Model Railway Tunnels
(Article written by
Metheringham and
saslord)


Introduction
Trains cannot usually go up steep gradients, this
meant that when the navies were building the railways they
either had to go around hills following the contours or they had
to dig cuttings so the railway would stay relatively flat as it
went over high ground. When the ground became to steep or high
for a cutting to be dug successfully tunnels were built.

On model railways tunnels are often used to hide things which
may make a layout look unrealistic. You will have probably
noticed that allot of layouts have tunnels to hide steep curves
in the track which are unrealistic. Tunnels are often used as a
divide between the layout and the fiddle yard.
Even as a feature on their own they can bring needed depth and
scenic interest to your layout at a very low cost.
Things to Consider
-
In real life tunnels
were/are expensive to build so often a cutting is carried on
as long as possible before a tunnel is build.
-
The old steam trains
used to give off allot of steam and smoke so ventilation
shafts were sometimes built in the tunnels to take the smoke
out into the air, also for the same reasons tunnels were
quite high compared to the trains going through them, again
to let the smoke out into the air.
Tunnel Mouths
Where a railway (or road
for that matter) enters a tunnel there is a structure holding
back the soil and rock, this is the tunnel mouth.
If you want a tunnel on your model railway it is a good idea to
first decide how you are going to obtain a tunnel mouth. You
could decide to build one from scratch, build a kit or buy a
ready to use one.
If you are going down the route of making your own from scratch
here is a template sheet which you can download, print off and
cut out for use for a double track tunnel mouth in either OO or
N gauge. Find it
here (Adobe PDF - 6Kb).
For the kit way of doing it there is
Scalescenes and
Metcalfe
to name just a couple of brands which you can buy a kit of some
tunnel mouths.
Ready to use tunnel mouths are available from
Peco
and Hornby,
again to name a couple.
Real Train Tunnels


From
railwaypictures.co.uk
OO Gauge
Tunnels
("Described below is
how I made my railway tunnel" saslord)
Introduction:
From the very start of may
layout plan I had wanted a tunnel on my layout. The corner chosen to have the
tunnel built over it was picked because it had the sharpest bend which looked
too sharp for the main line express trains.
I did have the problem of having three tracks going in (merging into two tracks)
and two coming out. This meant that I could not buy standard tunnel ends and
thus would have to build my own.
After deciding on the position of my tunnel ends, I made some tunnel template
(card template would be best) to test the loading gauge of my longest and
highest trains (highest being a class 90 with a pantograph up) on all the lines.
The tunnel templates where then transferred onto some 5mm ply board where I drew
out a tunnel shape. Using my jigsaw I then cut out two tunnel shaped ends and
sanded them to take out any imperfections in the cut. They were then positioned
on the layout to test that the loading gauge was still good.
To cover the tunnel I decided to use more 5mm ply board. I first put the sheet
of ply board over the ends and then marked where the entrances were. I then took
the ply board off and roughly drew up some lines to indicate the shape I wanted.
I then cut out the shape with my jigsaw.
The roof of the tunnel was connected to the entrances by using some 2 X 1 (cm)
to make the join. The 2 X 1 (cm) was first screwed to the top of the tunnel
entrances which then created a platform to support and fix (screw) the top piece
of ply board to. an additional piece of 2 X 1 wood was screwed to the far corner
of the tunnel to support the back.
The covering: To fill in the sides of the tunnel I decided to use some leftover
wire mesh and papier-mâché. The wire was cut and moulded to shape, and then
fixed to the top of the tunnel using some screws (see picture below). Glue was
added to make sure the wire did not break free.
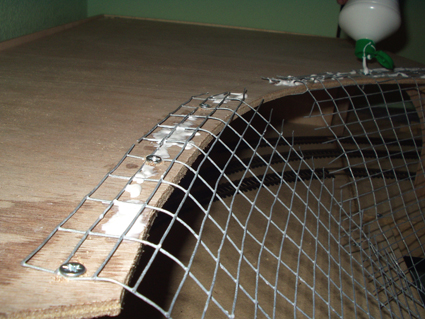
The wire mesh was mainly there to act as support for the papier-mâché.

The paper-mache:
Paper-mache is a simple and cheap way of creating topographic (hill) scenery.
Paper-mache is simply made by layering strips of newspaper, which have been
soaked in a mixture of PVA glue and water, over each other. By building up
layers of overlapping strips (best to alternate the direction of the layers) you
can build up a strong mass of paper and glue, which becomes ridged when dry. The
wire I used will give mine added strength.


The story will continue shortly.........
N Gauge
Tunnels
On my layout I have decided to use a tunnel to disguise the
steep corners and disguise that my layouts track is in a loop.
For my tunnel portholes I have gone down the route of buying
some ready made, which I can place on my layout ready and later
paint to add realism. The particular tunnels I have used are
peco double track N gauge tunnel portals.

Usually on a layout you
can see about the first four inches into a tunnel so for this
reason I chose to make the first 5 inches of the tunnel with a
tube. I quickly realised that a toilet tube cut down it's length
with around 7mm cut off was the perfect size to fit onto the
tunnel mouth - and as a bonus it was already curved.

After reading a comment on
the forum about making tunnels dark came my next idea, to make
some brick paper faded to black. You can download this
here (JPG Image - 47Kb). I
trimmed the brick paper down to size and stuck it to the inside
of the tunnel with a glue stick. I glued the toilet roll with
brick paper onto my tunnel mouth using super glue.
The next step was to place it on my layout. I carefully
positioned it and tested it with some carriages to make sure
that none would scrape on the side of the tunnels inside. All
was okay so I proceeded and stuck it down with a hot glue gun,
but I guess almost any glue would do.

The tunnel is now ready for some hard landscaping - which is
covered on this site
here - I look forward to
doing this at a later date.
[back to the top]
|