|
Building a Layout
(Step By Step)
Contents
-
-
-
-
-
-
-
-
There are two main track manufacturers, Hornby
and Peco. They can both be used together, costing about the same although
they do look slightly different. For my layout I have used Hornby track as I
prefer the look and it is more readily available.
There is also two types of track, coated steel rails
and nickel silver rails, again both can be used together, but the steel rail
takes more maintaining. See track maintenance for details.
Step 1 (Design)
The layout of your track is very
important and there are a few things you need to consider before you start
purchasing items and building:
Gauge: Gauge is basically the distance between the rails. The main
gauges are (in descending size order) O, OO, HO, and N. OO gauge is the one most
British modellers use. It is the gauge Hornby use and the gauge I used. This
websites information can be used on all but the N gauge layouts as N gauge is so
much smaller. If the room you have is limited N gauge may be your best bet, but
I find it too small to model. Equally O gauge is too big, for an indoors railway
but is perfect of a garden railway. Gauges are discussed in more detail on the
FAQ page.
Track: There are many things that can go wrong when laying track
from the initial design of the route to the to the construction of tunnels
and inclines. There are also some layouts that are not possible to build
without special wiring. This site has a whole page dedicated to track. The
types, the manufactures, the problems, the pitfalls, the theory. So read
The
Do's and Don'ts of layout track.
Layout: Here are some
possible layouts
Who is it for? and What is it for?:
If you are building a layout for your children consider the playability of the
layout. It is less likely that you need lots of fine detail, and more likely it
needs to survive children using it. Also think what children like. Consider
bridges, tunnels, and roads. They may want to play with there matchbox cars on
it. consider the rolling stock. Wagons that hold things (e.g. trucks, flatbeds,
car transporters) are more fun than wagons that don't (e.g. tanker). When making
buildings make them extra strong. However if this is a layout for an adult, just
coming back to the hobby. it is more likely you will want detail and realism.
In terms of "what it is for" consider whether
you are intending to make a high detailed layout or something fun you can
play with. Decide now because the two are not really compatible. realistic
layouts don't have much moving action and little track, where as a fun
layout is total imagination and can be as packed full of fun things as you
like.
Station: If
you are planning to have a large station you may want to position it on the
board at the same time that you start positioning the track. You may need to
make room for it at the edge of the base board or take out a siding to make
room for it.
Length of Train/Carriage:
In the same respect as the station, the type or length of the carriages
should be considered so that for example the station or sidings are long
enough to fit them. There is nothing worse than purchasing some new rolling
stock to find they don't fit in to the siding.
Important: Some of the newer locomotives/carriages are not
suitable for the tight radius (radius 1). Such as the euro star or any of
the mark 3-4 carriages. Not that they won't run but they are so long that
they stick out too much and look strange. In the case of some of the fast
locomotives like the Hornby Eurostar, they are simply to fast for the tight
curve. I also don't advise running the Euro star locomotive on its own on
second radius track, it is simply too fast even for that radius.
Points: These should
be placed at the front of the board or along the sides if accessible. If
placed at the back, point motors will have to be used.
Sidings: Sidings need
to be accessible so that you can uncouple wagons or unload goods. In my
opinion they are the funniest part of a layout and need to be at the front
or in the middle of your main oval tacks.
Roads: In my opinion it is best to position a
road crossing in the corner as it is space which is usually wasted. Peco are
the only company which I know, that produce crossings for curved track.
They do crossings for all three radius of curves (brought separately) that
lock into each other to make a seamless crossing.
Number Running of trains:
If you simply want to run as many trains as you can at the same time you are
best to use all three of the standard track radiuses to make three ovals. If
like me you like the idea of having lots of sidings you may want to reduce
the number of ovals to increase space for a shutting yard.
If you are using Hornby Track Mat then your layout is chosen for you.
[back to the top]
Step 2 (Building your Baseboard)
Everything you need to know about baseboard
construction is covered on the baseboard page. With design made you should
know what type of board you will be construction along with its ruff
dimensions (size)
[back to the top]
Step 3 (Choose You Ballast)
After choosing a layout you need to
consider the method of applying ballast. This needs to be done before you can
start laying the track as some preparation may be needed to the board. Also the
method used needs to fit with both the functional needs of the layout as well as
the visual aspects. There are several ways of fixing ballast around the track.
These methods are described in detail on the
scenery pages.
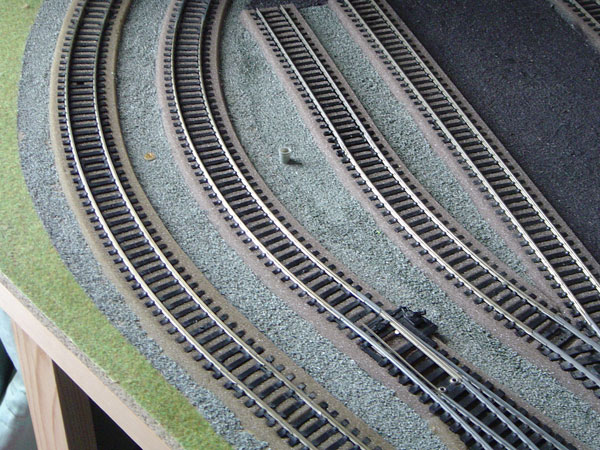
My Method: I used the foam track to get the dampening effect and because
it was quicker and easier than gluing aggregate between the gaps in the
sleepers. I used aggregate (method one) in between and around the track to
make a more realistic ballast bed. (Illustrated
below) I found very quickly that because I had to put the baseboard
away when not in use the aggregate often started to fall off, showing the
colour of the baseboard through. To reduce the impact of this I started to
paint grey where I wanted the ballast to be placed, before I glued the
aggregate over the top, so that if any gaps emerged it would simply show a
grey area popping through which was barely noticeable.
N.B. Ballasting with glue is semi-permanent. Before doing this make
sure that any point motors are installed and tested and then removed before
you carry out the ballasting on any points. If glue gets in to the point
motor it will most likely result in the point not operating correctly.
[back to the top]
Step 4 (laying the track)
This is a simple process of nailing
the track to the board with track pins. It is best to put together a full oval
of track before you start to pin it down so that adjustments can be easily made
without the need to unpin track. Do not pin every hole as it is unnecessary and
time consuming. Pin every other hole, or less on longer sections. I found that
it was easier to use pliers to push the pins in to the board, than to hammer
them in.
You may want to consider drilling holes for
point motors, signals, and track power cables before fixing the track down.
[back to the top]
Step 5 (Signals and point motors)
Power source:
If you decide to use point motors or to have
operating signals you will need an independent power source to operate them.
You can't run them from the track. If you have a newer Hornby power
supply you will find it has a built in accessory power supply outlet of 16
volts. This has been designed for Hornby accessory such as point motors,
signals, turn table...etc. The Hornby system does take some of the hard work
out of putting in electronics, but expect to pay highly for them.
Point motors:
There are other manufacturers of point motors.
The point motors I used on my first layout were SEEP which, have a built in
switch that allows one switch to control both point motor and signal (or
anything else you would like it to control). I found that these point motors
required more Amps than the Hornby controller could give out. I now use a
Gaugemaster controller, which has a life time warranty and costs no more
than the Hornby model. It also gives out more amps so it can operate my seep
point motors and it reduces the number of times my trains stall. Hornby
probably keep their amp levels down as they are catering for children.
I have now had some experience with the Hornby
point motor and I must say they work very well and come with good
instructions. They also come with wires attached so that no soldering is
needed. Just use a terminal block (available at most DIY shops) to connect
longer wires to them to reach to the power supply and switch. The Hornby
switch system is also very good but very pricey. I would recommend simple
cheap toggle switch that return to the off position automatically
(on-off-on).
Signals:
The two types of signal (the arm and the light
signal) need to be placed appropriately. The arm ones need to be within arm
length as they are manually operated and the light signals need a power
source. The arm signals are relatively cheap £5.70 but the light ones are
not (£13.50 Hornby). Decide where you need them the most and only place them
there. Remember they will need to be removed if you have to put your board
away. The
electronics page discusses this further.
[back to the top]
Step 6 Testing
Once the track is installed and the electronics are
in (points, signals etc..), its time to test it all. Everything needs to work
reliably. Check that the trains don't derail at the points and that the point
motors move the points freely. Best to fix any problems at this stage when
adjustments will be hidden from view. Its also a good time to see if the layout
you decided on lives up to your expectations. You may find that you don't have
enough sidings or that the ones you have don't fit your latest purchase. Fell
free to change your layout because it will be much harder to do later. You may
have to put in more work but it will be worth it if the layout forfills your
requirements.
[back to the top]
Step 7 Scenery
Once all the electronics and track are working well,
its time to decorate the layout. This part of modelling either fills a modeller
with dread or excitement. No matter what your craft skills are, you should be
able to produce a nice looking layout, whether building from scratch or from
buying ready made. All aspects of scenery are discussed in the
scenery section.
[back to the top]
Step 8 Enjoy or expand.
When your scenery is finished its time to sit back
and enjoy running your trains. Remember your track will need constant cleaning
to ensure that the trains run well. If like me you then want to continue the
building stage, how about building an add-on. I found with my layout that I got
tired of taking the trains on and off when it was time to put the board away.
Because of this I built a set of sidings as a shelf illustrated below:

I linked this new shelf to the main board with a
removable section Illustrated below. I later added removable power leads
from the shelf to the main board to power the point motors. This allows me
to simply drive my trains on and off the layout reducing the time taken to
set up. Although I tried to incorporate large siding into the main model I
found they were very constricted in length as they had to fit in the centre
of the board to maximise the length of the running ovals.

Many of the skills I learned from creating my
oval layout were incorporated in to the shelf. This shelf has a control
panel (illustrated below), all points have motors, most points have signals
(illustrated below) which I built from scratch, and the maintenance shed has
lights inside and out to illuminate the trains. All the track is ballasted
using the PVA glue and water mix which makes it look very real.

This model was of a much higher quality than my
first attempt. I am glad now that I decided to use the foam underlay as I
have the opportunity to reuse the track and start with a new oval which will
hopefully be of a higher quality. I recommend that anyone new to this hobby
should use the sponge underlay or to experiment before using the more
realistic scatter method.

[back to the top]
|