Model Railway Trees


Contents
-
Positioning advice
-
Hornby Skale Scenics
Sycamore Tree Kit (R8944)
-
Making Trees from Sea Foam (by Pete M)
-
Ready Made Trees (Reviewed)
Intro
There are many manufactures of model trees, suitable for any
gauges of model railway and buying them is often a quick and depending on
manufacturer relatively cheap way to cover your layout in trees. The quality,
look and price of the trees varies drastically between manufactures. If you
don't like the idea of making them read the reviews of trees I have experience
of below. click here
If on the other had you want to spend the time to make your
layout look unique and actually make your trees and bushes you couldn't do
better than to read Pete M's article on building Model Railway Trees for Sea
Foam.
If you personally have a method of making realistic model trees
please let me know so I can post it here. Email me at
info@newrailwaymodellers.co.uk
Model Tree
Positioning Advice
When positioning your trees try to bare in mind the
loading gauge of your
widest and longest rolling stock. Better to find out if they are too close
before you glue it in place.
In the past trees were cut down near railway lines due to the
problem of leaves on the line. This is especially the case near stations as
leaves can make it impossible for a locomotive to pull away after taking on
passengers. On the Lincoln to Peterborough line trees have been cleared from
around stations for this very reason, and I would assume this is a practise on
other lines.
There was also the danger of fires caused by the burning embers
from the chimneys of steam trains as well as sparks from the tracks. Nowadays
burning embers are not a problem but the proximity of large trees to overhead
power lines are. Trees can be brought down in windy conditions, blocking the
line and bringing down the power cables as well. Tree branches can also trip out
the power lines resulting in them having to be reset.
Bare in mind this information when locating your trees. Or like
me and many other modellers, ignore it and just make your layout look good.
[back to the top]
Hornby
Skale Scenics Sycamore Tree Kit
(R8944)
 This
Sycamore Tree Kit includes 16 flat tree armatures with three
bags of fine
foliage clusters.
You will also require (but is not included) some glue to secure
the foliage to the armatures. I would recommend a glue spray
such as
Deluxe Scenic Spray. This
Sycamore Tree Kit includes 16 flat tree armatures with three
bags of fine
foliage clusters.
You will also require (but is not included) some glue to secure
the foliage to the armatures. I would recommend a glue spray
such as
Deluxe Scenic Spray.
 First
of all you will need to bend the branches of the tree armature
to the desired 3 dimensional shape remembering that trees are
not perfectly symmetrical. I would use some pictures of real
trees to guide you in shaping the armature. First
of all you will need to bend the branches of the tree armature
to the desired 3 dimensional shape remembering that trees are
not perfectly symmetrical. I would use some pictures of real
trees to guide you in shaping the armature.
Once you have the armature into a shape you like, take some of
the foliage out of the pack and pull it apart without detaching
pieces from the whole. Spread this over the top and spread it
over the branches.
What you are trying to do is create the outer shape of the tree.
You should try and ensure that none of the branches are sticking
out beyond the foliage.
 Once
you are happy with the shape you have created, simply spray some
clear drying glue over the top (I used
Deluxe Scenic Spray) and sprinkle over some of the loose
foliage scatter that has fallen off. Once
you are happy with the shape you have created, simply spray some
clear drying glue over the top (I used
Deluxe Scenic Spray) and sprinkle over some of the loose
foliage scatter that has fallen off.
To the right you will see Hornby's representation of this kit in
use and above and to the left is my second attempt.
From looking at the ready made trees in the
Hornby
Professional Skale Scenics range you can see that the
materials in the kits are the same. I would expect that after
some practice you could create trees that look as good if not
better. For the price of
£8.99 (RRP) you have the potential to make up to 16 trees
which I think you will agree is a bargain.
Click here to see a video of
me making a tree with this kit.
Sea Foam:- Quick and
easy, great looking trees.
So you’ve finished the landscaping, you’ve covered every inch
with scatter and your mind now naturally turns to trees; that essential feature
that takes you from wasteland to landscape. So what are the options? Well as in
nature there are endless different varieties to choose from, the most common
being the array of ‘bottle brush’ trees.

The effect can vary from unconvincing (far left) to not too bad
(2nd from left), strange topiary (3rd and fourth from
right) to strange continental (5th from left). The little cherry tree
on the right being a nice ‘architectural’ cherry tree from ‘Busch’, ok on it’s
own but hardly suitable for a wood. On the whole the effect is unconvincing and
in large numbers will give your layout a strange German Expressionist landscape.
So what’s the solution? You could try etched brass:

(Authors view of etched brass trees.)
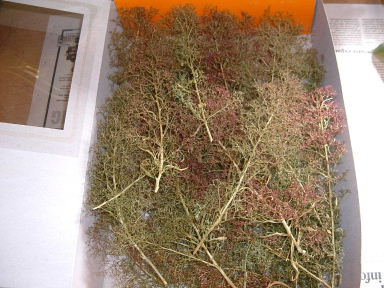
Or you could try Sea Foam. Still not the cheapest option, but if
you’ve spent a few hundred pounds on rolling stock and locos, endless months
building and testing your layout, why compromise on the scenery. For £20.00 you
can buy a big box of Sea Foam (I think smaller boxes may be available).
Assuming you don’t want bare trees in mid winter, you will also
need, some fine foam flock (about £1.40-£2.00 a bag), and a spray adhesive
(£5.00+) (diluted PVA in a plant spray will work). You may also have to hand a
scissors, craft knife, tweezers and a sieve.

Production is quick and simple. Select a stem of sea foam,
trim/pluck to your desired shape and size.

Spray all over with adhesive and sieve the flock onto the
‘sticky’ stem, make sure you give it a good coverage, although bald patches can
be touched in after.

A quick shake, to remove the excess, and put to one side to allow
to dry.

Instant tree in less than a minute. And a wood in less than ten
minutes!

Planting on your layout is easy, drill a small hole just smaller
than the stem, dip the base of your tree in neat PVA and insert. You may wish to
cover the excess glue with a bit of fine scatter.

The bushes around the tree are coarse clump foliage
For even better trees, mix various shades of flock to achieve a
more varied colouring. The finished trees can be airbrushed with some
highlights. The trunks can also be painted to give variation in colour, pretty
much anything you fancy!
Depending on the size of tree you make, a box should provide you
with at least 40 good trees, any clippings and scrags can be utilised as
undergrowth, nothing is wasted. They make great specimen trees for your main
scenic areas, but similarly good coverage for the backgrounds. The final trees
probably cost in the order of 50p-£1.00 each, less than a better than average
bottle brush. Savings can be made in making small trees (so you get more for
your money) also you can use up all your excess and left over scatter and flock
for foliage, (even static grass looks good!).
Give it a go, you won’t be disappointed!
[back to the top]
Manufactured Model Tress
Reviewed
If you are not interested in making your own trees your only
other option is to buy them. There are an endless number of manufactures but
I can only speck for the ones I have purchased.
In the past I have used Gaugemaster trees. You can buy an
assorted bag for £10 which will have more than enough trees of different
sizes to fulfil you needs.

A. Gaugemaster tall model tree large pack 10+
B. Gaugemaster model apple tree £3+ for three
C. Gaugemaster small model tree in blossom. Large pack £10+
D.
K & M Large model deciduous tree. £1.50 each
Model tree "B" and "D" are my favourite and are also the most expensive. I
like the "B" because it is not un uniformed shape. Trees very rarely grow
perfectly round unless they are conifers (and I should know as I have a
degree in forestry). Best to pick a variety of trees to give a more
realistic look. Although the large Gaugemaster trees packs are cheap, the
packs contain trees that are almost identical (except in size and blossom)
and that have the same uniformed roundness, which is not often found in
nature. They are great for an avenue of trees were uniformity is what you
are looking for.
If I were to buy ready made trees I would go for the
Hornby Professional
Skale Scenics range of trees as they produce a far more realistic look
than any of the above mentioned trees.
[back to the top]
|