|
XTrkCad -
Model Railway/Railroad Layout Design Software
Author
"mumbles
and
Ironduke"
(forum members)
"XTrkCad is a CAD program
for designing Model Railroad layouts. XTrkCad supports any
scale, has libraries of popular brands of turnouts and sectional
track (plus you add your own easily), can automatically use
spiral transition curves when joining track and has extensive
on-line help and demonstrations. XTrkCad lets you manipulate
track much like you would with actual flex-track to modify,
extend and join tracks and turnouts. Additional features include
tunnels, 'post-it' notes, on-screen ruler, parts list, 99
drawing layers, undo/redo commands, benchwork, 'Print to
BitMap', elevations, train simulation and car inventory."
(Programmers Description)
Review: Using
XTrkCad can be tricky to start with, but once you get the hang
of it, it is very versatile, better than the Hornby software
that I've used. I find the track plans look stylish. Also it
just seems more serious, not like a toy/game like the Hornby
software does. The amount of different track gauges is pretty
extensive too. If you were really going to delve into it you can
design your own points too. Below is an N and an 00 gauge layout
that I've designed using XTrkCad


To download an file on this
page, right click the link and choose "Save target as" for
Internet Explorer or "Save link as" for Mozilla Firefox
Download:
XtrkCad
Created By:
Sillub Technology
To register, use this free registration
key:
Name:
Open Registration
Key:
248890010702
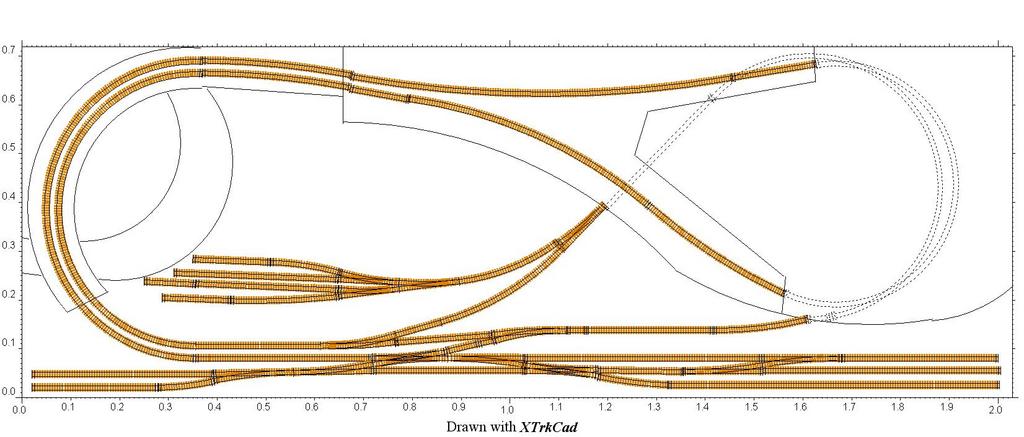
XTrkCad Designed Layouts
Oval with fig 8

This took only 1.3 metres off the end of the room
leaving enough space for the dining table but I worked out that
I wouldn't be able to reach to open the sliding window on that
wall (not shown at the top of the plan). Besides, it was all
track and had a rather unprototypical fly-over across the
middle.
Download a copy of
Layout01.xtc
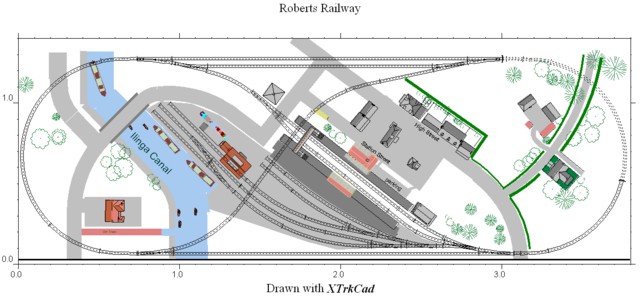
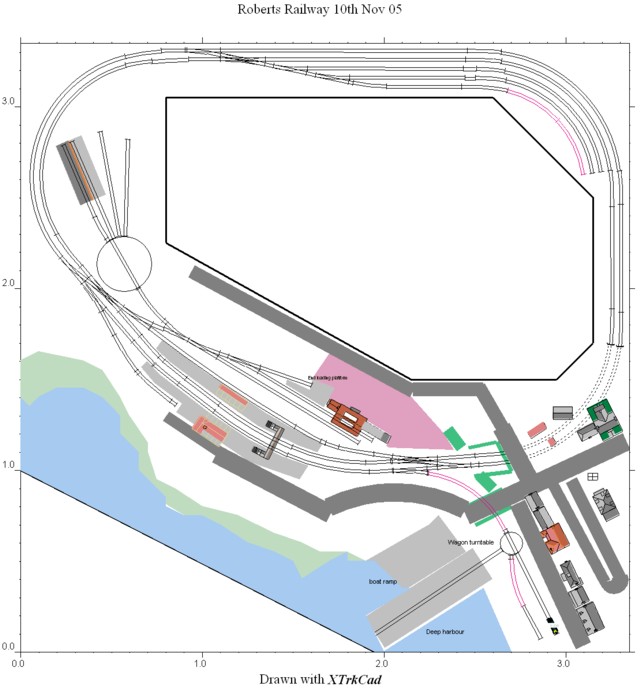
Loop with central operating
well

After a while my wife asked me why I was lurking
around the walls instead of using the whole room. I replied that
I always was like that but I scrapped the L shaped plan
and went for a full loop instead. I was determined to have a
fishing port on my layout but it was proving very difficult to
fit in.
Download a copy of
Layout06.xtc
For more XTrkCad Model Railway layout designs
visit Rob's
Railway Pages
Help and Advice with getting started Using XTrkCad
These two files add Hornby points and track sections to your
XtrkCad tool bar in both OO and HO scale.
Instructions:
Right click on these 2 links and choose "save target as" (for
Microsoft Internet Explorer) or "Save link As" (for Mozilla
Firefox) and save it somewhere that you can find it e.g. the
Desktop or "My Documents" (that's
your My Documents not
mine)
1.
images\xtrkcad\HornbyHO.xtp
2.
images\xtrkcad\HornbyOO.xtp
copy the files to
\program files\xtrkcad\params
In XtrkCad go to
Files,
Parameter Files and
browse for HornbyHO.xtp
and HornbyOO.xtp
lots of Hornby things will appear on your tool bar.
Note that for ease of use Xtrkcad is used in HO for both
HO and OO, this allows the use of HO scale items in OO
scale and vice versa. If you use XtrkCad in OO scale
there are no parameter files, except for trees and
control panel items common to all scales, unless you
edit the ones you have. The Structure Parameter files
contain only those kits which I've used on my layout and
the part numbers are not accurate. The Hornby Track file
is complete to my knowledge.
How do you delete and join
tracks?
To delete, move or
rotate tracks:
click the Select button
 and click on the object you wish to select - it will go red.
Be careful, if you have selected anything before without
UN-selecting it they will also be effected by whatever you do
now. To unselect everything first press the
Esc key on your keyboard.
To move hold Shift +
left mouse button and
move the mouse.
To rotate hold Shift +
right mouse button and
move the mouse.
To delete press the Delete
key on your keyboard.
If you like you can go to Options, Command and change the
default command from describe
 which show information about things you click on, to
select
which show information about things you click on, to
select
 which selects.

To join two tracks click the
join button
 then click on two unconnected ends of the tracks you want to
join.
then click on two unconnected ends of the tracks you want to
join.

To set baseboard size
First go to Options menu, Preferences and set either English
(imperial) or Metric
Go to Options menu, Layout, set room width and height to the
dimensions or your baseboard and choose your scale
Can’t find 00 track?
No 00 track- select H0 instead
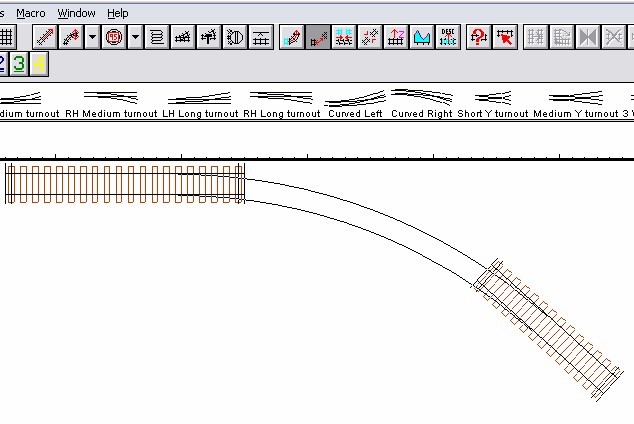
Getting Started
Try laying a point first then click on the "modify or extend"
button. now if you left click on any end of the point you can
extend it straight, if you right click you can extend in a curve
How do I get the track view - at
the moment it's just lines?
you can change the scale at which 2 rails show instead of just
lines by going to Options menu, Display and changing the value
of "Two rail scale". The default is 16. The 3 zoom buttons are
in the top left corner. If you click the middle button the list
of scales are there... note this is the scale of the screen not
the scale that you are modelling.
I have down loaded the program
but do not have any track all I can use is a flexi track. I do
not have any points. Am I having a blonde moment or do I need to
add or change something to the program?
In Options menu, click
Layout and choose HO, not
OO, there is no track for OO.
Also make sure that in File,
Parameter Files you have Peco HO Scale Turnouts (if not,
Browse for pecoho.xtp) and, if you've downloaded it from my
website, Hornby Points and Track Sections
(HornbyHO.xtp
right click the above link and choose
save target as,
copy the file into c:\program files\xtrkcad\params
In XtrkCad click Files,
Parameter Files and
Browse for the file)
Can I ask if anyone using
Xtrkcad has noticed any strange behaviour in their Add/Remove
Programs section of Windows XP?
After installing Xtrkcad I noticed a large black space
within Add/Remove Programs where I would usually expect to see a
list of applications. I've been told this behaviour happens when
certain CAD software is installed. After un-installing Xtrkcad
the 'black hole' went away.
This in no way affects the running of the program and is only
really relevant to sad people like myself who notice these
things.
I have been told that some CAD software includes a negative
value in one of the registry entries and this is the cause of
the 'zebra crossing' in the Add/Remove programs.
Uh, how do you post a screenshot
of the layout?
you can also print to a bitmap file under File menu in XtrkCad.
Choose a scale of 8. You have to convert the picture to a JPEG
(and resize it usually) or it takes too long to upload.
How do I join a crossing to a
turnout. I've laid the turnout but the crossing keeps using the
wrong track to join. How do you lay curved track? I want
it to curve right but it will only curve left? If I turn it, it
automatically snaps back when it reaches the laid track.
yep it's the same, Shift + left click changes the sticky end of
the point or track section.
Hey, is there any way to set
Xtrk to print the entire layout out, in full size, on A4? So
that I can lay it on my baseboard and build on top of it?
1. Go to File and Print
Check in Setup that you are printing to the right printer and
paper size (A4)
2. Set the Scale to 1
I usually choose to ignore margins so that sheets can butt right
next to each other, otherwise you have to overlap the edges or
cut them off.
Click Print Roadbed Outline if you are using roadbed (AMI or
Foam underlay or woodlands or cork)
3. Choose Portrait or
Landscape
At this point you'll notice that lots of rectangular boxes
appear on the plan. These represent pages. Click to highlight
the pages that you want to print (just do 3 or 4 as a test at
first)
Click Print to print :^)
How can I find out how long all
the track is, excluding points/crossings? So that I know how
many yards of flexible track I need...
Highlight the track (or anything) that you want a list of (or go
to Edit menu and choose select all to do the lot) Go
to File menu and choose Parts List
And
finally . XtrkCad beginners guide.... ummmmmm.
1. If you're modelling OO, set your layout to HO:
there's no track for OO in there. IE Peco Streamline track is
there but it isn't called OO, same stuff though. If you're using
Hornby track or peco Setrack include hornby3r.xtp in Parameter
files (Ctrl-Alt-S)
2.
XtrkCad is really designed for Flexible track, its very
difficult to construct a layout with set radii but not
impossible. Just use flexitrack and Peco streamline points,
they're better :^)
3. For
beginners set Easements to none (click the button that says
"Easements" on the tool bar) Easements make for a better railway
but the warning noise will drive you mad! You can change this by
changing the default beep in Windows (Start/Control Panel/Sounds
and Audio)
4. Set your
minimum track radius in Options-Preferences. Any curves tighter
than this will show in Red, the default is about 60mm (or
whatever the closest imperial measurement is) so if you're
designing a layout using sectional track radii, the whole lot
will be red! (Personally I wouldn't go under 55mm just because
that was the radius of the circle I got with my first train set)
You can also set "English" or "Metric" measurements here.
5. Click
options-layout and set the height and width of your table if its
a plain oblong table or your room if the layout is "L" or "U" or
"other" shaped. This is also where you set your scale, choose
HO, N or Z (it also has other scales like P4 and On3)
6. For
an oval, start with 2 circles( the button with a circle and "95"
in the middle). You can set the radius here (bottom of the
window) or change it afterward with the "?" button. Then join
the 2 circles.
7. For a
point to point layout, start with a straight or a point.
8. Use
the "modify or extend" button to run your track, left click
extends a track (or a point) in a straight line, right click
extends in a curve. Get the hang of this, it's my favourite part
:^) everything makes sense once you master this.
9. Use the
parralel button if you run a double track. The default
separation (in HO) is 2" (50mm) this fits with Peco streamline
points exactly. You'll need to change it if you're using Hornby
or Peco settrack points.
It will take a bit (or a lot) of
practice before you get anything that you want to keep but it's
worth it.
I hope that helps. All credit to
Rob
Ironduke who has guided us all on the long lonely road
through xtrckcadland. I just cut and paste! Michael
[back to the top]
|