With the plasterers in, skimming over acres of hideous 70s artexed ceilings there was nothing much I could do so I decided to crack on with the clerestory conversion. I wasn't holding out high hopes as this was an experimental botch: it seems to have progressed reasonably so far however, with the usual commitments to compromise.
This is a risky stage however, things always look better before they are primed, when all sorts of flaws flop out of the woodwork. Anyway.....
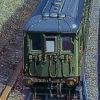
The chassis was the first to receive attention. Now, for those unacquainted with the old Hornby 6-wheel chassis, it was fine in its day, with an ingenious design that allowed it to travel through the most impossible radii without derailing. The first photo shows how this arrangement worked. By today's standards it is ridiculously crude but that wasn't the reason for adapting it. As built, the chassis would not allow for the fitting of footboards because the centre axle-unit needs to move radially through even the slightest curve. This movement is actuated by rods attached to swivelling couplings. I wanted footboards, so the mechanism had to go.

I cut away the couplings, removed the articulating rods and pulled out the centre axle-unit to produce this [photo taken after footboards were fitted]:

The easiest way to remove the couplings and their brass fittings is to use a Xuron cutter. The centre axle-unit then had its wheel removed and the flanges filed down so that the wheels would rest flat on the rail top creating, effectively, a 4 wheel chassis. This sounds crude but it works well in practice and is virtually invisible from normal viewing distance. I retained, with some regret, the original Hornby wheels. Although plastic they are at least metal tyred but replacing them would be difficult because the axle-units are cast and inflexible, preventing scale wheels from being 'sprung' into brass bearings. Next photo shows the flange-less wheels.

And another look at the foot-boards. The lower ones will receive hangers ion due course.

The body was then cleaned up and glued together. Plastic strips were glued inside first to ensure a good alignment and the whole was then glued up, pressed against a steel rule to keep everything square. Not a bad join really, given that the units were cut by eye. Some Squadron putty will be applied later to fill the cracks and disguise the joints. It should be 95% successful.
Boy Scouts and other keen-eyed observers will notice that there is one window too many in each side. I thought about painting the errant windows white, to represent a toilet compartment. I've decided to leave it as it is however as most will never notice it. This was an inevitable consequence of using the Hornby chassis, which dictated the length of the body.


Finally, the roof was measured out and cut up and the photos above show a dry fit. It was also need some putty filler but should come through well.
More in due course..............
Tony