
A lot of people are a bit apprehensive when it comes to DCC; many beginners warily contemplating it are put off by the prospect of computers, compatibility, and -above all- wiring. The advertising propaganda put out by manufacturers, despite their best intentions, doesn't really help newcomers to DCC, who can be bewildered by the various terminology. That's why I'm writing this article.
So: What is DCC?
The fundamental question: what exactly is this fancy digital system? There's a long answer and a shorter one. To avoid confusion, I won't go into any of the techie stuff about how the electronics of DCC work because unless you're building your own system, it isn't really relevant.
The best way to understand DCC is to think of a full size electric railway, such as the London Underground. Power is constantly supplied to the trains by conductor rails. The train driver on board each locomotive is then able to use this power to regulate the train's speed by controlling how much goes to the traction motors.
In model form, the principle is the same. The difference is that instead of a miniature driver, we fit each loco with a small electronic decoder, which receives power directly from the track. Unlike conventional DC systems, this power is always on. This way, the locos are all separated from each other.
Instructions are sent down the track by the controller and picked up by each decoder. If the command is intended for it, a decoder will respond accordingly, such as to increase its speed or switch on the headlights. If not, the commands are ignored and the loco carries on whatever it was doing. All locos can therefore be controlled independently of each other. With DCC, you drive the train and not the track.
Now, some popular DCC myths and misconceptions busted:
1) DCC means computer control.
Not necessarily. While DCC is ideal for computer control (as the DCC controller is already working in binary code, a simple interface is all that's needed for it to talk to a PC) you don't have to touch a computer to use DCC. You can (and most users do) control trains manually with a controller.
2) 'Wiring for DCC'
This one just won't go away. The prospect of 'wiring for DCC' often scares would-be newcomers with the thought of doing miles of complex wiring because of the more complex technology. Nothing could be further from the truth. Because you are controlling individual locos rather than sections of track, you don't need to set up isolating sections just to hold one train stationary while you move another- the loco itself is isolated electronically. All we need to do is power the track, avoiding short circuits.
There's still wiring to be done, as I'll show in following chapters, since we need to ensure the power gets to all parts of the layout without causing any short circuits. But it ranges from slightly simpler to a lot simpler than a comparable DC layout. 'Wiring for DCC' is nothing more thanwiring for DC with bits left out.
3) 'Two wire control'
Here's one you'll see in manufacturers' catalogues. This one is semi-true, actually, since there are only two main wires to the layout. However, on anything but the simplest layouts, you'll need extra feeds here and there to ensure continuity. Rather than wiring them all to a central panel though, all these feeds connect into the two main wires. So while there are only two wires leaving the controller, you will expect to see more than two connection points to the track.
4) 'Programming'
Another myth that sparks fear and confusion. What is wrong with this one is the choice of word. 'Programming' creates mental images of computers, complex program-writing and lots of effort and head scratching.
The fact is, you don't have to program anything to use DCC. Decoders come from the factory ready set up, and after installing into a loco will work right away. All you really need to do (unless you will only use one loco) is to allocate each loco a unique 'address' or running number (the default is usually 3). This enables the controller to communicate with each loco separately. However, this can be done with a few quick key presses and is very simple to do. After that, you can leave things how they are from the factory (which most of us are happy with under DC anyway)
Of course, there are lots of things you can alter if you want, but it's all optional. You can set up the maximum speed to something more realistic, or play around with the acceleration rate. If you just want to get something going though, you don't need to bother with any of it.
For the sake of clarity, I'll be using programming here, but feel free to read it as 'setting up', 'configuring' or whatever word you want.
Still to come:
Wiring the layout
Installing decoders
Any other topics I can think of (all suggestions noted)
NRM Article - DCC for beginners (Part 4 now up)
-
pete12345
NRM Article - DCC for beginners (Part 4 now up)
Last edited by pete12345 on Fri Aug 09, 2013 11:22 pm, edited 5 times in total.
-
easilyconfused
- Posts: 24
- Joined: Sat Feb 02, 2008 8:51 pm
- Location: Bristol, UK
Re: DCC for beginners
Very good !
I attend some of the UKTS roadshows at exhibitions that UKTS are invited to we usually have the DCC demo stand. We get the same questions most times and there are a lot of myths out there about DCC - you have answered some of them in that post and I see more is to follow
Any exhibition managers needing information can refer to http://www.uktrainsimlive.com/dccworkshops.asp or http://www.uktrainsimlive.com/mannotes.asp
Kindest regards
John
John

Re: DCC for beginners
I haven't been able to wrap my head around programming the DCC chip with speeds and directional lights, etc. Perhaps something to think about in the future.
-
pete12345
Re: DCC for beginners
There will probably be a section on decoder programming to come. Watch this space!
Pete
Pete
Re: DCC for beginners
Hi Pete
Excellent idea, yes DCC simply explained and a great help to all. Very interested in what you have to say about CV programming. Sometimes I find it a grey area and anything here helps.
Next w/end I am wiring in a couple more double slips and points if your interested I can photo wire by wire and explain.
m
Re: DCC for beginners
wow its actually a lot more simple than i thought one thing is price ino you can make it cheap ish with a dynamis and bachmann decoders but at a limit of £3 a week its pricy
proud modeller jake also known as Duke Jake the Bewildered of Mousehole by Sea 
anyone got n gauge track i can buy
anyone got n gauge track i can buy
-
pete12345
Re: DCC for beginners
Part 2: Wiring the layout
I mentioned earlier that the myth of 'wiring for DCC' is just that- a myth. However, as with any electric railway, there is wiring to be done, but because DCC controls the locomotives individually, there is no need to split the track into many sections in order to run multiple locos, making DCC layouts easier to wire than DC.
The principle of wiring a DCC layout is simple- supply power to all areas of the layout, avoiding the possibility of any short circuits.
The first thing to do, which really needs to be considered before laying any track, is the placement of isolating rail joiners. "But what's this!" I hear you cry, "he said there was no need to split the track into sections!" This is very true, however we must sometimes use isolating rail joiners to prevent the two rails touching each other. This can happen with live frog points, and sometimes with dead frog points as well (I'll explain about dead frog points later on)
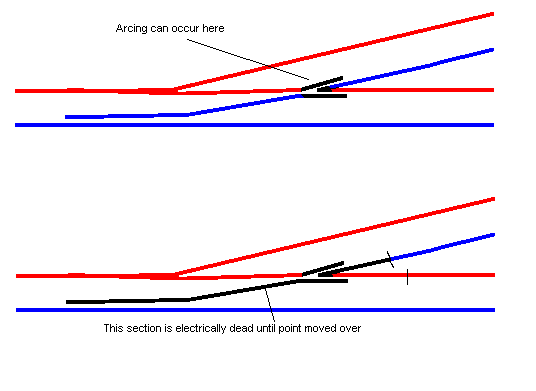
The most common situation where short circuits can occur is points. Use any live frog (electrofrog) point without insulated joiners and you are pretty much guaranteed a short circuit. The solution is very simple, and is shown below.

You can see where shorts would occur. Both rails on the non-selected track have the same polarity. The presence of any power feed beyond the point results in red meeting blue, and hence a short circuit. However, correcting this is very simple. Two isolating rail joiners must be placed on the inner vee rails as shown in black. Follow this simple rule and there will be no short circuits. Of course, this means that on an ordinary crossover, both rails will be isolated where the points meet, but it all boils down to the same rule.
To maintain continuity, we must also add extra power feeds to the tracks coming from the point. Theoretically, this is only necessary on the inner rails, but it doesn't hurt and is good practice to add them to the outer rails as well.
Dead frog points:
While I always recommend live frog pointwork, sometimes you have no option but to use dead frogs (if you are using peco setrack or hornby for example) In which case, I recommend using insulated joiners as for live frog points. While normally you would not do this (they are supposedly simpler to wire) you can sometimes get problems occurring when a metal wheel bridges the insulated gap at the crossing. This causes a short circuit as both rails are powered due to back feeding. Using insulated joiners will remedy this as shown. You might lay dead frog points without insulated joiners and never get a problem, but it's far better to take a thorough approach than have to alter things later on if problems arise. Remember though; this is not a DCC-only technique, and is equally applicable to DC layouts in places where the point is powered from both ends (for example, where a siding branches off from a main line)
'DCC friendly' points:
Here's another myth- you need special points for DCC operation. This is a bit misleading. When people convert their existing DC layout to DCC, you sometimes hear stories about how their system shuts down when trains pass over the points, and DCC gets blamed for this.
However, the short circuits that cause the shutdown were in fact occurring under DC anyway. Because DCC uses more complex electronics within controllers (compared to some DC controllers which can be a simple rheostat and switch) the short circuit detection is more refined and acts quicker. This means that a momentary short (which would be tolerated by a DC controller for a few seconds) causes the DCC system to shut down. This is a supposed case of 'DCC unfriendly' points. However, since the shorts were occurring on DC anyway, it is hardly fair to blame the new control system for the fault. The cause of the problem is electrically unfriendly points.
If you refer to the live frog wiring above, you can see clearly where the cause of the problem lies. The open blade of the point is very close to the stock rail, which happens to be at opposite polarity. An older loco with coarse scale wheels, or a wheel which is out of gauge, could bridge this gap and cause a short circuit.
It is sometimes possible to run a layout with points wired this way (I have done in the past) but a better method is shown below. You'll often see this described as 'DCC friendly', but it is equally applicable to DC layouts and is the recommended way to wire live frogs, regardless of the control system.
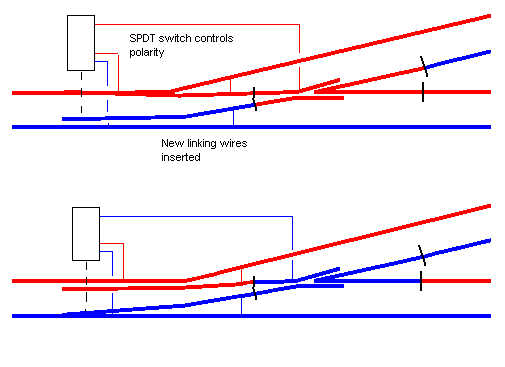
You can see that the point blades are now electrically separated from the crossing, and can be wired to the adjacent stock rail, ensuring the two are always at the same polarity. On points such as Peco code 75, the insulated gaps are there anyway, and one only needs to cut the two jumper wires on the back of the point, and add two new ones. On others such as Peco code 100, you will need to make the gaps yourself and insert pieces of plasticard into the gap. This is however quite simple to do, and is only the same as cutting a length of flexitrack.
With the point blade problem sorted, they are now no longer switching the crossing polarity. To solve this, we use a SPDT switch to do this job. If you are using peco or hornby point motors, the peco PL-13 switch can be attached to the motor. Seep point motors are available with a built in switch.
Note: While I've dumped this in to a DCC article with everything else, be aware that this is not a DCC specific technique. It is simply a better way to wire live frog points.
For the n-gaugers, I'm aware that n-gauge points are a bit more fiddly to convert than 00/H0 ones, making this modification more difficult. The clearances between the blade and rail are also that bit larger in scale terms, so you are less likely to get problems with the points left as they are. If you can modify them, do so, but it probably won't cause many problems to leave them. You can always add just the polarity switch to avoid relying on blade contact to carry power.
Connecting it all up
An example wiring diagram for a basic layout is shown below, and you can see how the basic rule is applied. Note how all the connections are either red or black, and therefore can be joined into a total of two wires (see the 'two wire' myth in part 1) On DC control, several of the red connections would have to be separately wired back to individual switches on the control panel. This quickly gets a bit out of hand on larger layouts, but with DCC the wiring remains relatively simple.
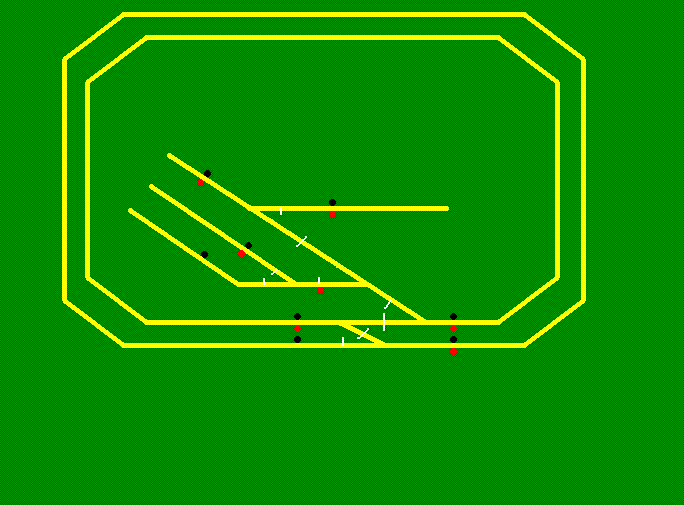
Once you have determined where to place isolated joiners and power feeds, it is time to start wiring it all up. The easiest way to do this is the 'bus' method. Rather than wiring each feed to the control panel, we can run a pair of wires along the layout, following the main lines (on smaller layouts, just run it down the middle.) Each of your individual feeds then connects to this central bus. The bus wires are connected to the output of the command station. This is where the simplicity of DCC wiring shows its advantage- the wiring can easily be kept neat and tidy, without a mass of cables all going to one place. You can use copper tape to form the bus, which allows you to simply solder the track feeds on at a convenient point. Alternatively you can use fairly thick wires.
With most entry-level units, a single unit forms a combined controller and booster. This must be fed by its own transformer, and this can usually be bought with the control unit. More advanced controllers often have a separate command station into which the controller (normally a handset) connects. Some have a separate booster as well, but the instructions will show how to connect everything together.
I mentioned earlier that the myth of 'wiring for DCC' is just that- a myth. However, as with any electric railway, there is wiring to be done, but because DCC controls the locomotives individually, there is no need to split the track into many sections in order to run multiple locos, making DCC layouts easier to wire than DC.
The principle of wiring a DCC layout is simple- supply power to all areas of the layout, avoiding the possibility of any short circuits.
The first thing to do, which really needs to be considered before laying any track, is the placement of isolating rail joiners. "But what's this!" I hear you cry, "he said there was no need to split the track into sections!" This is very true, however we must sometimes use isolating rail joiners to prevent the two rails touching each other. This can happen with live frog points, and sometimes with dead frog points as well (I'll explain about dead frog points later on)
The most common situation where short circuits can occur is points. Use any live frog (electrofrog) point without insulated joiners and you are pretty much guaranteed a short circuit. The solution is very simple, and is shown below.
You can see where shorts would occur. Both rails on the non-selected track have the same polarity. The presence of any power feed beyond the point results in red meeting blue, and hence a short circuit. However, correcting this is very simple. Two isolating rail joiners must be placed on the inner vee rails as shown in black. Follow this simple rule and there will be no short circuits. Of course, this means that on an ordinary crossover, both rails will be isolated where the points meet, but it all boils down to the same rule.
To maintain continuity, we must also add extra power feeds to the tracks coming from the point. Theoretically, this is only necessary on the inner rails, but it doesn't hurt and is good practice to add them to the outer rails as well.
Dead frog points:
While I always recommend live frog pointwork, sometimes you have no option but to use dead frogs (if you are using peco setrack or hornby for example) In which case, I recommend using insulated joiners as for live frog points. While normally you would not do this (they are supposedly simpler to wire) you can sometimes get problems occurring when a metal wheel bridges the insulated gap at the crossing. This causes a short circuit as both rails are powered due to back feeding. Using insulated joiners will remedy this as shown. You might lay dead frog points without insulated joiners and never get a problem, but it's far better to take a thorough approach than have to alter things later on if problems arise. Remember though; this is not a DCC-only technique, and is equally applicable to DC layouts in places where the point is powered from both ends (for example, where a siding branches off from a main line)
'DCC friendly' points:
Here's another myth- you need special points for DCC operation. This is a bit misleading. When people convert their existing DC layout to DCC, you sometimes hear stories about how their system shuts down when trains pass over the points, and DCC gets blamed for this.
However, the short circuits that cause the shutdown were in fact occurring under DC anyway. Because DCC uses more complex electronics within controllers (compared to some DC controllers which can be a simple rheostat and switch) the short circuit detection is more refined and acts quicker. This means that a momentary short (which would be tolerated by a DC controller for a few seconds) causes the DCC system to shut down. This is a supposed case of 'DCC unfriendly' points. However, since the shorts were occurring on DC anyway, it is hardly fair to blame the new control system for the fault. The cause of the problem is electrically unfriendly points.
If you refer to the live frog wiring above, you can see clearly where the cause of the problem lies. The open blade of the point is very close to the stock rail, which happens to be at opposite polarity. An older loco with coarse scale wheels, or a wheel which is out of gauge, could bridge this gap and cause a short circuit.
It is sometimes possible to run a layout with points wired this way (I have done in the past) but a better method is shown below. You'll often see this described as 'DCC friendly', but it is equally applicable to DC layouts and is the recommended way to wire live frogs, regardless of the control system.
You can see that the point blades are now electrically separated from the crossing, and can be wired to the adjacent stock rail, ensuring the two are always at the same polarity. On points such as Peco code 75, the insulated gaps are there anyway, and one only needs to cut the two jumper wires on the back of the point, and add two new ones. On others such as Peco code 100, you will need to make the gaps yourself and insert pieces of plasticard into the gap. This is however quite simple to do, and is only the same as cutting a length of flexitrack.
With the point blade problem sorted, they are now no longer switching the crossing polarity. To solve this, we use a SPDT switch to do this job. If you are using peco or hornby point motors, the peco PL-13 switch can be attached to the motor. Seep point motors are available with a built in switch.
Note: While I've dumped this in to a DCC article with everything else, be aware that this is not a DCC specific technique. It is simply a better way to wire live frog points.
For the n-gaugers, I'm aware that n-gauge points are a bit more fiddly to convert than 00/H0 ones, making this modification more difficult. The clearances between the blade and rail are also that bit larger in scale terms, so you are less likely to get problems with the points left as they are. If you can modify them, do so, but it probably won't cause many problems to leave them. You can always add just the polarity switch to avoid relying on blade contact to carry power.
Connecting it all up
An example wiring diagram for a basic layout is shown below, and you can see how the basic rule is applied. Note how all the connections are either red or black, and therefore can be joined into a total of two wires (see the 'two wire' myth in part 1) On DC control, several of the red connections would have to be separately wired back to individual switches on the control panel. This quickly gets a bit out of hand on larger layouts, but with DCC the wiring remains relatively simple.
Once you have determined where to place isolated joiners and power feeds, it is time to start wiring it all up. The easiest way to do this is the 'bus' method. Rather than wiring each feed to the control panel, we can run a pair of wires along the layout, following the main lines (on smaller layouts, just run it down the middle.) Each of your individual feeds then connects to this central bus. The bus wires are connected to the output of the command station. This is where the simplicity of DCC wiring shows its advantage- the wiring can easily be kept neat and tidy, without a mass of cables all going to one place. You can use copper tape to form the bus, which allows you to simply solder the track feeds on at a convenient point. Alternatively you can use fairly thick wires.
With most entry-level units, a single unit forms a combined controller and booster. This must be fed by its own transformer, and this can usually be bought with the control unit. More advanced controllers often have a separate command station into which the controller (normally a handset) connects. Some have a separate booster as well, but the instructions will show how to connect everything together.
Last edited by pete12345 on Fri Aug 09, 2013 11:27 pm, edited 5 times in total.
Re: DCC for beginners
Great idea, I for one will be most interested in the CV side of DCC. CV adjustments and the effects those adjustments made have on performance would be usefull information. Lighting etc would also be helpful. I know that there are a lot of different manufacturers decoders out there but the majority seem to have the same functions in some form or other, so a general topic based on one of the more feature rich decoders eg: Lenz gold would suit most of the others out there. Good start so far, thanks.
Re: DCC for beginners (Part 2 now up)
will you stop updating this thread!  youre making me want to go to dcc!
proud modeller jake also known as Duke Jake the Bewildered of Mousehole by Sea
anyone got n gauge track i can buy
anyone got n gauge track i can buy
Re: DCC for beginners (Part 2 now up)
Excellent article so far - thanks very much for taking the time to write it
One teeny weeny criticism - you mention the foibles of the dead/live OO gauge points, no mention of N gauge though?
Paul
One teeny weeny criticism - you mention the foibles of the dead/live OO gauge points, no mention of N gauge though?
Paul
-
pete12345
Part 3: Installing decoders
Here is the subject that causes a lot of confusion, and also most of the apprehension among DCC beginners. This is understandable, since you are about to partly dismantle an expensive model. However, there is nothing particularly taxing about DCC-ing your locos, as I will explain in this part of the article.
DCC chips
There are a multitude of different DCC manufacturers out there, and a common question is ‘will a chip from X work with a controller from Y?’ The short answer to this is yes. All DCC equipment that is to NMRA standards will work together. For example, a Lenz controller will happily control a loco fitted with a digitrax decoder.
The one exception to this I know of is hornby. Their original decoders are not NMRA compliant, and there have been issues with them and other systems, and their ‘select’ controller is also not NMRA compliant (though the ‘elite’ is.) My advice would be to avoid Hornby chips anyway, as they generally are not powerful enough for many locos.
When choosing a DCC decoder, there are a number of factors to consider. The most important is the continuous current rating of the decoder, which must be higher than the current draw of the loco motor and all lights. If not, the decoder will either shut down (best case) or self-destruct (worst case.) For 00/H0 locomotives a 1 amp rated decoder will normally suffice, though with older triang-hornby or similar locos something higher will be required.
Another feature is Back EMF. Many decoders have this, which is basically a form of load-compensation, allowing the speed to remain constant regardless of track gradient or the load being pulled. A useful side-effect is that it seems to help tame troublesome motors, such as the shoddy mechanism fitted to Lima models. This motor needs quite a punch to get it going, and the BEMF will automatically increase power to start moving, then throttle back to prevent the loco shooting off. For older locos I would regard BEMF as essential.
You will see in the decoder description that it has a number of 'functions', more often four but sometimes one, two or occasionally six. These are basically extra on/off outputs separate from the motor output, and can be used to operate auxiliary onboard features such as headlights, smoke generators or whatever. These can be operated totally independently of the loco's movement, and will work when stationary. Each is activated by simply pressing a button on the controller. Usually the first and second functions are intended for front and rear headlights, and will respond directionally, though this can be disabled if you want independent control.
Decoder fitting
So how do we convert locos to DCC? Well, the simplest option, which is available with some recent releases, is the ‘DCC fitted’ or ‘DCC on board’ loco. This is self-explanatory, and such locos are supplied from the factory with a DCC decoder installed. They can be run on a DCC layout straight away.
The next option is the ‘DCC ready’ loco. These do not have a decoder installed, but have a socket inside the loco into which a decoder can be plugged. After removing the body, all one needs to do is remove the blanking plug and slot in the decoder.
Until recently, all DCC ready 00 and HO locos came with the same 8 pin socket- NEM652. However, some newer Bachmann locos come with a 21 pin socket. This can be a nuisance if you have an 8 pin decoder, and while an adaptor is available it’s not really ideal in my opinion.
In N gauge, DCC ready locos usually come with a 6 pin socket- NEM651, though with some, DCC ready means the loco has no socket, but is designed to make conversion easy.
Many locos (particularly older models) are not DCC ready. This does not mean you can’t use them with DCC, only that you will have to do a little more work. The decoder will need to be hard-wired in, though if your soldering is up to scratch this is usually simple.
If you think of a DC loco, power comes through the wheels on one side, through the motor, and back through the wheels on the other side. What we need to do is splice the decoder between the wheels and motor.
Step one of the conversion is to completely disconnect the motor from the wheel pickups. This isolation must be total, as the only power to the motor must come through the decoder first. On many locos this is as simple as removing two wires, but on others the chassis provides one or both connections and a little more ingenuity is required. Use a continuity tester to check that neither motor terminal is connected to any wheel.
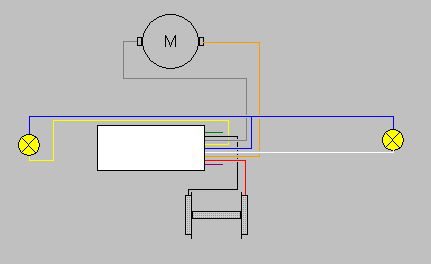
Step 2: Now we can start to connect up the decoder. First let’s connect it to the track. All references to left and right are with respect to the ‘driver’s view’ when looking forward. For diesel locos you will need to decide which end will be the front.
Black wire: connect to wheel pickups on the left side.
Red wire: connect to wheel pickups on the right side
Step 3: Now we connect to the motor.
Grey wire: connect to motor terminal previously connected to left pickups
Orange wire: connect to motor terminal previously connected to right pickups.
If you look at what you have done so far, you will see that the decoder has been spliced between the wheels and motor. Think of orange and grey as shades of red and black. If your loco has no lights, that’s all you need to do. Proceed to test the loco as described in step 5
Step 4: For locos with headlights, there are a few more connections to be made. On DC control, the lights are normally linked into the motor. This will work on DCC, but one of the advantages is that lights can be on independently. To do this, we wire the lights to the function outputs of the decoder, after disconnecting them from the motor.
White wire: connect to front headlight (for LEDs, this must go to the cathode side)
Yellow wire: connect to rear headlight (for LEDs, cathode side again)
Blue wire: connect to the other side of both front and rear headlights
Many decoders have extra functions, which can be used to control independent tail lights, smoke generators or whatever else your loco may have. These are connected in the same way as headlights, with the blue wire common to all functions. For smoke generators, you can either connect them to their own function, or wire them to the motor as with DC. The first approach needs a high-output function to cope with the current. The latter loses independent control, but with a smoke generator this isn't such a big deal.
Step 5: After all the connections are made, it’s time to test the loco. Place the chassis on your programming track and try to read back its address. If the installation was successful it should read back as 3. Replace the body, taking care not to snag any wires and test again.
Below you can see how the various wires connect to parts of a loco. The green and purple wires are for functions 3 and 4, and should be connected in a similar way to the white and yellow wires. For specific locos, there are many fitting guides on the web, and a search will usually come up with something helpful.
DCC on DC?
Questions on DCC often get asked about running a DCC fitted loco on a DC layout, and vice versa.
DCC decoders are designed so they will operate on DC layouts (though this can be disabled if you wish) On detecting the DC supply, the loco will respond as if it were a DC loco.
The reverse is not as simple. While many systems allow the running of one unconverted loco on DCC control (usually on address 0) the control method is rather crude. It works by 'stretching' the signal to give a DC bias. However, you are still running a DC loco on what is effectively an AC supply. This will cause motors to heat up sometimes burn out.
In short: DCC locos work fine on DC, DC locos are not recommended for use on DCC layouts.
Here is the subject that causes a lot of confusion, and also most of the apprehension among DCC beginners. This is understandable, since you are about to partly dismantle an expensive model. However, there is nothing particularly taxing about DCC-ing your locos, as I will explain in this part of the article.
DCC chips
There are a multitude of different DCC manufacturers out there, and a common question is ‘will a chip from X work with a controller from Y?’ The short answer to this is yes. All DCC equipment that is to NMRA standards will work together. For example, a Lenz controller will happily control a loco fitted with a digitrax decoder.
The one exception to this I know of is hornby. Their original decoders are not NMRA compliant, and there have been issues with them and other systems, and their ‘select’ controller is also not NMRA compliant (though the ‘elite’ is.) My advice would be to avoid Hornby chips anyway, as they generally are not powerful enough for many locos.
When choosing a DCC decoder, there are a number of factors to consider. The most important is the continuous current rating of the decoder, which must be higher than the current draw of the loco motor and all lights. If not, the decoder will either shut down (best case) or self-destruct (worst case.) For 00/H0 locomotives a 1 amp rated decoder will normally suffice, though with older triang-hornby or similar locos something higher will be required.
Another feature is Back EMF. Many decoders have this, which is basically a form of load-compensation, allowing the speed to remain constant regardless of track gradient or the load being pulled. A useful side-effect is that it seems to help tame troublesome motors, such as the shoddy mechanism fitted to Lima models. This motor needs quite a punch to get it going, and the BEMF will automatically increase power to start moving, then throttle back to prevent the loco shooting off. For older locos I would regard BEMF as essential.
You will see in the decoder description that it has a number of 'functions', more often four but sometimes one, two or occasionally six. These are basically extra on/off outputs separate from the motor output, and can be used to operate auxiliary onboard features such as headlights, smoke generators or whatever. These can be operated totally independently of the loco's movement, and will work when stationary. Each is activated by simply pressing a button on the controller. Usually the first and second functions are intended for front and rear headlights, and will respond directionally, though this can be disabled if you want independent control.
Decoder fitting
So how do we convert locos to DCC? Well, the simplest option, which is available with some recent releases, is the ‘DCC fitted’ or ‘DCC on board’ loco. This is self-explanatory, and such locos are supplied from the factory with a DCC decoder installed. They can be run on a DCC layout straight away.
The next option is the ‘DCC ready’ loco. These do not have a decoder installed, but have a socket inside the loco into which a decoder can be plugged. After removing the body, all one needs to do is remove the blanking plug and slot in the decoder.
Until recently, all DCC ready 00 and HO locos came with the same 8 pin socket- NEM652. However, some newer Bachmann locos come with a 21 pin socket. This can be a nuisance if you have an 8 pin decoder, and while an adaptor is available it’s not really ideal in my opinion.
In N gauge, DCC ready locos usually come with a 6 pin socket- NEM651, though with some, DCC ready means the loco has no socket, but is designed to make conversion easy.
Many locos (particularly older models) are not DCC ready. This does not mean you can’t use them with DCC, only that you will have to do a little more work. The decoder will need to be hard-wired in, though if your soldering is up to scratch this is usually simple.
If you think of a DC loco, power comes through the wheels on one side, through the motor, and back through the wheels on the other side. What we need to do is splice the decoder between the wheels and motor.
Step one of the conversion is to completely disconnect the motor from the wheel pickups. This isolation must be total, as the only power to the motor must come through the decoder first. On many locos this is as simple as removing two wires, but on others the chassis provides one or both connections and a little more ingenuity is required. Use a continuity tester to check that neither motor terminal is connected to any wheel.
Step 2: Now we can start to connect up the decoder. First let’s connect it to the track. All references to left and right are with respect to the ‘driver’s view’ when looking forward. For diesel locos you will need to decide which end will be the front.
Black wire: connect to wheel pickups on the left side.
Red wire: connect to wheel pickups on the right side
Step 3: Now we connect to the motor.
Grey wire: connect to motor terminal previously connected to left pickups
Orange wire: connect to motor terminal previously connected to right pickups.
If you look at what you have done so far, you will see that the decoder has been spliced between the wheels and motor. Think of orange and grey as shades of red and black. If your loco has no lights, that’s all you need to do. Proceed to test the loco as described in step 5
Step 4: For locos with headlights, there are a few more connections to be made. On DC control, the lights are normally linked into the motor. This will work on DCC, but one of the advantages is that lights can be on independently. To do this, we wire the lights to the function outputs of the decoder, after disconnecting them from the motor.
White wire: connect to front headlight (for LEDs, this must go to the cathode side)
Yellow wire: connect to rear headlight (for LEDs, cathode side again)
Blue wire: connect to the other side of both front and rear headlights
Many decoders have extra functions, which can be used to control independent tail lights, smoke generators or whatever else your loco may have. These are connected in the same way as headlights, with the blue wire common to all functions. For smoke generators, you can either connect them to their own function, or wire them to the motor as with DC. The first approach needs a high-output function to cope with the current. The latter loses independent control, but with a smoke generator this isn't such a big deal.
Step 5: After all the connections are made, it’s time to test the loco. Place the chassis on your programming track and try to read back its address. If the installation was successful it should read back as 3. Replace the body, taking care not to snag any wires and test again.
Below you can see how the various wires connect to parts of a loco. The green and purple wires are for functions 3 and 4, and should be connected in a similar way to the white and yellow wires. For specific locos, there are many fitting guides on the web, and a search will usually come up with something helpful.
DCC on DC?
Questions on DCC often get asked about running a DCC fitted loco on a DC layout, and vice versa.
DCC decoders are designed so they will operate on DC layouts (though this can be disabled if you wish) On detecting the DC supply, the loco will respond as if it were a DC loco.
The reverse is not as simple. While many systems allow the running of one unconverted loco on DCC control (usually on address 0) the control method is rather crude. It works by 'stretching' the signal to give a DC bias. However, you are still running a DC loco on what is effectively an AC supply. This will cause motors to heat up sometimes burn out.
In short: DCC locos work fine on DC, DC locos are not recommended for use on DCC layouts.
Last edited by pete12345 on Sun Nov 30, 2008 11:52 am, edited 4 times in total.
Re: DCC for beginners (Part 3 now up)
Another excellent installment! Congratulations.
Re: DCC for beginners (Part 3 now up)
Very useful indeed!
I wish this had all been around a few years back when I started, would have made things much easier!
One thing I would emphasise is the need for a programming track when fitting your own decoders!!!
If your controller has a program track output that is, not all do.
Why????
The program track from the controller only has enough power to program the decoder, there is not enough power to actually run the motor.
So if you have fitted the decoder and there is an error somewhere you should be able to see this when programming without damaging it.
I've fitted my own decoders and rushing about only tested on the 'main' track and fried the decoder!
Just double check everything.......or like me buy decoders with 'Goof-Proof' warranty, this allows you to send them back even if it's something you've done!
Cheers
Ian
-
pete12345
Re: DCC for beginners (Part 3 now up)
Yes definately use a programming track to test your locos if your controller has the output. Do not test on the main until the address can be properly read back. I'll elaborate on the programming track in Part 4: programming and accessories
Pete
Pete
Re: DCC for beginners (Part 3 now up)
you got a pics to words on installing it would help me (youngster) a lot more
proud modeller jake also known as Duke Jake the Bewildered of Mousehole by Sea
anyone got n gauge track i can buy
anyone got n gauge track i can buy