Part 4: Decoder programming
As requested, here’s a how-to on programming decoder CVs
The first thing we need to install, before thinking about programming the decoder, is the programming track. This is a low-powered section of track we use when configuring the decoder. In the event of an incorrect decoder installation, this also does not have enough power to destroy the decoder.
Most command stations will have a separate output for the programming track. For Lenz, the convention is terminals P and Q. The simplest way is to connect these to a spare piece of track, and you’re away. However, it avoids having to pick up the loco if you have a siding which can be switched between the main track or the programming output, the wiring for which is shown below.
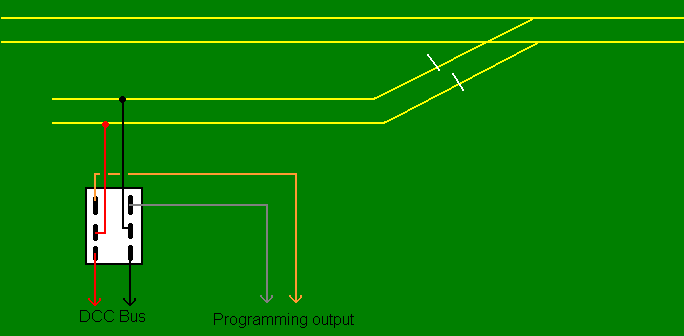
This way, you can change the loco’s settings by just driving on to the siding and throwing the switch.
Ok, now we get to the programming itself. I’ll be referring to the procedures with my Lenz Compact, but the principle is exactly the same on all systems. Use your controller’s handbook in conjunction with these instructions.
There are two types of decoder CVs: simple ones which take a decimal value, such as the decoder address, maximum speed etc, and complex ones which use a binary system to turn settings on or off. First let’s cover the simple ones. The one everyone will need to set is the loco address; CV1.
Right, with the loco positioned on the programming track, we enter program mode.
· On my controller, programming mode is accessed through the menu.
· Select CV1 and confirm.
· Confirm again to read back the current setting (with a new loco, the address should read back as ‘3’
· Change the address with the +/- keys and confirm again to set the address.
· The display should now read the new setting.
That’s it! Wasn’t that simple? Most of the basic CVs can be programmed in this way. Examples are acceleration delay, braking delay, maximum speed, starting voltage. Even using these, you can set up most of the characteristics of each loco.
A quick note on the Lenz Compact:
The instruction manual for the Compact will tell you that you can only write five CVs, which are accessed through ‘register’s. However, at some point the circuit board was changed to allow all CVs to be read and written. The manual was never updated. To access the other CVs, you first have to read back any of the basic registers. Then, after scrolling past R8, the display should change to C09. You can then alter any CV you want.
Now we move onto the complex CVs. These are for things like setting up lighting effects on the function outputs, and adjusting the decoder’s basic settings.
If you look at the decoder instructions, you will come across something like this:
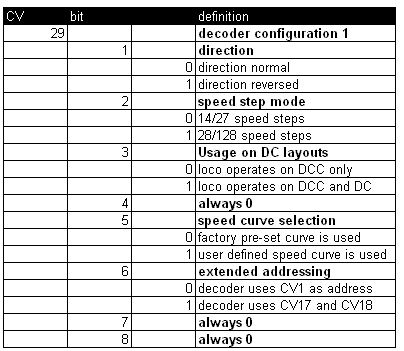
To the beginner, this looks a bit daunting. How do we work out this lot?!
Well, each ‘bit’ can either be on or off. When it is off, it stands for nothing. When it is on, it stands for a number. What number? Each bit is worth twice the amount of the previous one. So when ‘on’ bit one is worth 1, bit 2=2, bit 3=4, bit 4=8, bit 5=16, bit 6=32 etc. So each decimal number corresponds to a unique combination of ‘on’s and ‘off’s.
Still following this? Don’t worry, I’ll show you an example. Take a look at the table for CV29. Suppose you wanted to set up the decoder with normal direction, 28/128 speed steps, operation on DC, standard speed curve, and with CV1 as the address. This means that bit 2 and 3 are on, while the others are off. This means the number we need to set is 2+4=6. This is the default setting for most decoders.
If you wanted to use a custom speed-curve (set up using other CVs) we need to switch on bit 5. This adds 16 to the number, making it 22.
You can apply this process backwards to work out the current settings. Suppose you had a reading of 5 on CV29. The only way to get this number is 1+4, so bit 1 and bit 3 are on.
This process seems a little complicated just reading it, but it’s a lot easier once you get the hang of it, and is far easier to do than it looks- have a go. The hard part is converting binary to decimal. You can actually use your computer’s calculator to do this if you can’t do it mentally.
One final tip: if you completely screw up the programming of your decoder, entering a certain value (depending on the decoder) in CV8 will reset the decoder to factory settings.
 ) but there are some excellent pictorial guides on Steve Jones' website http://www.electricnose.co.uk/dcc/dccdecoders.html