
Hi Richard08,
That's coming along so well - great result so far.
We always enjoy a good fight !!
Geoff T
Queen Mary Brake Van 2.0
Re: Queen Mary Brake Van 2.0
Remember ... I know nothing about railways.
http://www.newrailwaymodellers.co.uk/Fo ... 22&t=32187 and Another on http://www.newrailwaymodellers.co.uk/Fo ... &sk=t&sd=a
http://www.newrailwaymodellers.co.uk/Fo ... 22&t=32187 and Another on http://www.newrailwaymodellers.co.uk/Fo ... &sk=t&sd=a
Re: Queen Mary Brake Van 2.0
Ding, ding, Round roof. The brass (well, nickel silver) strip arrived (courtesy Hobby Holidays near insta-delivery service) and got soldered on. Some bits and bobs to add, vents, chimney and rain strips, but it fits. I've not pushed it right into place for photo, for fear of it sticking, but it will be removable as per the Connoisseur model for decorative purposes.
A nice pair. (That's an album reference)
Re: Queen Mary Brake Van 2.0
So to the missing brake hangars. Using Ambis brake shoes and bits of brass for the hangars. Fortunately there's a recess for these to be mounted in - a lot easier than expected. More brass rod needed... The shoes aren't exactly what they should be, but only the very ends are visible without turning the van over so no worries. One bogies done (that has the right shoes).
Re: Queen Mary Brake Van 2.0
And finally the underneath is done. Well, bar two clevises that go on the centre brake cranks and head off bogiewards - I'll fit these when I've concluded that the bogies won't need to come off again. And then refit them when the bogies have to come off again....
And on to the roof, adding detail bits - chimney (2 supplied), rain strip (none supplied) and 2 torpedo vents (none supplied). Luckily there were two spares in the Connoisseur kit that are knocking about. Somewhere. Along with the Connoisseur instructions which have the dimensions for where they go. Or I might add the sole bar pipe next. Decisions, decisions.
-
Bigglesof266
- Posts: 1026
- Joined: Tue Feb 10, 2009 9:59 am
- Location: Australia
Re: Queen Mary Brake Van 2.0
Nice job. Truly looks superb. Almost a shame to paint it!
Re: Queen Mary Brake Van 2.0
I currently have a 50/50 brass/painted ratio on the layout - really need to open the Painting & Decorating Dept. Soon.Bigglesof266 wrote:Almost a shame to paint it!
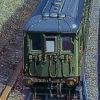
Meanwhile, back at the (b)ranch. The roof. Getting it to fit nicely was hindered by the overlays on the corners. Without them the roof, with the added facias, is exactly the width of the body so I had to remove the tops of them, and a little bit of the drip on the outer ends. Filing was going to be slow and risking a slip knackering other bits so I resorted to a sanding disc in the multi tool gizmo. Scary, but worked, the roof is a very tight fit but all is good. While rooting round in the Connoisseur box for the roof furniture dimensions and the two vents (not all vans had these apparently, but they look nice) I came across some spare works plates and some bits of brass on which I mounted Ambis label clips. Now fitted. The rain strip material isn't due til next week, also the split pins that will mount the sole bar pipe. There's also some spare brake pipes from the Connoisseur kit such that I an give it the full complement (dual vacuum and air brakes). Though there are no air tanks to go underneath, they could be added later now I've moved the vacuum tanks - lord knows where I could get any though. I just think it looks nice fully kitted out. I'm going to have to start searching for transfers for all the unpainted (and one painted) wagons) while I await the last few bits for one final session. It run amazingly too, which is a pleasant surprise after bogiegedon.

Re: Queen Mary Brake Van 2.0
That looks great! Out of interest, brass stock is weighty. Do you need more powerful locos or is it a case that once the loco gets the train moving it all runs well? I am intregued as 0 gauge motors don't look all that much larger than 00. I realize that decent wagons roll better so that makes a difference.
Modelling On A Budget ---》 https://www.newrailwaymodellers.co.uk/F ... 22&t=52212
Re: Queen Mary Brake Van 2.0
I don't think I ever managed to build a kit of any sort without at least one wheel seizing up, so kudos to you on that. Looks great too.Richard08 wrote:
It run amazingly too, which is a pleasant surprise after bogiegedon.
Re: Queen Mary Brake Van 2.0
It's hard to know really, as my layout is short and end-to-end. That said the vast amount of experience I have with my huge fleet of three engines:Mountain wrote:That looks great! Out of interest, brass stock is weighty. Do you need more powerful locos or is it a case that once the loco gets the train moving it all runs well? I am intregued as 0 gauge motors don't look all that much larger than 00. I realize that decent wagons roll better so that makes a difference.
The 14xx isn't very heavy, but it will pull around 10 brass wagons easily (defined as not stalling or wheel-spinning) until it reaches a slight dip in the boards which coincides with the train going over three sets of points - where it slips. The tractive effort is significantly more than any 00 I had, with plastic stock I suspect it would out-do a 00 version, with metal wagons I suspect it's much nearer to 00 (without traction tyres). I'd expect it would trundle along happily once it had the train going.
The 08 is a stunner, DC and DCC. It's geared to run a prototypical top speed, giving it bags of torque and amazing control - it takes it about 15 minutes to crawl 14ft on '1' - you have to look away and back again to be sure it is moving. It pulls anything I hang on it, yet only weighs a tad more than the 14xx. The importance of gearing. Note to self : Patent model train field conversion system.
The Western. This is just another universe compared to my old 00 world. It weighs 4kg and is actually difficult to push along the track by hand. I've only taken it off the track once since I had it, for programming. I will pull anything, it is powerful. No idea what the top speed is, the layout's way too short.
My gut feeling, and from looking at videos by those fortunate enough to have enough room for large layouts, is that as long as the brass wagons are built correctly, as in the wheels turn as freely as they can (there's a sweet spot where everything is just-so, takes a bit of patience some times) the major difference would only really be in moving off - you'd have to really drive the train to avoid slipping. But that's just speculation really, and I'm totally ignoring hills just be be really unscientific. One thing that was unexpected is than the engines don't get 'pushed' by heavy wagons, I kind of assumed they would.
Re: Queen Mary Brake Van 2.0
I was going to say about getting pushed going downhill! Actually if the motor drives through metal gears so there is minimum friction and the gearing does not have a worm, it ispossible that trains would if heavy push the loco allowing its motor to turn, as I have had this effect in 00 with a certain loco (Can't remember the make. Think it was Jouef or some other continental brand. I don't really remember which loco it was. Whatever it was it was small (E.g. an 0-4-0) and weigty). The effect was minor but it did happen.
Talking about effects. What I love in 7mm scale which I can hear on my narrow gauge models (Though it is a quiet sound) is the clash of buffers. I love that sound! Makes me want to rough shunt just to hear them! Somehow in the smaller scales it is not the same, though go larger again and the sound is amplified!
You mentioned the 08. If I was going to model in 0 in standard gauge form, that is my first choice and my preference is to have one in black! (Though blue is ok). What make is yours? Is it Dapol?
Modelling On A Budget ---》 https://www.newrailwaymodellers.co.uk/F ... 22&t=52212
Re: Queen Mary Brake Van 2.0
Yes it's Dapol (as is the 14xx, the Western is Heljan) - not sure anyone else does one RTR. Not seen the (unpainted) Sancheng Brass ones new for quite some time, I guess that brand died a bit of a death.Mountain wrote:
You mentioned the 08. If I was going to model in 0 in standard gauge form, that is my first choice and my preference is to have one in black! (Though blue is ok). What make is yours? Is it Dapol?
Re: Queen Mary Brake Van 2.0
And change hats again... The brass rod and split pins turned up, so onwards into the light. Needless to say, immediately after opening the parcel I put the rod down - right next to the other pack I couldn't find. Every. Damn. Time! Still, never mind. Forming up the pipes went ok, but the 1.5mm stuff is hard to bend. It should be 1.4mm but I can only find one supplier - at £5.00 p&p for a £1 rod. Nah. Perusing the Connoisseur kit and photos got the positions for the fixings sorted out, said fixings being split pins. A few more holes to drill. There's some detailing, rivets and something rectangular on the platforms of the Connoisseur kit which I'll have a look a replicating, though not quite sure whether rivet strip would look right. Getting there.
Re: Queen Mary Brake Van 2.0
Richard08 wrote:
Every. Damn. Time!
Re: Queen Mary Brake Van 2.0
Cancel that one more session thing... The pipes were fitted on the sole bars and all is good there. There's a difference in the way the buffer beam and sole bars join up, which, without hacking away merrily at the sole bars, means the pipes stand out a bit more than they should. On the Connoisseur kit there's a sort of 'gap' for them. Not being a perfectionist the compromise works well enough.
So lets pop on the brake pipes. Unfortunately, the spare air pipes from the Connoisseur kit turned out to be vacuum pipes, and the only supplier for said items I can find is out of stock. The air pipes supplied have a large flange (right word?) for mounting, but this assumes it can be mounted immediately behind the buffer beam front face - ignoring the thickness of the bottom of the beam. Hacking out part of the beam is not going to happen, so three choices : File the mounting flange right down and fix it in the front of the beam. The real thing has a strip with three rivets (oh god, did I actually write that! Noooo... ) above each air pipe (brake & reservoir) that could be simulated. Could be done, but prone to error I suspect; Use the vacuum pipe mounting from the MMP brake accessories kit (photo) after cutting off the mounting. Not really right, but you'd have to really be looking to see it; Wait for pipes to come back in stock, always assuming they do. This wagon is cursed.
So lets pop on the brake pipes. Unfortunately, the spare air pipes from the Connoisseur kit turned out to be vacuum pipes, and the only supplier for said items I can find is out of stock. The air pipes supplied have a large flange (right word?) for mounting, but this assumes it can be mounted immediately behind the buffer beam front face - ignoring the thickness of the bottom of the beam. Hacking out part of the beam is not going to happen, so three choices : File the mounting flange right down and fix it in the front of the beam. The real thing has a strip with three rivets (oh god, did I actually write that! Noooo... ) above each air pipe (brake & reservoir) that could be simulated. Could be done, but prone to error I suspect; Use the vacuum pipe mounting from the MMP brake accessories kit (photo) after cutting off the mounting. Not really right, but you'd have to really be looking to see it; Wait for pipes to come back in stock, always assuming they do. This wagon is cursed.
Re: Queen Mary Brake Van 2.0
I found some air brake pipes, as in they are on order - bit of a punt as there's no picture so all the more exciting. So, bar them, all is finally done. It's come out a hell of a lot better than I was expecting when things started getting wobbly. The roof is going to have to be fixed somehow as though it clips on (as in the somewhat over optimistic 'Peel Here' stickers on packets of ham) it did rather spectacularly pop off when I was playing. I mean testing. Ah, the Triang Battlespace exploding wagon  I'm think a brass tube (rod seems a bit 'fragile'?) soldered to the roof and the outside of the floor through a hole after Painting & Decorating have done their stuff. Worry about that when the pipes get here. Also, I've added a floor in the verandas, not least to hide the redundant screw holes.
Well, this was an interesting kit to build. It was kind of the experience I expected brass kits to be back in the days when I used to really wish I could do it but feared it would all just end a ball of solder with bent brass bits sticking out. The sort of thing articles in Railway Modeller would talk about back in back pre-modern history - modding this or that, hacking away bits on that, trying to get hold of Frank to buy a gasspeil grantator and so on. Had I tried this kit back when I lost my sanity at the start of lockdown (non-transmissable trainitis) it would have been a failure as I just didn't have much experience with working with brass, what you can and can't do, how to fold neatly, yes-you-are-really-going-to-have-to-file-that-like-it-or-not et al. Most of the kits I've made have alternatives, so I kind of got broken in gently having to drill a hole or whatever and got into the swing of things overcoming my phobia of wrecking perfectly good parts. Solving the problems was fun, though frustrating - I seem to have been building this for months. Though this kit is still for sale I have no idea if it has been changed at all, mine was form the Naughties judging by the price on the box, so my whinges may be non-winges now. Gotta say though, even taking the price differential into account, the Connoisseur kit is much nicer both in building and the finished article - planking and hinges on the inside, rivets round the duckets, nicer plumbing underneath, rivets and bits on the open platforms amongst others. Also, to be fair, this kit (started out) representing a presumably SR van, without all the junk that was added over the years, whereas the Connoiseur kit provides options for the full metal jacket BR version.
I'm think a brass tube (rod seems a bit 'fragile'?) soldered to the roof and the outside of the floor through a hole after Painting & Decorating have done their stuff. Worry about that when the pipes get here. Also, I've added a floor in the verandas, not least to hide the redundant screw holes.
Well, this was an interesting kit to build. It was kind of the experience I expected brass kits to be back in the days when I used to really wish I could do it but feared it would all just end a ball of solder with bent brass bits sticking out. The sort of thing articles in Railway Modeller would talk about back in back pre-modern history - modding this or that, hacking away bits on that, trying to get hold of Frank to buy a gasspeil grantator and so on. Had I tried this kit back when I lost my sanity at the start of lockdown (non-transmissable trainitis) it would have been a failure as I just didn't have much experience with working with brass, what you can and can't do, how to fold neatly, yes-you-are-really-going-to-have-to-file-that-like-it-or-not et al. Most of the kits I've made have alternatives, so I kind of got broken in gently having to drill a hole or whatever and got into the swing of things overcoming my phobia of wrecking perfectly good parts. Solving the problems was fun, though frustrating - I seem to have been building this for months. Though this kit is still for sale I have no idea if it has been changed at all, mine was form the Naughties judging by the price on the box, so my whinges may be non-winges now. Gotta say though, even taking the price differential into account, the Connoisseur kit is much nicer both in building and the finished article - planking and hinges on the inside, rivets round the duckets, nicer plumbing underneath, rivets and bits on the open platforms amongst others. Also, to be fair, this kit (started out) representing a presumably SR van, without all the junk that was added over the years, whereas the Connoiseur kit provides options for the full metal jacket BR version.