
Atso's May/June 2018 Competition Entry
-
flying scotsman123
- Posts: 2233
- Joined: Thu Jan 12, 2012 5:29 pm
- Location: err, down there round the corner... not that one!!!
Re: Atso's May/June 2018 Competition Entry
Good idea, makes sense I suppose, I tend to add owatrol oil to paints when I'm signwriting on the full size things, same idea I guess, never thought of scaling it down!

Re: Atso's May/June 2018 Competition Entry
I've hit a bit of a bump mentally a few weeks ago which has taken some time to start putting behind me. However, I've just started to lightly get back into the swing of things and got a little further with the V1 build which it now has it's identity.
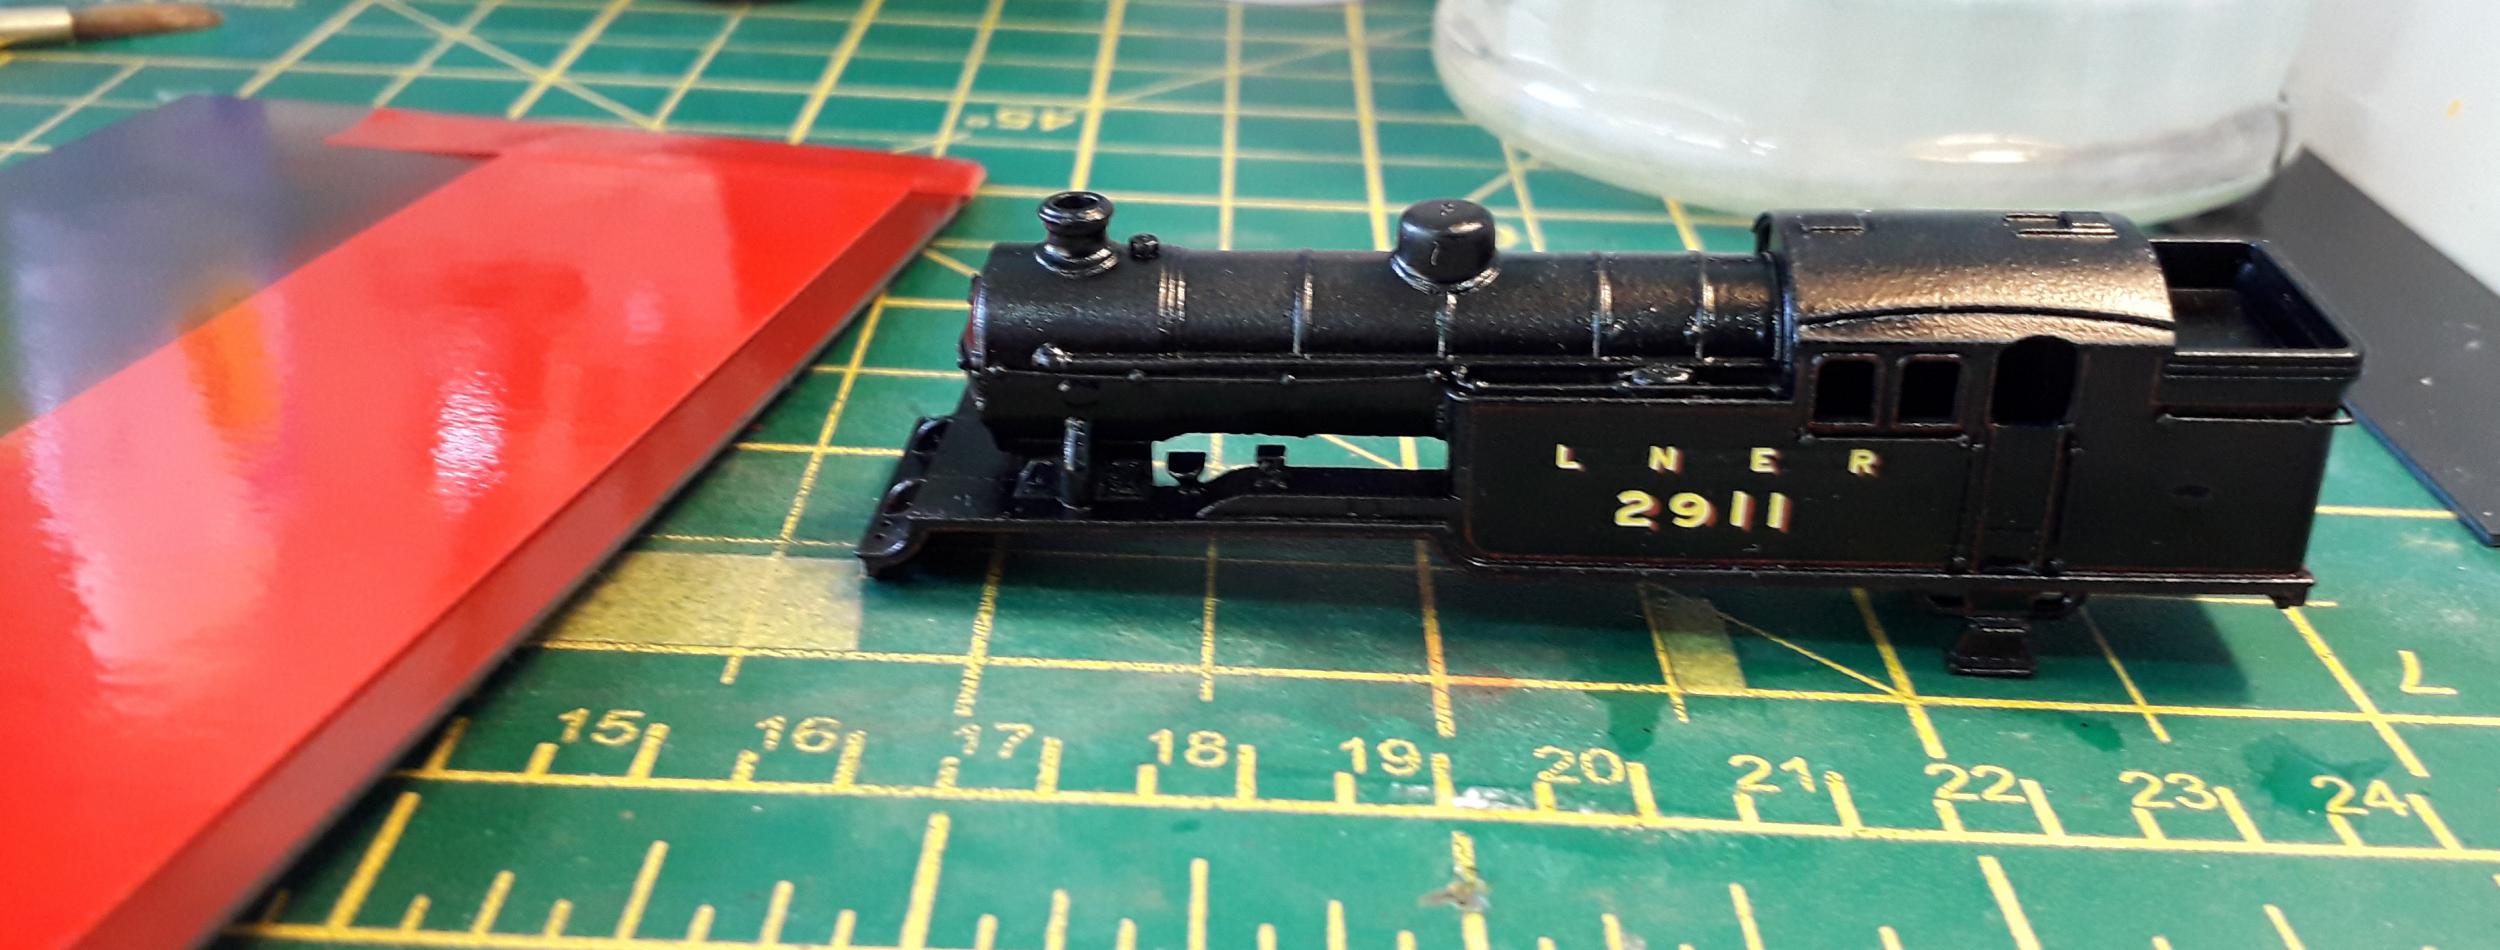
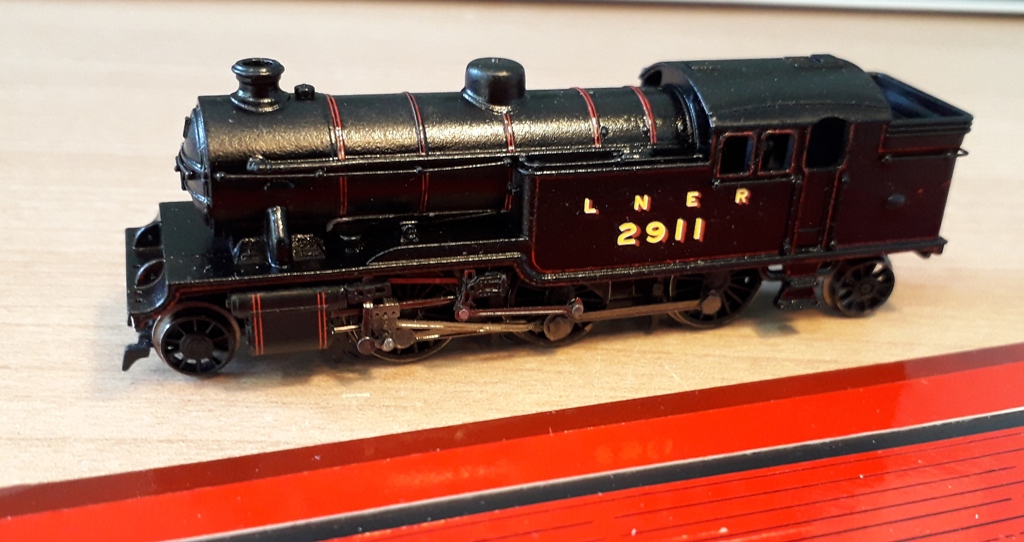
No. 2911 was briefly allocated to Kings Cross shed for seven weeks in 1931. Since taking the picture, I've moved the numbers around as I wasn't happy with their placement. The red paper to the left is clear decal paper that I've sprayed with the same colour as I did the lining. Once it has dried I'll use my bow pen to draw in a black line and carefully cut the paper to leave a thin red line either side of it. This will form the boiler bands for 2911. I've not attempted this before but have seen it used to good effect on some very nice 2mm finescale scratch builds.
No. 2911 was briefly allocated to Kings Cross shed for seven weeks in 1931. Since taking the picture, I've moved the numbers around as I wasn't happy with their placement. The red paper to the left is clear decal paper that I've sprayed with the same colour as I did the lining. Once it has dried I'll use my bow pen to draw in a black line and carefully cut the paper to leave a thin red line either side of it. This will form the boiler bands for 2911. I've not attempted this before but have seen it used to good effect on some very nice 2mm finescale scratch builds.
Steve
Re: Atso's May/June 2018 Competition Entry
I drew the black line on the decal paper this morning. While I'm waiting for this to dry I got sidetracked by building one of the last two Finetrax N gauge turnout kits required for the scenic section of my Hadley Wood project.
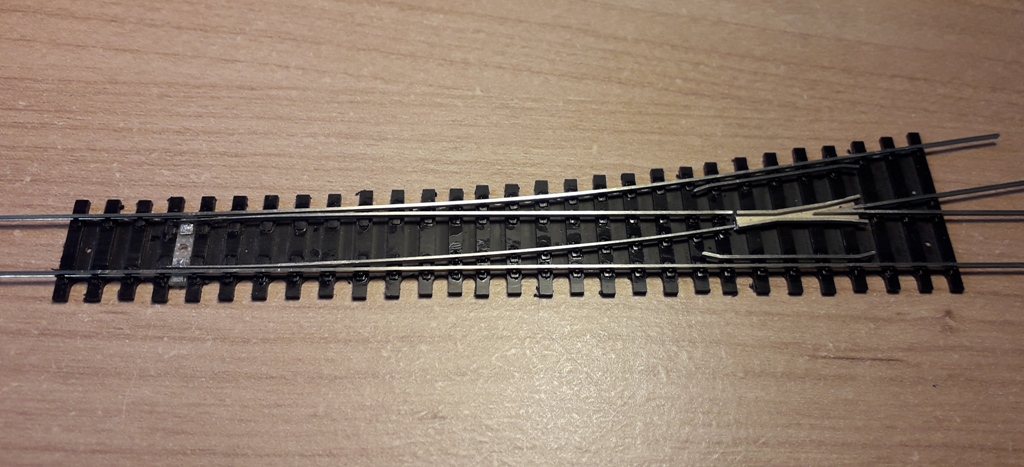
I'm glad there is only one more to do, threading all those N gauge rail chairs is tedious!
I'm glad there is only one more to do, threading all those N gauge rail chairs is tedious!
Steve
-
PinkNosedPenguin

- Posts: 1683
- Joined: Tue Oct 01, 2013 10:23 pm
- Location: Wiltshire
Re: Atso's May/June 2018 Competition Entry
Looks good thoughAtso wrote:I'm glad there is only one more to do, threading all those N gauge rail chairs is tedious!

Re: Atso's May/June 2018 Competition Entry
Is not as difficult as it seems for 0-16.5. (Not sure about N gauge though so well done!)PinkNosedPenguin wrote:Looks good thoughAtso wrote:I'm glad there is only one more to do, threading all those N gauge rail chairs is tedious!. I never had the guts to build my own track or points...
Buy a PCB board. Cut strips of sleepers off it and go from there.
Modelling On A Budget ---》 https://www.newrailwaymodellers.co.uk/F ... 22&t=52212
Re: Atso's May/June 2018 Competition Entry
Thanks guys.
Mountain, do you mean something like this?
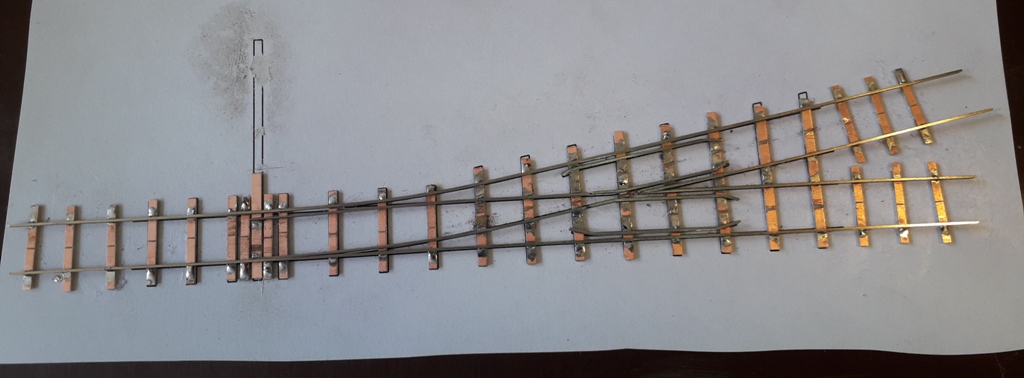
My first attempt and soldered track following a delivery from the 2mm Association this morning. I don't own any gauges so had to rely on my calipers to set the gauge and check rail clearances. It's a little messy but, surprisingly, it works very well!
It's a test piece to see if building the track for the fiddle yard is a viable option. It appears that it is and, at c. £1.50-£2 in materials, a cheaper option than Peco.
Mountain, do you mean something like this?
My first attempt and soldered track following a delivery from the 2mm Association this morning. I don't own any gauges so had to rely on my calipers to set the gauge and check rail clearances. It's a little messy but, surprisingly, it works very well!
It's a test piece to see if building the track for the fiddle yard is a viable option. It appears that it is and, at c. £1.50-£2 in materials, a cheaper option than Peco.
Steve
Re: Atso's May/June 2018 Competition Entry
Well done! Excellent work. Yes, like that!  At first I thought it would be beyond my capabilities, but when I made a start, I was surprised that it was easier then I thought. It is time consuming though, and is not without its issues. My rails needed relocating several times and I dont have any gauges either!
  Also my points are very short points built with no templates or anything like that. I just cut myself some sleepers from a PCB board and grabbed some scraps of code 100 rail and went for it!
Modelling On A Budget ---》 https://www.newrailwaymodellers.co.uk/F ... 22&t=52212
Re: Atso's May/June 2018 Competition Entry
May I ask what you used to cut the PCB board with, I've never had much success cutting that material,Mountain wrote:Well done! Excellent work. Yes, like that!
Rob.
Re: Atso's May/June 2018 Competition Entry
Wear safety glasses for this... I used a minidrill and a carbodium type cutting disk. I cut half way through the sleeper and then snap them off, but there again, my sleepers are thick. I guess one has to cut right through if one wants thin sleepers. The ideal tool would be a mini bench saw. I dont have one of those.
Modelling On A Budget ---》 https://www.newrailwaymodellers.co.uk/F ... 22&t=52212
Re: Atso's May/June 2018 Competition Entry
I'm lucky that most of the sleepers come cut to size and gaped. I find that the longer ones can be cut easily using some track cutters or wire cutters. Then again, 2mm scale sleepers are only 0.7mm thick!
Following yesterday's surprise success, I couldn't resist knocking up some straight bits of track and laying the whole lot down on a bit of shelving. A little bit of wiring and some crocodile clips to change the polarity of the frog and I was ready to test some locos. Once again, I was surprised that this actually works - the link below is the proof!
https://www.youtube.com/watch?v=0EsfMqhFzZw
Steve
Re: Atso's May/June 2018 Competition Entry
Wow At so. That is excellent work. A job really well done. A lot cheaper then buying and more rewarding.
Modelling On A Budget ---》 https://www.newrailwaymodellers.co.uk/F ... 22&t=52212
Re: Atso's May/June 2018 Competition Entry
Thank Mountain! It is cheaper and more rewarding that simply buying track (but more time consuming). I'm really pleased that my first effort has come off so well.Mountain wrote:Wow At so. That is excellent work. A job really well done. A lot cheaper then buying and more rewarding.
I unpacked three wagons this morning and put them behind the Jinty. The movement through the turnout is so smooth, even in reverse! With Peco code 55 there is a noticeable drop as the wheels pass over the common crossing, no such problem with the scratch built turnout. This is good to know as my planned fiddle yard will have some sidings which will require long formations to reverse into them reliably.
Steve
Re: Atso's May/June 2018 Competition Entry
Back to the main project for the competition and some progress on the V1 test build/paint. Having seen Tim Watson's magnificent 2mm scale P2 build, I thought I would try his technique for making the boiler bands. This comprises spraying a piece of clear decal paper (Microscale in this case) the colour of the outer lines and, once fully dry, ruling on the center colour using a bow pen. Once this has hardened, the decal is trimmed to size using a razor blade and applied to the model. Keeping the outer lines a consistent width is a bit of skill but I'm happy with me first attempt at using this technique.
Below the locomotive is the decal sheet I used which hopefully gives an idea on how this was done.
It occurs to me that this could also be adapted for use as cab and tender lining and, although the corners would still need to be carefully brush painted, it would be easier than trying to line three different lines using a bow pen!
Steve
-
TimberSurf

- Posts: 2537
- Joined: Wed Jan 08, 2014 5:47 pm
- Location: N.Wales
- Contact:
Re: Atso's May/June 2018 Competition Entry
You have the patience of Job! Cracking job!

-
PinkNosedPenguin
- Posts: 1683
- Joined: Tue Oct 01, 2013 10:23 pm
- Location: Wiltshire
Re: Atso's May/June 2018 Competition Entry
Yes I found slow progress over code 55 Peco points was a bit wobbly - and I checked it wasn't the way I had laid themAtso wrote:The movement through the turnout is so smooth, even in reverse! With Peco code 55 there is a noticeable drop as the wheels pass over the common crossing, no such problem with the scratch built turnout.
Those bands look fantastic, and I know how small they are in N gauge. You have a lot of skill and it is very educational to read of your exploits . . .Atso wrote:Having seen Tim Watson's magnificent 2mm scale P2 build, I thought I would try his technique for making the boiler bands.