DIY Motor Bogies
Posted: Mon Mar 19, 2018 5:50 pm
With my coach project on hold I started looking into building a motor bogie. This was prompted by the appearance on the bay of a number of Triang BRCW DEMUs minus their motor bogie, at quite reasonable prices. Someone has obviously found a use for the double worm drive bogies, they are a very engineered drive unit but unless you can source some finer wheels you are stuck with the Ultrascale replacement sets which are a bit pricey but also have a long lead time. I'd been wondering for some time if the sets of plastic gears available very cheaply on Ebay could be used in a home brew bogie, with the frame etc 3D printed. I also bumped into the N20 format geared motors which can be had for under a fiver in a variety of speeds and voltages. If you haven't yet come across them they look like this.
As you can see this one is from TangTangBuy's Ebay shop. There are loads of other dealers selling them and between them you can find almost any combination of output speed and supply voltage. They are just a bit longer than the old X03/4 sized motors. They do have one odity as far as we are concerned, they almost all come with a 3mm D profile shaft, the only exceptions I've found come with a long screwed rod which would be excellent for traversers, crossing gates etc.
Fortunately there are gears available to fit the shaft either 3mm bore or 3mm D bore. I suggest you do what I did Google "0.5 Module plastic gears". There's a bewildering array of them exceedingly cheap. I just ordered a selection and had fun sorting through them. For motor bogie use those with a 2mm nominal bore (usually categorised as turns freely on 2mm, or tight fit on 2mm and under 10mm diameter are the most useful.
For my motor bogie I decided to use an old arrangement, I'd put a crown wheel on each axle, driven by a spur gear on each end of a shaft one to the left one to the right to ensure they both turned the same way. The one gear I used was combined with a larger gear which I intended to drive from a gear fitted on the motor shaft, but try as I might i couldn't get a choice of gears that held the motor clear of the gear at the other end of the bogie. So I had to put an idler in between.
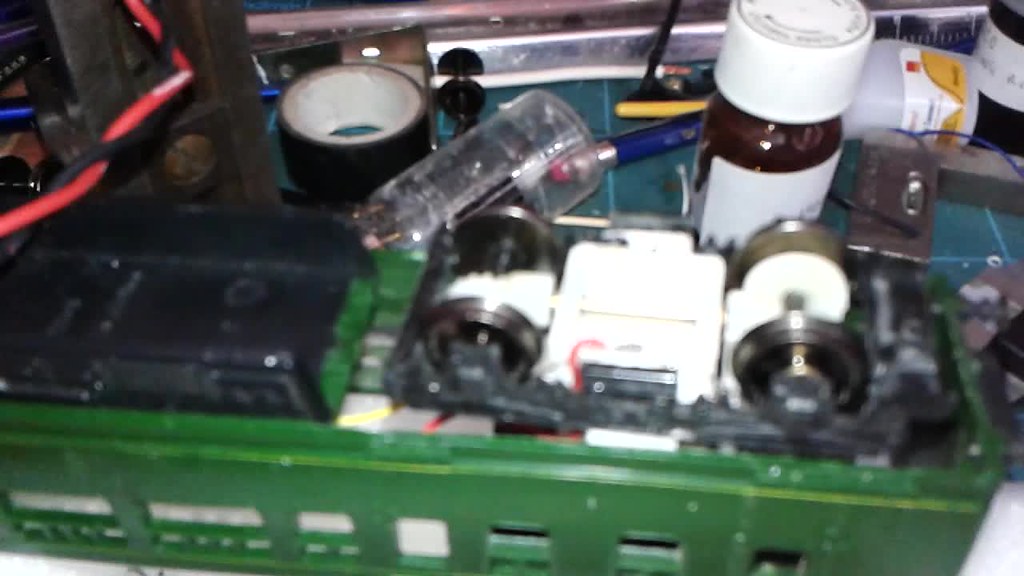
Here's what I ended up producing
we have:
The motor with gear attached
4x 2mm top hat bearings
2x wheel sets with crown wheel gears fitted
then 3D printed
2x cosmetic side frames
a bogie frame
a motor mounting block, with the gear shaft passing through the bottom
a securing cap, upon which more later.
and this is how it looks put together, I haven't attached the cosmetic frames as this is to prove it works.
Applying some power it turns, the speed range seems about right but maybe a little slow. Because the motor output shaft turns at a relatively low speed, and the spur gearing doesn't produce any end to end forces it just about holds together by friction fit which is fantastic for experimenting. The motor even stays in place without the top cap, which is convenient as that's from my first trial print, I've since changed some dimensions so it doesn't fit, besides which I want to modify it to hold the bogie mounting screw.
Now I know my limitations, particularly when it comes to long drawn out tasks, and even more so if someone else has already done the graft. So rather than turn to those cosmetic sides with spring and axlebox detail to be added I reached in the spares box and pulled out a Hornby bogie frame that had lots of lovely detail that I would struggle to reproduce. So I attacked it with a craft knife and removed most of the centre.
Some cleaning up with a file and I was able to try a first test assembly,
Hornby bogie mouldings are definitely more slippery than 3D printing so I can't try it out until I've done some more work on the frame devising a fixing for it and adding some strengthening to the end where the coupler had been, as its removal has left that end a bit weak. Still it all fits. I'll be reporting back when it has run under its own power, hopefully with a DMU body sitting on top. The gear on the motor shaft is still only pushed on, the built in gearing produces enough torque to turn the shaft within the gear if I hold on to it, which promises a decent amount of hauling power.
If you want to know more about these motors purely by coincidence there's a good article about them in the April Railway Modeler.
Fortunately there are gears available to fit the shaft either 3mm bore or 3mm D bore. I suggest you do what I did Google "0.5 Module plastic gears". There's a bewildering array of them exceedingly cheap. I just ordered a selection and had fun sorting through them. For motor bogie use those with a 2mm nominal bore (usually categorised as turns freely on 2mm, or tight fit on 2mm and under 10mm diameter are the most useful.
For my motor bogie I decided to use an old arrangement, I'd put a crown wheel on each axle, driven by a spur gear on each end of a shaft one to the left one to the right to ensure they both turned the same way. The one gear I used was combined with a larger gear which I intended to drive from a gear fitted on the motor shaft, but try as I might i couldn't get a choice of gears that held the motor clear of the gear at the other end of the bogie. So I had to put an idler in between.
Here's what I ended up producing
The motor with gear attached
4x 2mm top hat bearings
2x wheel sets with crown wheel gears fitted
then 3D printed
2x cosmetic side frames
a bogie frame
a motor mounting block, with the gear shaft passing through the bottom
a securing cap, upon which more later.
and this is how it looks put together, I haven't attached the cosmetic frames as this is to prove it works.
Now I know my limitations, particularly when it comes to long drawn out tasks, and even more so if someone else has already done the graft. So rather than turn to those cosmetic sides with spring and axlebox detail to be added I reached in the spares box and pulled out a Hornby bogie frame that had lots of lovely detail that I would struggle to reproduce. So I attacked it with a craft knife and removed most of the centre.
If you want to know more about these motors purely by coincidence there's a good article about them in the April Railway Modeler.