UppyDownyRoundyRoundyRailway

Post pictures and information about your own personal model railway layout that is under construction. Keep members up-to-date with what you are doing and discuss problems that you are having.
Post Reply
User avatar
NedFlanders
Posts: 184
Joined: Mon Feb 01, 2016 7:56 pm

UppyDownyRoundyRoundyRailway

Post by NedFlanders »

And so, after much fiddling with track plans, the first sod was turned – well, I started to remove the track from a tailchaser that never got past initial track laying and also removing the track and electrics from the current Trackmat layout.

The track on the tailchaser had been stuck down with PVA, just a little bit of persuasion with a paint scraper soon had the track and pointwork lifted from the four baseboards.

Image

Then it was on to the Trackmat, the track there was held down with a mixture of track pins and drawing pins and they soon came up.

Image
Last edited by NedFlanders on Fri Dec 29, 2017 11:51 pm, edited 2 times in total.
Getting back into railways, one step at a time.
Ned's Workbench - https://tinyurl.com/y4jby73c
The UppydownyRoundyRoundyRailway - https://tinyurl.com/y6stelsr
User avatar
NedFlanders
Posts: 184
Joined: Mon Feb 01, 2016 7:56 pm

Plans and reality

Post by NedFlanders »

Once all the track was lifted and the point motors, Point motor decoders and the Hornby eLink controller all safely put away, the trackmat baseboard would become a very useful workbench for building the baseboards.

With Christmas fast approaching ( 2 weeks to go) and a promise made to have the first level of the new railway running I decided on B&Qs finest 9mm ply for the baseboards as I knew they would have it in stock and they could cut the boards to the right sizes, the only problem was that when we arrived it turned out the cutting machine was dead in the water so we traipsed back home and picked up a trailer and then after another round trip we ended up with 3 sheets of 8X4 at home.

I did have a reasonable selection of tools ( budget circular saw, Jig saw and table saw) that I felt I could do it some justice. A basic L-Shape with a diagonal connecting the ends of the L was what I was going for, built out of five individual boards to allow us to (re)move the whole shebang as needed. It was to be built In what had been the playroom but now as the kids are getting older it had become more of a second Tv room occasionally use as a poolroom etc.

For the lower level I was going to end up with 2X 4.5ft, 1X6ft and 2X ???ft…… at least that was my best guess after printing out the plan and making various annotations...

Image

Turnout positions were noted and rough positions of the crossbracing decided, changed, ruminated upon, changed, moved back etc....

Image
Getting back into railways, one step at a time.
Ned's Workbench - https://tinyurl.com/y4jby73c
The UppydownyRoundyRoundyRailway - https://tinyurl.com/y6stelsr
User avatar
NedFlanders
Posts: 184
Joined: Mon Feb 01, 2016 7:56 pm

Building the L

Post by NedFlanders »

The base boards were going to be built in an “eggbox” fashion with 9mm tops, 4inch deep 9mm sides and 9mm cross bracing every foot or so.

The sides were cut on the table saw once I had cut the main sheets into 2ft wide sections with the circular saw. These were then laid on the floor to give me a rough feel for how it would all fit. An 8ft length of shelving was used to give me a straight edge for the circular saw for the long cuts.

Image

A short length of ply was used to give me a straight edge for the cutting of the 2ft wide boards down to the lengths for the tops. I used the trackmat baseboard and trestles to give me a flat(ish) work surface.

Image

Image

I picked up some framing clamps to hold the corners square when I was screwing/gluing them together.

Image

The three boards gradually took shape

Image

Now for the complicated bit - the Diagonal boards - or as I call it "The Bridge".
Getting back into railways, one step at a time.
Ned's Workbench - https://tinyurl.com/y4jby73c
The UppydownyRoundyRoundyRailway - https://tinyurl.com/y6stelsr
User avatar
Mountain
Posts: 5884
Joined: Mon Oct 24, 2016 3:43 pm
Location: UK.

Re: UppyDownyRoundyRoundyRailway

Post by Mountain »

It looks like it is coming along nicely.
User avatar
PinkNosedPenguin
Posts: 1683
Joined: Tue Oct 01, 2013 10:23 pm
Location: Wiltshire

Re: UppyDownyRoundyRoundyRailway

Post by PinkNosedPenguin »

Some very professional-looking boards there 8)
Note to self:
Get some of those corner clamps for when I build the boards for my next layout!
User avatar
carnehan
Posts: 1319
Joined: Mon Jan 07, 2013 9:44 pm

Re: UppyDownyRoundyRoundyRailway

Post by carnehan »

Those boards look smashing Ned.

My initial reading of your thread had me thinking you'd be treading water in that poolroom until the penny dropped! :lol:

Paul
User avatar
NedFlanders
Posts: 184
Joined: Mon Feb 01, 2016 7:56 pm

The diagonal baseboards next.

Post by NedFlanders »

Thanks for all your comments.

Time was pressing on - Christmas is not a date to be messed with - once I had the baseboards for the L built I laid them down on the ground and then I ran masking tape between the ends of the L until I was happy I had an outline for the diagonal boards that would allow the TV to be seen from the whole sofa ( very important design consideration……), I then started framing up one board,

Image

And then the other. I had a rough idea in my head of the boards design and it worked out reasonably well. Only the corner joints were glued on any of the baseboards. All of the crosspieces were left without glue so that I could shift them if they were in the way of a turnout.

Image

I then put together some basic legs and attached adjustable feet, then there followed a brief game of baseboard Tetris to shuffle them around the room while I attached the legs. I clamped them all together so that I could drill the oversized holes for the wingnuts/bolts.

Image

look - No legs!

Image

One I had this done I then adjusted each of the baseboards alignment until I was happy that they were as aligned as my woodworking skills allowed and then drilled 8mm holes near each of the bolts and put in Brass alignment dowels.

Image

Image

You can see the dowels here as the brass “dots” near each of the bolts.

All the Legs attached now.

Image

The tops on the diagonal boards are a bit patchwork as there is no need for them to be fully covered as there will be inclines here - we'll see how that works out.....


Next - some trackwork.
Getting back into railways, one step at a time.
Ned's Workbench - https://tinyurl.com/y4jby73c
The UppydownyRoundyRoundyRailway - https://tinyurl.com/y6stelsr
User avatar
NedFlanders
Posts: 184
Joined: Mon Feb 01, 2016 7:56 pm

Track laying begins

Post by NedFlanders »

So, having had some intial deliberations on the Trackwork forum

viewtopic.php?f=15&t=52110

then some final deliberations on the planning forum

viewtopic.php?f=44&t=52294

I settled on a design with a folded 8, double track design. Both upper and lower stations would have small goods yards/industrial yards for shunting puzzles etc.. The upper station would have a turntable and run around loop and the lower level would have an outer loop with two storage/staging loops – the outside lower loop to be able to be switched between DCC and DC until we have all the stock of locos converted. Simple really – EEK!!!

The customer specific instructions from the “Small Controller” were – “Dad, can we have bridges and tunnels.”

In order to hit the Christmas deadline I resolved to have the lower outer loop laid and powered for Christmas day in order to accommodate at least one present that the Small Controller would be getting. Still no pressure.....

Trackwork being shuffled around – seeing what curves would fit and give good lines down the diagonal etc.

Image

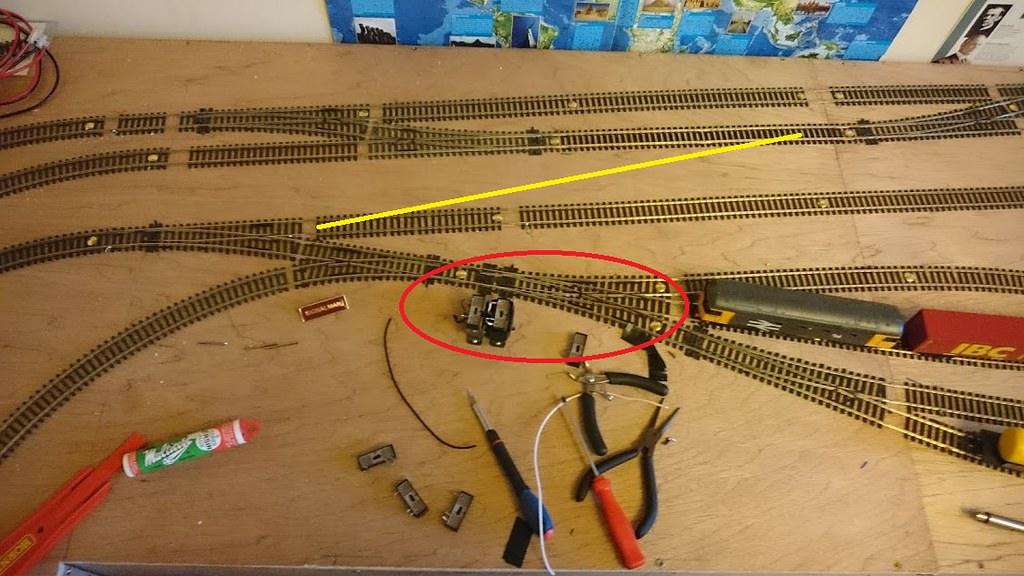
For soldering I have a Lidl Soldering Iron which I set to 350 and I have the Solder in the photo below which flows nicely.

Image

I tin the dropper, then bend the end to fit between two chairs, tin the rail and then with the helping hand holding the dropper up to the tinned rail I bring the iron to it and job done.

For a more scenic layout I would tin the bottom of the rail, but for a Small Controllers layout this will do the job fine.

Image

On Christmas morning I managed to have the outer loop and the outer main line loop wired up so two trains could be run. Happy Small Controller.
On the 26th I got the inner main line loop wired and then on the 27th the goods yard followed suit.

Image

Now for a break of a couple of days before I take on the turnouts motors and any trackwork reconfiguration, Already I’ve noted a number of changes - not least that the middle line of the outer loop is 6-12” too short for the longest loco and four MK3 coaches……. But that’s not so bad, the basic operation of the lines is working well( no derailments despite my less than exact rail cutting) , just a bit of finagling of positioning needed.
Getting back into railways, one step at a time.
Ned's Workbench - https://tinyurl.com/y4jby73c
The UppydownyRoundyRoundyRailway - https://tinyurl.com/y6stelsr
Dad-1
Posts: 7327
Joined: Sun Aug 24, 2008 8:05 pm
Location: Dorset - A mile from West Bay.

Re: UppyDownyRoundyRoundyRailway

Post by Dad-1 »

So what are you going to do next week ?
This has been so fast I'm dizzy, I do like the standards of
woodworking, mine always looks like the remains of a lorry crash !!

Geoff T.
timbologist
Posts: 372
Joined: Wed Sep 18, 2013 6:39 am
Location: Hazeldene Victoria Australia ( in the bush )

Re: UppyDownyRoundyRoundyRailway

Post by timbologist »

All I can say is when do you sleep, your bench work you seem to have used all the good bits.

Will be a nice layout when finished
Dave wrote:Should be finished by Easter :lol:

I thought the end of the month at the present rate :)
User avatar
NedFlanders
Posts: 184
Joined: Mon Feb 01, 2016 7:56 pm

How long does it take?????

Post by NedFlanders »

Sleep, hmmm. Not so much of that in the run up. Each Baseboard "night" took about three times longer than I expected. ( and lets not even go there with the trackwork/electrics) One of the things that I hadn't catered for was the sheer number of screws needed. Initially I built some of the boards with shorter screws than intended, and then had to remove and replace them with the longer ones afterwards - it all worked out though.
All I can say is when do you sleep, your bench work you seem to have used all the good bits.
Will be a nice layout when finished
Dave wrote:
Should be finished by Easter :lol:
I thought the end of the month at the present rate :)
Thank you all for your comments - onwards and upwards.
Getting back into railways, one step at a time.
Ned's Workbench - https://tinyurl.com/y4jby73c
The UppydownyRoundyRoundyRailway - https://tinyurl.com/y6stelsr
User avatar
NedFlanders
Posts: 184
Joined: Mon Feb 01, 2016 7:56 pm

Slow progress now

Post by NedFlanders »

Once I had the track all connected to power and trains could be run on all circuits I took a break for a while and then started back on a couple of "development" jobs.

first things first was to wire up the three way point in the yard so that trains could test the yard. The wiring went fine but the point motor control on a three way point took a bit of time for me to get my head around. Using up my stock of Peco point motors I needed to add on some of the polarity switches ( of which I also had a bag full).

Initially, I mounted two polarity switches on top of two working point motors, fixed them underneath the baseboard, attached up the controller and apart from a couple of pathetic noises nothing happened. so, with a weary sigh I took them out and tested them on top with a baseboard top mount instead (In the red circle below). ultimately I found like many a poor soul before that the peco point motor needs a Capacitor Discharge unit (CDU) in order to work reliably with the polarity switch.

Image

Luckily I had one from many years past - a quick email to the point motor decoder supplier on how to wire it in and away they now work.

Then I finished separating the outside circuit from the main bus so that DC Locos could be run and cue a very happy Small Controller able to run Thomas et al on the long run!

After a reasonable bit of running, a couple of changes to the trackwork seem to be suggesting therselves.

The crossover in the lower station in Red on the bottom of the photo below would seem to be much better in the Yellow position at the goods yard points. I had originally put it in the red position with curved points for a "space saving" exercise, but I think the Yellow position will be the way to go and move the intended Island platform further to the right.

Image

I'll leave it a while longer to do that one - too much work on last week and this week. maybe next weekend again.
Getting back into railways, one step at a time.
Ned's Workbench - https://tinyurl.com/y4jby73c
The UppydownyRoundyRoundyRailway - https://tinyurl.com/y6stelsr
User avatar
NedFlanders
Posts: 184
Joined: Mon Feb 01, 2016 7:56 pm

Re: UppyDownyRoundyRoundyRailway

Post by NedFlanders »

So what are you going to do next week ?
This has been so fast I'm dizzy, I do like the standards of
woodworking, mine always looks like the remains of a lorry crash !!

Geoff T.
Thank you Geoff. I do try to measure twice, three times, perhaps even four to try and avoid calamities but I can assure you that they are there...... my favourite one was where I marked on a piece of timber how long the legs should be - went out, cut them all to that length - using that one upright as the jig for the others. imagine my surprise (putting it politely )when I came back in and found the right bit of timber still in the playroom and all the legs were one inch too short!!!! somehow I had two pieces of timber both with a pencil line drawn on them in roughly the same place and I had picked up the wrong one. :?
Getting back into railways, one step at a time.
Ned's Workbench - https://tinyurl.com/y4jby73c
The UppydownyRoundyRoundyRailway - https://tinyurl.com/y6stelsr
User avatar
End2end
Posts: 6010
Joined: Sun Jan 12, 2014 9:58 pm
Location: At the end....... and sometimes at the other end

Re: UppyDownyRoundyRoundyRailway

Post by End2end »

:lol: Ahh that did make me laugh. My calamities are many.
You really are going a pace on the build. Why didn't I think of a triangular layout! :?
Thanks
End2end
"St Blazey's" - The progress and predicaments.
Welcome‎
Planning
Building
St. Blazey's Works & Depot thread
User avatar
NedFlanders
Posts: 184
Joined: Mon Feb 01, 2016 7:56 pm

Further Clearance testing.

Post by NedFlanders »

Sooo, time passed........

Further testing by the relevant (Junior) engineer brought to light that (some of) the storage sidings on the Diagonal board just weren’t long enough. A Swallow Liveried HST set with four carriages was deemed the longest train for storage – and it wouldn’t fit.

Careful examination of the previous compulsory purchase order that had been served revealed that there had been an error on the site layout by the surveyors and there was an area of land that should have been used for the trackbed……. This was duly appropriated and the person responsible for the error suitably chastised!

Construction of the expanded trackbed location commenced with more 9mm ply and some softwood supports along the edge of the existing boards. – at its widest it only gives an extra 4-5 inches ( TV End) narrowing to 0 at the opposite end( Door End). The Area reclaimed is highlighted in the next photo

Image

This was then covered in the same 9mm ply

Image

Track realignment works commenced, and we then edged the boards to secure against the dreaded drop to the floor and started test clearance runs.

Image

Some static load testing also took place.

Image

All seemed to be going well from the first tests but then issues arose with the curved points at either end of the sidings. We originally only had one in the “trailing” position, however after the redevelopment work we ended up with one curved point at either end. Certain locos/carriages would derail, but not all.

Much puzzlement and deliberations ensued – ultimately I came to the conclusion that a three way point at either end would deal with the problem. However the “Small Controller” expressed the opinion that three way points were too confusing. Hmmmmmm.

Testing continued and a simple solution was happened upon.......
Getting back into railways, one step at a time.
Ned's Workbench - https://tinyurl.com/y4jby73c
The UppydownyRoundyRoundyRailway - https://tinyurl.com/y6stelsr
Post Reply