
PNP's O-16.5 Workbench
Re: PNP's O-16.5 Workbench
Very ingenious, amazing build.
-
PinkNosedPenguin

- Posts: 1683
- Joined: Tue Oct 01, 2013 10:23 pm
- Location: Wiltshire
Re: PNP's O-16.5 Workbench
Thanks Strider 
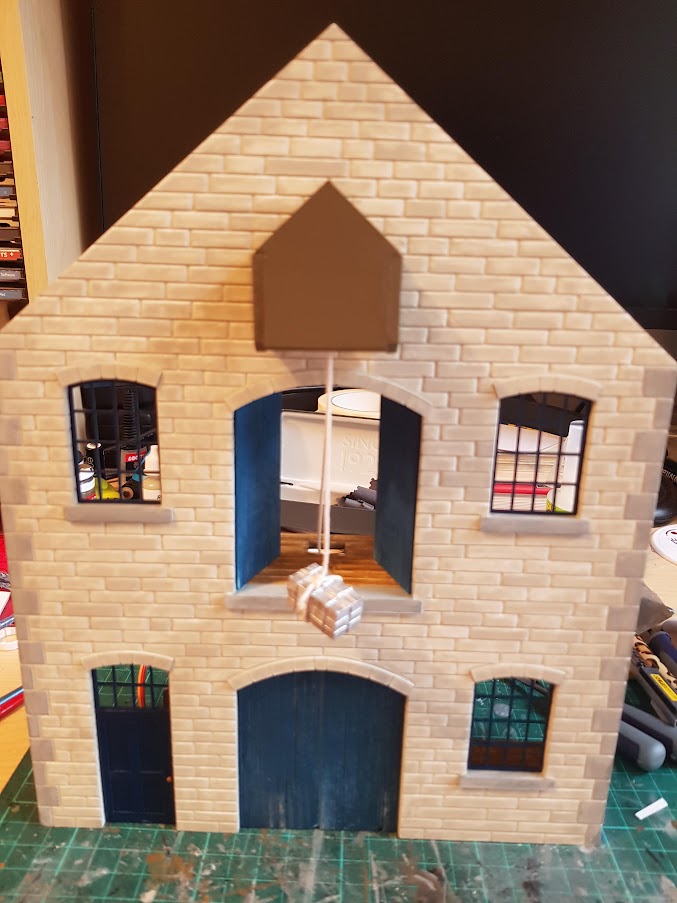
A big day today! First trial of the hoist in action!!!
One final pulley was needed on the ground floor, in a position quite visible through the window . Hence I made up a little stand for the pulley wheel (which is mounted on a spindle running in bearings like the others) and then 'hid' it behind a pile of crates!
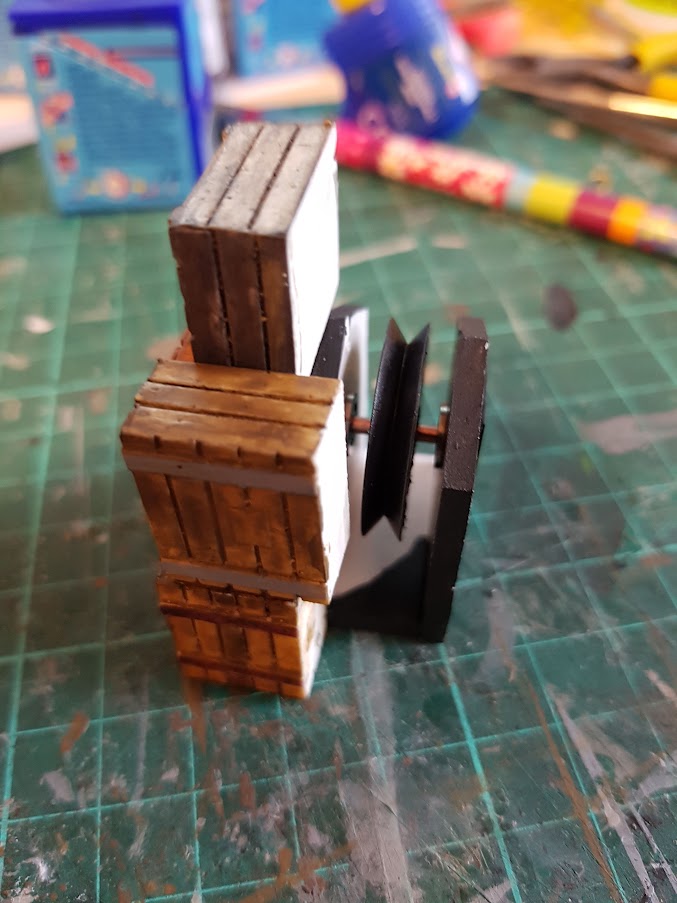
The pile only needs to hide the gubbins from an angle view from the right:

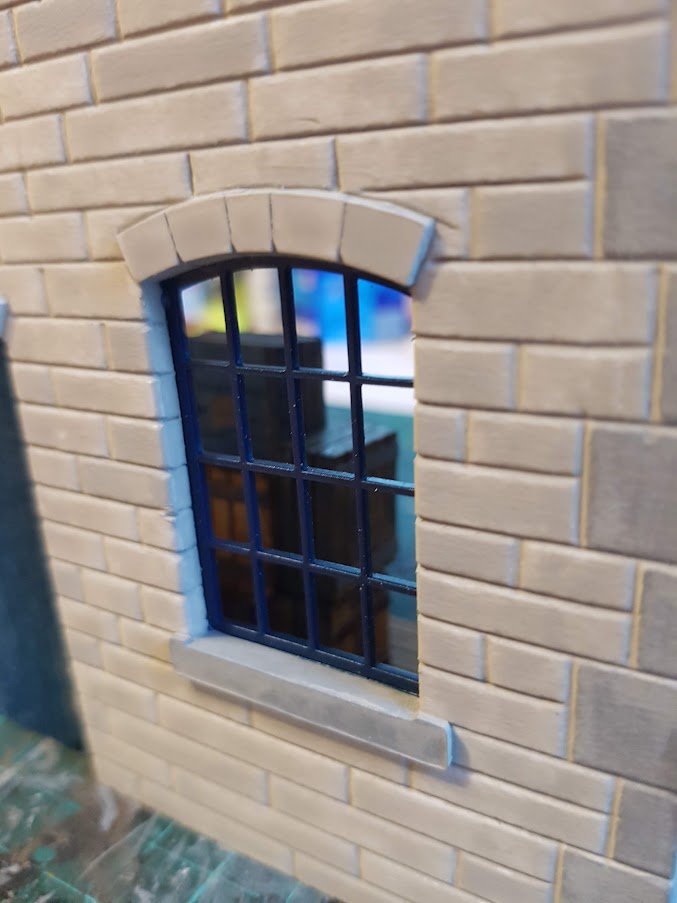
This is how the view through the ground floor window will look once the floor is fixed in place:
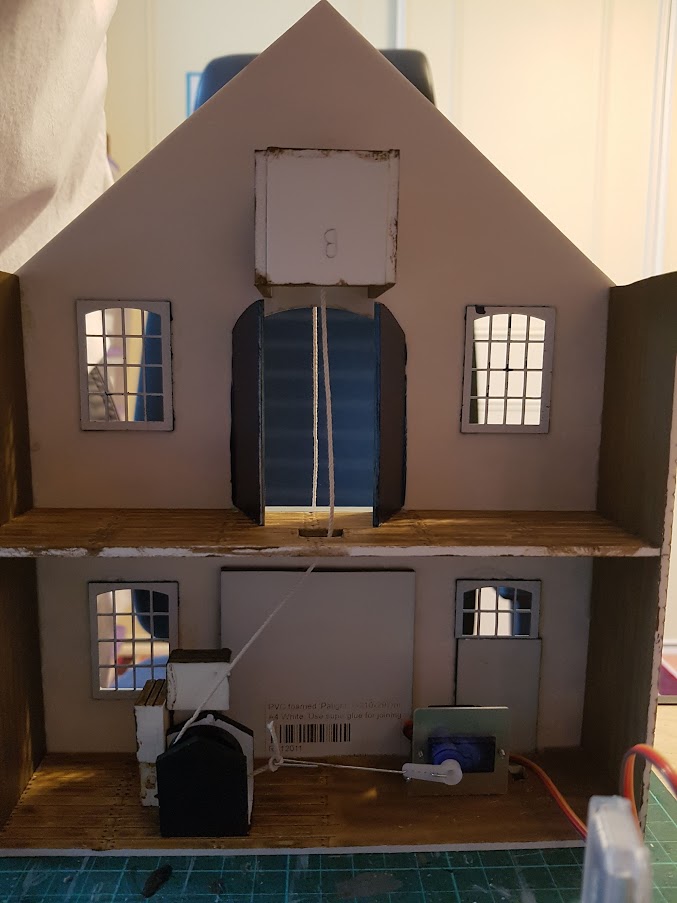
Next the servo was attached to the floor where it can do its stuff from behind the closed doors! This photo shows the servo and pulley attached to the floor, and temporarily connected up to the Arduino:
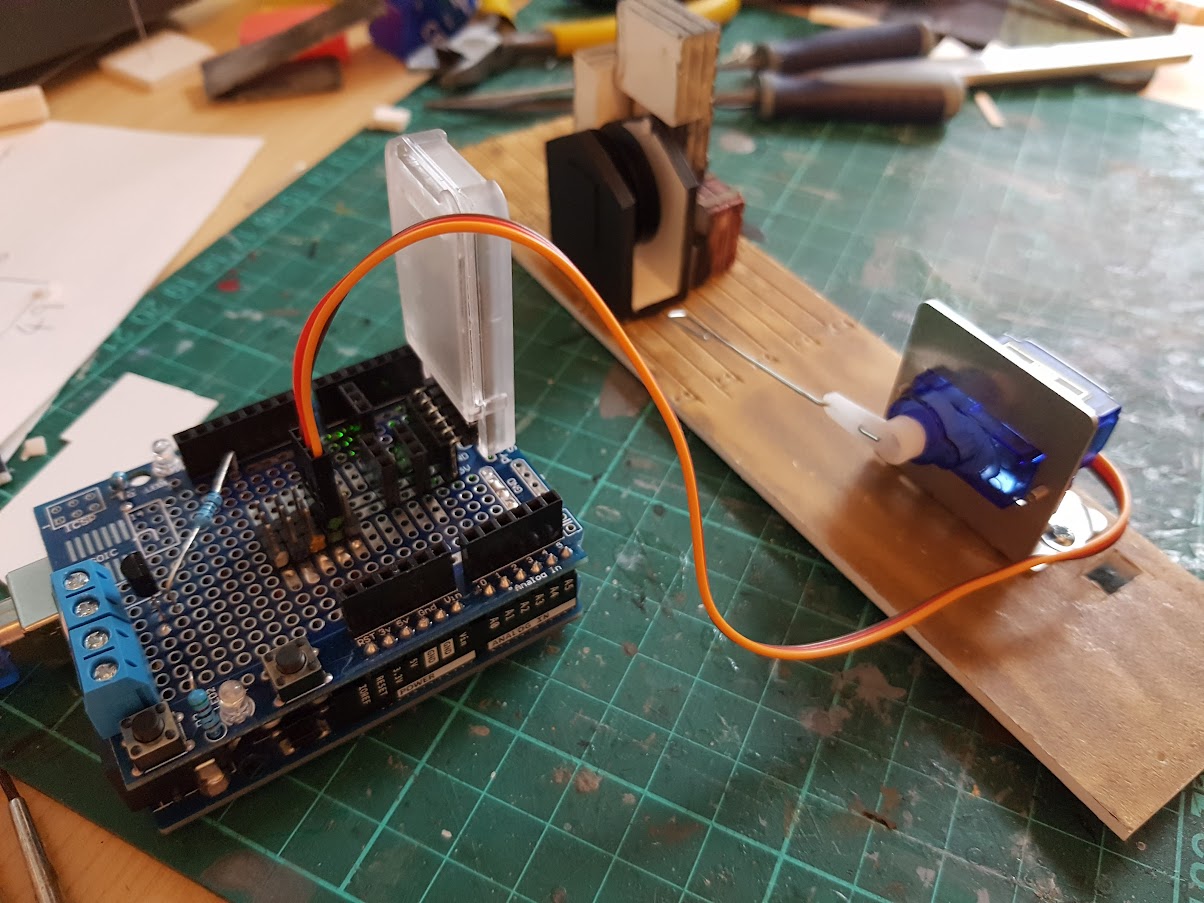
I had purchased some Caldercraft rigging thread which I thought looked like scale rope (I decided a chain would not run easily enough through the pulleys). For a trial run this was temporarily attached to the servo arm at one end, fed through all three pulleys, and tied around a whitemetal 'load' at the other. Sitting on my workbench it now looked like this:
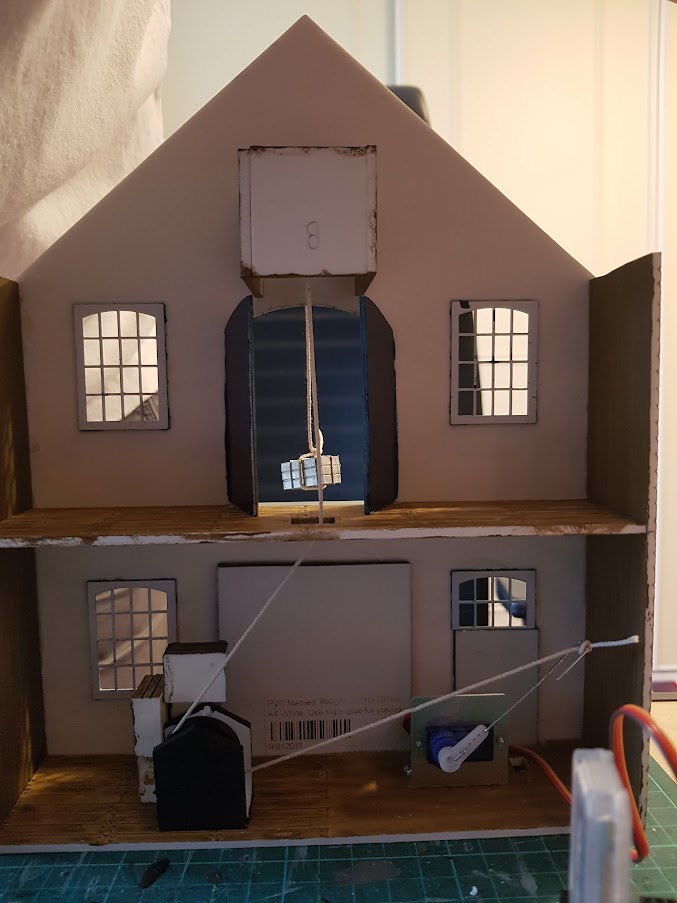
I powered it up and raised the hoist using my phone app. It worked ! The load was raised up to the first floor:
From the back you can see the slightly convoluted path that the thread takes from servo up to the lucam and then outside down to the load on the ground. Hoist down:
And hoist up:
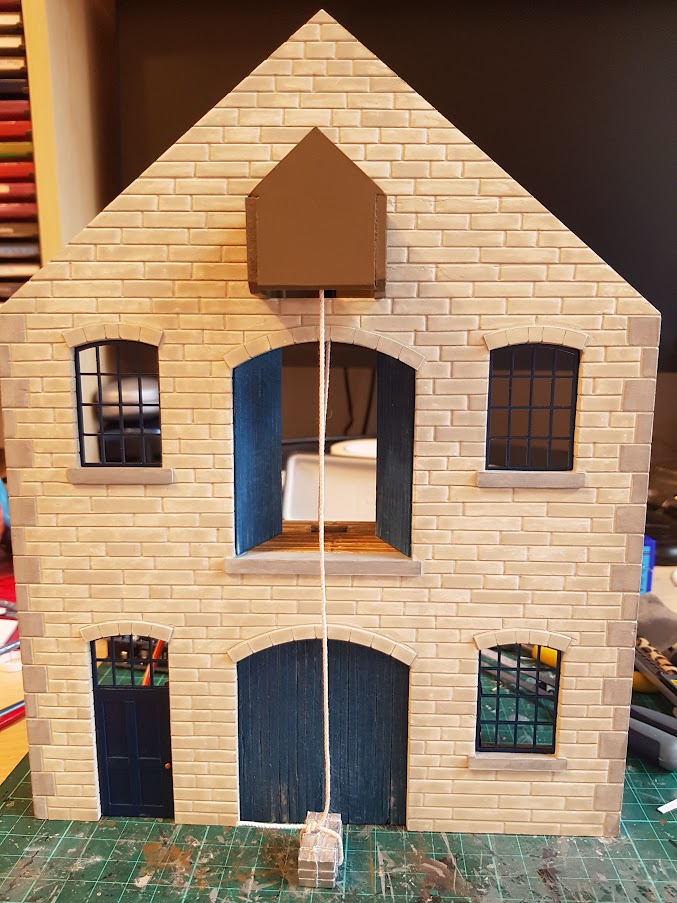
As you can see I have tried to design it all so that very little is seen from the outside front - the top pulleys are enclosed in the lucam, the crates effectively hide the bottom pulley (I'll add more cosmetic crates/sacks/drums in due course), the servo is hidden behind the two closed doors. Something is visible through the window above the door so I'll probably just make the glass dirty ! The rope can of course be seen travelling back down through the first floor, but I am planning to install a workman in front of it, and maybe some more crates!
Anyway, I thought a video was in order!
>>>>>>>>>> Hoist video <<<<<<<<<<
A big day today! First trial of the hoist in action!!!
One final pulley was needed on the ground floor, in a position quite visible through the window
The pile only needs to hide the gubbins from an angle view from the right:
This is how the view through the ground floor window will look once the floor is fixed in place:
Next the servo was attached to the floor where it can do its stuff from behind the closed doors! This photo shows the servo and pulley attached to the floor, and temporarily connected up to the Arduino:
I had purchased some Caldercraft rigging thread which I thought looked like scale rope (I decided a chain would not run easily enough through the pulleys). For a trial run this was temporarily attached to the servo arm at one end, fed through all three pulleys, and tied around a whitemetal 'load' at the other. Sitting on my workbench it now looked like this:
I powered it up and raised the hoist using my phone app. It worked
From the back you can see the slightly convoluted path that the thread takes from servo up to the lucam and then outside down to the load on the ground. Hoist down:
And hoist up:
As you can see I have tried to design it all so that very little is seen from the outside front - the top pulleys are enclosed in the lucam, the crates effectively hide the bottom pulley (I'll add more cosmetic crates/sacks/drums in due course), the servo is hidden behind the two closed doors. Something is visible through the window above the door so I'll probably just make the glass dirty
Anyway, I thought a video was in order!
>>>>>>>>>> Hoist video <<<<<<<<<<
-
TimberSurf

- Posts: 2537
- Joined: Wed Jan 08, 2014 5:47 pm
- Location: N.Wales
- Contact:
Re: PNP's O-16.5 Workbench
That's terrific, I love animated stuff, the build looks great too! I have played with Arduino's, but connecting with phones is beyond me! (busy learning 3D printing, so Arduino projects are on hold)

-
PinkNosedPenguin
- Posts: 1683
- Joined: Tue Oct 01, 2013 10:23 pm
- Location: Wiltshire
Re: PNP's O-16.5 Workbench
Thanks Timbersurf, but that's what I love about this hobby - there are so many aspects that can be brought in (or not!) as per what interests us. E.g. I can't really see me getting into 3D printing - and 'real' engineering that I see some modelers doing is way beyond me. But a bit of software and simple electronics is proving a rewarding 'extra' to the actual modelling for me at the moment 
Re: PNP's O-16.5 Workbench
"Thanks Strider "
You're most welcome, credit where credit is due, loving the hoist, superb!
Picking up on what you - clever and ingenious - guys are writing about.....
I've a friend who's a 'cad jockey' and two friends with 3DP printers, stereo lithography kit and laser cutters etc, all keep saying that I should learn CAD etc etc. But I'm sorry the thought of doing CAD drawings, learning it? Leaves me cold. Each to their own of course, no value judgements made. I can see its value and uses (I would use it if I'd been taught it at Eg work), similarly electronics and a certain level of computerisation, but even though my work has led me to do some programming, teaching/instruction and even designing computer based processes and systems? I find that computers always have glitches, inbuilt problems, planned and enforced obsolescence even. I guess I'm old school, that I look to the hands on therapeutic aspects of modelling. Our hobby is a broad church though, thank goodness for that and long may it continue too!
I'll admire - boths - work from afar
All the best,
Strider
-
PinkNosedPenguin
- Posts: 1683
- Joined: Tue Oct 01, 2013 10:23 pm
- Location: Wiltshire
Re: PNP's O-16.5 Workbench
Thanks guys
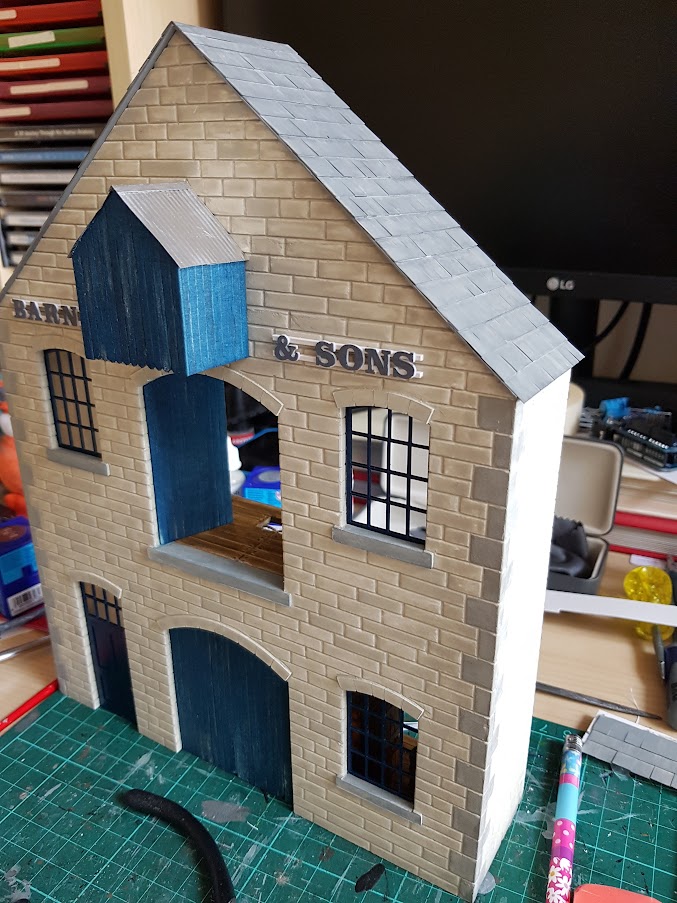
Another small update - wooden cladding on the lucam - made from thin balsa sheeting scribed with an awl, then painted blue, washed with black and distressed a little:

Added to the building, with a 'corrugated iron' roof:


Next will be to weather it - especially that shiny little roof!
Another small update - wooden cladding on the lucam - made from thin balsa sheeting scribed with an awl, then painted blue, washed with black and distressed a little:
Added to the building, with a 'corrugated iron' roof:
Next will be to weather it - especially that shiny little roof!
-
PinkNosedPenguin
- Posts: 1683
- Joined: Tue Oct 01, 2013 10:23 pm
- Location: Wiltshire
Re: PNP's O-16.5 Workbench
Actually the main roof needed to be done firstPinkNosedPenguin wrote:Next will be to weather it - especially that shiny little roof!

The roof is very thin plasticard, laid in overlapping strips which have been part-cut-through to represent individual slates, some of which are a little uneven and others cracked. Several washes of greys and blacks to give an uneven colouring before weathering of the whole building starts...
Re: PNP's O-16.5 Workbench
Looking superb! It'll look great on your layout.

Re: PNP's O-16.5 Workbench
That is looking good. Love the hoist.
Modelling On A Budget ---》 https://www.newrailwaymodellers.co.uk/F ... 22&t=52212
-
PinkNosedPenguin
- Posts: 1683
- Joined: Tue Oct 01, 2013 10:23 pm
- Location: Wiltshire
Re: PNP's O-16.5 Workbench
I have now done the following to effectively complete this first warehouse building:

Anyway, some more photos of the building:


Only 3 more warehouses to go now
- lights (leds)
- more crates, barrels etc
- load attached to rope via a hook made from wire
- rope guard across the upper opening on hooks
- man looking down from the upper opening
- weathering
- glazing
- gutters and a downpipe
Anyway, some more photos of the building:
Only 3 more warehouses to go now
Re: PNP's O-16.5 Workbench
As there are no 'like' buttons etc, all I can say is: excellent!
Re: PNP's O-16.5 Workbench
I love how you made the drainpipe. So much easier in this scale... Your eye for detail and work are excellent.
Modelling On A Budget ---》 https://www.newrailwaymodellers.co.uk/F ... 22&t=52212
-
PinkNosedPenguin
- Posts: 1683
- Joined: Tue Oct 01, 2013 10:23 pm
- Location: Wiltshire
Re: PNP's O-16.5 Workbench
As there is no "thanks" button, all I can say is: many thanks!Strider wrote:As there are no 'like' buttons etc, all I can say is: excellent!
Don't tell anyone (!) but I saw some downpipes advertised on eBay, and the close-up photos showed how he'd made them. So I saved myself a few quid (and got more satisfaction) from doing it myselfMountain wrote:I love how you made the drainpipe. So much easier in this scale... Your eye for detail and work are excellent.
-
TimberSurf
- Posts: 2537
- Joined: Wed Jan 08, 2014 5:47 pm
- Location: N.Wales
- Contact:
Re: PNP's O-16.5 Workbench
That is really looking good PNP.
I made a how to video of this technique a while back, perfectly possible to use this on OO and N scale! https://youtu.be/u0cOOwC0HykMountain wrote:I love how you made the drainpipe. So much easier in this scale... Your eye for detail and work are excellent.
-
PinkNosedPenguin
- Posts: 1683
- Joined: Tue Oct 01, 2013 10:23 pm
- Location: Wiltshire
Re: PNP's O-16.5 Workbench
Good video TS - should have found that first! Yes I did almost the same scaled up to 7mm scaleTimberSurf wrote:That is really looking good PNP.
I made a how to video of this technique a while back, perfectly possible to use this on OO and N scale! https://youtu.be/u0cOOwC0HykMountain wrote:I love how you made the drainpipe. So much easier in this scale... Your eye for detail and work are excellent.
For the record I got my plastic pipe (I chose 2.5mm diameter) and half round hollow tube (4mm outside diameter) from Model Scenery Supplies @60p and 65p per 330mm length.