PNP's O-16.5 Workbench

Post your narrow gauge model railway questions here. That includes model railway narrow track gauges Nn3 to Gn15 and beyond!.
User avatar
PinkNosedPenguin
Posts: 1683
Joined: Tue Oct 01, 2013 10:23 pm
Location: Wiltshire

Re: PNP's O-16.5 Workbench

Post by PinkNosedPenguin »

Back to some modelling at last :D.

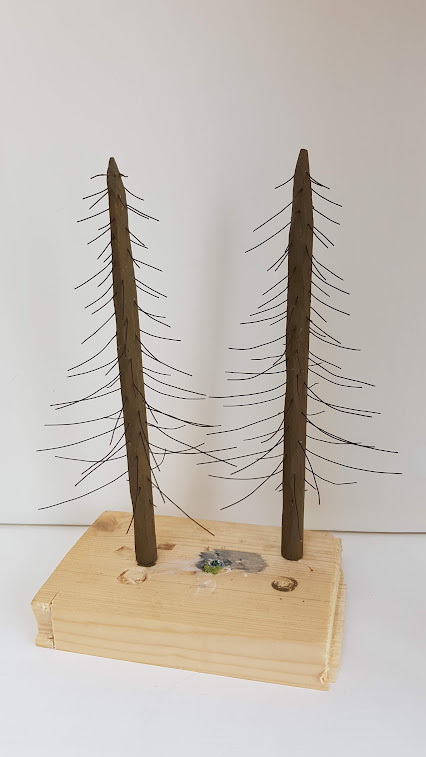
Remember these fir trees I started back in June?
Image

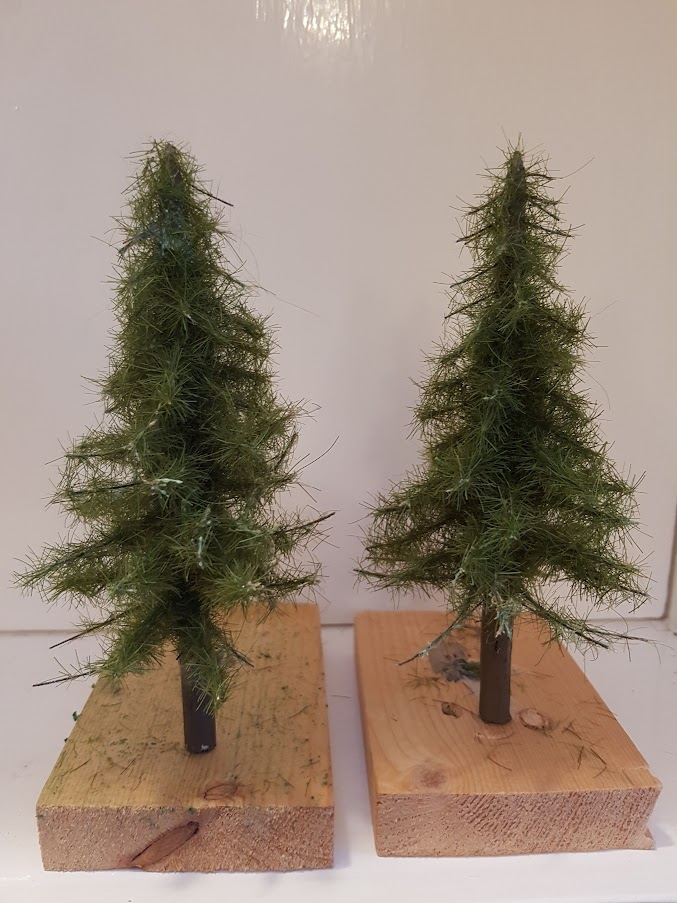
Well, they now have some foliage like this (still waiting for some of the glue to dry):
Image

As you may remember, their construction loosely followed this video I found:
https://www.youtube.com/watch?v=TGlTTOuTGBc
I used 7mm Woodland Scenics dark green static grass stuck on using some spray glue I bought cheaply on eBay. I don't think they are too bad - and are quite different in style to the earlier (deciduous!) trees I made so will hopefully make a nice contrast 8)

Incidentally the Woodlands Scenics static grass seems better than the Peco Scene stuff I had used for my . . . erm . . . grass. The fibres are a bit thicker and don't 'clump' like the Peco ones.
User avatar
PinkNosedPenguin
Posts: 1683
Joined: Tue Oct 01, 2013 10:23 pm
Location: Wiltshire

Re: PNP's O-16.5 Workbench

Post by PinkNosedPenguin »

OK now for something a little different :o

I recently purchased an Arduino Starter Kit (actually a Chinese version called Elegoo) with a view to automating some accessories on my little layout. I intend to (initially at least):
  1. control lights
  2. switch my single point
  3. activate an uncoupler on my siding
Other things may follow later . . .

I also bought a bluetooth module so I can control these things from my phone, rather than having to install physical switches etc.

A combination of some programming of both a simple android app and a sketch for the Arduino has got me to the point where I can switch lights on/off on my layout using my phone - Oh the wonders of technology!!!

Here is the bread-boarded circuit showing the Arduino, bluetooth module (standing upright behind it), battery powering the Arduino, second battery powering my two grain-of-wheat bulbs, and a servo (in the foreground) for the future point control:
Image

And here is my simple app on my phone (not all of it does anything yet!):
Image

Then (after a few corrections to circuits and programs!) the moment of truth - lights that I can switch on/off:
Image
Image

This was only possible because I have a background in software development (!) but it is so nice to now have a use for those skills that I can apply to my hobby :lol:
User avatar
TimberSurf
Posts: 2537
Joined: Wed Jan 08, 2014 5:47 pm
Location: N.Wales
Contact:

Re: PNP's O-16.5 Workbench

Post by TimberSurf »

If the grain of wheat are not to current hungry, you could set their brightness with the arduino, or introduce some gas flicker!
Image
Lumsdonia <--- Hit link to go to my website for full story and wiring advice!
User avatar
PinkNosedPenguin
Posts: 1683
Joined: Tue Oct 01, 2013 10:23 pm
Location: Wiltshire

Re: PNP's O-16.5 Workbench

Post by PinkNosedPenguin »

Yeah I wished I'd gone for LEDs as then they could have been controlled directly from the Arduino, but gow's were already installed... I like their glow on 9v so quite happy with them in the end :D
User avatar
Bufferstop
Posts: 13821
Joined: Thu Mar 11, 2010 12:06 pm
Location: Bottom end of N. Warks line

Re: PNP's O-16.5 Workbench

Post by Bufferstop »

Every year when it comes to taking down the decorations, I check out the strings of lights. If one looks ropey I canibalise it, otherwise the oldest gets the treatment. This year it was a string of "gow" Doing a quick count and calc I reckon they were 3v bulbs but at 3volts on my power supply they give a lovely warm yellow light. They'll look great as gas lights, I'll be fitting them under the platform canopy..
Growing old, can't avoid it. Growing up, forget it!
My Layout, My Workbench Blog and My Opinions
User avatar
PinkNosedPenguin
Posts: 1683
Joined: Tue Oct 01, 2013 10:23 pm
Location: Wiltshire

Re: PNP's O-16.5 Workbench

Post by PinkNosedPenguin »

Work has continued with my little arduino project - the first four uses (each controlled from my phone as previously mentioned) will be:
  1. station lights
  2. point switching
  3. uncoupler
  4. warehouse door
The software for all four has now been written for both the android app and the arduino sketch.

This photo shows the circuit on the breadboard - showing the servos for items 2 to 4 and 3 infra-red sensors for automatic opening of item 4 when a train approaches:
Image

The next stage was to build the circuit on a 'shield' board which sits on top of the arduino itself. As this photo shows I have used connectors for all components that need to be installed on the layout, so that the boards can be removed easily if required:
Image

So, I am now contemplating the final stage, which is the mechanical installation of servos for the items 2 and 3 (item 4 will follow later once there is a warehouse in which to install a door :lol:)
User avatar
PinkNosedPenguin
Posts: 1683
Joined: Tue Oct 01, 2013 10:23 pm
Location: Wiltshire

Re: PNP's O-16.5 Workbench

Post by PinkNosedPenguin »

I have made a start on construction of the right-most mocked-up building in the picture below from my layout thread:
Image

Right now I am all about trying out new things and techniques, so I purchased some Palight material from 4D Modelshop - it is described as "Foamed PVC - a specialist rigid sheet material". Using some 3mm thick sheeting of the stuff I cut out the basic shape; even this thickness is quite easily cut with a knife. I have bought some very nice windows from York Modelmaking, so cut the window apertures to suit these.

The beauty of this stuff is that it can also be carved - so I set to with a couple of sizes of old screwdriver to mark out a fairly regular pattern of stone blocks. On another of the warehouse buildings I might try a more random pattern, but for my first one I decided a steel ruler would be my best ally! And of course, being 3mm thick, it is sturdy stuff and I think the model will be very strong once held rigid by sides and floors.

Also from York Modelmaking I got some curved 'headers' to fit over the windows and also to go above the door openings. These were glued onto the Palight along with some pieces of plasticard for window, and floor, sills.

This is where I am right now:
Image
Image
Strider
Posts: 17
Joined: Thu Feb 11, 2021 2:35 am

Re: PNP's O-16.5 Workbench

Post by Strider »

PinkNosedPenguin wrote:I have made a start on construction of the right-most mocked-up building in the picture below from my layout thread:
Impressive! Lovely work.
User avatar
PinkNosedPenguin
Posts: 1683
Joined: Tue Oct 01, 2013 10:23 pm
Location: Wiltshire

Re: PNP's O-16.5 Workbench

Post by PinkNosedPenguin »

More progress on the warehouse :D. I made a list of each task I have to do (to make sure I do everything in the right order!) and it was over 40 steps long :shock:

Anyway, first was to paint the stonework. I made up a dilute solution of Roots 'Camouflage' #28 acrylic paint and spread it unevenly onto the stone carvings - starting with the two side pieces (which wouldn't matter too much if I messed them up :lol:). The paint had a nice textured consistency and flowed into the grooves for the mortar quite nicely. It also soaked into the un-primed Palight material unevenly so the stonework did not appear too uniform. Here is the first coat while still wet:
Image

Encouraged, I proceeded to give the main front panel the same treatment. Then I picked out the corner stones in Stone Grey, and the sills in Medium Grey. When dry, another diluted coat of Camouflage was applied to tone down these grey stones - and also to darken the main area a bit more. I tried to pick out a few stones with the second coat to make them appear darker than the others, to provide some more variation. This technique seemed to work quite well and I am quite pleased with such a quick and easy result:
Image
Strider
Posts: 17
Joined: Thu Feb 11, 2021 2:35 am

Re: PNP's O-16.5 Workbench

Post by Strider »

PinkNosedPenguin wrote:More progress on the warehouse :D. I made a list of each task I have to do (to make sure I do everything in the right order!) and it was over 40 steps long :shock:
That's really organised! I should do that more often, make my own instructions! If there are instructions, I usually scrawl notes all over them :roll: :D :lol:

I've just started trialing Roots paints too, I usually use, in the main, Lifecolor (sic) and Humbrol and one or two others for specifics. How do you find the Roots paints? They're supposed to dry really flat/matt and have more per dropper/bottle than Eg Humbrol?

Amazing work btw, very nice indeed!

The attached photo is walling I've painted using Lifecolor and Games Workshop specific paints (apologies for the hijack).

I'm looking forward to using UK manufactured Roots paints though.
Attachments
post-11256-0-66146000-1382911620_thumb.jpg
User avatar
PinkNosedPenguin
Posts: 1683
Joined: Tue Oct 01, 2013 10:23 pm
Location: Wiltshire

Re: PNP's O-16.5 Workbench

Post by PinkNosedPenguin »

Excellent wall - let's see more of your work please!

TBH I stumbled across Roots because I wanted Humbrol #28 "Camouflage" in matt acrylic and found that was the only make available = Roots matched colours. But I like it, a lot. As I said, the consistency when diluted "to taste" was very nice.
Strider
Posts: 17
Joined: Thu Feb 11, 2021 2:35 am

Re: PNP's O-16.5 Workbench

Post by Strider »

PinkNosedPenguin wrote:Excellent wall - let's see more of your work please!

TBH I stumbled across Roots because I wanted Humbrol #28 "Camouflage" in matt acrylic and found that was the only make available = Roots matched colours. But I like it, a lot. As I said, the consistency when diluted "to taste" was very nice.
Hi PNP,

Thanks for the kind words - I've not much to write about at this time, I'll post something soon though (hopefully).

Thanks for the comments about the Roots paint, that's good to know. I think some Humbrol paints are deleted in pots as they're switching to droppers? But the good folk at Roots seem helpful and make good products too.

I'm slowly working my way through your thread - very nice work btw - I can see that we are using similar kits/kit ranges etc, interesting to see how people adapt various aspects too.

Regards,

Strider
User avatar
PinkNosedPenguin
Posts: 1683
Joined: Tue Oct 01, 2013 10:23 pm
Location: Wiltshire

Re: PNP's O-16.5 Workbench

Post by PinkNosedPenguin »

More progress on the warehouse.

As I said, I have some windows from York Modelmaking - a set of 4 arched ones, one of which I cut in half and attached above a scratch-built door:
Image

These were sprayed with primer and then with a gloss blue (the only blue spray I had to hand) and fitted behind their openings. I also made up some goods doors from thin balsa sheet attached to plasticard (for strength) and then lightly sprayed with the same colour. I then tried to scribe the planks on them with limited success, the balsa kept springing back to hide the scribed lines :evil:. So I used a black wash to highlight the planking lines which has worked to a degree! The balsa was then distressed a bit, esp. at the bottoms. Here is the front face with windows and doors fitted - the upper goods doors (sitting on the mat in front) will be open.
Image

Here are some cruel close-ups (the door handle is simply a pin head painted brass):
Image
Image
Image

Note that glazing has not been installed yet. Also the stonework looks much more varied in shade in real life than is showing in these photos... :?
Strider
Posts: 17
Joined: Thu Feb 11, 2021 2:35 am

Re: PNP's O-16.5 Workbench

Post by Strider »

It's hard to (digitally) photograph Cotswold type stonework and capture all the nuances. Looking very good though, nevertheless!
User avatar
PinkNosedPenguin
Posts: 1683
Joined: Tue Oct 01, 2013 10:23 pm
Location: Wiltshire

Re: PNP's O-16.5 Workbench

Post by PinkNosedPenguin »

More progress has been made in the form of sides (only 5cm as this is a low relief building), first floor and its (open doors), and what I am told is a Lucam (or as I call it "the sticky-out bit"!).

The corners between sides and front are not perfect (by any means) but at least by scribing it all myself I was able to get the corner key stones to (virtually) line up! Next time I may paint AFTER construction so I can properly use filler first to make it a seamless join? Though the wash technique requires the wall to be horizontal whilst the paint dries :?:

The floor was simply scribed straight into the Palight and painted with brown washes. The doors are open on the first floor awaiting a delivery!

The lucam contains two pulley wheels on spindles which turn nice and freely in little bearings set into the side walls. These components were bought very reasonably from an online shop called Technobots. The horrible brown will be 'clad' in wood planking, but I didn't want any bright white showing through anywhere so gave it a quick coat of paint :D.

Here are some photos:
Image
Image
Image
Image
Image

Thanks for reading . . .
Post Reply