
Looking at the wiki it seems to be that "toad" was the GWR code for a brake van, the codes were standardised across the big four. So all brake vans were, telegraphically "toads". On the GWR the single ended brake was the standard and so in GW speak became toads. "Circular reference resolved"Atso wrote:Thanks Mountain.
Regarding the term 'Toad, I honestly don't know about what constituted deserving the designation but I do know that the LNER used the term as well with B, D, and E varieties being built during its existence - but not in Order with the B being first, the E second and the D the last.
The Toad D also formed the basic design for the BR standard brake van. The 2mm association does this as a lot and I think it would be fun to backdate one into a Toad D in the future.
Mainly 3D Printed LNER Locomotives in N gauge
-
Bufferstop

- Posts: 13821
- Joined: Thu Mar 11, 2010 12:06 pm
- Location: Bottom end of N. Warks line
Re: Mainly 3D Printed LNER Locomotives in N gauge
Growing old, can't avoid it. Growing up, forget it!
My Layout, My Workbench Blog and My Opinions
My Layout, My Workbench Blog and My Opinions
Re: Mainly 3D Printed LNER Locomotives in N gauge
It's been a few days since I last posted on here but things have been happening.
A few painting and lettering jobs on some plastic wagons that I built a year ago!
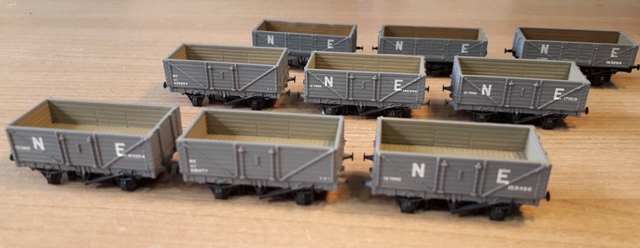
Some Peco 9' wheelbase PO wagons painted to represent the LNER's own builds for their own use. I've still got to paint the white diagonal stripe that denoted which end the end door was and then weather and coal them. These will form part of a coal train which will include some wooden hopper wagons that I'll obtain and build from the 2mm Association kits. I wasn't going to do a train such as this as my understanding was that these were a feature of the ex North Eastern section of the line and that private owner wagons were used between New England and London. However, having managed to obtain a cheap second hand copy of 'Yeadon's Register of LNER Locomotives', part no. 9, I found a wonderful picture of a Gresley O2 hauling such a train to London on the ECML so I'll be making it after all! I think that the Toad E will look good at the end of this rake!
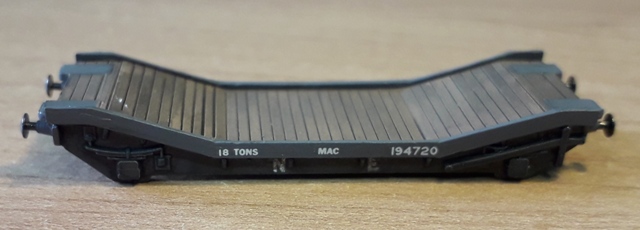
This is a representation of an ex-NER 'MAC L' built from the N Gauge Society kit for the GWR Loriot well wagon. I've not modified the kit in any way other than the paint scheme but, as part of a fix rake, I doubt that many will be able to tell! I've got a second one to finish painting but the decal sheet I have also contains 'MAC' decals for one wagon! Since building these, I've discovered that the 2mm Association produces etches for both the GER and GCR versions of this type of wagon so I've marked these as kits to obtain and build in the future.
After some time away from the CAD (and modelling) due to illness, I finally got back to the GWR County a couple of days ago and detailed the tender.
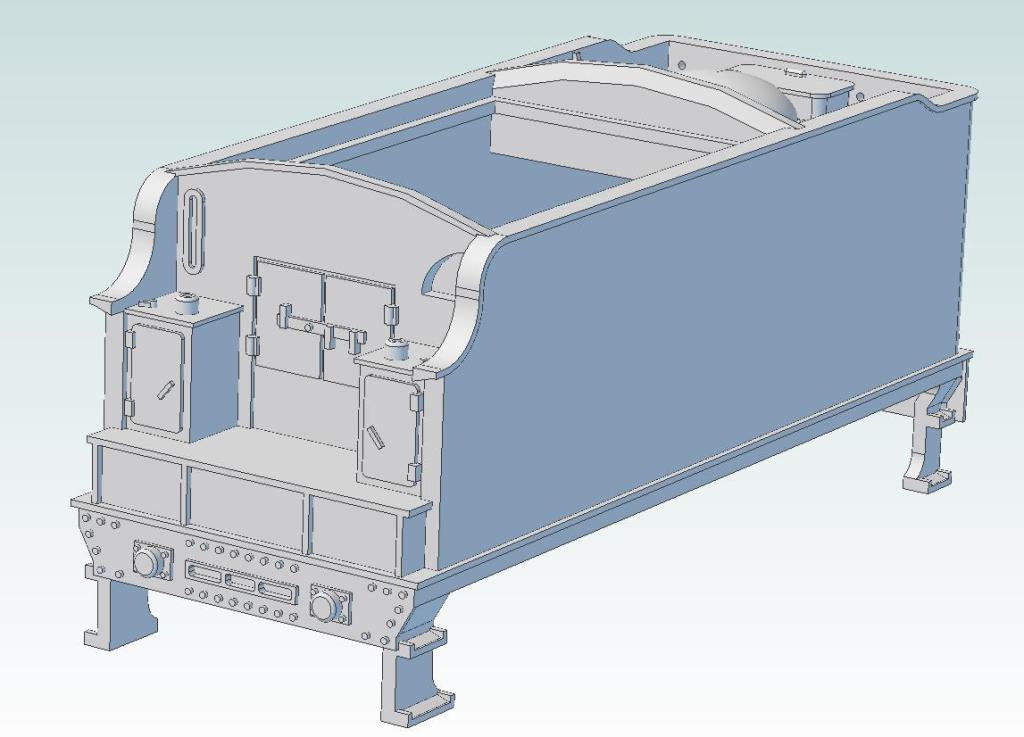
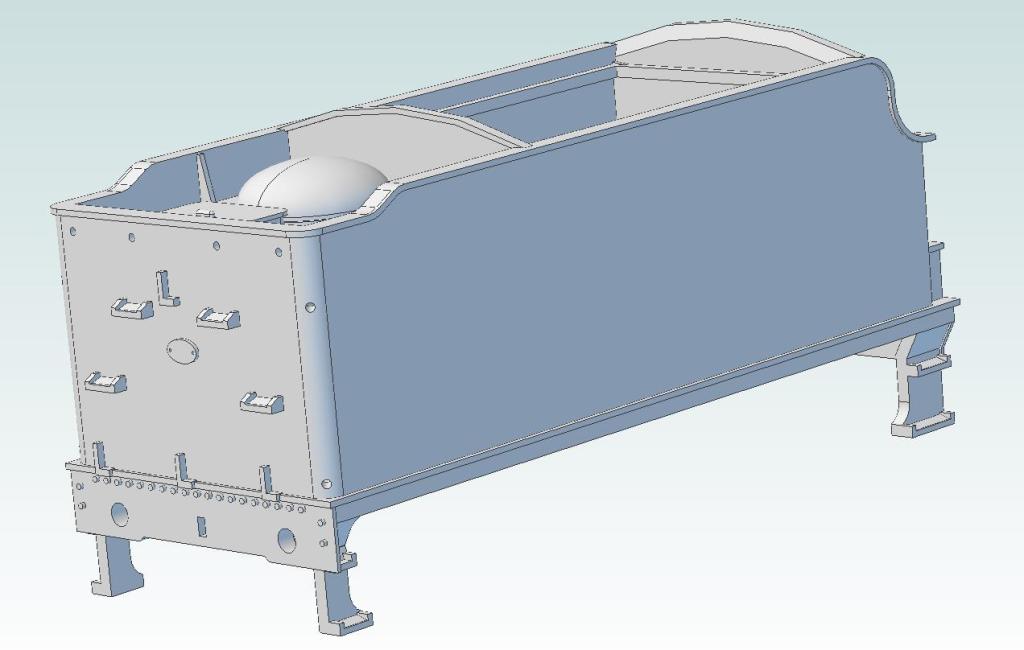
There is still quite a bit of work to be done before I can print the final version of the loco and tender but this mainly revolves around calculating fixing points and such so that it will fit properly on the Farish Black Five (tender driven) donor chassis.
A few painting and lettering jobs on some plastic wagons that I built a year ago!
Some Peco 9' wheelbase PO wagons painted to represent the LNER's own builds for their own use. I've still got to paint the white diagonal stripe that denoted which end the end door was and then weather and coal them. These will form part of a coal train which will include some wooden hopper wagons that I'll obtain and build from the 2mm Association kits. I wasn't going to do a train such as this as my understanding was that these were a feature of the ex North Eastern section of the line and that private owner wagons were used between New England and London. However, having managed to obtain a cheap second hand copy of 'Yeadon's Register of LNER Locomotives', part no. 9, I found a wonderful picture of a Gresley O2 hauling such a train to London on the ECML so I'll be making it after all! I think that the Toad E will look good at the end of this rake!
This is a representation of an ex-NER 'MAC L' built from the N Gauge Society kit for the GWR Loriot well wagon. I've not modified the kit in any way other than the paint scheme but, as part of a fix rake, I doubt that many will be able to tell! I've got a second one to finish painting but the decal sheet I have also contains 'MAC' decals for one wagon! Since building these, I've discovered that the 2mm Association produces etches for both the GER and GCR versions of this type of wagon so I've marked these as kits to obtain and build in the future.
After some time away from the CAD (and modelling) due to illness, I finally got back to the GWR County a couple of days ago and detailed the tender.
There is still quite a bit of work to be done before I can print the final version of the loco and tender but this mainly revolves around calculating fixing points and such so that it will fit properly on the Farish Black Five (tender driven) donor chassis.
Steve
Re: Mainly 3D Printed LNER Locomotives in N gauge
A little bit of progress on some projects that I use as space fillers in between other things.
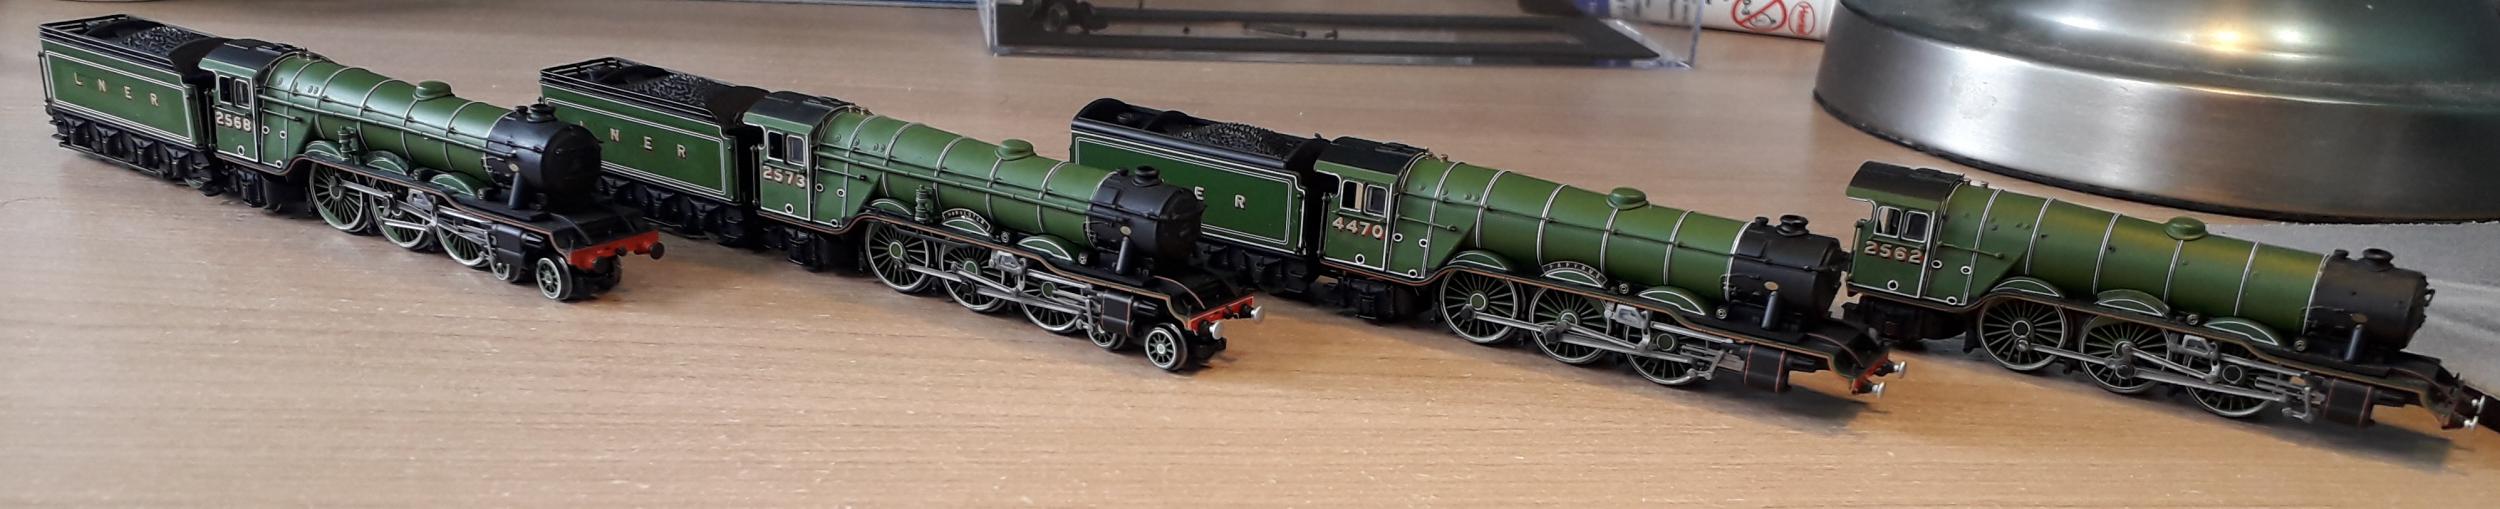
Four Dapol A3s that are in the process of being re-numbered/named and modified. These have been on the go on and off for a year now and are a useful set of filler projects in between other bits and pieces. From left to right there are:
A1 'Sceptre' c. 1933: Started life as a BR example that was gifted to me as it was a non-runner. I had a spare apple green boiler, cab and driving wheels which I substituted for the BR ones and repainted and lined the splashers. The smokebox has had the superheater covers carefully sanded off and the pipework and reversing gear as been transplanted to the right hand side of the boiler to give a reasonable approximation of an A1. Strictly speaking the cab should have the earlier large cutouts but I decided this was a step too far. The Westinghouse pump is a spare from a Dapol Terrier mounted on a simple 'L' shaped bracket that I made out of 0.5mm plastic. The lining on the pump was made using some decal paper, sprayed with Precision gloss Doncaster Green and a thin white line was ruled onto the decal using a bow pen - I'll be adding the associated pipework at some point!
A3 'Harvester' c. 1933: Many of the same modifications as per Sceptre but, as this one is an A3, it retains the superheater covers on the smokebox. This loco was purchased as a returned LNER green item from the Dapol open day.
A1 'Great Northern' c. 1938: A birthday present from my better half in June (the newest of these projects!) which was obtained as an absolute bargain on Ebay. So far I've renumbered it but not yet carried out the modifications to make in an A1. One this locomotive, removing the tender letters (I don't like Dapol's effort on this model) resulted in a loss of paint and some unsightly black patches. Therefore, I carefully masked up the lining and outer sections and resprayed the center section with Precision gloss Donny green before applying the lettering. Although I've renumber the loco, the nameplate still betrays its origins as 'Papyrus'!
A1 'Isinglass' c. 1935: Another returned item from the Dapol open day and returned to working order (at £35 each, who could refused!). I've still got to reinstate the handrails having sanded off the superheater covers and finish transplanting the various bits to the right hand side of the boiler. It is presently missing its tender as I'm having to repaint a GNR BR liveried spare. I've chosen this particular locomotive as a nod to Andy at Isinglass Models who has been so helpful in supplying me with drawings for my 3D printed projects over the years.
There is still plenty to do on these such has painting in the missing bits from the wheels, correcting the green valances and fitting the various other bits in the detailing packs (where I have them, scratch built where I don't). In the end I'll have another four Gresley Pacifics available for my future layout, each subtly different to the others.
Steve
Re: Mainly 3D Printed LNER Locomotives in N gauge
After a day wrestling with the CAD for the GWR County 4-6-0, I decided to paint the missing lining on to the tender and Cartazzi truck for Great Northern using a bow pen. The front bogie wheels have had a wash of white paint put into their centers. Once dry, I'll carefully paint in a black dot.
I've also painted out the incorrect green on the loco's valance and had to respray inside the tender lining as I'd accidentally removed the paint when I removed the original, too large, lettering. The two pence piece is to give an idea of the scale of the Dapol A3 donor (still retaining its original 'Papyrus' nameplates!).
Prior to this, I had to backdate the A3 boiler into an approximation of an original A1 type. To do this, I needed to remove the main handrails and vacuum ejection pipe to be able to sand off the superheater header covers from the top of the smoke box. I then had to make good a few holes where the ejector pipe had been as it was going to transplanted to the right hand side of the boiler (all the original Gresley A1s were right hand drive) and patch paint in the affected areas.
After this, I reinstated the handrails and transplanted the ejector pipe and again did some more patch painting.
The boiler was then reunited with the rest of the loco to bring it to the state shown in the first picture.
I've also painted out the incorrect green on the loco's valance and had to respray inside the tender lining as I'd accidentally removed the paint when I removed the original, too large, lettering. The two pence piece is to give an idea of the scale of the Dapol A3 donor (still retaining its original 'Papyrus' nameplates!).
Steve
Re: Mainly 3D Printed LNER Locomotives in N gauge
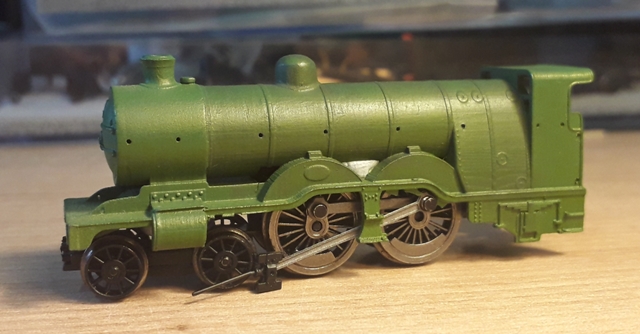
Back to a 3D print... I test printed the current GWR County loco body and decided to quickly spray it up using Tayima paints (hence the wrong shade of green) as it was coming with me to TINGS yesterday.

Please note that, other than removing the printing supports, no cleaning up or rubbing down of this print had taken place - hence the strange pattern on the boiler. However, I hope that you can see some of the detail that's been incorporated into the CAD.
Please note that, other than removing the printing supports, no cleaning up or rubbing down of this print had taken place - hence the strange pattern on the boiler. However, I hope that you can see some of the detail that's been incorporated into the CAD.
Steve
Re: Mainly 3D Printed LNER Locomotives in N gauge
Where is everyone at the moment? It is very quiet on here. It seems somethings that, for ever model that makes it off the bench, there are always one or two more that didn't quite make it and need a rethink before they see fruition (if they ever do!).
A few months back I obtained a NQP Dapol Britannia and a NQP Dapol Grange in the hope that I might be able to combine the Britannia's wheels and the Grange's chassis to create the basis for an LNER C1 Atlantic. Unfortunately, Dapol didn't use the same size gear wheel for the driven axles of these two locos and also redesigned the axle so that they could not be swapped without modification (and risk of damaging the plastic axles). Therefore the project was once again shelved.
Fast forward to June and I was lucky enough to arrange a swap of some locomotive bodies for chassis units with a 2mm fine scale modeller. Within that little lot was the remains of a Dapol Hall chassis. This went unnoticed due to various events that lead to another bout of depression and some other health issues.
Fast forward again to today. I spent quite a bit of time today measuring the Black Five chassis and transferring it into CAD to get the fixing points correct for the Hawksworth County project. Yes, you would think that would have been the first thing I would have done but, when I started the project, I wasn't in the best frame of mind and this didn't occur to me for some reason - I almost got away with just measuring and transferring directly to the loco body too!
Anyway, after several hours of doing this, I'd just about lost the will to live and needed to do something else. While searching for that something else, I came across the remains of the Hall and the Britannia. Anyway, long story short, the Hall and the Britannia both use the same size of axle gear and therefore are compatible! I'll need to shim one or two of the gears in the gear chain to stop them disengaging but this is easy to do. Having proven that I could fit the Brit wheels, I found a very old C1 body that I designed awhile back - it also has several mistakes that I'd like to correct but is accurate in the major dimensions. Anyway, bluetacked onto the the chassis with a spare Farish bogie temporarily standing in, the C1 concept...
The Brit wheels are slightly too small for a C1 (but bigger than the Hall's wheels) and the Hall chassis is a scale two inches too long in the coupled wheelbase but I think it is close enough - due to how close together the coupled wheels are, I couldn't fit anything bigger anyway! The loco body will need to be completely redesigned to both correct mistakes and make it easier to fit properly on the Hall/Brit chassis. As I've got plenty of other things that I need to get through, I doubt this will progress for a few more months but I'm very happy that there maybe a way of making a close to scale C1 after all!
Steve
-
TimberSurf

- Posts: 2537
- Joined: Wed Jan 08, 2014 5:47 pm
- Location: N.Wales
- Contact:
Re: Mainly 3D Printed LNER Locomotives in N gauge
I have no interest in N gauge, but still read your blog just to marvel at the work you do in such a small scale. 
If you keep dropping projects and swapping to others, may I suggest you keep a 'worksheet' with each bunch of bits, track what you have done (cross through) and jot down what is next to be done. As I juggle at least half a dozen projects at a time, it helps keeping me from scratching my head as to what I was planning next when I pick up a project 6 months later!
If you keep dropping projects and swapping to others, may I suggest you keep a 'worksheet' with each bunch of bits, track what you have done (cross through) and jot down what is next to be done. As I juggle at least half a dozen projects at a time, it helps keeping me from scratching my head as to what I was planning next when I pick up a project 6 months later!

-
flying scotsman123
- Posts: 2233
- Joined: Thu Jan 12, 2012 5:29 pm
- Location: err, down there round the corner... not that one!!!
Re: Mainly 3D Printed LNER Locomotives in N gauge
Having read this comment on my phone I looked really hard to see what you were on about. It's only now that I'm on my laptop I can see what you're on about, with the picture probably 4 times the size it is in real life! That's bloody impressive in my book, certainly compared to plenty of even recent OO gauge 3D printed stuff that required a lot of work to remove awful striation.Atso wrote:
Please note that, other than removing the printing supports, no cleaning up or rubbing down of this print had taken place - hence the strange pattern on the boiler. However, I hope that you can see some of the detail that's been incorporated into the CAD.

Re: Mainly 3D Printed LNER Locomotives in N gauge
Thank you TimberSurf, I do find that I end up with more than half a dozen on the go and, while I've not had a problem with remembering what I've done (to be honest, I usually think I've found a better way and often start again!) your idea of keeping a worksheet is a great idea and something I think I'll be employing in the future.TimberSurf wrote:I have no interest in N gauge, but still read your blog just to marvel at the work you do in such a small scale.
If you keep dropping projects and swapping to others, may I suggest you keep a 'worksheet' with each bunch of bits, track what you have done (cross through) and jot down what is next to be done. As I juggle at least half a dozen projects at a time, it helps keeping me from scratching my head as to what I was planning next when I pick up a project 6 months later!
The print was produced on my B9Creator which I find is great for prototyping models before sending them to Shapeways (sometimes the B9C print is good enough to use directly), the layering is subtle but visible and for a final model I'd use fine grades of flexible sanding sticks (I use both the Flory Models and Albion Alloys brands (just a satisfied customer) to buff out any print lines. This would work in 4mm scale as well but I find that Shapeways' Frosted Detail materials (or whatever they've been rebranded to this week!) and the B9C prints respond best to this kind of treatment but materials such as White Strong and Flexible and Sandstone (or whatever they're call now) are difficult to work with.flying scotsman123 wrote: Having read this comment on my phone I looked really hard to see what you were on about. It's only now that I'm on my laptop I can see what you're on about, with the picture probably 4 times the size it is in real life! That's bloody impressive in my book, certainly compared to plenty of even recent OO gauge 3D printed stuff that required a lot of work to remove awful striation.
Steve
Re: Mainly 3D Printed LNER Locomotives in N gauge
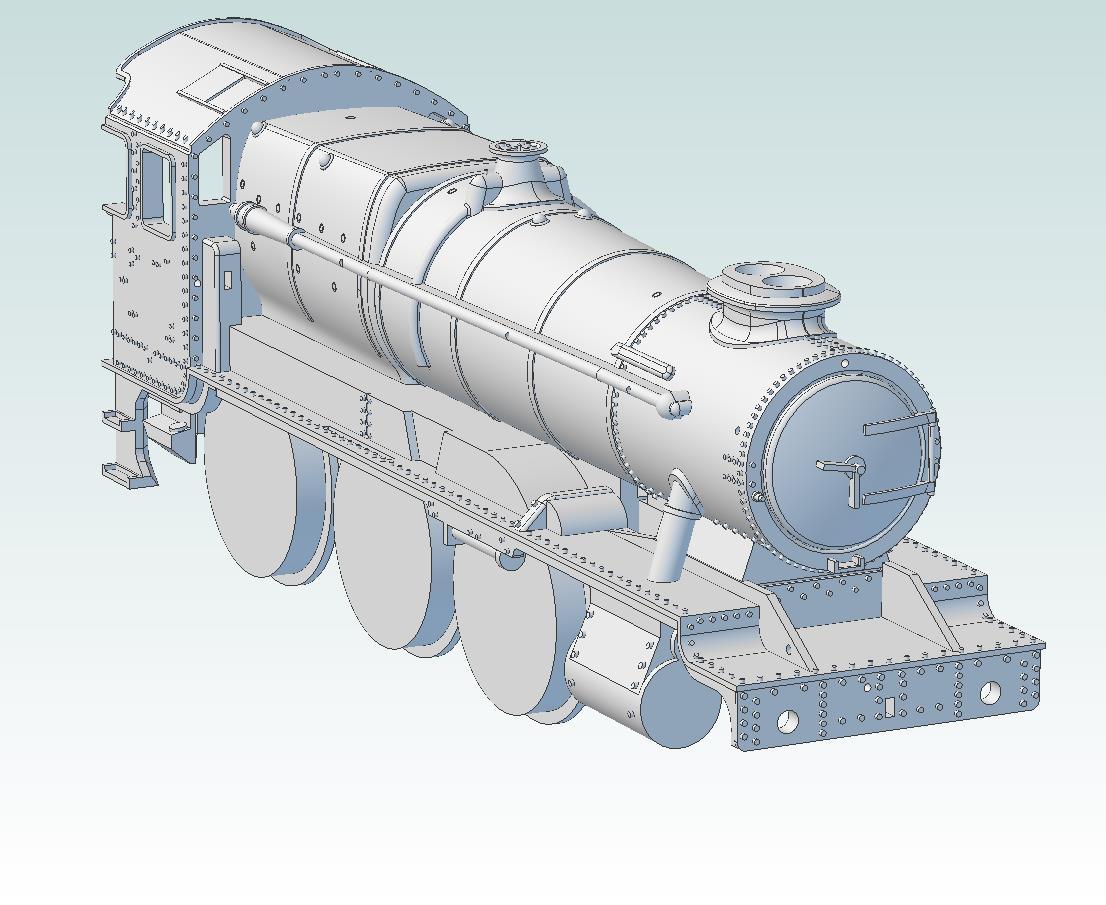
Some more work has been going on with the County CAD and I'm very relieved that it finally got green lighted and ordered from Shapeways.
So, a couple of last looks at the CAD model.

While I was ordering, this L1 model got added to the basket!
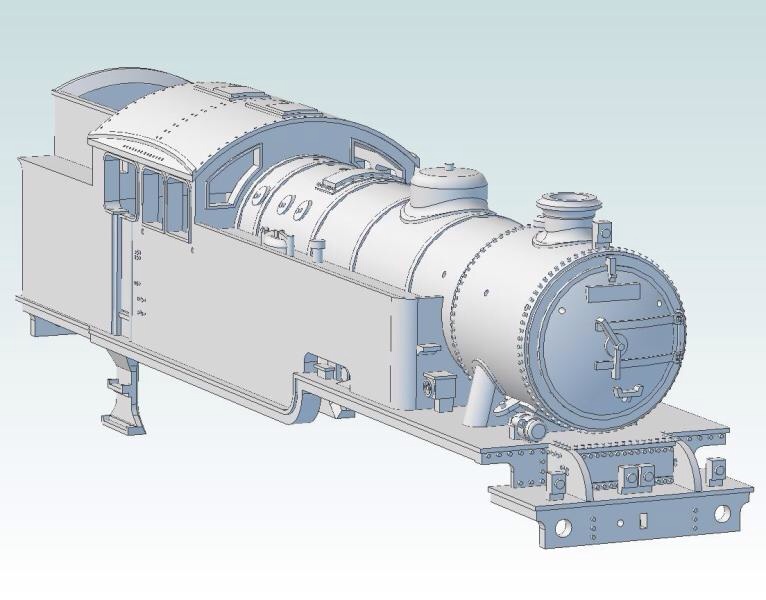
So, a couple of last looks at the CAD model.
While I was ordering, this L1 model got added to the basket!
Steve

Re: Mainly 3D Printed LNER Locomotives in N gauge
In theory you could make the models to 3.5, 4 and 7mm scales as well just by enlarging the dimensions?
Modelling On A Budget ---》 https://www.newrailwaymodellers.co.uk/F ... 22&t=52212
Re: Mainly 3D Printed LNER Locomotives in N gauge
In theory, yes. However you'll need to also reduce all of the wall thicknesses to a more appropriate thickness. Also, some of the details don't scale well so it usually ends up easier to completely redesign the model from scratch.Mountain wrote:In theory you could make the models to 3.5, 4 and 7mm scales as well just by enlarging the dimensions?
Steve
Re: Mainly 3D Printed LNER Locomotives in N gauge
Having finally gotten CAD models ordered through Shapeways today, I turned my attention to a lining commission on one of my V3 bodies. Having painted the basic black body and red buffer beams in gloss paint (actually done a few weeks ago), I broke out my bow pens this evening and made a start on the first bit of lining. The corners were touched in using a fine brush and once everything has hardened a bit, I'll clean up and touch up as necessary before adding the red line (I'm not going to try and add the cream lining in N gauge!). This is a slow process as I can only apply one colour to one side each day - sometimes longer if the paint is acting up.
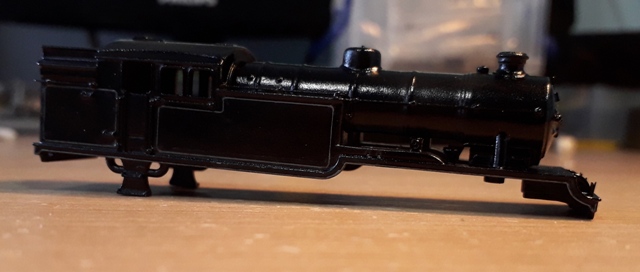
The slightly wonky line under the cab windows has since been corrected.
The slightly wonky line under the cab windows has since been corrected.
Steve
Re: Mainly 3D Printed LNER Locomotives in N gauge
It is looking very good.
Modelling On A Budget ---》 https://www.newrailwaymodellers.co.uk/F ... 22&t=52212