
I started Railway modelling (not counting childhood layout) about 2 years ago in 'N' gauge and did not really get to grips with the scale so sold up and restarted in 'OO' much better for me.
I have been modelling as long as I can remember, starting with Airfix planes hanging in my bedroom, through RC Boats and Rock Crawler's, I am 55 now and still enjoying modelling.
I have a small shunting layout, a siding, goods depot and engine shed which is progressing well, asking for help and assistance here and thought I would post some of my idea's
1. Hydraulic Buffers - Problem - Too Big................
Tom@Crewe - Workbench
Tom@Crewe - Workbench
Never enough time...........
Coppenhall Goods https://www.newrailwaymodellers.co.uk/F ... 22&t=50174
Coppenhall Goods https://www.newrailwaymodellers.co.uk/F ... 22&t=50174
Re: Tom@Crewe - Workbench
Problem Solved...
Buffers too wide but I really wanted them for my Goods Depot.

First Deconstruction. Plus a little Plasticard.

New bases made from Plasticard.

Tops refitted (almost).

Second set made and track modified.

Almost finished item, Concrete paper added, Paint and Working Lamps.


Buffers too wide but I really wanted them for my Goods Depot.
First Deconstruction. Plus a little Plasticard.
New bases made from Plasticard.
Tops refitted (almost).
Second set made and track modified.
Almost finished item, Concrete paper added, Paint and Working Lamps.
Never enough time...........
Coppenhall Goods https://www.newrailwaymodellers.co.uk/F ... 22&t=50174
Coppenhall Goods https://www.newrailwaymodellers.co.uk/F ... 22&t=50174

Re: Tom@Crewe - Workbench
That's excellent work, and a huge visual improvement. No longer a toy. I wish more would chop up and reconstruct: the raw materials are all out there....
Tony
Tony
Men with false teeth may yet speak the truth.......
Re: Tom@Crewe - Workbench
brilliant solution 
Re: Tom@Crewe - Workbench
Had to do a similar thing myself, all still in place 7 years later.
Geoff T.
Geoff T.
Remember ... I know nothing about railways.
http://www.newrailwaymodellers.co.uk/Fo ... 22&t=32187 and Another on http://www.newrailwaymodellers.co.uk/Fo ... &sk=t&sd=a
http://www.newrailwaymodellers.co.uk/Fo ... 22&t=32187 and Another on http://www.newrailwaymodellers.co.uk/Fo ... &sk=t&sd=a
Re: Tom@Crewe - Workbench
I am having a rest from the scenic side and going to remodel a Cowens Sheldon 10 ton Crane by Hornby I bought from eBay a few months ago, I have been researching here and on the net.
I have gathered a few items together and I am ready to start.

Brass etchings and detailed weight from Jonathan Hall
Plastruct from local model shop
Bachmann couplings from eBay
Line from Tackle shop (this is to small)

Crane stripped and off the bogie.

Broken down cleaned and ready for build


Main crane ready for paint.

Jib ready for paint

Bogie ready for paint (odds and ends from scrap box)


Temporally assembled as I think it will be easier to paint and detail in the 3 main chunks.
I have gathered a few items together and I am ready to start.
Brass etchings and detailed weight from Jonathan Hall
Plastruct from local model shop
Bachmann couplings from eBay
Line from Tackle shop (this is to small)
Crane stripped and off the bogie.
Broken down cleaned and ready for build
Main crane ready for paint.
Jib ready for paint
Bogie ready for paint (odds and ends from scrap box)
Temporally assembled as I think it will be easier to paint and detail in the 3 main chunks.
Never enough time...........
Coppenhall Goods https://www.newrailwaymodellers.co.uk/F ... 22&t=50174
Coppenhall Goods https://www.newrailwaymodellers.co.uk/F ... 22&t=50174
-
lozstlouis

- Posts: 422
- Joined: Fri Dec 28, 2007 6:54 pm
- Location: London SW19
Re: Tom@Crewe - Workbench
Good bit of bashing there. Keep it up!
OO in the loft. Lenz 90 making it go.
Re: Tom@Crewe - Workbench
Quite an extensive re-build.
It should certainly add interest to any layout.
Geoff T.
It should certainly add interest to any layout.
Geoff T.
Remember ... I know nothing about railways.
http://www.newrailwaymodellers.co.uk/Fo ... 22&t=32187 and Another on http://www.newrailwaymodellers.co.uk/Fo ... &sk=t&sd=a
http://www.newrailwaymodellers.co.uk/Fo ... 22&t=32187 and Another on http://www.newrailwaymodellers.co.uk/Fo ... &sk=t&sd=a
Re: Tom@Crewe - Workbench
First flush of colour...


Transfers, rust and grime to add.....
Just a note on transfers. A complaint (tongue in cheek) I sent for the transfers from Cambridge Custom Transfers and the delivery time was ridiculous, less than 24 hours I was hoping for a rest and be able to clean workshop.
Ahh well I will have to carry on modelling.
Never enough time...........
Coppenhall Goods https://www.newrailwaymodellers.co.uk/F ... 22&t=50174
Coppenhall Goods https://www.newrailwaymodellers.co.uk/F ... 22&t=50174
Re: Tom@Crewe - Workbench
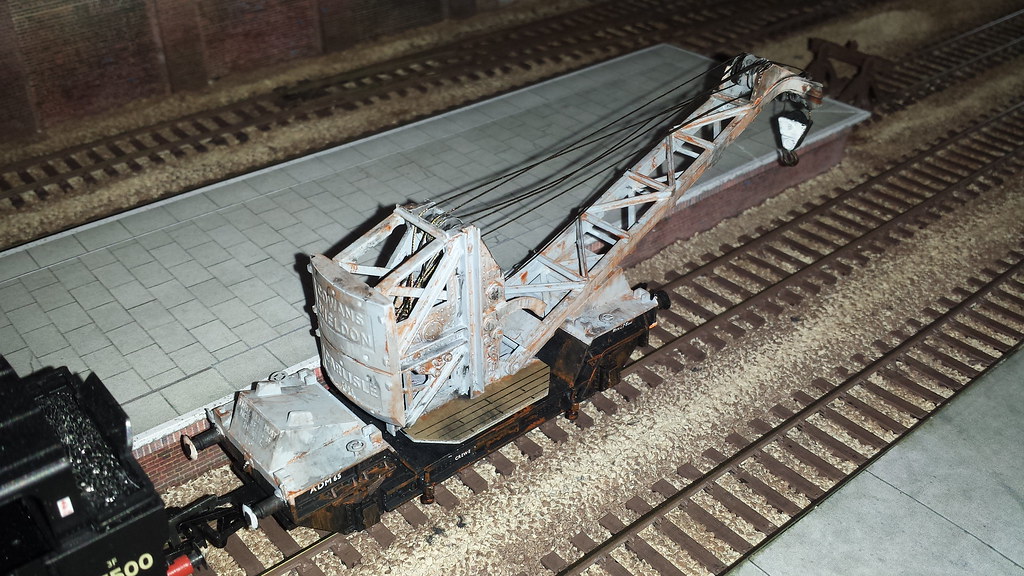
I had been running the crane on my layout and found it was poor, the wheel tyre width and flange depth made it just bounce over points etc. So I changed the wheels and axles for more scale ones.
I have now almost finished. just the hook to weather.
Before and after.


I have now almost finished. just the hook to weather.
Before and after.
Never enough time...........
Coppenhall Goods https://www.newrailwaymodellers.co.uk/F ... 22&t=50174
Coppenhall Goods https://www.newrailwaymodellers.co.uk/F ... 22&t=50174
Re: Tom@Crewe - Workbench
The crane now has a little friend.

Never enough time...........
Coppenhall Goods https://www.newrailwaymodellers.co.uk/F ... 22&t=50174
Coppenhall Goods https://www.newrailwaymodellers.co.uk/F ... 22&t=50174
Re: Tom@Crewe - Workbench
After quite a while I have started some more work on my layout, particularly at the depot end.
5 x Dapol station canopies are to be kit bashed to cover the platforms and I am looking to have illumination.
I asked a question on the forum about LED's, ratings, resistors and brightness. I have some excellent advice and help but most of all from 'Flashbang' who posted the following.......
I would obtain a 22K liner potentiometer and wire it in series with a 1K0 resistor and the LED. Then set the pot to its maximum resistance value (22K). Apply DC power, then if the LED doesn't illuminate or is too dim reduce the pots setting until the LED lights or is at the required brightness. Either leave it in circuit as an adjustable source or disconnect the pot and using an OHM meter measure the value in OHMs of the pots setting then obtain a resistor of the OHM value nearest to that read plus 1000 ohm. If you opt for a fixed value resistor, you the wont need the 1K0 one just the final value resistor.
The reason for the 1K0 resistor initially is that if the pot without the resistor was reduced to zero OHMs the LED would receive full supply volts and probably blow. But the 1K0 keeps the supply volts and current in check and will always be in circuit even if the Pot is at Zero OHMS.
So off I went to the dreaded Maplin and got some supplies.

Then just a little later had built this.

The input is on the right and for my layout lighting I am using 12v
The LED or LED's are on the left, turn on and when you have the brightness correct, switch off the power measure the resistance between the reds at the chocolate block and you know what resistor you need in that application.
And thanks again to Flashbang
5 x Dapol station canopies are to be kit bashed to cover the platforms and I am looking to have illumination.
I asked a question on the forum about LED's, ratings, resistors and brightness. I have some excellent advice and help but most of all from 'Flashbang' who posted the following.......
I would obtain a 22K liner potentiometer and wire it in series with a 1K0 resistor and the LED. Then set the pot to its maximum resistance value (22K). Apply DC power, then if the LED doesn't illuminate or is too dim reduce the pots setting until the LED lights or is at the required brightness. Either leave it in circuit as an adjustable source or disconnect the pot and using an OHM meter measure the value in OHMs of the pots setting then obtain a resistor of the OHM value nearest to that read plus 1000 ohm. If you opt for a fixed value resistor, you the wont need the 1K0 one just the final value resistor.
The reason for the 1K0 resistor initially is that if the pot without the resistor was reduced to zero OHMs the LED would receive full supply volts and probably blow. But the 1K0 keeps the supply volts and current in check and will always be in circuit even if the Pot is at Zero OHMS.
So off I went to the dreaded Maplin and got some supplies.
Then just a little later had built this.
The input is on the right and for my layout lighting I am using 12v
The LED or LED's are on the left, turn on and when you have the brightness correct, switch off the power measure the resistance between the reds at the chocolate block and you know what resistor you need in that application.
And thanks again to Flashbang
Never enough time...........
Coppenhall Goods https://www.newrailwaymodellers.co.uk/F ... 22&t=50174
Coppenhall Goods https://www.newrailwaymodellers.co.uk/F ... 22&t=50174
Re: Tom@Crewe - Workbench
Starting my second crane rebuild Hornby R197, I intend to detail it to be a Cowans Sheldon 45 ton crane.
Still researching but making a start. also waiting for delivery of new razor saw's, I am planning to work bottom up. so rework the jib runner, relieving bogies, main chassis and how they fit together.
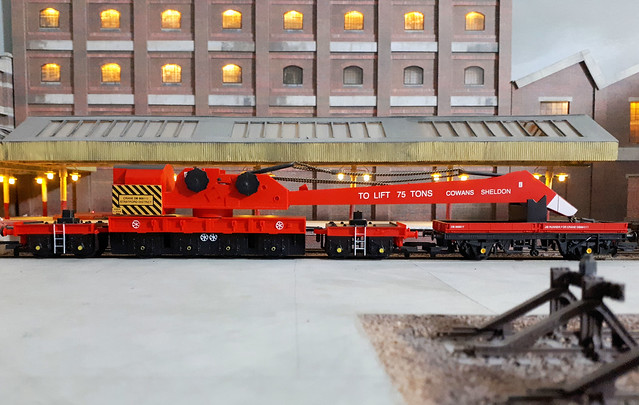

Still researching but making a start. also waiting for delivery of new razor saw's, I am planning to work bottom up. so rework the jib runner, relieving bogies, main chassis and how they fit together.
Last edited by Tom@Crewe on Sun Feb 10, 2019 1:31 pm, edited 1 time in total.
Never enough time...........
Coppenhall Goods https://www.newrailwaymodellers.co.uk/F ... 22&t=50174
Coppenhall Goods https://www.newrailwaymodellers.co.uk/F ... 22&t=50174
Re: Tom@Crewe - Workbench
This is never going to be an exact scale build but I have been surprised by the axle spacing.
almost all within 2 mm, the worst being the relieving bogies from first axle to buffet but this has a 5 mm section which is easily removed.

almost all within 2 mm, the worst being the relieving bogies from first axle to buffet but this has a 5 mm section which is easily removed.
Never enough time...........
Coppenhall Goods https://www.newrailwaymodellers.co.uk/F ... 22&t=50174
Coppenhall Goods https://www.newrailwaymodellers.co.uk/F ... 22&t=50174