

As we have created a new Workbench section for the forum, I had better start the first thread for it:
All my railway stuff is currently packed and in storage due to an impending house move, but to get the ball rolling I will post a couple of older things:
An index will be placed here once the thread gets a reasonable amount of content.
Lofty’s Workbench
Lofty’s Workbench
Once upon a time I built a model railway in the loft. Now I dabble on much smaller baseboards.
Re: Lofty's Workbench
The debate about applicators for static grass is well documented. Some people apply it by simply rubbing it between their fingers and letting it dribble onto the board. The basic tool is a 'Puffer bottle' supplied by one of the main manufacturers, whilst at the top end a purpose built 'Static Generator' will cost well over £100.
Somewhere between is the 'Fly swat & Tea strainer combination' I made one of these a few years ago:
Purchased from a well known auction site was a 'tennis racket' style fly swat, and from my local Pound shop a metallic tea strainer, total cost in the region of £10.
You can find a few "How to" video's on Youtube regarding construction, but basically there are two wires that go to the metal mesh on the fly swat. one of these needs soldering to the metal mesh of the tea strainer, with the other being attached to a crocodile clip:
Once upon a time I built a model railway in the loft. Now I dabble on much smaller baseboards.
Re: Lofty's Workbench
all i can say is dont try and touch it when turned on it hurts allot more then you would think 

also when your done using it tap it against the croc clip / nail its on to discharge it or the above will apply
mine worked brilliantly and am looking forward to getting it out again when i am at that stage building the layout
also when your done using it tap it against the croc clip / nail its on to discharge it or the above will apply
mine worked brilliantly and am looking forward to getting it out again when i am at that stage building the layout
Re: Lofty's Workbench
In early 2008 I was becoming despondent at my failure to see a large layout through so I decided to knock up a little photo backdrop which I named the Two Hour Layout.
It was constructed out of bits and bobs that I had lying about, it was more a diorama than a layout, but basically it was built in a weekend with about 2 hours of actual construction time.
* * * * *
Friday evening
It started life as a few off cuts of MDF and a couple of pieces of wood that had already seen life on a previous layout:
The back corner was deliberately curved to avoid a hard join in any future pictures:
A profiled front and end was added:
More bits of MDF were glued (No nails type grab adhesive) to the base and sides to make a skeleton for the banking behind the track:
Glued to the formers was a sheet of bubble wrap that probably wrapped my latest stock additions:
An undercoat plaster was mixed to a yoghurt consistency and applied over the banking and left to dry overnight:
It was constructed out of bits and bobs that I had lying about, it was more a diorama than a layout, but basically it was built in a weekend with about 2 hours of actual construction time.
* * * * *
Friday evening
It started life as a few off cuts of MDF and a couple of pieces of wood that had already seen life on a previous layout:
Once upon a time I built a model railway in the loft. Now I dabble on much smaller baseboards.
Re: Lofty's Workbench
Saturday
Neat PVA was used to attach some lichen to various parts of the banking:
A coat of diluted PVA was spread over the rest of the banking and a coat of ‘static grass’ was applied using a bottle applicator:
A couple of different grasses were added to different bits to avoid everything looking the same, I wasn’t worried by the odd bare patch:
A picture of the whole thing so far;
A couple of pieces of reclaimed track were added and given a quick spray of Red primer. Ballast was applied loose and pressed, pushed and flicked into position with a ½” paintbrush. After a mist spraying with water, diluted PVA was applied with a syringe, and left to dry overnight.
Neat PVA was used to attach some lichen to various parts of the banking:
Once upon a time I built a model railway in the loft. Now I dabble on much smaller baseboards.
Re: Lofty's Workbench
Sunday
A darker brown colour was painted on the tracks to tone down the red, this was also used to pick out a few of the bare patches on the banking, mainly more vertical areas where the grass missed.
A fence was constructed using short pieces of wire as uprights with ‘metallic silver’ cotton used for the wire.
A couple of buffer stops completed the project:
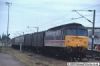
In Use: A Class 31 abandoned in the siding awaiting the final trip tp the scrap yard:
A darker brown colour was painted on the tracks to tone down the red, this was also used to pick out a few of the bare patches on the banking, mainly more vertical areas where the grass missed.
A fence was constructed using short pieces of wire as uprights with ‘metallic silver’ cotton used for the wire.
A couple of buffer stops completed the project:
Once upon a time I built a model railway in the loft. Now I dabble on much smaller baseboards.
Re: Lofty's Workbench
Unfortunately the layout didn’t survive a fall out of the loft
It landed on the landing below upright but the plaster did not stand up to the shock:
It landed on the landing below upright but the plaster did not stand up to the shock:
Once upon a time I built a model railway in the loft. Now I dabble on much smaller baseboards.
Re: Lofty's Workbench
Thank goodness you didn't 'follow it'.Lofty wrote:Unfortunately the layout didn’t survive a fall out of the loft
It landed on the landing below upright but the plaster did not stand up to the shock:
Glencairn
To the world you are someone. To someone you are their world.
I Cannot Afford the Luxury of a Negative Thought
I Cannot Afford the Luxury of a Negative Thought
Re: Lofty's Workbench
My first visit to the Workbench section as your thread seemed a great place to start as you created this section after all. That was a lovely little diorama, sad to see it meet it's demise like that.
I'll admit, when I saw the bare plaster I was thinking, "Oh no, that's going to look garish, especially when I saw the first bushes placed straight on, but the end result was fantastic and showed me that when i get to my own scenics, not to worry too much about the intermediate appearance and focus on the end vision. Thank you for sharing.
I'll admit, when I saw the bare plaster I was thinking, "Oh no, that's going to look garish, especially when I saw the first bushes placed straight on, but the end result was fantastic and showed me that when i get to my own scenics, not to worry too much about the intermediate appearance and focus on the end vision. Thank you for sharing.
Re: Lofty's Workbench
There is a small space on a layout at the Railway Club, that I have said I will fill:
A piece of MDF cut to size
A simple corrugated fence made from plasticard
A few bits of stuff from the spares box to get a feel for things
A piece of MDF cut to size
Once upon a time I built a model railway in the loft. Now I dabble on much smaller baseboards.
Re: Lofty's Workbench
More bits and bobs from the spares box:
Once upon a time I built a model railway in the loft. Now I dabble on much smaller baseboards.
Re: Lofty's Workbench
Inserted into the layout:
Once upon a time I built a model railway in the loft. Now I dabble on much smaller baseboards.
Re Loft’s Workbench
A couple of years ago a family member gave me a little Hornby hut. I was very grateful but lets be honest its a bit garish:
Using a Ice lolly stick I cut into planks and a door and glued the bits around the outside:
If I was doing it again I would use a thiner stirrer, but that's hindsight for you.
A couple of applications of cheap kids paints and I think that it looks far better:
Using a Ice lolly stick I cut into planks and a door and glued the bits around the outside:
A couple of applications of cheap kids paints and I think that it looks far better:
Once upon a time I built a model railway in the loft. Now I dabble on much smaller baseboards.
Re: Lofty’s Workbench
It sat on the shelf for quite a while before I modified it again:
I had a plan for it, but it required the chimney to be removed:
It could now be used on my Quarry Lane Layout:
With a bit of weathering it fits in quite well:
I had a plan for it, but it required the chimney to be removed:
Once upon a time I built a model railway in the loft. Now I dabble on much smaller baseboards.
Re: Lofty’s Workbench
Agh Lofty,
How about finding that snow scene ?
It deserves to be here !
Geoff T.
How about finding that snow scene ?
It deserves to be here !
Geoff T.
Remember ... I know nothing about railways.
http://www.newrailwaymodellers.co.uk/Fo ... 22&t=32187 and Another on http://www.newrailwaymodellers.co.uk/Fo ... &sk=t&sd=a
http://www.newrailwaymodellers.co.uk/Fo ... 22&t=32187 and Another on http://www.newrailwaymodellers.co.uk/Fo ... &sk=t&sd=a