Building a modelling "strip & profile" storage/assorter box
-
- Posts: 1205
- Joined: Sun Mar 09, 2008 1:16 am
- Location: Erdington, Birmingham,.... but can also be found at various railway bridges !
Building a modelling "strip & profile" storage/assorter box
I was'nt sure about the most suited topic for this long awaited* project of mine, (*on a personal modelling storage needs basis)
As I enjoy scratchbuilding quite a lot, & I like to have various items in & sometimes plenty of them, then some efficient storage methods are needed.
Heres a couple of photo's of my current strip assorter box, its lasted well, made out of mostly plywood & oother stripwood dividing sections, all dividing sections are fixed in place with glue, screws & small nails.
You'll notice it holds everthing thats a "strip" plastruct profiles, brass & wood, the Evergreen items are kept in their individual packets (but open), the packs are wide, so they need a wide storage area of 7cm , Its tiered as to allow storage for cut down or smaller strip like items, the shortest strip item is approximately 8cm.
The box seen here has basically served its pupose well for the past 10 years, but due to it all being glued the modification process of enlarging & altering would be too damaging, it can no longer accomodate every item I have, recent purchases of more Evergreen strip packs & various modelling stripwood items as seen in coffee jar meant I needed to design & build a new bigger & better box. ,
I'll update/edit this post in a short while with step by step stages of me building the new box & how this is progressing.
Scratchbuilding 4mm scale JXA scrapwagons ; - http://www.newrailwaymodellers.co.uk/Fo ... =6&t=37620
Scratchbuilt & kit built grappler claw cranes ; - http://www.newrailwaymodellers.co.uk/Fo ... =6&t=36342
-
- Posts: 83
- Joined: Tue Jan 05, 2010 7:12 pm
- Location: nottinghamshire
Re: Building a modelling "strip & profile" storage/assorter box
*watch this space,,, could be some interesting carpentry...
cheers, lewis.
ps, im no carpnter, but could use something like what your planning on building...
cheers, lewis.
ps, im no carpnter, but could use something like what your planning on building...
Lest we forget.
"Due to too much time, too much money, and lack of a girlfreind; I model."
-
- Posts: 1205
- Joined: Sun Mar 09, 2008 1:16 am
- Location: Erdington, Birmingham,.... but can also be found at various railway bridges !
Re: Building a modelling "strip & profile" storage/assorter box
Hi Lewis,the flying irishman wrote:*watch this space,,, could be some interesting carpentry...
cheers, lewis.
ps, im no carpnter, but could use something like what your planning on building...
No real carpentry skills are needed really mate, no T&G or mortice & tenon joins associated with carpentry needed to make this, as long as you've the ability to read a tape measure/rule, have an accurate tri-square, you're safely able to use a jigsaw, & use a file/rasp, & sandpaper & a small tenon saw.
Although do be aware of the splinters from plywood, remove any loose or jagged plys from cut edges asap with fine sandpaper as soon as you cut each item of plywood, have a pair of fine nosed tweezers on standby to pluck it out, just in case you get one.
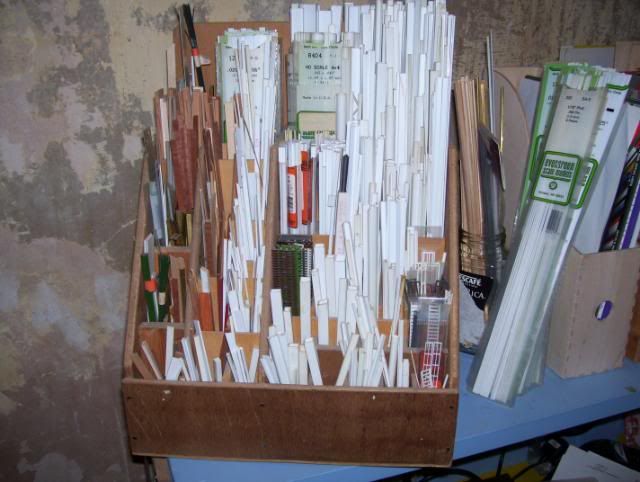
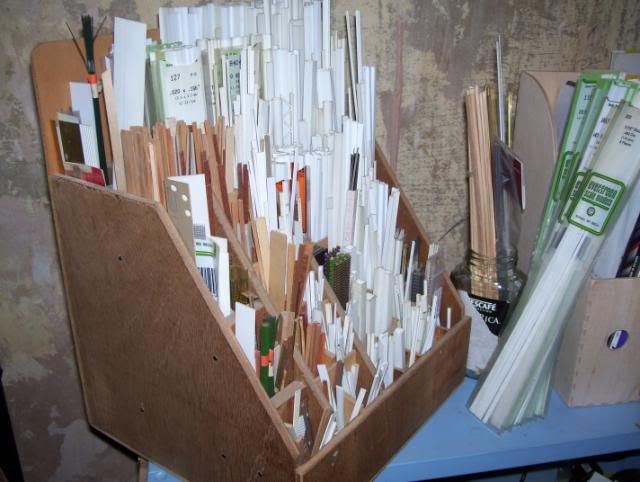
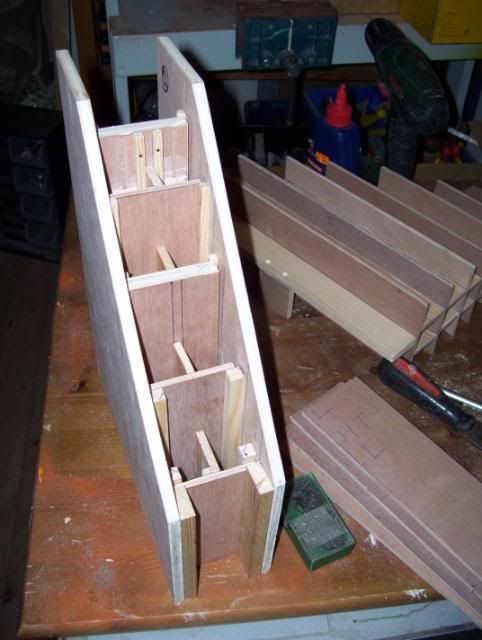
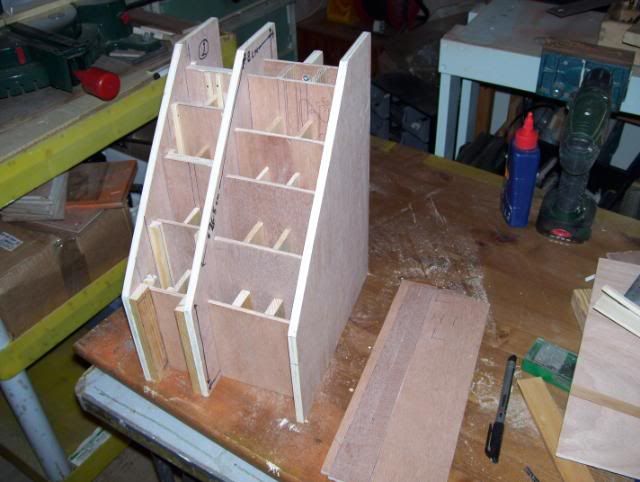
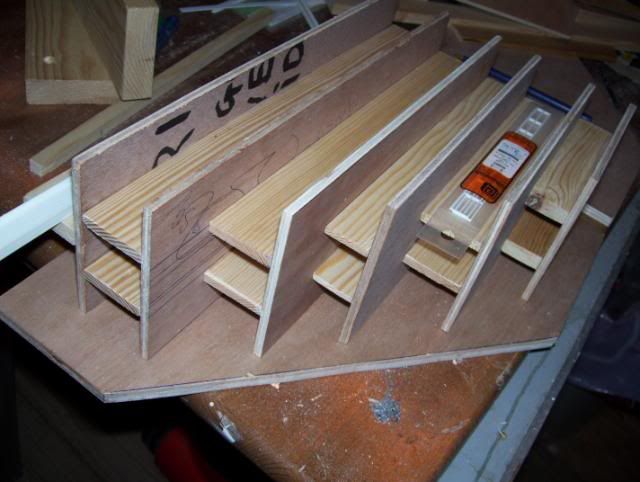
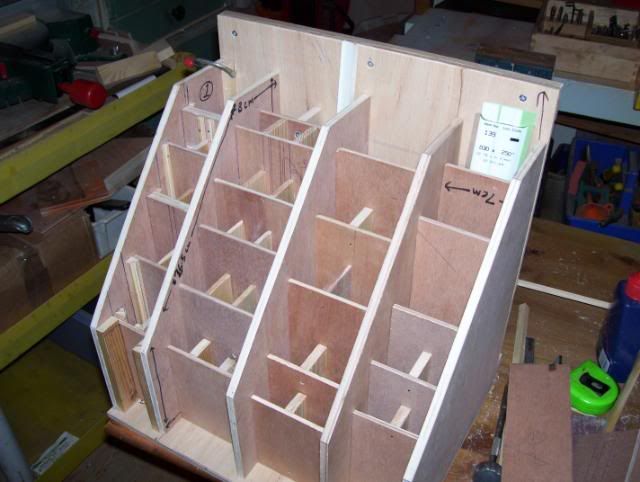
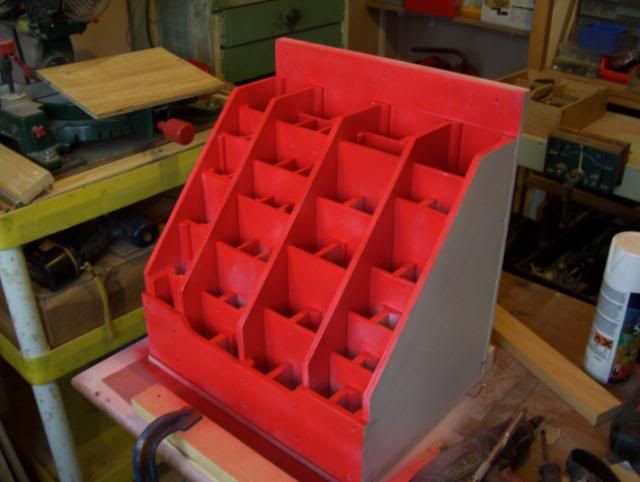
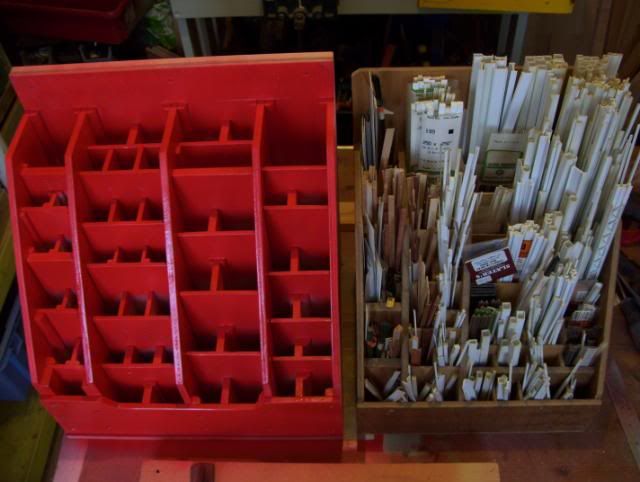
The box I'm building here is much more demanding as to store everthing "stripwise" I have, so it'll store a lot more than current box seen in my 1st post of this thread, (4 or 5 main divided sections) totaling no more than 14" wide (36cm),
The other main thing to remember is not to rush any job you do, the extra time taken on accuracy & checking to avoid mistakes will be worth your while in the long term result.
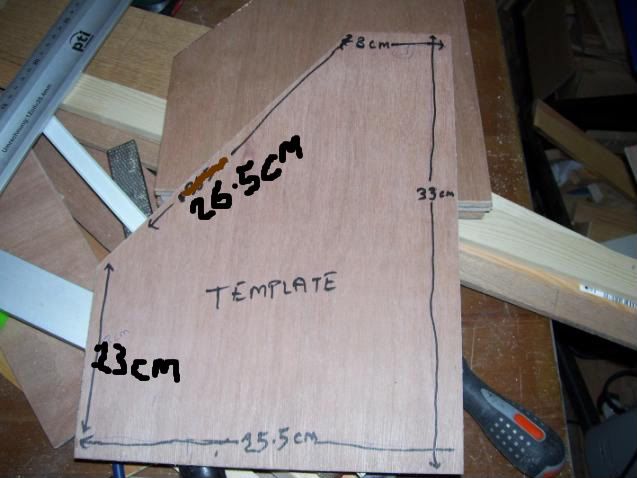
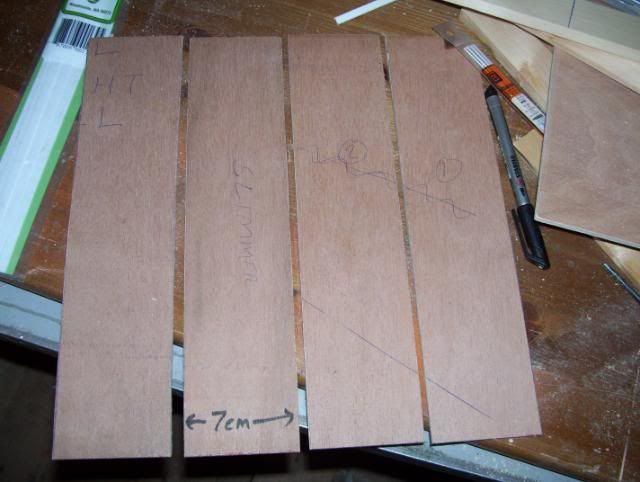
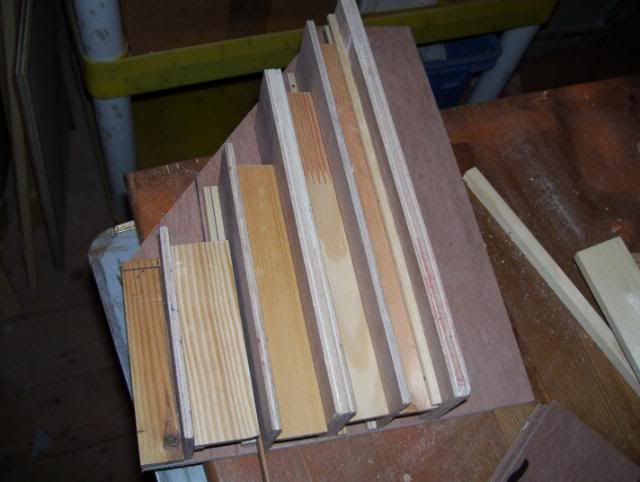
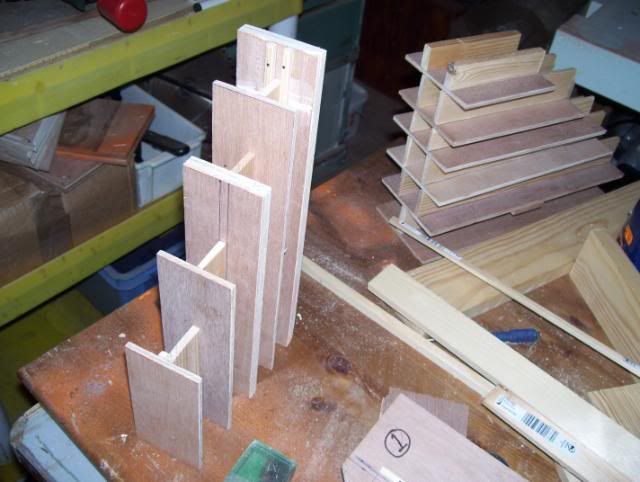
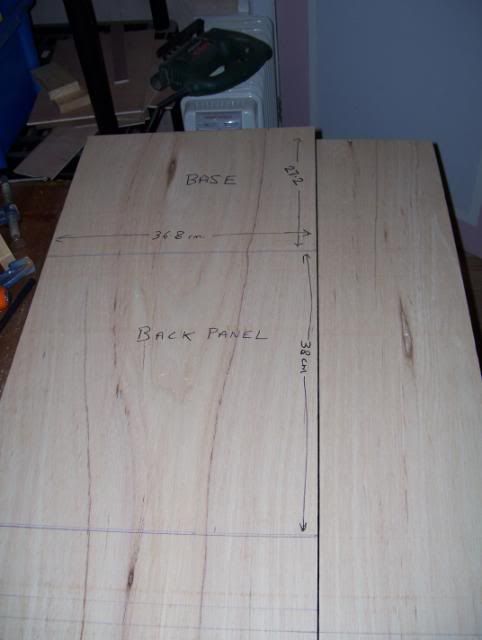
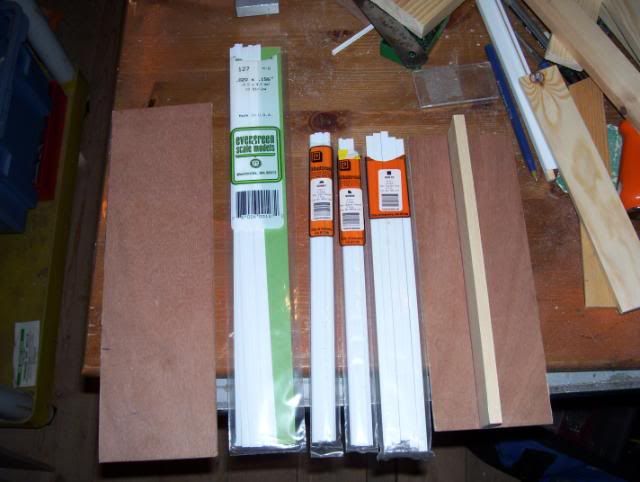
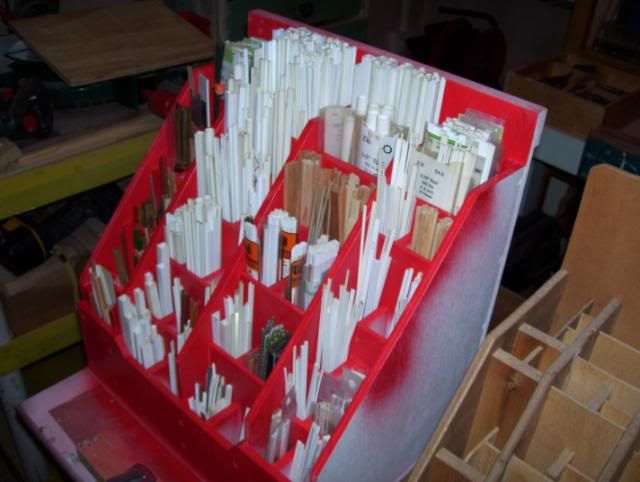
I decided on the dimensional requirements i needed & kept one aside as to use as a template for the other 5 that I've jigsawn out to be exactly the same., the size dimensions are shown in black pen, this will accomodate most of you strip items height needs from most plastruct profiles & evergreen packs at 14" high (36cm), down to your off-cuts for these & others (brass tubes/profiles & thin midwest stripwoods down to 3" (or 8cm) in off-cut heights & various heights inbetween, that way nothing is "hidden" from view as everthing is tier'd & sorted into alike divided various componants of similar sorted sizes.
Golden rule
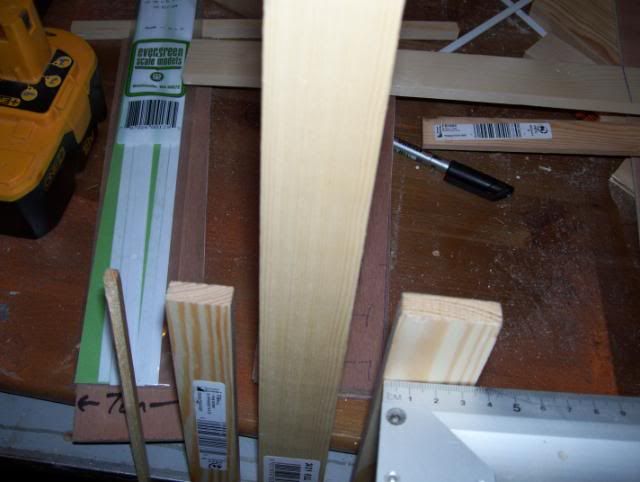
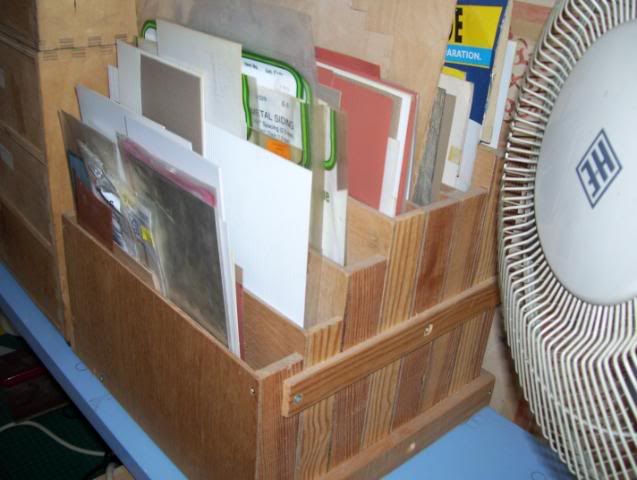
: the nature & design of this box is easier built with perfectly flat plywood, Last year I attempted building a box using plywood like this, when I purchased the plywood was flat, a day later the changes in room temperature can often & did make a huge differance & the ply & other wood warped & bowed as seen with the above photo, so the project was unworkable so I gave up on that attempt, but I've used a lot of the warped plywood for other things instead.
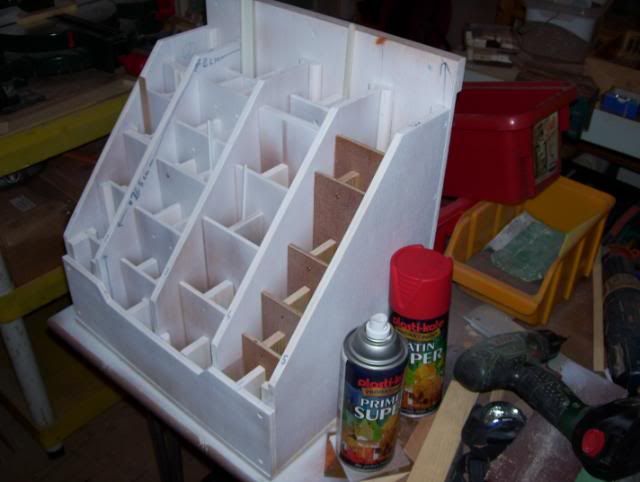
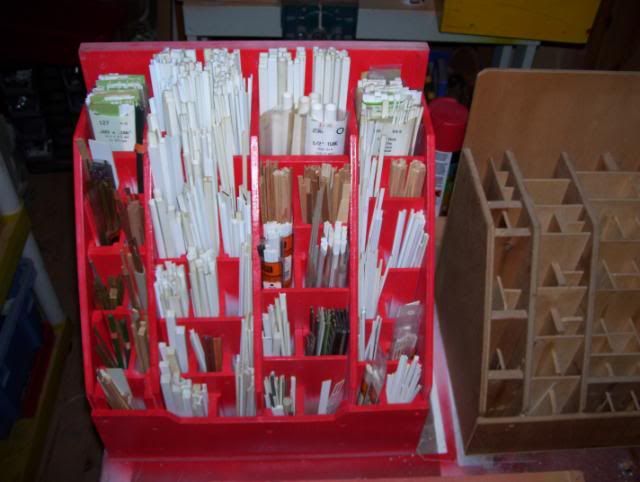
I've so far been lucky with the plywood & softwood I'm using here for the main sides, middle & sub-dividers seen here .
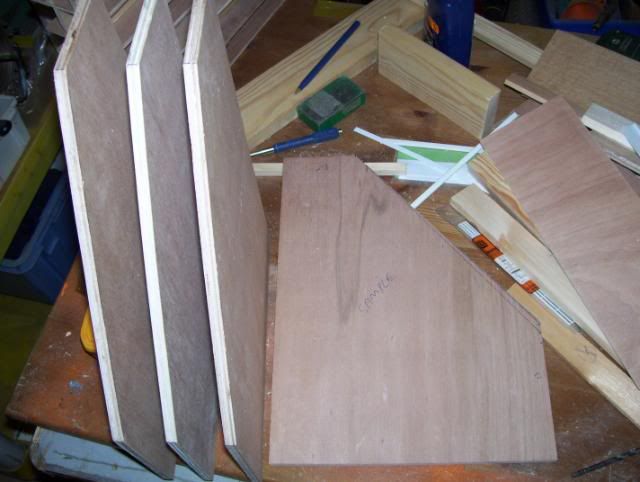
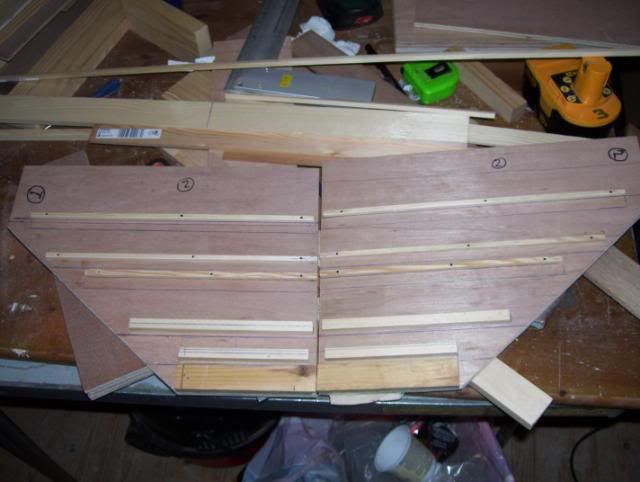
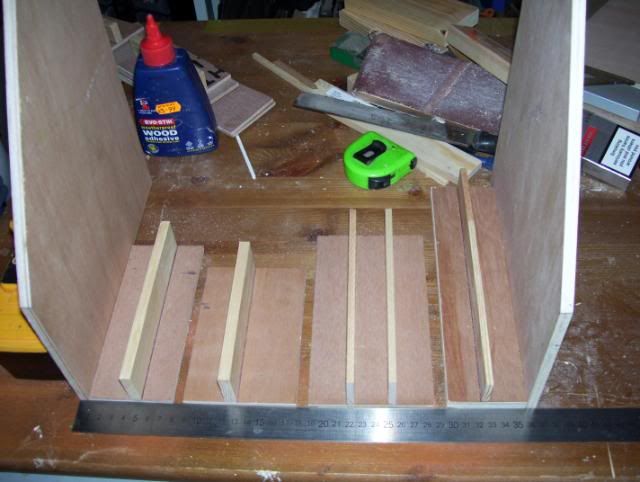
Here are 4 of the 6 side & main dividers cut to shape taken from the above template of the same, the front, back & bottom plywood panel sections will be cut last, as i'll need to work this out at a later stage as I'm not sure what all the 5 divided sections will add up to in total, all this will become more clear soon., but if there are less main width components , making a smaller, not so wide box (to store less items & variety), say for instance 3 as seen uprights in total, (RH main, middle & LH main) then by all means pre-cut all whats needed at the same time, other peoples prefered methods may be different, but do a job the way you feel its easier & less prone to mistakes & errors on measuerments.
Scratchbuilding 4mm scale JXA scrapwagons ; - http://www.newrailwaymodellers.co.uk/Fo ... =6&t=37620
Scratchbuilt & kit built grappler claw cranes ; - http://www.newrailwaymodellers.co.uk/Fo ... =6&t=36342
-
- Posts: 83
- Joined: Tue Jan 05, 2010 7:12 pm
- Location: nottinghamshire
Re: Building a modelling "strip & profile" storage/assorter box
okay, thanks 0121, looks like a very organized way of stowing bits and bobs. I might look into getting some plywood and have a go at something similar.
many thanks, lewis
many thanks, lewis
Lest we forget.
"Due to too much time, too much money, and lack of a girlfreind; I model."
-
- Posts: 1205
- Joined: Sun Mar 09, 2008 1:16 am
- Location: Erdington, Birmingham,.... but can also be found at various railway bridges !
Re: Building a modelling "strip & profile" storage/assorter box
Happy to have Inspired you Lewis
I puchased a few 3ft lengths of 3 & 4cm x 6mm & 9mm wide pinewood strips from B&Q, I made sure the selection I chose were as perfect as possible, having no splits, warps, knotts, twists or other im-perfections. These will be the sub-divided partly glued assemlies between the 6 main divided setctions.
They will be cut down to varied heights the equal to the plywood tier'd separators, as seen in photo's below with the ones already done.
These 4 peices of 6mm thick x 30cm x 7cm plywood sections will be another main divided section made up similar to the 2 other divided sections already made up as seen in photo's below. They will be cut down to the following size heights: 10, 17, 23, 26, & *30*cm (*=no need to cut down).
The reason why they all start off the same 30cm height is because I cut them each 7cm from a square 30cm x 30cm, ideally they'd be all cut from one long piece of 7cm wide to start with, but I used whatever plywood That I had which was flat & not warped or bowed.
You can see from this photo that one is a mm under, I cut the wrong side of the penciled line I made , I'll keep this in mind when it comes to assembly, but, I can rectify this by glueing a section of 6mm x 1mm Midwest stripwood piece I have at a later stage.
The 2 photo's above show how one of the tier'd assemblies will "slot in" , the idea is to have the option of removing the tierd dividers rather than permanently glueing in place.
I've used mostly 6mm x 6mm pine stripwood for the slot in / guides, after working out the "mirrored effect" of facing main dividing section the 6mm x 6mm guides were glued & fixed permanantly wth track pins, & drilled a 0.5mm pilot hole first of all as 6mm x 6mm stripwood is liable to split otherwise, push down trackpins with a sprung return pin pusher tool.
Heres how one of the divided section assemblies will look, you can see another tier'd assembly section stacked behind this, the two stacks cannot be mixed together as other stack is a slightly different widths & placement & retaining guides & slots have been made & glued to 2 of the main dividers as shown above symetrically aligned.
Scratchbuilding 4mm scale JXA scrapwagons ; - http://www.newrailwaymodellers.co.uk/Fo ... =6&t=37620
Scratchbuilt & kit built grappler claw cranes ; - http://www.newrailwaymodellers.co.uk/Fo ... =6&t=36342
-
- Posts: 1205
- Joined: Sun Mar 09, 2008 1:16 am
- Location: Erdington, Birmingham,.... but can also be found at various railway bridges !
Re: Building a modelling "strip & profile" storage/assorter box
Heres some photo's to give an idea how its starting to take shape,
The photo above gives an an idea of the size dimensions & how various items will fit in their place, I would imagine the storage area available seen here* (*=if fully assembled with base, front & back panel) would be adequet for most modellers who choose not to have a lot of raw materials on standby, I'm more of a "spur of the moment" type of chap & I prefer having as much quantity & variation as possible needed as for modelling & within arms length, so the end product will be approximately twice the width of whats seen here.
That'll be the last update for at least a couple of days I reckon, I've my class 47 modelling project on the go also, & I need to make up the other 3 divided sub-sections & then assemble strip box altogether including front, back & base.
Dave.
Scratchbuilding 4mm scale JXA scrapwagons ; - http://www.newrailwaymodellers.co.uk/Fo ... =6&t=37620
Scratchbuilt & kit built grappler claw cranes ; - http://www.newrailwaymodellers.co.uk/Fo ... =6&t=36342
-
- Posts: 1205
- Joined: Sun Mar 09, 2008 1:16 am
- Location: Erdington, Birmingham,.... but can also be found at various railway bridges !
Re: Building a modelling "strip & profile" storage/assorter box
I had to find some unwarped plywood as to cut the base, back & front as seen here, at this point I checked my tri-square for accuracy as shown in photo below.
The total width required was calculated, in this case the 4 main divided sections needed a back, front & base width of 36.8cm. (as seen in above photo)
The Plastruct range of strip items can also be purchased in poly bags as shown here, their strip range is'nt as tall as the Evergreen equivalents so extra "medium height" allocated storage space was kept in mind for these packaged items from plastruct.
A great tip is to always keep them stored in their original package (just snip the top of the packages off).
When you run short & need to buy a new pack of the same, keep the old packaging for something else thats thats strip related & consists of the same size , it can be for anything strip that you've multiple of, you'll just maybe need to label it up with the size/dimensions, the main idea is that identical products of a large quantity are kept together.
The whole thing ready for assembling, it has much more holding capacity than my other box
Dave.
Last edited by 0121modeller on Sun Dec 26, 2010 5:20 pm, edited 1 time in total.
Scratchbuilding 4mm scale JXA scrapwagons ; - http://www.newrailwaymodellers.co.uk/Fo ... =6&t=37620
Scratchbuilt & kit built grappler claw cranes ; - http://www.newrailwaymodellers.co.uk/Fo ... =6&t=36342
Re: Building a modelling "strip & profile" storage/assorter box
Thats a cracking idea... I wonder if it could be adapted for sheets of plasticard as I haven't the same range of bits as you!
-
- Posts: 1205
- Joined: Sun Mar 09, 2008 1:16 am
- Location: Erdington, Birmingham,.... but can also be found at various railway bridges !
Re: Building a modelling "strip & profile" storage/assorter box
Cheers b308
I felt the need to build myself a sheet styrene storage box too, although this is also struggling to store all I have, at the time of me designing & building this, I mis-judged the variety of different slaters plain & embossed plastikard, various Evergreen sheet, the odd alloy/brass sheeting, aluminium repair mesh sheet, A4 size wet "n" dry (for tarmac) & allowing more storage space for the "cut down sizes" of mostly styrene sheet materials.
The box seen here is only just adequet (but very crammed) , so I'll be building another (better designed) one of these sometime within the near future.
Dave.
Scratchbuilding 4mm scale JXA scrapwagons ; - http://www.newrailwaymodellers.co.uk/Fo ... =6&t=37620
Scratchbuilt & kit built grappler claw cranes ; - http://www.newrailwaymodellers.co.uk/Fo ... =6&t=36342
-
- Posts: 1205
- Joined: Sun Mar 09, 2008 1:16 am
- Location: Erdington, Birmingham,.... but can also be found at various railway bridges !
Re: Building a modelling "strip & profile" storage/assorter box
More progress on the strip assorter box,
I gave a couple of coats of white primer, the main components (front, back, base & main dividers) are'nt yet screwed & glued, reason being the first coat of primer will
need a gentle wipeing over with very fine sandpaper & the area of spraying vaccumed.
Although I was as accurate as possible with the measurements, I reckon the slight bowing/warping progression of the plywood was taking effect, re-assembly fitting internal stack dividers was a mm out & slightly angled so giving a slight skew on screw fixed prior to glueing assembly, the cause of the problem will need to be rectified before final glue & screw assembly, bear in mind the internal stack divider glued assemblies are designed to be lifted out for occassional vaccuming inbetween the 4 main divided sections.
Allowing primer to dry for a day then I gave a spraypaint coat of satin red. I chose the colour red because nothing I have "strip" is red, so everything will be clearly seen & found, if i chose white paint or clear varnish the white styrene & model stripwood would'nt be so easily seen.
Topside view, I counted 51 compartments.
Put alongside the other sorter box I have, its 2 inches wider.., so this box should fit all my raw strip materials .
Dave.
Scratchbuilding 4mm scale JXA scrapwagons ; - http://www.newrailwaymodellers.co.uk/Fo ... =6&t=37620
Scratchbuilt & kit built grappler claw cranes ; - http://www.newrailwaymodellers.co.uk/Fo ... =6&t=36342
-
- Posts: 1205
- Joined: Sun Mar 09, 2008 1:16 am
- Location: Erdington, Birmingham,.... but can also be found at various railway bridges !
Re: Building a modelling "strip & profile" storage/assorter box
I transfered all the items from the old strip box & those strips I had stored in coffee jars ;
Still a bit of a tight fit, but it will serve its purpose quite well I think, I'll just need to keep it tidy.
I'll have to build myself a sheet profile box fairly soon also, as I mentioned in one of my above posts. When thats also built I can have more organized workspace on my modelling bench, so I can get back down to some serious railway modelling again
Anyway, I hoped to have inspired some of you to maybe build yourself something similar for your scratchbuilding strip storage needs
Dave.
Scratchbuilding 4mm scale JXA scrapwagons ; - http://www.newrailwaymodellers.co.uk/Fo ... =6&t=37620
Scratchbuilt & kit built grappler claw cranes ; - http://www.newrailwaymodellers.co.uk/Fo ... =6&t=36342
- Bufferstop
- Posts: 13821
- Joined: Thu Mar 11, 2010 12:06 pm
- Location: Bottom end of N. Warks line
Re: Building a modelling "strip & profile" storage/assorter box
Dave - a while back on another thread I posted you the directions from S-on-A station to Mach Ado About Toys. Don't bother, you're better stocked than he is
Cheers
John W
Bufferstop
Cheers
John W
Bufferstop
Growing old, can't avoid it. Growing up, forget it!
My Layout, My Workbench Blog and My Opinions
-
- Posts: 1205
- Joined: Sun Mar 09, 2008 1:16 am
- Location: Erdington, Birmingham,.... but can also be found at various railway bridges !
Re: Building a modelling "strip & profile" storage/assorter box
Cheers John, Yep that lot should keep me modelling for a while I think...., H'mm, but then again.., does'nt it always seem to be the case that whatever strip or profile you need for a particular job is one you have'nt got (or very little) & will need to go out & buy more!Bufferstop wrote:Dave - a while back on another thread I posted you the directions from S-on-A station to Mach Ado About Toys. Don't bother, you're better stocked than he is
Cheers
John W
Bufferstop
Dave.
Scratchbuilding 4mm scale JXA scrapwagons ; - http://www.newrailwaymodellers.co.uk/Fo ... =6&t=37620
Scratchbuilt & kit built grappler claw cranes ; - http://www.newrailwaymodellers.co.uk/Fo ... =6&t=36342
- Bufferstop
- Posts: 13821
- Joined: Thu Mar 11, 2010 12:06 pm
- Location: Bottom end of N. Warks line
Re: Building a modelling "strip & profile" storage/assorter box
Sounds like Murphy's law of stock control which says that "If any urgently required component has a value which is critical, then there will be none in stock and it will prove impossible to arrive at that value by any sort of combination of parts that are in stock."
Growing old, can't avoid it. Growing up, forget it!
My Layout, My Workbench Blog and My Opinions