Dean Sidings "Killin Pug" conversion set.

Have any questions or tips and advice on how to build those bits that don't come ready made.
Post Reply
Dad-1
Posts: 7327
Joined: Sun Aug 24, 2008 8:05 pm
Location: Dorset - A mile from West Bay.

Dean Sidings "Killin Pug" conversion set.

Post by Dad-1 »

I've fancied doing a kit, getting as far as trying to buy a Highland Railways Jones Goods, but fortunately for me they were sold out. That would have been a very expensive kit to start with - enough to make the NRM 'City of Truro' look cheap !!

Some of you will have seen the 'build' article in the September issue of Hornby Magazine. Being a fan of the Hornby 0-4-0 series locos which I seem to get running well I thought here was the perfect introduction. I was also less than impressed with the build quality as photographed for the article. that was until I saw how little time had been taken, indicating it was done in a rush to meet publication deadlines.
Right thought I, here will be my first sort of kit !! Well Dean Sidings had sold out ..... probably lots being made following the article. Today though my little box arrived, very well packed, out came tools tonight to begin .......

Image

The Hornby build had rag left all around the cab doorway - I've spent a little time with fine files and scalpels to clean up the cab interior and basic body moulding.

Image

Back to the job in hand ..... More when I've done something !!

Geoff T.
rocketman
Posts: 567
Joined: Wed Jan 13, 2010 6:58 pm

Re: Dean Sidings "Killin Pug" conversion set.

Post by rocketman »

the problem is that Google is so modern9digital photos too) that all it finds are recent photos.
I wish you luck and look forward to your doings.
I am sure there was some Backtrack or similar article on the branch in the last 20 or so years
(sorry to be so unhelpful, memory fades)
good luck with the makings!
rocketman
Dad-1
Posts: 7327
Joined: Sun Aug 24, 2008 8:05 pm
Location: Dorset - A mile from West Bay.

Re: Dean Sidings "Killin Pug" conversion set.

Post by Dad-1 »

Hi Rocketman,

I have 2 concerns, one is the removal of the cast metal chassis as part of the build. It's going to leave the loco very light, there will just about be enough room in the boiler area to fit a small DCC chip, but virtually no space for lead !! At least the Killin Junction to Killin Pier was to my knowledge usually just a one coach job.

The other is getting details correct for a Caledonian Blue version as yet I've not found any pictures ....... not even one in LMS black ! If I can find nothing I'll use the Hornby Caledonian Pug as my guide using similar chimny, buffers and such

So far so good - cylinders cut off and required surgery to add the resin completed. Minor mods to coupling rods done, but I fancy making a cylindrical rod out from the piston rather than the Hornby flat blade. Time for bed and to think about this !!!

Geoff T.
Dad-1
Posts: 7327
Joined: Sun Aug 24, 2008 8:05 pm
Location: Dorset - A mile from West Bay.

Re: Dean Sidings "Killin Pug" conversion set.

Post by Dad-1 »

Things I should have put on ealier ......
This kit comes packed in a tough neat little box so no matter how rough your postman is it will arrive in good condition.

Image

In the instructions it mentions that resin can sometimes be slightly distorted, this can be corrected in hot (not boiling) water, exactly how hot I don't know, but will have to find out. You can see the twist in the frame from front to rear.

Image

To start with you wonder why the trouble of cutting off the cylinders ...... however it's easy to see how much larger the replacements are. My Xacto saw still sitting in the second cut !! This was very easy, but took time as you have very little space in which to move the saw.

Image

I have also filed the pip off the inside of the piston rod and increased the angle as shown in the instructions. It's clear that unless you do this the wheel motion rivets will catch and jam. I have not worked out why it was necessary, but have also taken roughly 4 mm off the tip as recommended

All very easy stuff. I have already noted that the kit has no hook or 3 link coupling to fit to the buffer beam centre. I'll now have to search to see what I can find - I may have a 'spare' from a Heljan or ViTrains diesel.
I've decided to cut the Hornby couplings off altogether and just add a brass wire loop which will work just as well, but be much less visually intrusive. I remove all hooks from my shunters couplings anyway to make removal from a train easier.

Geoff T.
rocketman
Posts: 567
Joined: Wed Jan 13, 2010 6:58 pm

Re: Dean Sidings "Killin Pug" conversion set.

Post by rocketman »

I am watching your progress with great interest.
If you cannot find any sources of photos on this forum, I suggest you try a couple of others....maybe RM Web (don your waterproof). I used to have a mag with an article on the KIllin Branch: I don't recall which, but probably Backtrack sometime in the 80's. It was a very beautiful short branchline and the steamer journey must have been superb, well worth modelling. Latterly it certainly had a one coach train to an attractive station with a BR Standard tank: in Caley days I don't recall....but someone out there does.
I may even tackle this conversion myself if it is easy enough and if I can find a cheap spare pug!
Good luck
rocketman
Dad-1
Posts: 7327
Joined: Sun Aug 24, 2008 8:05 pm
Location: Dorset - A mile from West Bay.

Re: Dean Sidings "Killin Pug" conversion set.

Post by Dad-1 »

More done this evening ......
First cutting away of the guard irons for the rear - a scalpel gives a nice finish.

Image

However it was at this point I found out the chassis I was using had the two rear clips broken off ! This means I'll either have to arrange a screw system to retain the new body, or superglue it together ?

Image

It was me (with a little help from the instructions) that made the cut to remove the rear coupling in the wrong place. It says you cut at the back frame of the underbody, which I did from the top. However the picture shows it cut from the bottom and the rear frame has two different thicknesses ! As can be clearly seen with the underside in deep shadow.

Image

The cut groove for the rear axle should be between 5 & 7 mm from the above mentioned aft cut, this leaving you with a 2 mm groove some 3 mm (or so) deep into which the axle slips.

Image

I am seriously worried about lack of weight and intend to try adding lead to the very small voids within the chassis. Care will be needed not to accidently foul the worm drive at one end and the additional axle at the other !!

Image

Image

I've also found that my kit had a replacement coupling and small length of brass wire for the whistle missing. As I intend using brass wire loops for both couplings that's no problem and my wire/plastic tube stock should be enough to sort out the whistle.

Almost time to check out my Halfords spray cans .......... also see if I can match Caledonian blue of '123' as I want the first built machine which I'm certain was done to 'show off' the companies service.

Ahh yes Rocketman - Hattons have at last received their stock of Hornby DCC chips, they may arrive with me tomorrow. I note all new orders will be at £9 each .... over a 10% increase.

Geoff T
rocketman
Posts: 567
Joined: Wed Jan 13, 2010 6:58 pm

Re: Dean Sidings "Killin Pug" conversion set.

Post by rocketman »

The search for photos of these is a difficult task. I have found a couple of leads which will occupy considerable modeling time;
They are http://www.steamindex.com/backtrak/bt3.htm a paragraph down the page
and then this trail from the old RM Website with some sources quoted of photos in books I have not seen
http://www.rmweb.co.uk/forum/viewtopic.php?f=24&t=35503
Regards
rocketman
Dad-1
Posts: 7327
Joined: Sun Aug 24, 2008 8:05 pm
Location: Dorset - A mile from West Bay.

Re: Dean Sidings "Killin Pug" conversion set.

Post by Dad-1 »

Hi rocketman,

I did ask a question on rmweb and had several helpful answers - as a result I've ordered a book from Amazon. Drummond Locomotives by Brian Haresnape & Peter Rowledge, used, good condition £5 with £2.75 P&P.
I also am advised there is a picture in Locomotives Illustrated 144, RAS Publishing which covers LMS and Scottish tank engines. As yet I've not found a copy of this. There is also a picture on line of the last survivor in 1947 in LMS black, I'll try and highlight the location in here later.

One of the answers was that the Dean Sidings is not as dainty as it should be and had photos of his part built brass kit. What the picture and the brass kit confirm is that the fire box area behind the saddle tank should only be at the same height as the forward smoke box. This is simply not possible with the Hornby chassis as the motor sits far too high, so the Hornby Pug is also inaccurate for this reason. Now I'm not a pedantic perfectionist (it was that which drove me out of scale aircraft modelling) so the configuration of both this resin kit and the Hornby product become acceptable to me.

I was out when the postman came, but they have my decoders at the village shop. I will now convert the chassis to DCC and make certain this is running well before I proceed much further. I have to do this if I'm going to glue the resin body to the modified Hornby chassis - no going back for any changes !!!

I'm going to remove the block of white metal from the driver and fireman's feet - will drill up through a foot into the leg and insert a small length of brass pin which will be mounted into a hole drilled in the cab floor. Oh my gawd ...... I'm drifting back to my aircraft set of standards !!!!

Image

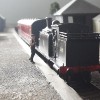
I drilled some holes - can't say what size drills as I just pick on eyeball sizing, and have propped/plugged pieces into place - the chimney I expect to use is too deep back to front and will need a little fettling to sit neatly on the smokebox.
The exercise has been quite easy with no problems yet, although I'm not hurrying.

Image

Now another thing to overcome will be getting Caledonian blue paint and transfers for cab-side number plate ...... and when the book arrives will it need blue, maroon shadowed C R and the crest on the saddle tank sides ? More research needed.

Geoff T.
User avatar
stuartp
Posts: 1244
Joined: Sat Feb 28, 2009 7:40 pm

Re: Dean Sidings "Killin Pug" conversion set.

Post by stuartp »

I'll no doubt get myself all confused posting in both forums but never mind. (Looking good btw !).

No crest, just a dot according to the Haresnape photo, but fully lined out including cylinders. Fox do transfers for the lettering. It looks to me like the darker blue but 'what shade was Caley blue ?' is one of those subjects which starts fights in empty rooms. The CR Association have published a very weighty book on the subject which quotes the following modern matches in BS381-C: 105 'Oxford Blue' for the darker blue, 109 'Middle Blue' for the lighter, and 541 'Maroon' for the valances, based on ScR records.

I have the Precision colours stored away for when I get round to building 123 in the lighter blue, I'd be tempted to use Humbrol Oxford Blue for the darker.

There's a pug and Branchlines chassis in the stash, I might just drag it out and bump it to the top of the 'to do' pile !
Portwilliam - Southwest Scotland in the 1960s, in OO - http://stuart1968.wordpress.com/
Dad-1
Posts: 7327
Joined: Sun Aug 24, 2008 8:05 pm
Location: Dorset - A mile from West Bay.

Re: Dean Sidings "Killin Pug" conversion set.

Post by Dad-1 »

Hi stuartp,

Yes, thanks for your help - this tends to be my normal 'home', but I do sometimes use the err ... the more experts site ?

So I've brought forward the link http://travelandmixpix.fpic.co.uk/p62441112.html as much to help me as anyone else ! Hope it works here.

I probably don't want to spend that much, but where there are full BS381 paint colour specifications you can get them mixed up and put into a spray can at your local Halfords. I've had a few RAF aircraft colours done for me in the past.

If this works out OK I may start looking to see if someone makes a McIntosh 439 0-4-4T kit. My only 'fear' is the white lining - I've not got that steady hands for a lining pen (& don't have one), masking & painting not really practical, white decal strip would be easier, except for any curves ..........

Geoff T.
User avatar
Essex2Visuvesi
Posts: 2318
Joined: Thu Aug 28, 2008 4:51 pm
Location: Finland, Finland, Finland!

Re: Dean Sidings "Killin Pug" conversion set.

Post by Essex2Visuvesi »

This stuff is great, I did the whiskers on my Dapol Park Royal with the yellow one, goes round corners nice too :)

http://balsamart.co.uk/store/index.php? ... ts_id=2027
Si quam primum vos operor non successio , impono

The only stupid question is the one I didn't ask

Proud member of the OAM
(Order of the Armchair Modeller
Dad-1
Posts: 7327
Joined: Sun Aug 24, 2008 8:05 pm
Location: Dorset - A mile from West Bay.

Re: Dean Sidings "Killin Pug" conversion set.

Post by Dad-1 »

A less productive day than wanted ........ but that's life !
What I have been doing is trying to add weight to the Hornby chassis. By removing the main Hornby metal frame much of this lightweight models weight is removed. Anyone who likes the 0-4-0 series will be well aware that limits of traction (& electrical pickup) are dictated by the overall weight and I don't want this conversion to be unable to pull anything. My modest target is two coaches, or around 5 wagons and brake van.

The lead weights came from a Force India racing wheel with around 30 grams added. A 10 gram weight stuck to the forward motor top, 10 grams fitted into the rear chassis above the two pony wheels, Cut down weights amounting to around 10 grams in the front, part by the final drive (not in place when photo taken), the remaining piece stuck to the resin shell under the water filler.

Image

This should still give enough room for the Hornby DCC chip above the forward motor.
Hard wiring in the DCC chip is my evening project.

Geoff T.
Dad-1
Posts: 7327
Joined: Sun Aug 24, 2008 8:05 pm
Location: Dorset - A mile from West Bay.

Re: Dean Sidings "Killin Pug" conversion set.

Post by Dad-1 »

Hi E2V,

At that price you can't go wrong - I'll have to get a roll.

Geoff T.
User avatar
Essex2Visuvesi
Posts: 2318
Joined: Thu Aug 28, 2008 4:51 pm
Location: Finland, Finland, Finland!

Re: Dean Sidings "Killin Pug" conversion set.

Post by Essex2Visuvesi »

Dad-1 wrote:Hi E2V,

At that price you can't go wrong - I'll have to get a roll.

Geoff T.
yep.

Also the white takes paint rather well... paint it while its still on the backing
Si quam primum vos operor non successio , impono

The only stupid question is the one I didn't ask

Proud member of the OAM
(Order of the Armchair Modeller
Dad-1
Posts: 7327
Joined: Sun Aug 24, 2008 8:05 pm
Location: Dorset - A mile from West Bay.

Re: Dean Sidings "Killin Pug" conversion set.

Post by Dad-1 »

Everything was going to plan, very easy, no problems beyond my chassis having the clips broken - I forgot to mention that it came free from a friend.
But tonight before I started hard wiring the chip in I looked it over carefully and I'm not happy with the front end frame.
I must fix all this before I hard wire the chip in, I don't want to saw things with a chip dangling on it's flimsy wires.

What makes me unhappy ? Well the original front frame which I cut as per instructions (although I'll have another careful read of them) protrudes well forward of the buffer beam which of course it shouldn't.

Image

In addition to that there is a gaping hole through between the resin frame and the original chassis, which again is not wanted.

Image

While the remedy is simple enough it's going to take a little extra time. I shall fabricate in plasticard, of which I have good stocks in various thicknesses, filler blocks, but that's not all. By cutting off another 4 mm or so I will remove the forward guard irons, these will need to be replaced by plasticard items which need to be fixed onto my packing/filler piece.

This is something of a shame as all had seemed so easy with completion viable in just a few days of simple cutting of that original chassis.
Perhaps the chip fitting can be done tomorrow !

I'm trying not to sink back into my aircraft standards, otherwise I'll never get it finished !!
For a guide - I started one aircraft kit in 1983 and finished it in 1995, although it did get a Commended at the international exhibition.

Geoff T.
Post Reply