Birmingham New Street and Brettell Road in P4

Re: Birmingham New Street and Brettell Road in P4
I don't know how you do it to such an impressive standard. Always good to see!
Modelling On A Budget ---》 https://www.newrailwaymodellers.co.uk/F ... 22&t=52212
Re: Birmingham New Street and Brettell Road in P4
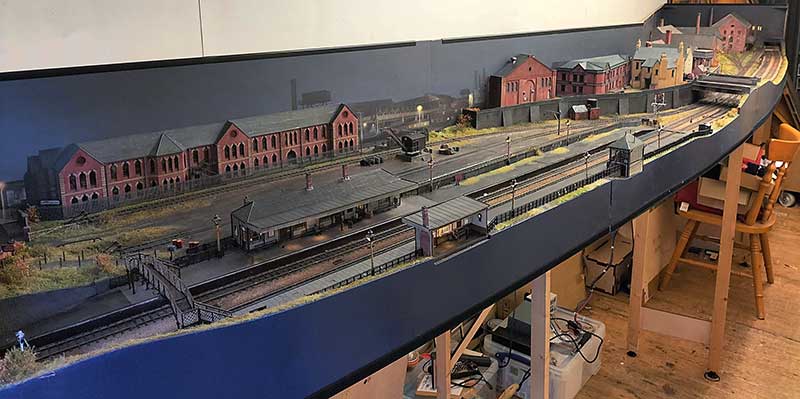
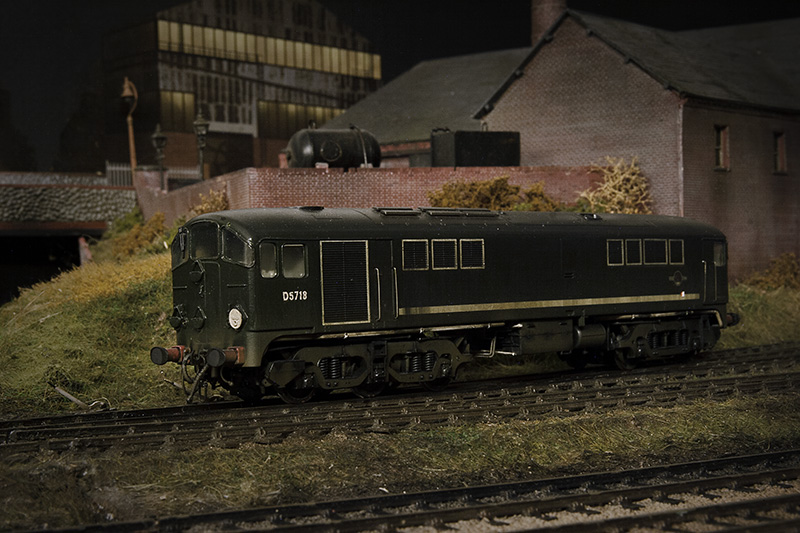
A bit of re-jigging of the shed means I have been able to put all of the scenic boards for Brettell Road up together. Its 5 months since the Cradley show - Time flies doesn't it?
Theres a few things to fix after the show. A couple of the points needed a check over as they weren't totally reliable. I also found 2 dead sections that hadn't shown up during the show so I fixed those too.
The lights on the upper floor of this building failed before the show but after the building had been planted onto the layout. It was too close to the show to fix it before so this is something to look at now I have time. I also want to add a few yard lights and sort out the telegraph poles on the layout because as they stand now they don't make a huge amount of sense.
The other thing to fix was the route setting on the main lines. Signalling purists are advised to look away now! Before the track and signals were all operated separately via the throttles with only the yard set up as a route. (My Digitrax system allows me to program routes into it.) So thats been changed for operator convenience so that throwing a signal sets the route as well. I know the route should be set then the signal pulled rather than this way round. You can set the signals to danger on their own but in case you forget the routes will set all the other signals to danger for you anyway. I hoping this will be pretty simple to use.
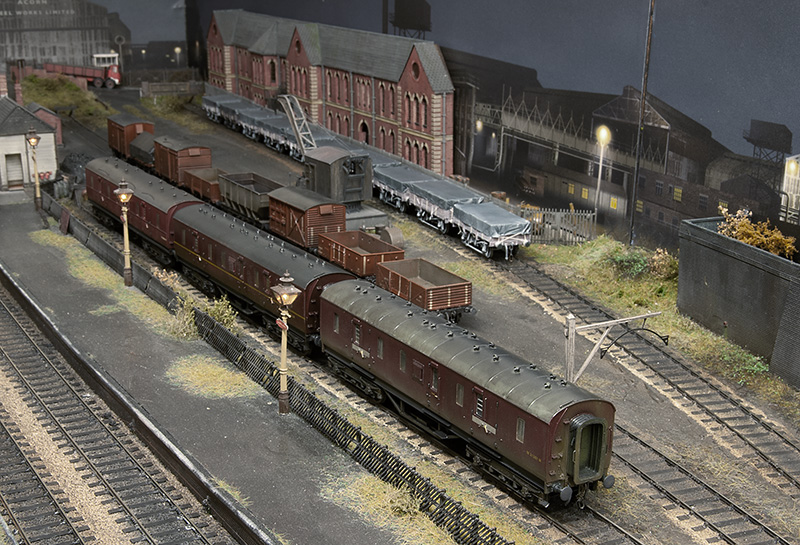
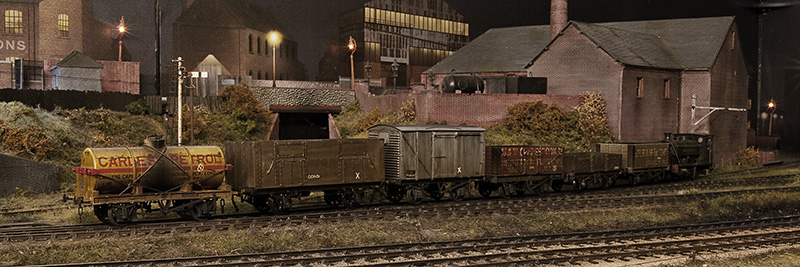
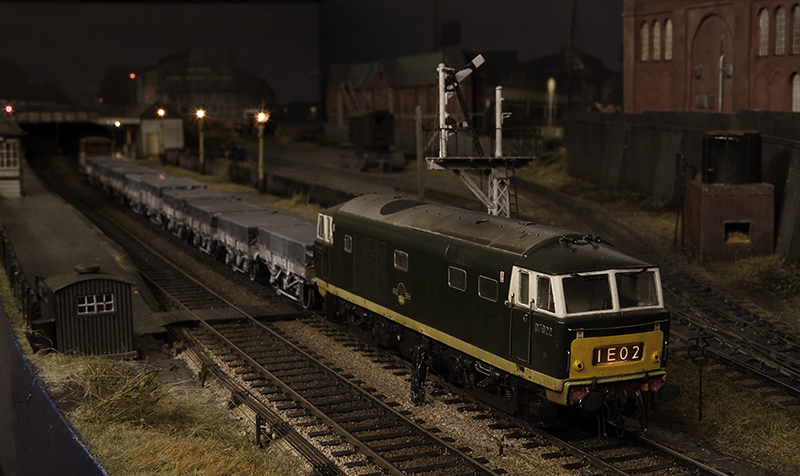
Since the show I have a small stockpile of new rolling stock to be tested. The rule is all stock must go everywhere without falling off, even though in this image only the middle road of wagons will go into the yard at shows. Of this little lot only 4 wagons were rejected and returned to 'works' for some fettling. These 4 have now been passed too.
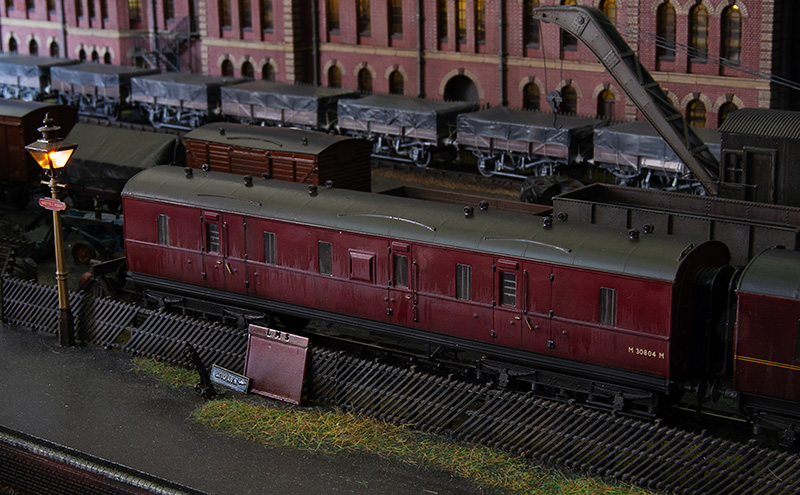
Below, just some more traditional layout style pictures.
Re: Birmingham New Street and Brettell Road in P4
Hi Jim,
Lots of eye candy.
What more can I say ?
Geoff T.
Lots of eye candy.
What more can I say ?
Geoff T.
Remember ... I know nothing about railways.
http://www.newrailwaymodellers.co.uk/Fo ... 22&t=32187 and Another on http://www.newrailwaymodellers.co.uk/Fo ... &sk=t&sd=a
http://www.newrailwaymodellers.co.uk/Fo ... 22&t=32187 and Another on http://www.newrailwaymodellers.co.uk/Fo ... &sk=t&sd=a
Re: Birmingham New Street and Brettell Road in P4
I love this layout. Way back on whatever page I ran out of superlatives for it. Now I just look and admire.
Thanks for posting, Jim.
Glencairn
Thanks for posting, Jim.
Glencairn
To the world you are someone. To someone you are their world.
I Cannot Afford the Luxury of a Negative Thought
I Cannot Afford the Luxury of a Negative Thought
Re: Birmingham New Street and Brettell Road in P4
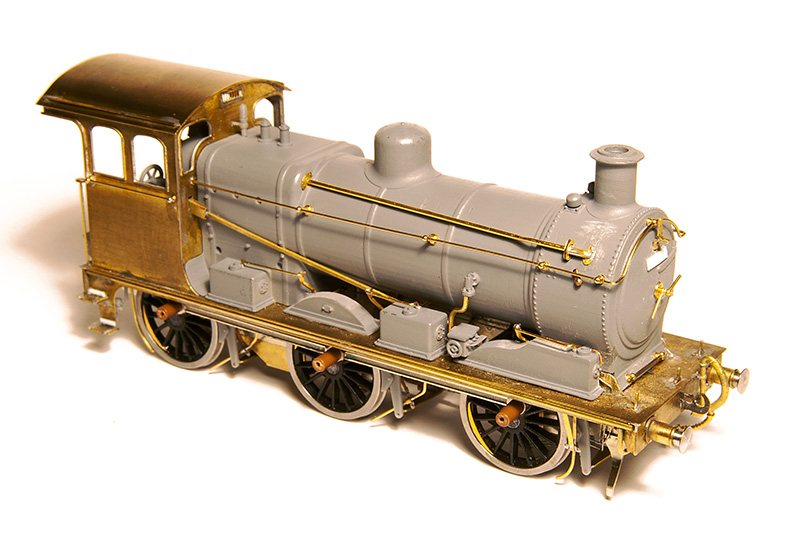
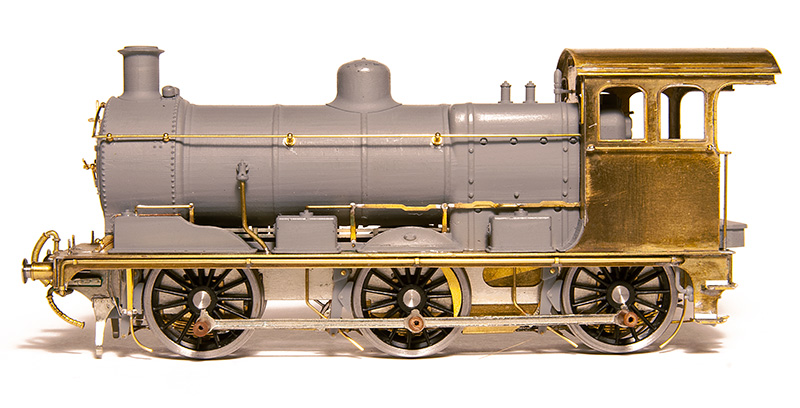
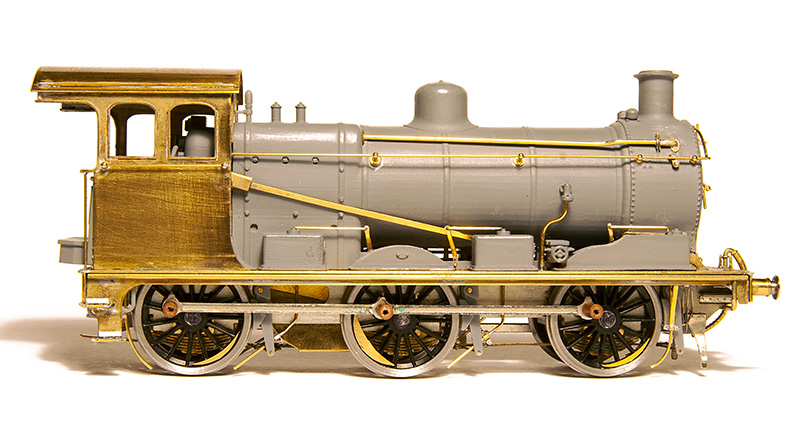
Over the last week or so Ive embarked on another test build for Brassmasters. This time a J17 kit thats been designed by David Barham. Its not really any use for Brettell Road but it would fit North Elmham (which I have been know to help out with).

The basic chassis build with a High level Loadhauler gearbox. The loco and tender use CSBs throughout. The kit will be supplied with both printed and etched brake shoes.

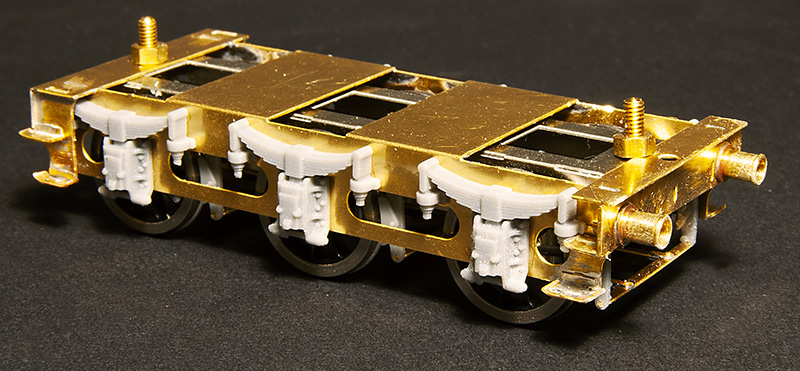
The tender subframe - Again with options on the brake shoes.
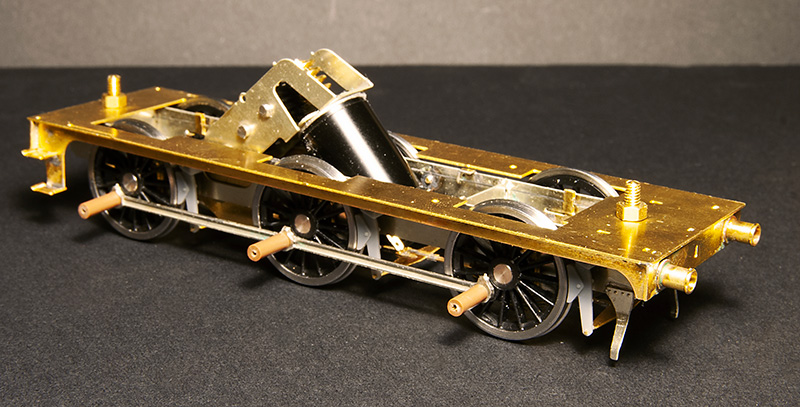
Chassis and footplate.
Tender with its outer frame.
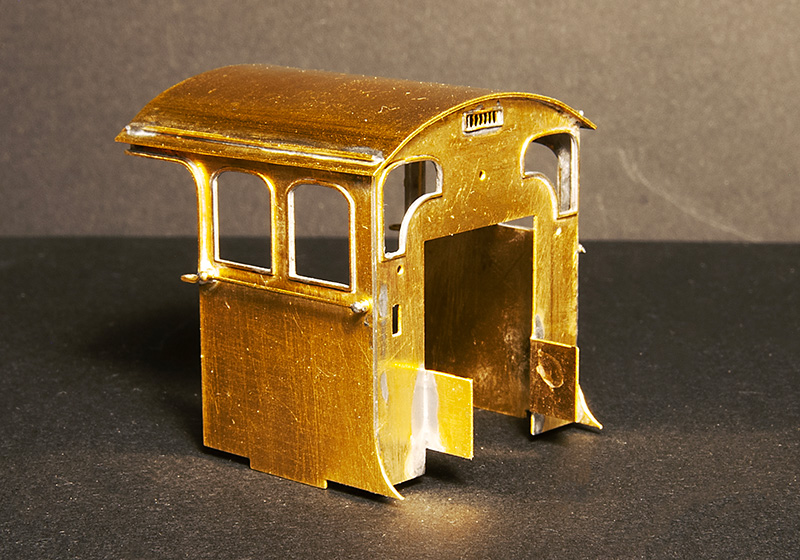
The cab
Pretty much everything above the footplate and forward of the cab is catered for by a 3D print. Here I've made a start on the basic detailing
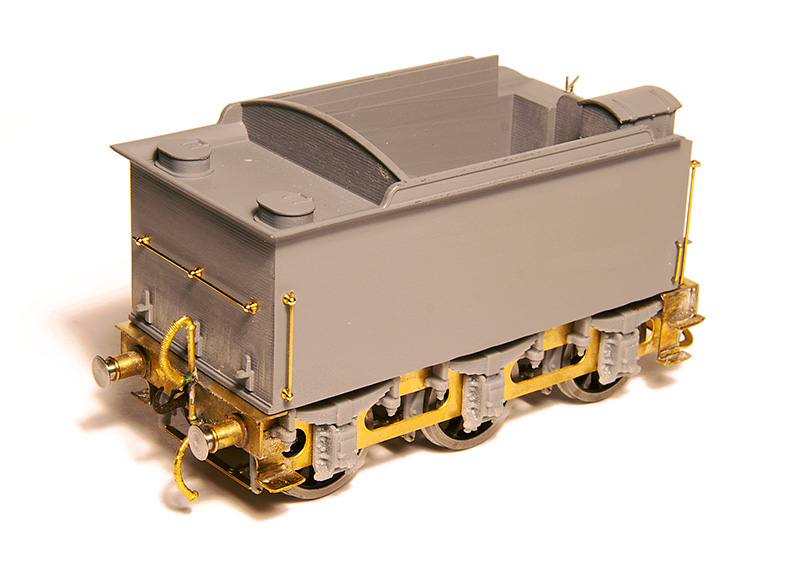
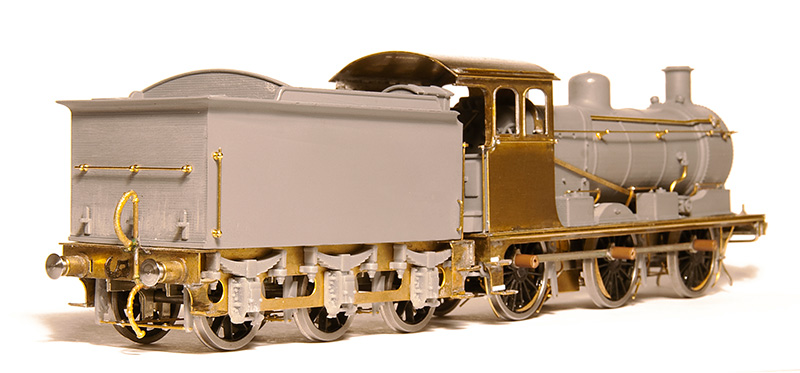
The tender body, like the loco, is a 3D print.
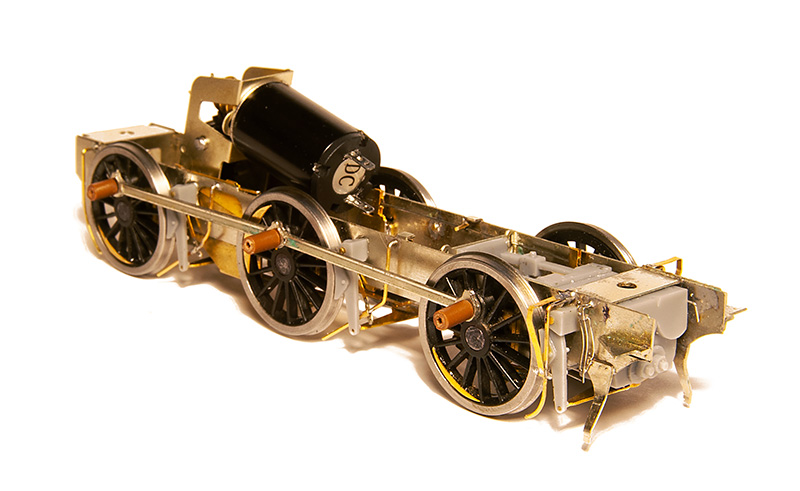
The detailed up chassis
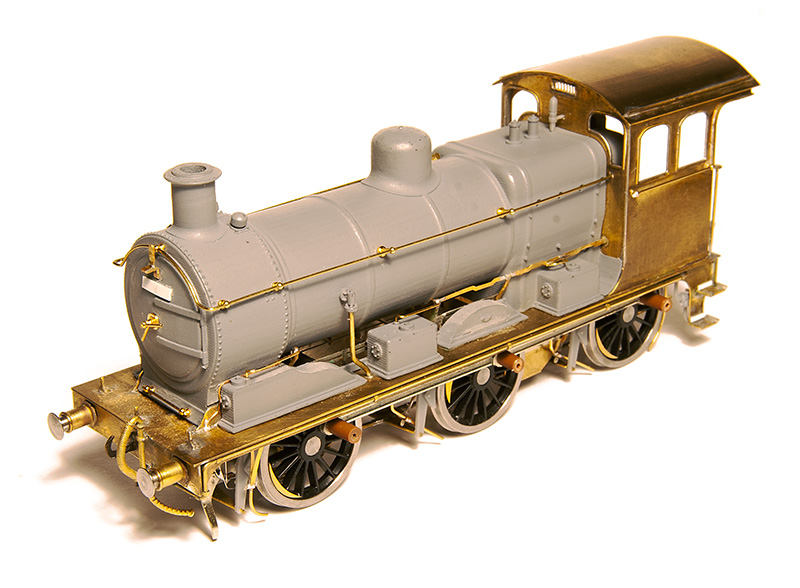
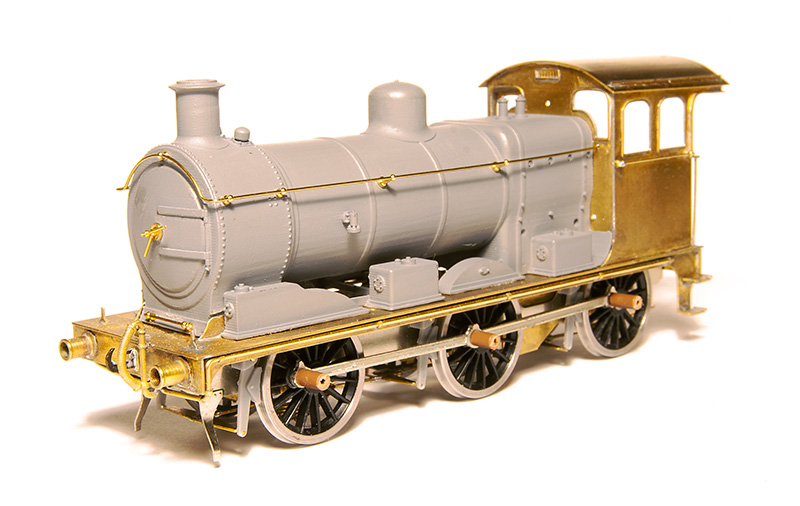
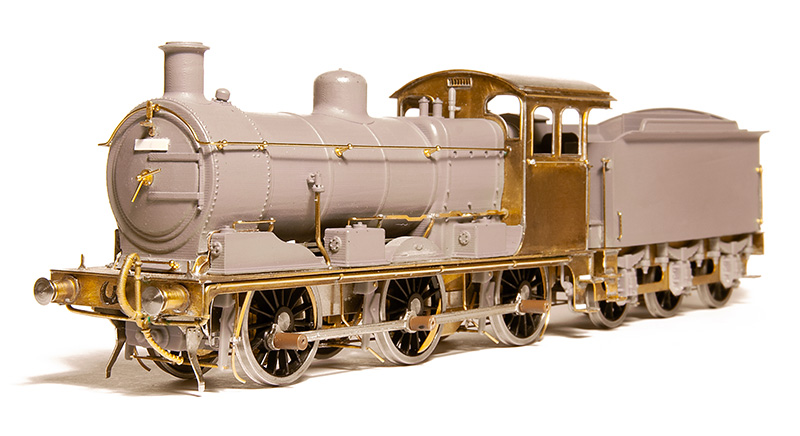
The finished loco - More pictures below. This has been a pleasure to put together.

The basic chassis build with a High level Loadhauler gearbox. The loco and tender use CSBs throughout. The kit will be supplied with both printed and etched brake shoes.
The tender subframe - Again with options on the brake shoes.
Chassis and footplate.
Tender with its outer frame.
The cab
Pretty much everything above the footplate and forward of the cab is catered for by a 3D print. Here I've made a start on the basic detailing
The tender body, like the loco, is a 3D print.
The detailed up chassis
The finished loco - More pictures below. This has been a pleasure to put together.
-
Roger (RJ)

- Posts: 1567
- Joined: Tue May 29, 2007 2:59 pm
- Location: Nottingham, UK.
Re: Birmingham New Street and Brettell Road in P4
"The loco and tender use CSBs throughout."
?
?
Re: Birmingham New Street and Brettell Road in P4
Continuous springy beams. It's a method of sprung suspension.

Re: Birmingham New Street and Brettell Road in P4
G'Day Gents
Nice, Very nice.
manna
Nice, Very nice.
manna
EDGWARE GN. Steam in the Suburbs
Re: Birmingham New Street and Brettell Road in P4
Fantastic is the first word that comes to mind. Thanks for posting.
Pete.
Re: Birmingham New Street and Brettell Road in P4
A most beautiful thing. 
Re: Birmingham New Street and Brettell Road in P4
I agree. Is lovely seeing such godd things being created!
Modelling On A Budget ---》 https://www.newrailwaymodellers.co.uk/F ... 22&t=52212
Re: Birmingham New Street and Brettell Road in P4
Excellent kit, skilled builder, I am trying to curb my drooling. This class were such a neat design, I believe the earliest 0-6-0 class to subsequently receive a 4F rating on BR, very effective in service.
Re: Birmingham New Street and Brettell Road in P4
STUNNING!!!!!!!!
Glencairn
Glencairn
To the world you are someone. To someone you are their world.
I Cannot Afford the Luxury of a Negative Thought
I Cannot Afford the Luxury of a Negative Thought
Re: Birmingham New Street and Brettell Road in P4
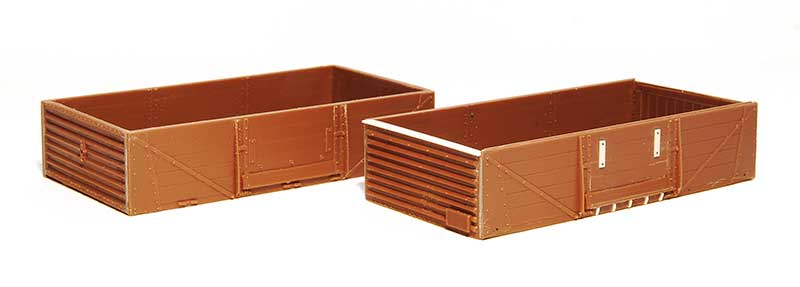
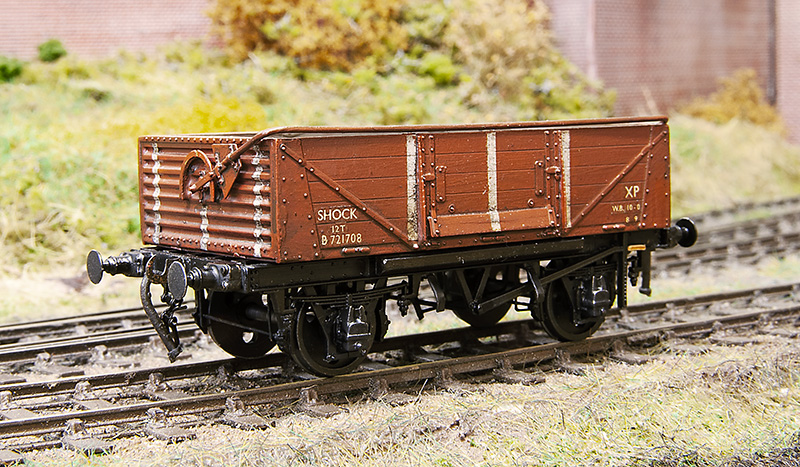
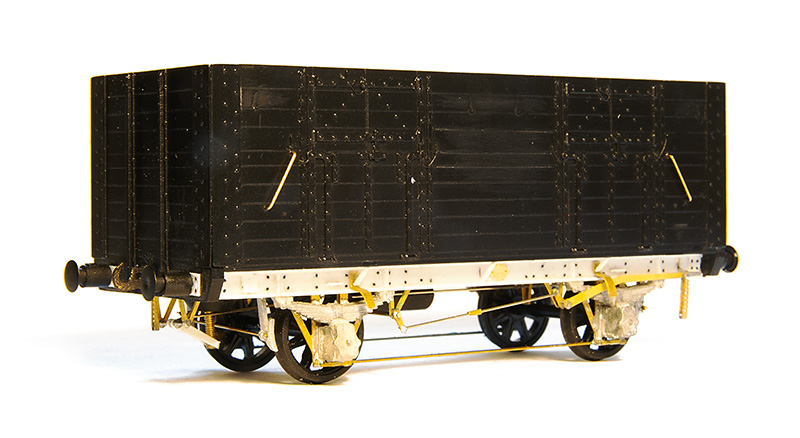
A while ago I did a batch of shock opens including an attempt at an ex-LMS diagram 1983 variant. Justin of Rumney Models noticed that I had used the same ends as the BR version with inset corrugations while the LMS wagon has corrugations that stick out. Something I had completely failed to notice myself. So that wagon had its top lip removed and renumbered back to a BR one. A new kit was brought (well a few actually - saves on postage!) and a second attempt made using cut down spare ends from a Parkside 12t van kit. The BR version is at the back. Theres a few other differences too like the bang plates for the doors, the shape of the panelling on the ends and the braces under the door.

The finished wagon in the company of yet another D2150 13t open.
The BR wagon has had a Rumney models sheet rail added and been mated with a clasp brake chassis to produce a D1/040 variant. Buffers are from Lanarkshire Models.
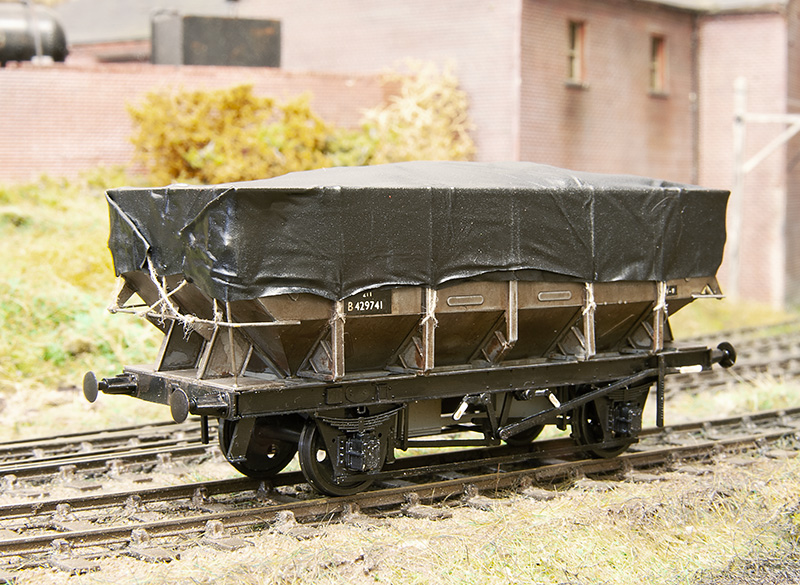
Moving on to a couple of hoppers.
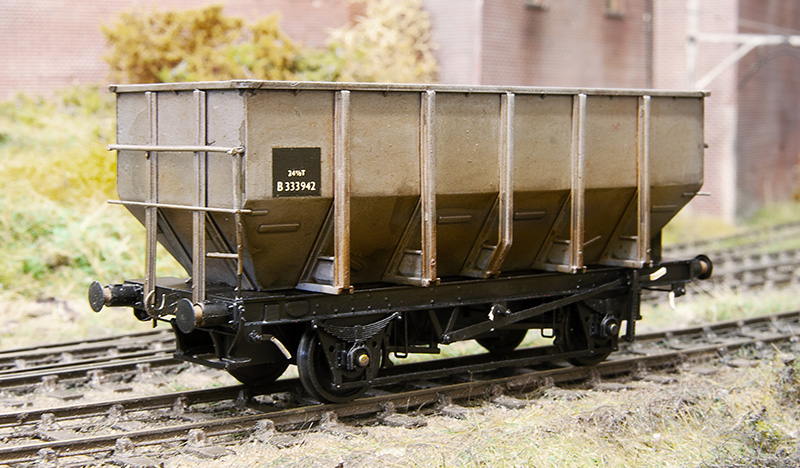
First up the Accurascale 24.5t hopper which i picked up cheaply from a private sale on Western Thunder. It came in brown livery and with a certificate saying it was a limited edition number 061 of 500. If this sort of thing matters to you and you have one you will be pleased to know that your model is now even more limited being 1 of 499 (You're welcome!). It was separated into its component parts (a process that had already started in the box) and the body resprayed. These are not a straight drop in wheels job as the axles used are a little short and theres a boss on the back of the W-iron, much like Lima was doing 40+ years ago. Its not a huge problem though as a few turns of a bearing cutter (I use Ed's tool) and a little bit of thinning the boss down and off you go. I also cut off the NM pockets.
What is a little bit more of an issue is it doesn't weigh anything, just 21 grammes out of the box. Obviously if you plan to run your wagons loaded no problem but if you want them empty (as did ) then a little bit of trickery is required.
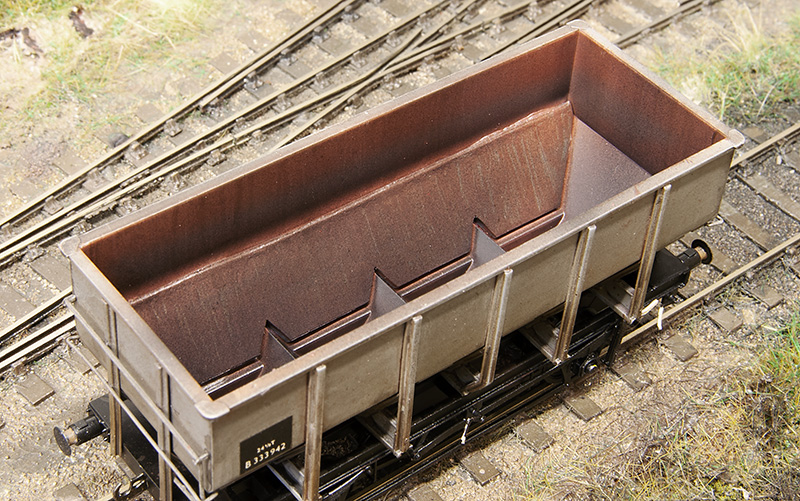
My solution was to make new lower sides from 1mm lead. This brings the wagon up to 50 grammes. If you would like to follow suit I drew up a little cutting template which you can download from here https://p4newstreet.com/wp-content/uplo ... rawing.pdf
Another parkside 21 tonner based on a picture that came up on my facebook feed. (some of the wagons in the post are waiting a delivery of couplings you may notice). Theres often a discussion when these kits crop up that they are difficult to build but they really aren't. The trick is to assemble a side and end as 2 pairs on a piece of glass with a cutting matt to ensure they are square, let these set fully before assembling the rest of the wagon and theres no problems Any slight gaps between the panels can be filled from the inside using Mr Surfacer 1000 liquid filler.
Now a few oddballs - this is an ex L&Y diagram 81 loco coal wagon from the old MAJ models kit. The kit is supplied with a wooden chassis which is correct for the earlier wagons but i wanted the later one so only used the body. The brake gear on these were a little weird to say the least
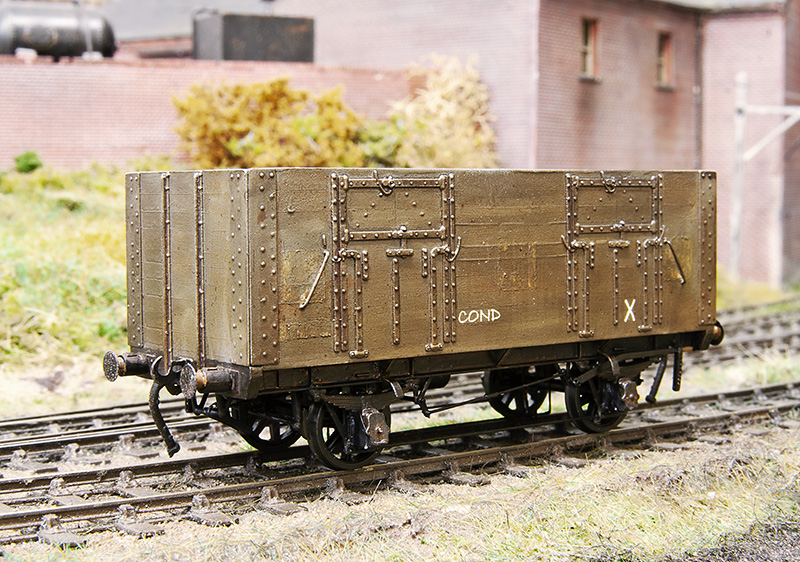
The plan is to have a short train of condemned wagons that is delivered to the yard as a trip working from Bescot. These are then to be collected by one of the Round Oak locos to be taken away for scrapping and the metal bits melted down in the furnaces. This is basically what happened and quite a few locos met their fate this way in real life. Unlike some of the more famous railway scrap yards stuff didn't hand around for long so nothing from my scrap train will have any hope of reprieve sadly. The condemned markings are from Railtec,
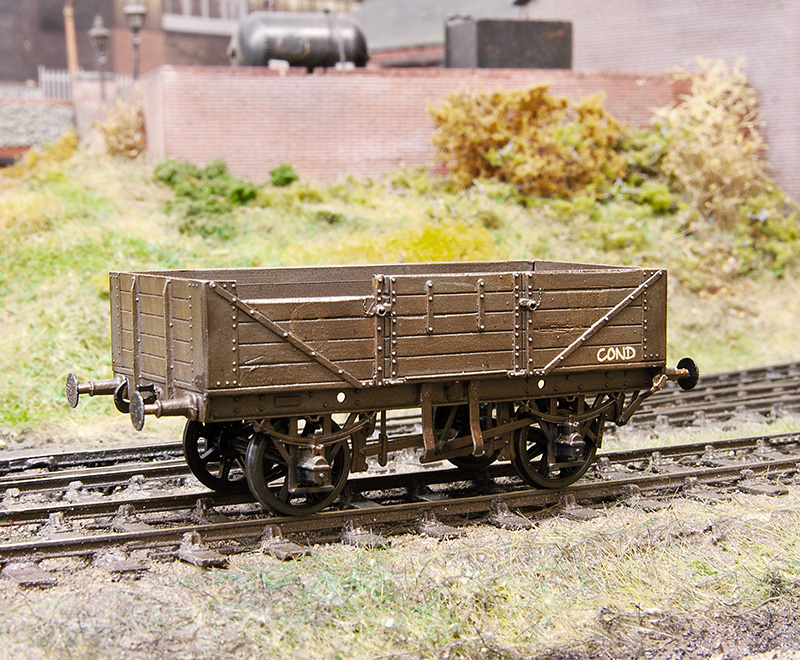
Another victim this time a GWR diagram 04 open from the cooper craft kit. Like another Coopercraft kit I've built this has the bearing holes mounted too low meaning that the wagon looked like it was on stilts. This one has slightly odd brake gear as well. You can just make out the old GW branding.
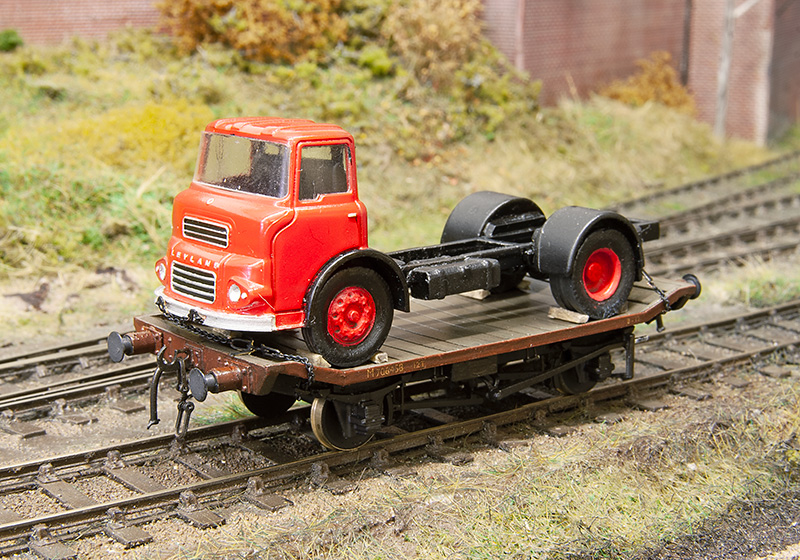
The LMS traction truck has finally been mated with its load.
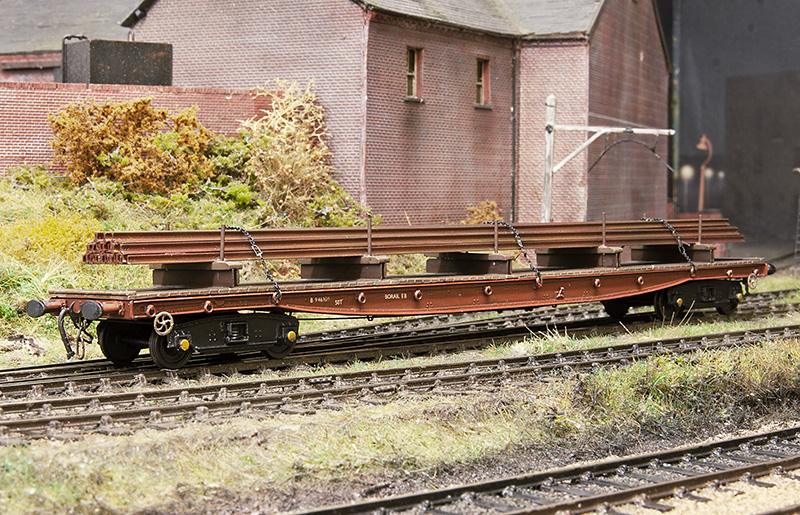
Also based on a picture that cropped upon my facebook feed is this Borail from the Cambrian kit. Making the load was far from the most interesting task I've ever done I can tell you and despite it being essentially hollow this wagon still hovered up 5 meters of rail!