
Thank you, Mountain.
Great that you posted it.
Regarding the plastic heating method, it may be perfect but be sure you do it outside or in a really good ventilated area. Heating plastic may generate vapours that can be pretty damging for the lungs.
Daniel
THE UNIVERSAL WORKBENCH
Re: THE UNIVERSAL WORKBENCH
My new Flickr:
https://www.flickr.com/photos/158027525@N08/
My old Flickr:
https://www.flickr.com/photos/daniel_1_32_scale/page223
Being right is one thing, but being true is quite another.
https://www.flickr.com/photos/158027525@N08/
My old Flickr:
https://www.flickr.com/photos/daniel_1_32_scale/page223
Being right is one thing, but being true is quite another.
Re: THE UNIVERSAL WORKBENCH
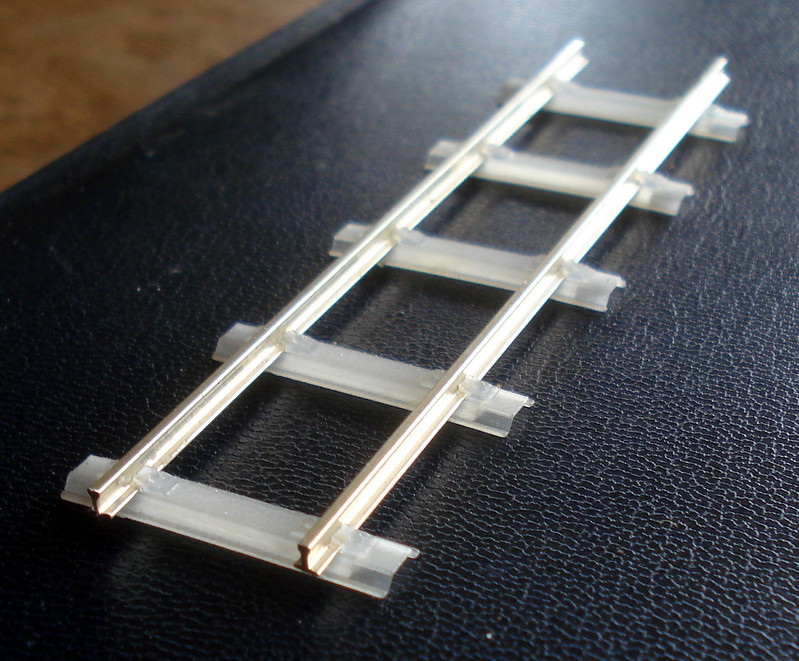
I had made the drawing and ordered from Shapeways a number of trapezoidal metal sleepers for portable track. The two critical points where the visible very thin profile and some fine detail so they were ordered in the finest but also most fragile material: FUD.
They were intended for code #100 rail and 1`6,5mm gauge for my 1/32 scale nonsese.
The prints were beautifully done and the #100 rail went with a little pressure in so I was very happy...
 27 6 2011 074 by d.caso, on Flickr
 27 6 2011 076 by d.caso, on Flickr
Painted and heavilly weathered they had the look I had been dreaming:
 FM 1 9 2011 023 by d.caso, on Flickr
 FM 1 9 2011 026 by d.caso, on Flickr
 FM 1 9 2011 027 by d.caso, on Flickr
... so I decided to make also some matching curved track too... but then a problem arised:
Curved track using such fragile sleepers can be reinforced by glueing an appropriate wood strip of matching shape to the underside but shorter than the sleeper so the edges will still present the hollow profile appeareance. Fine. But what the fragile FUD couldn't take was the lateral tension of the rails bended by eye to an approximate radius: the tiny rail plates couldn't take such tensions and, one after the other, broke.
Getting one rail through the needed sleepers went fine but the second curved rail never went good.
So I understood I needed precision precurved rail in two different but precise radiusses because the outer rail has of course a bigger radius than the inner...
I spent a couple of months dreaming with one of those beautiful FastTrack rail benders...
https://www.youtube.com/watch?v=B7g9O04wMDA
https://www.handlaidtrack.com/tl-0004
... but Mr. Wallet's reaction was to say
"_Over my dead body!_"
and slamming an imaginary door, he vanished into the drawer as always.
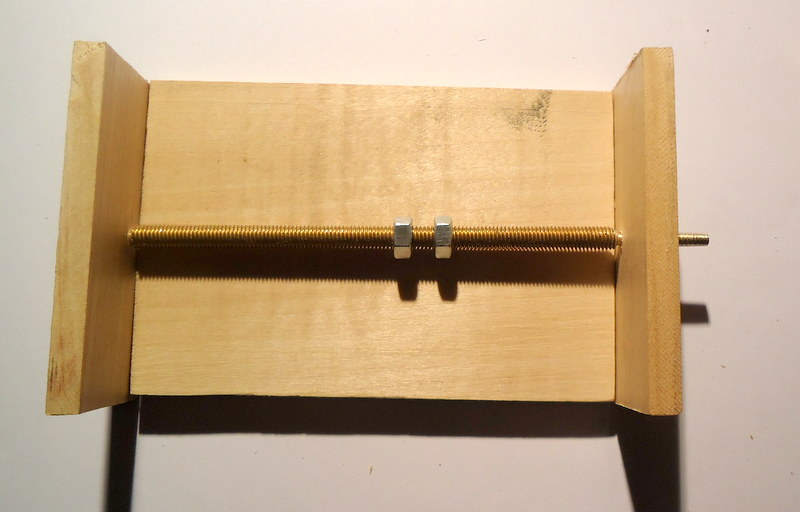
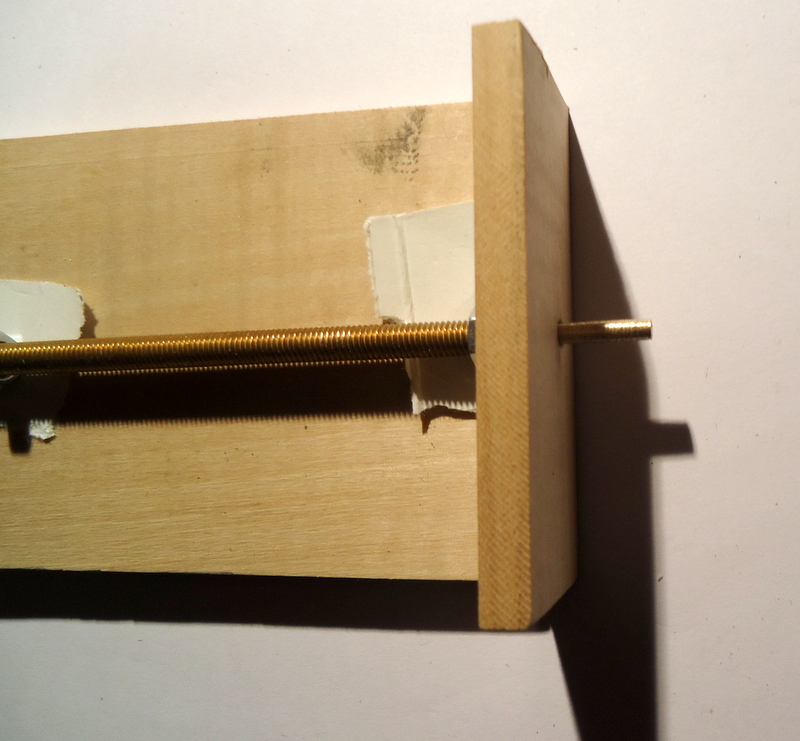
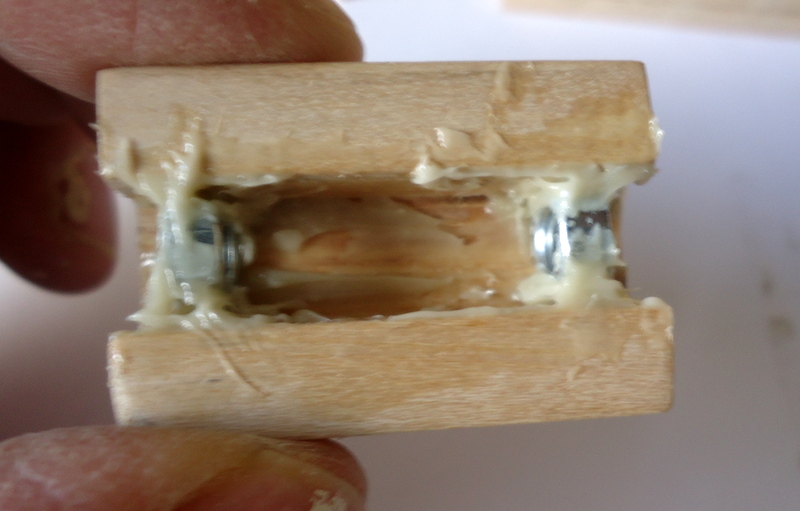
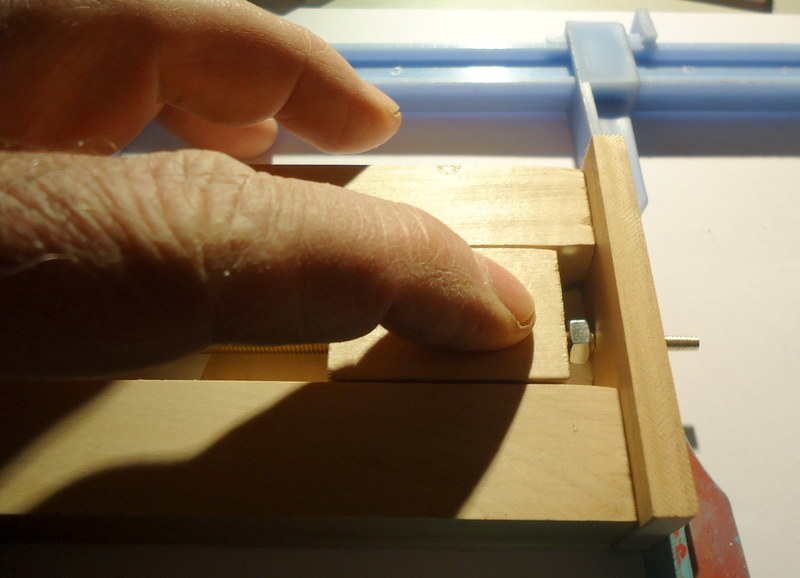
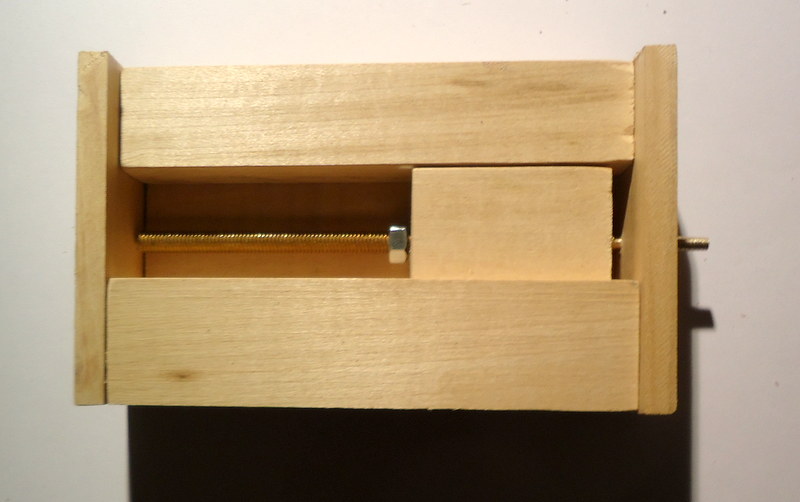
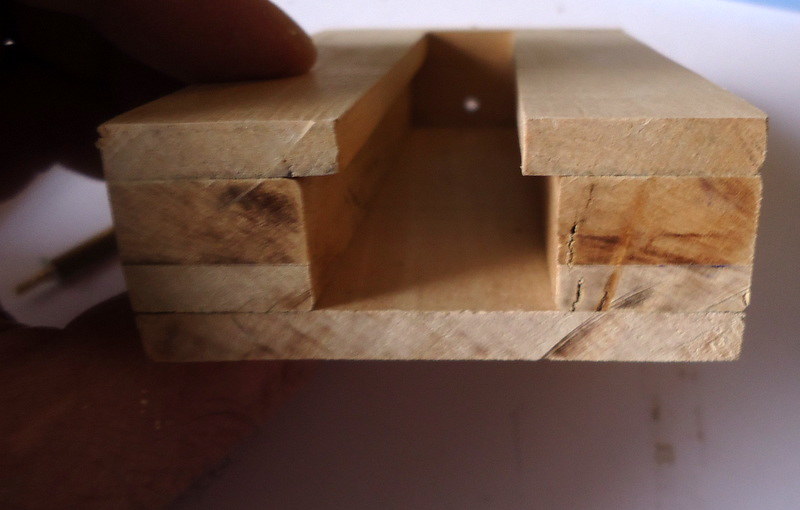
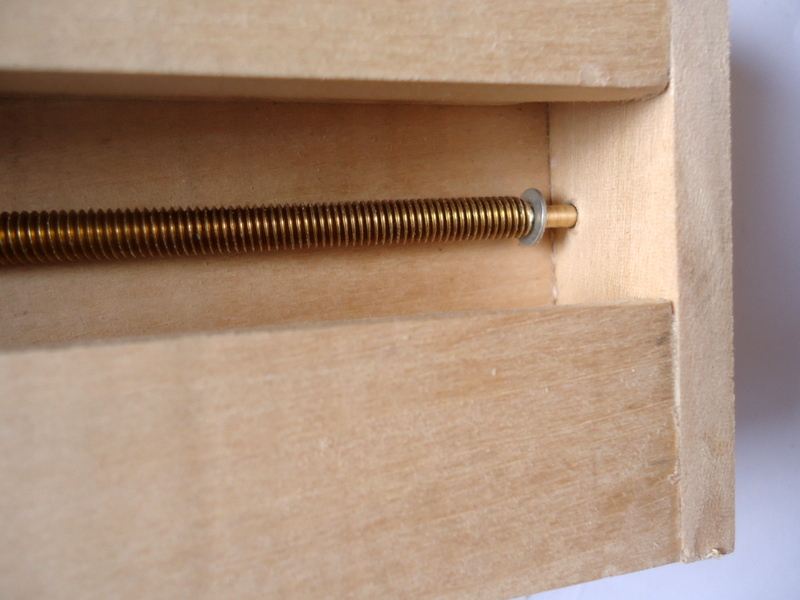
But I wanted those curved track panels done so....
 Afbeelding 284 by d.caso, on Flickr
 Afbeelding 290 by d.caso, on Flickr
 Afbeelding 291 by d.caso, on Flickr
 Afbeelding 297 by d.caso, on Flickr
 Afbeelding 298 by d.caso, on Flickr
 Afbeelding 285 by d.caso, on Flickr
 Afbeelding 286 by d.caso, on Flickr
 Afbeelding 288 by d.caso, on Flickr
 Afbeelding 373 by d.caso, on Flickr
 Afbeelding 374 by d.caso, on Flickr
 Afbeelding 300 by d.caso, on Flickr
 Afbeelding 295 by d.caso, on Flickr
 Afbeelding 301 by d.caso, on Flickr
 Afbeelding 303 by d.caso, on Flickr
 Afbeelding 305 by d.caso, on Flickr
 Afbeelding 370 by d.caso, on Flickr
 Afbeelding 369 by d.caso, on Flickr
 Afbeelding 303 by d.caso, on Flickr
 Afbeelding 307 by d.caso, on Flickr
 Afbeelding 299 by d.caso, on Flickr
 Afbeelding 372 by d.caso, on Flickr
 Afbeelding 793 by d.caso, on Flickr
 Afbeelding 794 by d.caso, on Flickr
That was many years ago.
Did I get then the portable curved track?
No. Not yet.
Why?
Because for the time I've got the bender working I had started to build "PONDÉZAR" and sweeming in what was for me an amazing adventure dat took several years. but have used many times the bender and it works beautifully. I even bent accuratelly brass channel profile for making the frame for skips... wich I neither made because found a much cheaper, faster and convenient (because one can emboss rivets in it) way to make the skip frames with Styrene.
Do I have them done, well, neither because I have no idea why...

Anyway the bender is marvelous and really precise so one can reproduce the same exact radius as many times as wanted.
Daniel
They were intended for code #100 rail and 1`6,5mm gauge for my 1/32 scale nonsese.
The prints were beautifully done and the #100 rail went with a little pressure in so I was very happy...
27 6 2011 074 by d.caso, on Flickr27 6 2011 076 by d.caso, on FlickrPainted and heavilly weathered they had the look I had been dreaming:
FM 1 9 2011 023 by d.caso, on FlickrFM 1 9 2011 026 by d.caso, on FlickrFM 1 9 2011 027 by d.caso, on Flickr... so I decided to make also some matching curved track too... but then a problem arised:
Curved track using such fragile sleepers can be reinforced by glueing an appropriate wood strip of matching shape to the underside but shorter than the sleeper so the edges will still present the hollow profile appeareance. Fine. But what the fragile FUD couldn't take was the lateral tension of the rails bended by eye to an approximate radius: the tiny rail plates couldn't take such tensions and, one after the other, broke.
Getting one rail through the needed sleepers went fine but the second curved rail never went good.
So I understood I needed precision precurved rail in two different but precise radiusses because the outer rail has of course a bigger radius than the inner...
I spent a couple of months dreaming with one of those beautiful FastTrack rail benders...
https://www.youtube.com/watch?v=B7g9O04wMDA
https://www.handlaidtrack.com/tl-0004
... but Mr. Wallet's reaction was to say
"_Over my dead body!_"
and slamming an imaginary door, he vanished into the drawer as always.
But I wanted those curved track panels done so....
Afbeelding 284 by d.caso, on FlickrAfbeelding 290 by d.caso, on FlickrAfbeelding 291 by d.caso, on FlickrAfbeelding 297 by d.caso, on FlickrAfbeelding 298 by d.caso, on FlickrAfbeelding 285 by d.caso, on FlickrAfbeelding 286 by d.caso, on FlickrAfbeelding 288 by d.caso, on FlickrAfbeelding 373 by d.caso, on FlickrAfbeelding 374 by d.caso, on FlickrAfbeelding 300 by d.caso, on FlickrAfbeelding 295 by d.caso, on FlickrAfbeelding 301 by d.caso, on FlickrAfbeelding 303 by d.caso, on FlickrAfbeelding 305 by d.caso, on FlickrAfbeelding 370 by d.caso, on FlickrAfbeelding 369 by d.caso, on FlickrAfbeelding 303 by d.caso, on FlickrAfbeelding 307 by d.caso, on FlickrAfbeelding 299 by d.caso, on FlickrAfbeelding 372 by d.caso, on FlickrAfbeelding 793 by d.caso, on FlickrAfbeelding 794 by d.caso, on FlickrThat was many years ago.
Did I get then the portable curved track?
No. Not yet.
Why?
Because for the time I've got the bender working I had started to build "PONDÉZAR" and sweeming in what was for me an amazing adventure dat took several years. but have used many times the bender and it works beautifully. I even bent accuratelly brass channel profile for making the frame for skips... wich I neither made because found a much cheaper, faster and convenient (because one can emboss rivets in it) way to make the skip frames with Styrene.
Do I have them done, well, neither because I have no idea why...
Anyway the bender is marvelous and really precise so one can reproduce the same exact radius as many times as wanted.
Daniel
My new Flickr:
https://www.flickr.com/photos/158027525@N08/
My old Flickr:
https://www.flickr.com/photos/daniel_1_32_scale/page223
Being right is one thing, but being true is quite another.
https://www.flickr.com/photos/158027525@N08/
My old Flickr:
https://www.flickr.com/photos/daniel_1_32_scale/page223
Being right is one thing, but being true is quite another.

Re: THE UNIVERSAL WORKBENCH
Very nice. 
I solder so I have been fortunate in that the solder is strong enough to hold the rails firmly in place, but solder itself does not look like railchairs so needs imagination. Though for me I do not mind. Fine detail I am not so concerned about as long as it has a nice overall look to it.
Your rail bending device looks excellent.
I solder so I have been fortunate in that the solder is strong enough to hold the rails firmly in place, but solder itself does not look like railchairs so needs imagination.
Your rail bending device looks excellent.
Modelling On A Budget ---》 https://www.newrailwaymodellers.co.uk/F ... 22&t=52212
Re: THE UNIVERSAL WORKBENCH
Mountain wrote:Very nice.
I solder so I have been fortunate in that the solder is strong enough to hold the rails firmly in place, but solder itself does not look like railchairs so needs imagination.
Your rail bending device looks excellent.
Mountain:
of course!
The metal sleepers were previous to "PONDÉZAR" wich started in 2010 and I still dreamed about neat lines of rivets and such things. Nowadays I would be VERY hapy if I would be able to lay my own track and points by soldering everything on a large plates of 0.5mm copper with no sleepers at all except here and there for their merely esthetic function. (Riding under RC mean no wires at all and no electricity in the rails).
But the above is all old sutff.
I love ageing!
It is bringing me back plenty of that delicious 'I don't care' sense that made childhood so great!
I go to the other room. As soon as I enter I notice I have no idea why I am there. GREAT!: that means another welcome chance to do whatever I want!
https://www.youtube.com/watch?v=d-diB65scQU
Daniel, Magoo & Wallet
My new Flickr:
https://www.flickr.com/photos/158027525@N08/
My old Flickr:
https://www.flickr.com/photos/daniel_1_32_scale/page223
Being right is one thing, but being true is quite another.
https://www.flickr.com/photos/158027525@N08/
My old Flickr:
https://www.flickr.com/photos/daniel_1_32_scale/page223
Being right is one thing, but being true is quite another.
Re: THE UNIVERSAL WORKBENCH
I suppose most of you are familiar with it but just in case, here a great source of parts for modellers:
http://www.markits.com/MARKITS_Price_Guide_2013_09.pdf
In case you are interested in ordering something read first this:
http://www.markits.com/
Daniel
http://www.markits.com/MARKITS_Price_Guide_2013_09.pdf
In case you are interested in ordering something read first this:
http://www.markits.com/
Daniel
My new Flickr:
https://www.flickr.com/photos/158027525@N08/
My old Flickr:
https://www.flickr.com/photos/daniel_1_32_scale/page223
Being right is one thing, but being true is quite another.
https://www.flickr.com/photos/158027525@N08/
My old Flickr:
https://www.flickr.com/photos/daniel_1_32_scale/page223
Being right is one thing, but being true is quite another.
Re: THE UNIVERSAL WORKBENCH
HELP NEEDED!
 Why would one make things simple if one could complicate them as much as desired?
I started two days ago, unexpectedly, a first try in a bigger scale.
I thought it would be 16mm scale using 32mm track representing 600mm gauge but, suddenly, my nose reminded me Brexit, approved the 32mm track but silently pointing towards 1/22 scale.
Indeed, there are much more chances in Europe of getting figures and other things, new and second hand, in 1/22 than 1/19 so this was yesterday 600mm gauge but, without moving even one finger became, thanks Brexit, 700mm gauge:
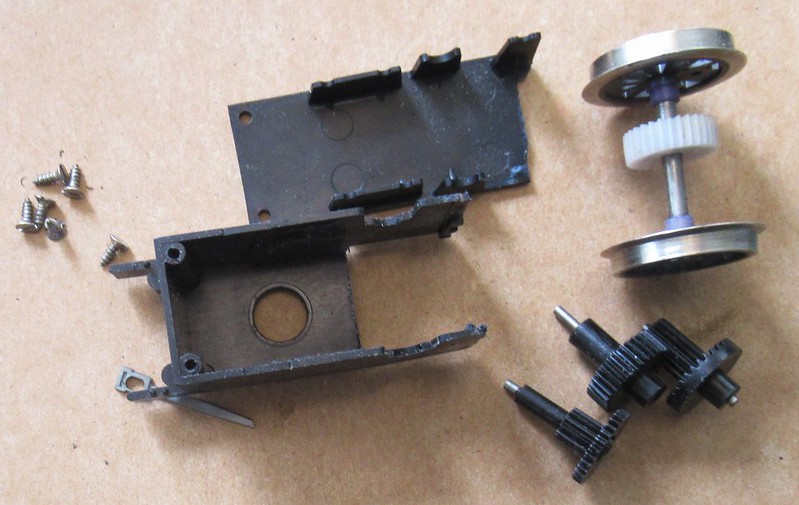
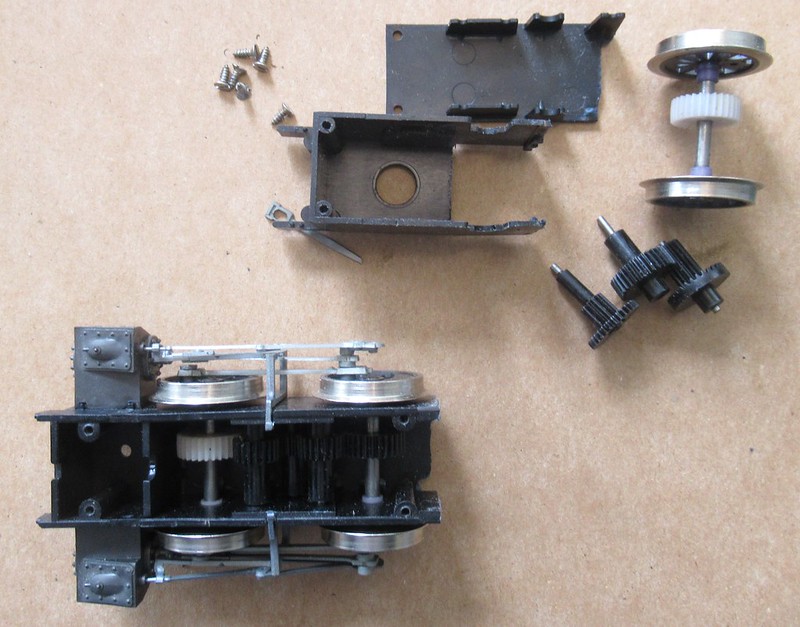
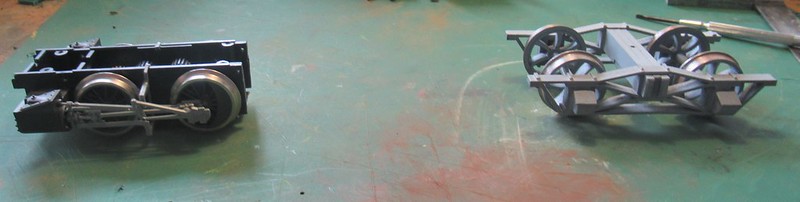
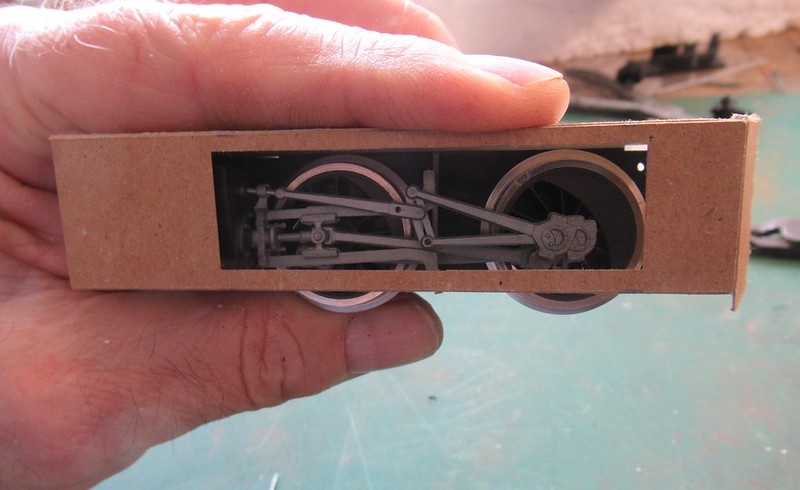
It all started with an old 0 scale POLA-MAXI T3 loco I've got from a friend six or seven years ago...
 IMG_0124 (2) by Daniel Osvaldo Caso, on Flickr
I know the Fleischmann 0e Magic Train valve gear is much better and beautiful working and have two of them waiting in a box but they are 16,5mm gauge and already destined for two specific future projects. Above that, the motion of the valve gear will be visible trough the metal mesh but not as good as in an unskirted loco...
 IMG_0124 (3) by Daniel Osvaldo Caso, on Flickr
... so I...
 IMG_0104 (2) by Daniel Osvaldo Caso, on Flickr
... provided some food for a new 1/22 scale scrapbox but...
 IMG_0104 (3) by Daniel Osvaldo Caso, on Flickr
 IMG_0105 (2) by Daniel Osvaldo Caso, on Flickr
Well, yes, it is going to be a 'ROWAN-ish' steam railcar, just as a dummy version (so no motor) that will alow me to learn about the scale and enjoy building a 'small' diorama...(how could one say 'small' if is talking 1/22?)
 IMG_0115 (2) by Daniel Osvaldo Caso, on Flickr
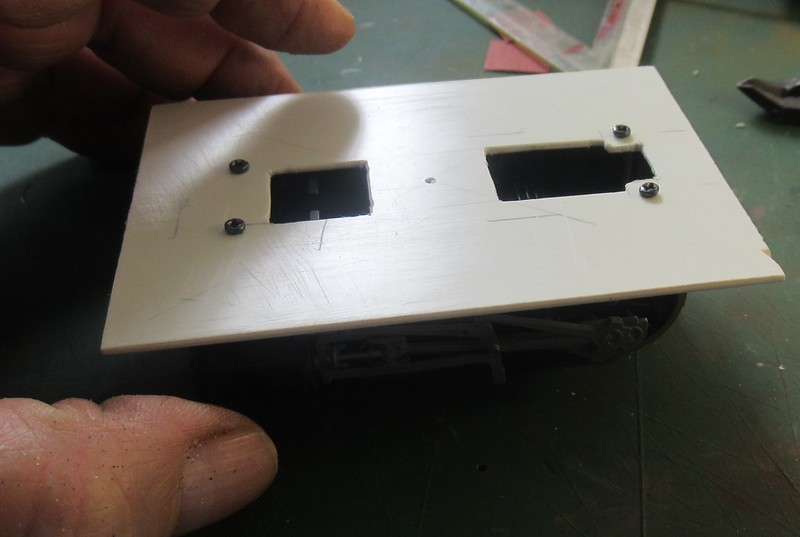
... so after the necessary choping (... sometimes I wonder if it is not a kind of sophisticated sadism...?) I made a floor plate...
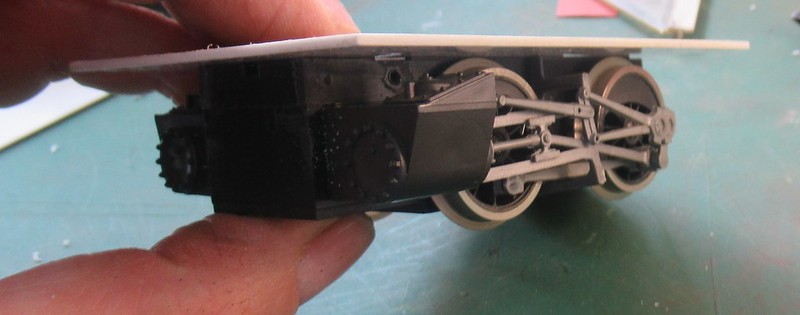 IMG_0117 (2) by Daniel Osvaldo Caso, on Flickr
 IMG_0118 (2) by Daniel Osvaldo Caso, on Flickr
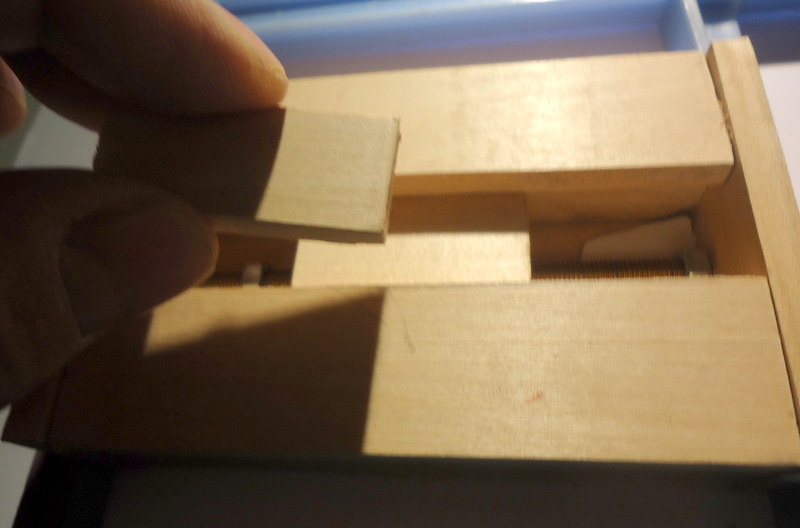
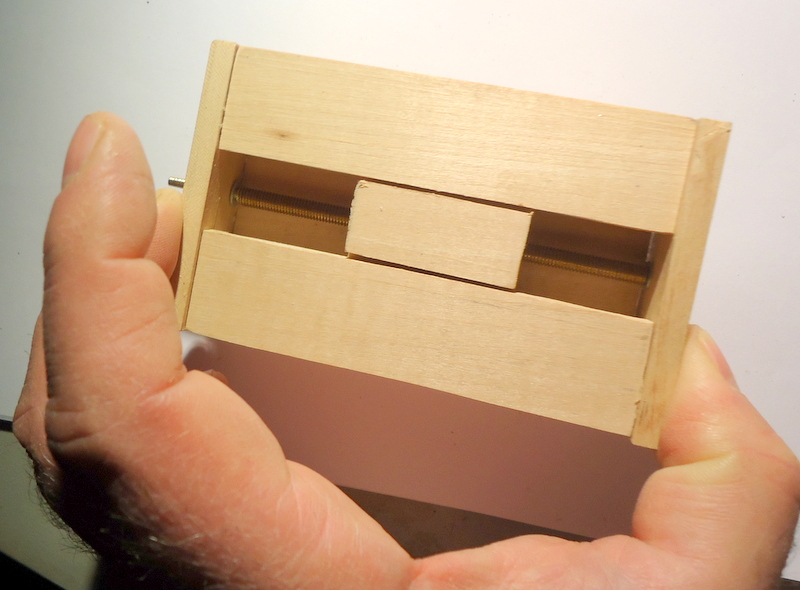
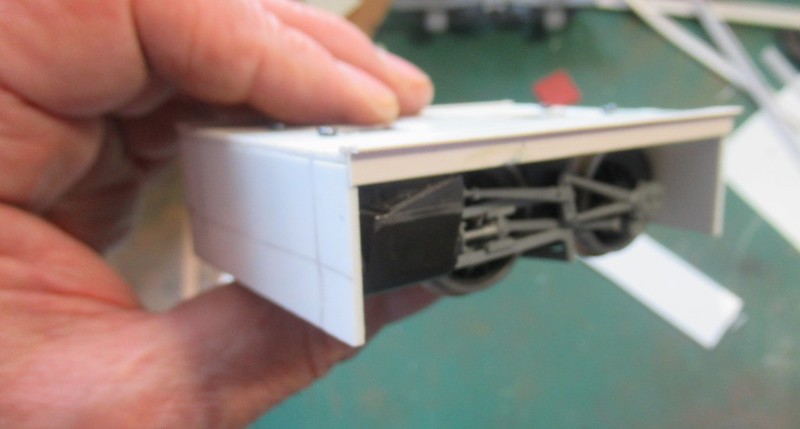
... and made a simple craft paper 3D sketch to see how the skirt should be...
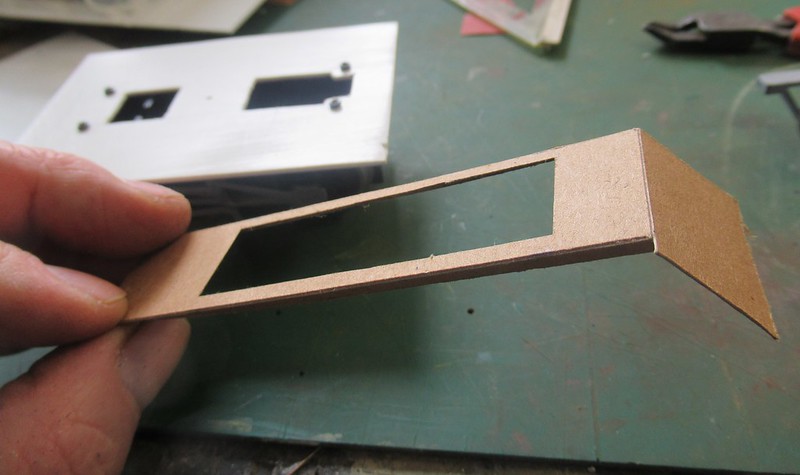 IMG_0122 (2) by Daniel Osvaldo Caso, on Flickr
 IMG_0121 (2) by Daniel Osvaldo Caso, on Flickr
... and I liked it so...
 IMG_0123 (2) by Daniel Osvaldo Caso, on Flickr
I will post later more about this play session but now I need some help:
My lone brain cell can't recall what I used for glueing PVC plate to styrene oir to another PVC plate.
I know BISON-Kit contact cement works but also creates a risk of deforming the flat of the materials if they are thin (you don't want to know how I've learnt that).
Indeed, the PVC and the styrene are both 0,8mm and since there are going to be a considerable number of rivets I would preffer no distortions, if it's posible.
So my quyestion is what glue works good for both, PVC and Styrene?
Thank you in advance!
Daniel
I started two days ago, unexpectedly, a first try in a bigger scale.
I thought it would be 16mm scale using 32mm track representing 600mm gauge but, suddenly, my nose reminded me Brexit, approved the 32mm track but silently pointing towards 1/22 scale.
Indeed, there are much more chances in Europe of getting figures and other things, new and second hand, in 1/22 than 1/19 so this was yesterday 600mm gauge but, without moving even one finger became, thanks Brexit, 700mm gauge:
It all started with an old 0 scale POLA-MAXI T3 loco I've got from a friend six or seven years ago...
IMG_0124 (2) by Daniel Osvaldo Caso, on FlickrI know the Fleischmann 0e Magic Train valve gear is much better and beautiful working and have two of them waiting in a box but they are 16,5mm gauge and already destined for two specific future projects. Above that, the motion of the valve gear will be visible trough the metal mesh but not as good as in an unskirted loco...
IMG_0124 (3) by Daniel Osvaldo Caso, on Flickr... so I...
IMG_0104 (2) by Daniel Osvaldo Caso, on Flickr... provided some food for a new 1/22 scale scrapbox but...
IMG_0104 (3) by Daniel Osvaldo Caso, on FlickrIMG_0105 (2) by Daniel Osvaldo Caso, on FlickrWell, yes, it is going to be a 'ROWAN-ish' steam railcar, just as a dummy version (so no motor) that will alow me to learn about the scale and enjoy building a 'small' diorama...(how could one say 'small' if is talking 1/22?)
IMG_0115 (2) by Daniel Osvaldo Caso, on Flickr... so after the necessary choping (... sometimes I wonder if it is not a kind of sophisticated sadism...?) I made a floor plate...
IMG_0117 (2) by Daniel Osvaldo Caso, on FlickrIMG_0118 (2) by Daniel Osvaldo Caso, on Flickr... and made a simple craft paper 3D sketch to see how the skirt should be...
IMG_0122 (2) by Daniel Osvaldo Caso, on FlickrIMG_0121 (2) by Daniel Osvaldo Caso, on Flickr... and I liked it so...
IMG_0123 (2) by Daniel Osvaldo Caso, on FlickrI will post later more about this play session but now I need some help:
My lone brain cell can't recall what I used for glueing PVC plate to styrene oir to another PVC plate.
I know BISON-Kit contact cement works but also creates a risk of deforming the flat of the materials if they are thin (you don't want to know how I've learnt that).
Indeed, the PVC and the styrene are both 0,8mm and since there are going to be a considerable number of rivets I would preffer no distortions, if it's posible.
So my quyestion is what glue works good for both, PVC and Styrene?
Thank you in advance!
Daniel
My new Flickr:
https://www.flickr.com/photos/158027525@N08/
My old Flickr:
https://www.flickr.com/photos/daniel_1_32_scale/page223
Being right is one thing, but being true is quite another.
https://www.flickr.com/photos/158027525@N08/
My old Flickr:
https://www.flickr.com/photos/daniel_1_32_scale/page223
Being right is one thing, but being true is quite another.
Re: THE UNIVERSAL WORKBENCH
Some time ago Doug Scott told me he had bought a flockingbox.
He was enthousiastic and made pretty serious gardenings & lamndscaping in his UPDAH layout.
I thought 'may be one day' but forgot: I have the 35KW Greenkeeper static grass applicator and is a jewell doing plenty of things on landscaping.
Short ago, while doing the massive grass areas along the 2,50m river in my layout I thought I would like to hide the too small mountain with the tunnels by laying on it a massive fores. A forest even if only twenty trees, fools more the eyes than a mountain of same size. Probably because the montain isquiet and unchanging massive while a forest is more...abstract, airy, and... whatever. Because at the foot of the mountain the long river starts and will be flamked at both sides but a Birch woods I wanted for te mountain a different type of tree... Pine ones!
I have made along the last decade several types of 'more or less' (...!) pine trees. All beautiful but none giving the impression of a true pinetree.
The reason was, of course, the foliage. Many types of leaves look pretty well in conifers, but a pine must have needles, not leaves...say Magoo.
A couple of weeks ago the wanting of the pine forest and Doug's comments on the flocking machine... I only droped both in my mind's mixer and...
 IMG_0008 (2) by Daniel Osvaldo Caso, on Flickr
I am sure many modellers must have done it already, but I want to give it my own try...
 IMG_0002 (3) by Daniel Osvaldo Caso, on Flickr
 IMG_0003 (2) by Daniel Osvaldo Caso, on Flickr
 IMG_0004 (3) by Daniel Osvaldo Caso, on Flickr
 IMG_0006 (2) by Daniel Osvaldo Caso, on Flickr
 IMG_0007 (2) by Daniel Osvaldo Caso, on Flickr
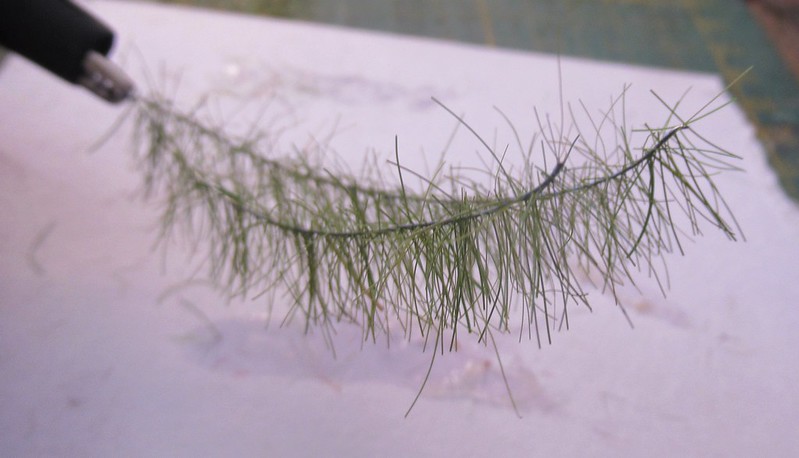
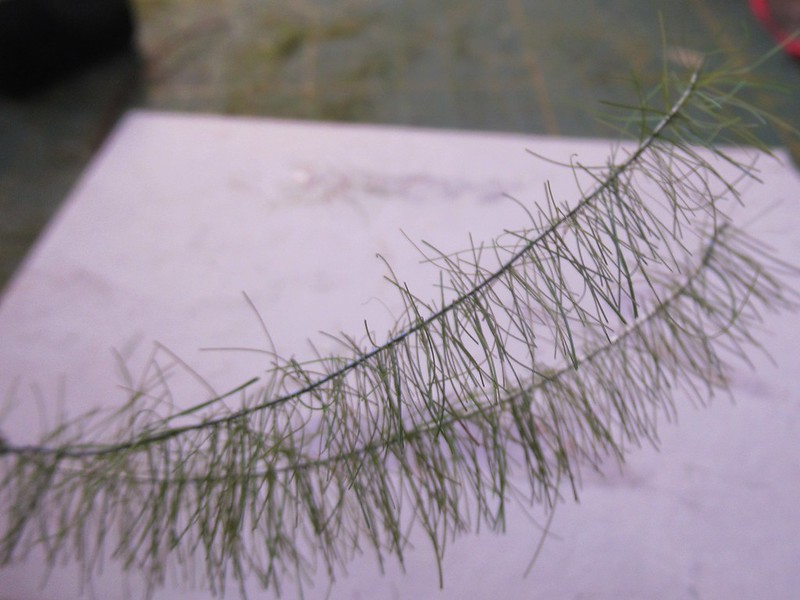
Of course, the iron wire should be first painted brown, and the hairs bust stay only hanging from it not above.
The mayor issue is to ensure the wires gets glue only at the underside of the 'twigs'. I have done what you see above and will see if it is stronmg wnough to undergo a primitive haircutting.
Still there is another thing: it would take several hours to make enough twigs for a 40cm tall pine tree. It would take ... to make enough for twenty of them which is what I need. So my only hope is to use two pieces of 50mm PVC pipes . One for coiling the wire for spraying the glue on it so it all gets glue only along the 'underside' and a second pipe for keeping the wire coiled during the grass application...
Magoo said:
_Yes, Dumbo, I understand. But how would you move the wire from one pipe to the other, ensuring the glued side stays expossed and not glueing to the pipe itself?_
O.k., I thought, I rather go to the forum and ask some sugestions from my fellows...
Daniel
He was enthousiastic and made pretty serious gardenings & lamndscaping in his UPDAH layout.
I thought 'may be one day' but forgot: I have the 35KW Greenkeeper static grass applicator and is a jewell doing plenty of things on landscaping.
Short ago, while doing the massive grass areas along the 2,50m river in my layout I thought I would like to hide the too small mountain with the tunnels by laying on it a massive fores. A forest even if only twenty trees, fools more the eyes than a mountain of same size. Probably because the montain isquiet and unchanging massive while a forest is more...abstract, airy, and... whatever. Because at the foot of the mountain the long river starts and will be flamked at both sides but a Birch woods I wanted for te mountain a different type of tree... Pine ones!
I have made along the last decade several types of 'more or less' (...!) pine trees. All beautiful but none giving the impression of a true pinetree.
The reason was, of course, the foliage. Many types of leaves look pretty well in conifers, but a pine must have needles, not leaves...say Magoo.
A couple of weeks ago the wanting of the pine forest and Doug's comments on the flocking machine... I only droped both in my mind's mixer and...
IMG_0008 (2) by Daniel Osvaldo Caso, on FlickrI am sure many modellers must have done it already, but I want to give it my own try...
IMG_0002 (3) by Daniel Osvaldo Caso, on FlickrIMG_0003 (2) by Daniel Osvaldo Caso, on FlickrIMG_0004 (3) by Daniel Osvaldo Caso, on FlickrIMG_0006 (2) by Daniel Osvaldo Caso, on FlickrIMG_0007 (2) by Daniel Osvaldo Caso, on FlickrOf course, the iron wire should be first painted brown, and the hairs bust stay only hanging from it not above.
The mayor issue is to ensure the wires gets glue only at the underside of the 'twigs'. I have done what you see above and will see if it is stronmg wnough to undergo a primitive haircutting.
Still there is another thing: it would take several hours to make enough twigs for a 40cm tall pine tree. It would take ... to make enough for twenty of them which is what I need. So my only hope is to use two pieces of 50mm PVC pipes . One for coiling the wire for spraying the glue on it so it all gets glue only along the 'underside' and a second pipe for keeping the wire coiled during the grass application...
Magoo said:
_Yes, Dumbo, I understand. But how would you move the wire from one pipe to the other, ensuring the glued side stays expossed and not glueing to the pipe itself?_
O.k., I thought, I rather go to the forum and ask some sugestions from my fellows...
Daniel
My new Flickr:
https://www.flickr.com/photos/158027525@N08/
My old Flickr:
https://www.flickr.com/photos/daniel_1_32_scale/page223
Being right is one thing, but being true is quite another.
https://www.flickr.com/photos/158027525@N08/
My old Flickr:
https://www.flickr.com/photos/daniel_1_32_scale/page223
Being right is one thing, but being true is quite another.
Re: THE UNIVERSAL WORKBENCH
I have never made those trees but I have seen them being made. They look quite easy to make in theory...
Modelling On A Budget ---》 https://www.newrailwaymodellers.co.uk/F ... 22&t=52212
Re: THE UNIVERSAL WORKBENCH
Thank you, Mountain.Mountain wrote:I have never made those trees but I have seen them being made. They look quite easy to make in theory...
Could you mention a website, a link, a film or something so I can learn?
Daniel
My new Flickr:
https://www.flickr.com/photos/158027525@N08/
My old Flickr:
https://www.flickr.com/photos/daniel_1_32_scale/page223
Being right is one thing, but being true is quite another.
https://www.flickr.com/photos/158027525@N08/
My old Flickr:
https://www.flickr.com/photos/daniel_1_32_scale/page223
Being right is one thing, but being true is quite another.
Re: THE UNIVERSAL WORKBENCH
It was on Youtube I saw them.
At the moment the internet is playing up so it is difficult to get Youtube to work, but there is plenty on there. People use drills to twist the wire.
At the moment the internet is playing up so it is difficult to get Youtube to work, but there is plenty on there. People use drills to twist the wire.
Modelling On A Budget ---》 https://www.newrailwaymodellers.co.uk/F ... 22&t=52212
Re: THE UNIVERSAL WORKBENCH
Mountain wrote:It was on Youtube I saw them.
At the moment the internet is playing up so it is difficult to get Youtube to work, but there is plenty on there. People use drills to twist the wire.
Thank you, Mountain,
The old method of twisted wire I know well. My interest is now the making of the pine branches with their long hanging needles.
Regarding the armature I want to make them from wood and pin all the wire branches in it.
What I want to see if someone has made pine trees in such a way (using the flockingbox and static grass) and if it's so, how he/she easilly done for smaller scales because the static grass up to 6mm reacts perfectly. But the 12mm ones I am using seem to be too much for the power of the machine I've got.
May be I should get the 55Kw version of the Greenkeeper.
My Greenkeeper is the middle one with 35Kw but I think the 55Kw and an aluminium plate would do the work.
Making a few branches is not an issue but a decent pine tree in 1/32 should get at least 60 or more branches >>> 20 trees means 1200 branches and I assure you Miss Patience considers that a cience-fiction category while Magoo is what he call a 'no-go area'.
My impression is de 55Kw version can do it. (...but I'm afraid I would need a sledge hammer to convince Mr. Wallet to spend 250 euro in it!!!)
Daniel
My new Flickr:
https://www.flickr.com/photos/158027525@N08/
My old Flickr:
https://www.flickr.com/photos/daniel_1_32_scale/page223
Being right is one thing, but being true is quite another.
https://www.flickr.com/photos/158027525@N08/
My old Flickr:
https://www.flickr.com/photos/daniel_1_32_scale/page223
Being right is one thing, but being true is quite another.
Re: THE UNIVERSAL WORKBENCH
I bought recently a flockingbox.
Have started to play with it and must say it's a great tool.
As any other tool it presents first a (short) learnig curve but even dat is enjoyable.
I don't like electronics at al (wires and I seem to feel a strong rejection for each other) but for those able to enjoy way to get one:
https://www.youtube.com/watch?v=dAI5VzirB7s&t=15s
Daniel
My new Flickr:
https://www.flickr.com/photos/158027525@N08/
My old Flickr:
https://www.flickr.com/photos/daniel_1_32_scale/page223
Being right is one thing, but being true is quite another.
https://www.flickr.com/photos/158027525@N08/
My old Flickr:
https://www.flickr.com/photos/daniel_1_32_scale/page223
Being right is one thing, but being true is quite another.
Re: THE UNIVERSAL WORKBENCH
I like the work you're doing with the track Daniel. For the straight panels you've got it, i can see why it's not easy for the curved, a lot of people hide the track under ballast and copperclad it or use wooden sleepers. Even if the rail was formed for the curve it would still try to ease it's way back over time. Possibly the solution is to use a mix of materials, for example the FUD as decoratif and something stronger on intermediate sleepers for the curved sections ?....
Colin James....
Re: THE UNIVERSAL WORKBENCH
Thank you Colin.
Yes, the first version was with soliud sleepers from rail to rail and only the rest to both ends hollow at the underside so to fool de eye. Iwas perfect but did'nt give me the chance to do a decent track transport with each of two lenths of track use to be laid up-side-down. And the also bridges and so.
Then I've made a perfectly fitting strip of hard wood following the contour of the inderside's shape which I can use just where needed. All that were improvements but the tiny plates fastening the rail to the sleeper remain FUD and extremelly thing there (0,4mm) so it wouldn't work an easy way.
If one day I go back to real railway modeling (with riding trains and all the circus, I mean) I will probably go a different way:
To beging with I wil etch on thin brass plate both sides (so not exactly what he would call a Mr. Wallet firendly project but sometimes life is hard...)
the lines for the bends for the top of the sleeper and on the other side the bends for the leaps. Also the lines for separating every sleeper profile from the next. These lines will be the whole lentgh of an A4 so I will be able to cut them to length as desired also for every type & size of points and crossings.
I will order a length of a profile in steel fitting the underside of the sleeper profile and will use my harborpress to form as many sleepers I want and any length. They would be, of courese, pre-cut to length while still flat.
Then a simple jig will allow me to drill the four holes on each sleeper with the drillpress/crosstable combo and same with the special length ones for points and crossings... The rest I will see when I get there (as you know, I don't like much plans but preffer, by far, improvisation)...
But who knows?
May be I win the lottery so will look for someone to make a decent stamping mold and provide several thousands of bras or other metal (inclkuding steel, tin, nickelsilver or whatever...
Well, I didn't expect this but after years I have been now able to see back my old drawing at Shapeways. Here some photo's:
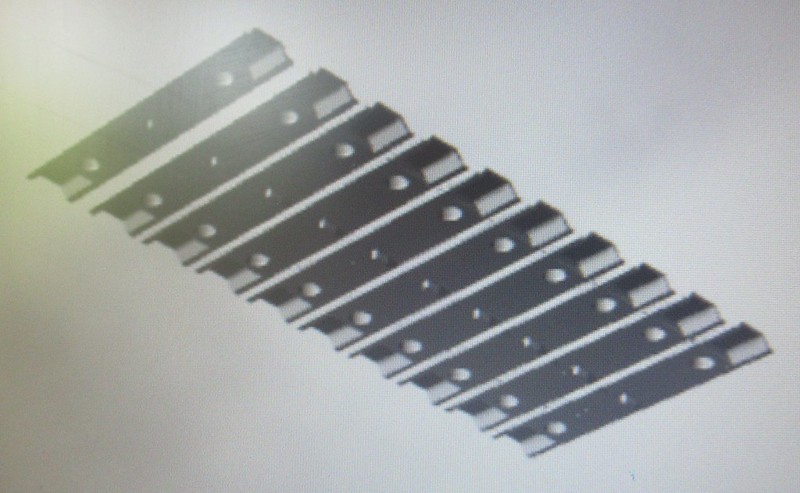
These are the (almost) full length massive support sleepers:
 IMG_0029 (2) by Daniel Osvaldo Caso, on Flickr
 IMG_0030 (2) by Daniel Osvaldo Caso, on Flickr
 IMG_0031 (2) by Daniel Osvaldo Caso, on Flickr
 IMG_0033 (2) by Daniel Osvaldo Caso, on Flickr
 IMG_0002 (2) by Daniel Osvaldo Caso, on Flickr
The rwo 'big' (...) round holes are exacly under the rail and not visible from above once the rail is in place but gave me a chance to ACC in a hidding way the rails to the sleepers. I never used that because the rails fit tight enough to hold their places...
Next are the ones with solid support only under the rails
 IMG_0003 (2) by Daniel Osvaldo Caso, on Flickr
I don't know...Seeing it all again makes sound several bells inside but with my eyes as they are now I don't think I will get back to it...
Daniel
Yes, the first version was with soliud sleepers from rail to rail and only the rest to both ends hollow at the underside so to fool de eye. Iwas perfect but did'nt give me the chance to do a decent track transport with each of two lenths of track use to be laid up-side-down. And the also bridges and so.
Then I've made a perfectly fitting strip of hard wood following the contour of the inderside's shape which I can use just where needed. All that were improvements but the tiny plates fastening the rail to the sleeper remain FUD and extremelly thing there (0,4mm) so it wouldn't work an easy way.
If one day I go back to real railway modeling (with riding trains and all the circus, I mean) I will probably go a different way:
To beging with I wil etch on thin brass plate both sides (so not exactly what he would call a Mr. Wallet firendly project but sometimes life is hard...)
the lines for the bends for the top of the sleeper and on the other side the bends for the leaps. Also the lines for separating every sleeper profile from the next. These lines will be the whole lentgh of an A4 so I will be able to cut them to length as desired also for every type & size of points and crossings.
I will order a length of a profile in steel fitting the underside of the sleeper profile and will use my harborpress to form as many sleepers I want and any length. They would be, of courese, pre-cut to length while still flat.
Then a simple jig will allow me to drill the four holes on each sleeper with the drillpress/crosstable combo and same with the special length ones for points and crossings... The rest I will see when I get there (as you know, I don't like much plans but preffer, by far, improvisation)...
But who knows?
May be I win the lottery so will look for someone to make a decent stamping mold and provide several thousands of bras or other metal (inclkuding steel, tin, nickelsilver or whatever...
Well, I didn't expect this but after years I have been now able to see back my old drawing at Shapeways. Here some photo's:
These are the (almost) full length massive support sleepers:
IMG_0029 (2) by Daniel Osvaldo Caso, on FlickrIMG_0030 (2) by Daniel Osvaldo Caso, on FlickrIMG_0031 (2) by Daniel Osvaldo Caso, on FlickrIMG_0033 (2) by Daniel Osvaldo Caso, on FlickrIMG_0002 (2) by Daniel Osvaldo Caso, on FlickrThe rwo 'big' (...) round holes are exacly under the rail and not visible from above once the rail is in place but gave me a chance to ACC in a hidding way the rails to the sleepers. I never used that because the rails fit tight enough to hold their places...
Next are the ones with solid support only under the rails
IMG_0003 (2) by Daniel Osvaldo Caso, on FlickrI don't know...Seeing it all again makes sound several bells inside but with my eyes as they are now I don't think I will get back to it...
Daniel
My new Flickr:
https://www.flickr.com/photos/158027525@N08/
My old Flickr:
https://www.flickr.com/photos/daniel_1_32_scale/page223
Being right is one thing, but being true is quite another.
https://www.flickr.com/photos/158027525@N08/
My old Flickr:
https://www.flickr.com/photos/daniel_1_32_scale/page223
Being right is one thing, but being true is quite another.