
Technically, for the French at that time, using lead would have been a problem. IMO, getting such long strips of the metal would have been an issue. As far as using lead, no, not a problem it it were available. My guess is that even the galvanized or tinned strips would have been in shorter sections. Lead is an excellent roofing material, but heavy.
I’m sure your weathering skills can make the lead strip look like it belongs there. The powder surface is lead oxide and should be sealed anyway.
Our house is cluttered with real stained glass panels that my Father and I made LONG ago. Decades. The lead in many cases still hasn’t oxidized. And, no we didn’t seal it to prevent corrosion.
The roof looks really good Daniel, as does the entire diorama. I am amazed at the ‘aerial’ views. The thing is so tiny and yet when you look at the pool below the bridge from eye level, it looks REAL. Good job sir.
Oh...NO...! Not another 1/32 diorama...!!!
-
Nevadablue
- Posts: 75
- Joined: Sun Apr 18, 2021 5:54 am
- Location: Nevada, USA
Re: Oh...NO...! Not another 1/32 diorama...!!!
Nevadablue wrote:Technically, for the French at that time, using lead would have been a problem. IMO, getting such long strips of the metal would have been an issue. As far as using lead, no, not a problem it it were available. My guess is that even the galvanized or tinned strips would have been in shorter sections. Lead is an excellent roofing material, but heavy.
I’m sure your weathering skills can make the lead strip look like it belongs there. The powder surface is lead oxide and should be sealed anyway.
Our house is cluttered with real stained glass panels that my Father and I made LONG ago. Decades. The lead in many cases still hasn’t oxidized. And, no we didn’t seal it to prevent corrosion.
The roof looks really good Daniel, as does the entire diorama. I am amazed at the ‘aerial’ views. The thing is so tiny and yet when you look at the pool below the bridge from eye level, it looks REAL. Good job sir.
Thank you, Ken, for both, your comment on the diorama and also the explanation on the roofing thing.
I removed the lead but made the mistake of peeling it from the roof from below up. Now I've learnt that the opposite will be now on the way to go: a few tiles that were at the edge had been cut to fit the situation with as result some being no more than a triangle glued only at it's top angle. Too weak to take the lead away. But as old wise men used to say: "If there is a problem the solution is nearby. If there is no solution it is not a problem but simply a fact."
Good to know now that long rolls of lead plate are modern time's stuff.
I am going to give short lebgths of 'zinc' a chance.
I have used card before for simulating metal and proved to be doable.
Here the iron plate lengths made from thin card, paint and dry pastels for the scafold used for repairing the broken stone bridge bridge in the Valkenburg Diorama...
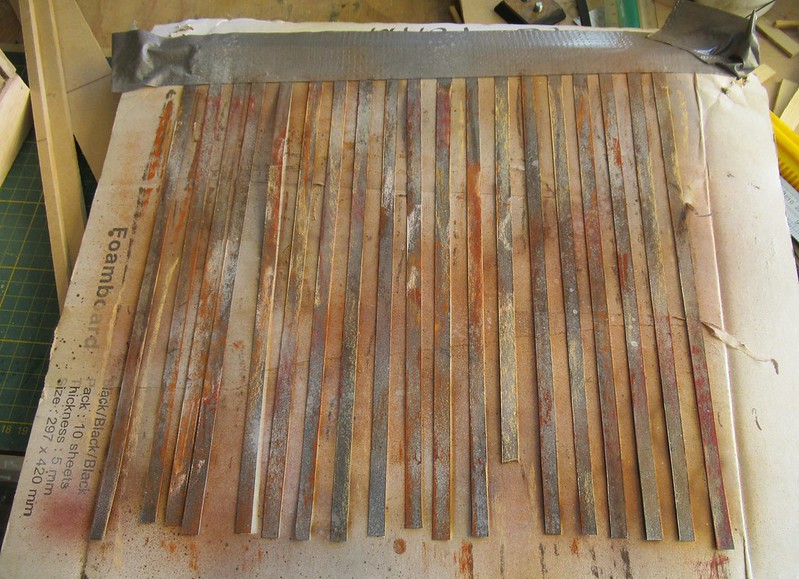 IMG_0170 (2) by Daniel Osvaldo Caso, on Flickr
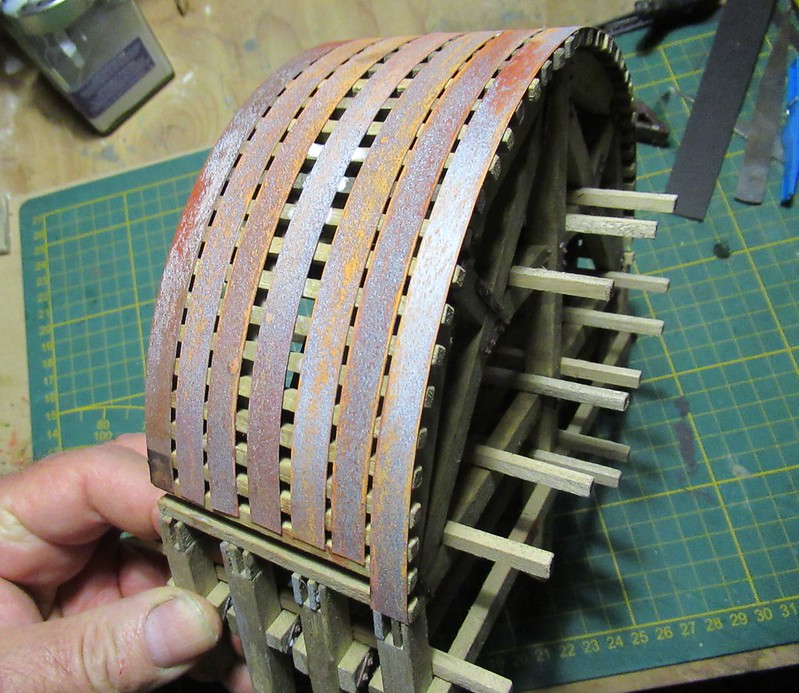
I wanted the new iron still visible but als the rust expanding...
 IMG_0172 (2) by Daniel Osvaldo Caso, on Flickr
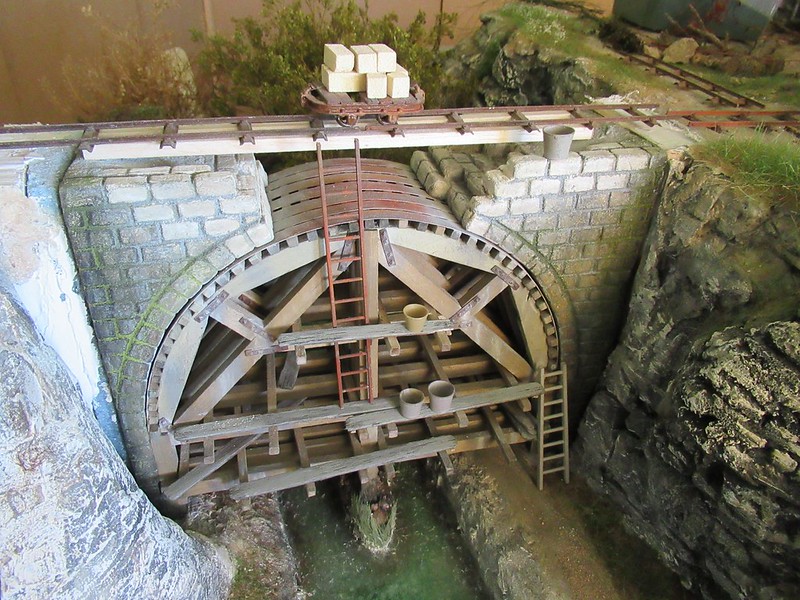
Here already installed on the scafold...
 IMG_0180 (2) by Daniel Osvaldo Caso, on Flickr
... and here already in the diorama...
 IMG_0004 (2) by Daniel Osvaldo Caso, on Flickr
I have also modelled some zinc plates in card for the roof of the factory building in current diorama and other so I think it won't be a problem at all.
I didn't know you had done stained glass work. Where are those photos?
Daniel
My new Flickr:
https://www.flickr.com/photos/158027525@N08/
My old Flickr:
https://www.flickr.com/photos/daniel_1_32_scale/page223
Being right is one thing, but being true is quite another.
https://www.flickr.com/photos/158027525@N08/
My old Flickr:
https://www.flickr.com/photos/daniel_1_32_scale/page223
Being right is one thing, but being true is quite another.
Re: Oh...NO...! Not another 1/32 diorama...!!!
 IMG_0021 (169) by Daniel Osvaldo Caso, on Flickr
 IMG_0024 (163) by Daniel Osvaldo Caso, on Flickr
 IMG_0025 (167) by Daniel Osvaldo Caso, on Flickr
 IMG_0020 (179) by Daniel Osvaldo Caso, on Flickr
 IMG_0022 (169) by Daniel Osvaldo Caso, on Flickr
 IMG_0023 (159) by Daniel Osvaldo Caso, on Flickr
My new Flickr:
https://www.flickr.com/photos/158027525@N08/
My old Flickr:
https://www.flickr.com/photos/daniel_1_32_scale/page223
Being right is one thing, but being true is quite another.
https://www.flickr.com/photos/158027525@N08/
My old Flickr:
https://www.flickr.com/photos/daniel_1_32_scale/page223
Being right is one thing, but being true is quite another.
Re: Oh...NO...! Not another 1/32 diorama...!!!
... meanwhile work on the water area has been resumed and in the morning another layer of acrylic lack and further retouchging of... everything will continue...
 IMG_0026 (165) by Daniel Osvaldo Caso, on Flickr
 IMG_0027 (163) by Daniel Osvaldo Caso, on Flickr
 IMG_0028 (151) by Daniel Osvaldo Caso, on Flickr
 IMG_0029 (137) by Daniel Osvaldo Caso, on Flickr
 IMG_0030 (147) by Daniel Osvaldo Caso, on Flickr
 IMG_0033 (140) by Daniel Osvaldo Caso, on Flickr
 IMG_0034 (132) by Daniel Osvaldo Caso, on Flickr
 IMG_0035 (136) by Daniel Osvaldo Caso, on Flickr
 IMG_0037 (117) by Daniel Osvaldo Caso, on Flickr
 IMG_0038 (122) by Daniel Osvaldo Caso, on Flickr
 IMG_0039 (120) by Daniel Osvaldo Caso, on Flickr
 IMG_0040 (108) by Daniel Osvaldo Caso, on Flickr
IMG_0026 (165) by Daniel Osvaldo Caso, on FlickrIMG_0027 (163) by Daniel Osvaldo Caso, on FlickrIMG_0028 (151) by Daniel Osvaldo Caso, on FlickrIMG_0029 (137) by Daniel Osvaldo Caso, on FlickrIMG_0030 (147) by Daniel Osvaldo Caso, on FlickrIMG_0033 (140) by Daniel Osvaldo Caso, on FlickrIMG_0034 (132) by Daniel Osvaldo Caso, on FlickrIMG_0035 (136) by Daniel Osvaldo Caso, on FlickrIMG_0037 (117) by Daniel Osvaldo Caso, on FlickrIMG_0038 (122) by Daniel Osvaldo Caso, on FlickrIMG_0039 (120) by Daniel Osvaldo Caso, on FlickrIMG_0040 (108) by Daniel Osvaldo Caso, on FlickrMy new Flickr:
https://www.flickr.com/photos/158027525@N08/
My old Flickr:
https://www.flickr.com/photos/daniel_1_32_scale/page223
Being right is one thing, but being true is quite another.
https://www.flickr.com/photos/158027525@N08/
My old Flickr:
https://www.flickr.com/photos/daniel_1_32_scale/page223
Being right is one thing, but being true is quite another.
Re: Oh...NO...! Not another 1/32 diorama...!!!
After comments from a friend claiming the water fall has -with the stones- become too dramatic for the amount of water now 'flowing' and not wanting to remove any of the stones, I decided to change the proportions by pouring enough water to rise it's level at this end of the diorma about 4 to 5mm.
As everything I do and say, it is, of course, a lie:I won't rise the whole water stream but tilt very little the diorama so the extra water poured will start under the stone bridge and rise progresively to the top of a 5mm lip made with transparant kit.
The transparant lip is already done but such a thick acrylic lack mass must be built in layers so it all can dry properly.
The photos show the lip done and the first layer of lack just poured.
It will take at least a week to get the level change done but I think it will look nice to see many of the stones underwater or emerging very little...
 IMG_0020 (180) by Daniel Osvaldo Caso, on Flickr
 IMG_0021 (172) by Daniel Osvaldo Caso, on Flickr
 IMG_0023 (162) by Daniel Osvaldo Caso, on Flickr
 IMG_0024 (164) by Daniel Osvaldo Caso, on Flickr
... and here you see also the first 'new water'...
 IMG_0025 (169) by Daniel Osvaldo Caso, on Flickr
As everything I do and say, it is, of course, a lie:I won't rise the whole water stream but tilt very little the diorama so the extra water poured will start under the stone bridge and rise progresively to the top of a 5mm lip made with transparant kit.
The transparant lip is already done but such a thick acrylic lack mass must be built in layers so it all can dry properly.
The photos show the lip done and the first layer of lack just poured.
It will take at least a week to get the level change done but I think it will look nice to see many of the stones underwater or emerging very little...
IMG_0020 (180) by Daniel Osvaldo Caso, on FlickrIMG_0021 (172) by Daniel Osvaldo Caso, on FlickrIMG_0023 (162) by Daniel Osvaldo Caso, on FlickrIMG_0024 (164) by Daniel Osvaldo Caso, on Flickr... and here you see also the first 'new water'...
IMG_0025 (169) by Daniel Osvaldo Caso, on FlickrMy new Flickr:
https://www.flickr.com/photos/158027525@N08/
My old Flickr:
https://www.flickr.com/photos/daniel_1_32_scale/page223
Being right is one thing, but being true is quite another.
https://www.flickr.com/photos/158027525@N08/
My old Flickr:
https://www.flickr.com/photos/daniel_1_32_scale/page223
Being right is one thing, but being true is quite another.
Re: Oh...NO...! Not another 1/32 diorama...!!!
Also I suddenly remembered I had promise to let see how I make the Birch trees and found that will be a good way (...I hope...!) to keep my hands away of the water scene until the first lack layer is really dried. (...Hmm... I don't know if I'll manage to stay away from it...)
Here the tree factory:
I buy a 10cm X 20cm X 130cm block of Balsa wood at the local finewood provider for 15 euro.
It is not same quality as the one one get at hobbyshops but for this purpose is much better: it has more visible wood grain and it is a lot stronger than the super soft balsa used for hobby. I have seen this type of Balsa used for packing expensive old forniture.
I would certainly use this type of balsa and NOT the usual hobby one if my tress must be H0 or 00 sclae so to avoid the branches being too weak.
Anyways the trees I am making now are very small for 1/32 but not too big for 00 or H0.
For making the armatures there are many times more methods as people in this poor planet and I love to try as many ways as possible but this time I do this...
 IMG_0001 (273) by Daniel Osvaldo Caso, on Flickr
The first rough cut of the balsa wood I made with the band saw because I have one but before I did it several times with a jig saw and before that with simply a hand saw and a couple of sharp knives...
 IMG_0002 (247) by Daniel Osvaldo Caso, on Flickr
 IMG_0003 (223) by Daniel Osvaldo Caso, on Flickr
For the sanding I used BOSCH P.40 sandpaper but keeps at hand reach the much rougher one for 'detailing' (...) the armature onbce complete...
When cutting the trunk a lot of small piueces of wood fall to the ground but I spare them for making branches...
 IMG_0004 (233) by Daniel Osvaldo Caso, on Flickr
 IMG_0006 (238) by Daniel Osvaldo Caso, on Flickr
 IMG_0005 (239) by Daniel Osvaldo Caso, on Flickr
 IMG_0008 (221) by Daniel Osvaldo Caso, on Flickr
 IMG_0009 (213) by Daniel Osvaldo Caso, on Flickr
 IMG_0010 (208) by Daniel Osvaldo Caso, on Flickr
Toothpicks and a 2mm drill bit in a Dremel.
 IMG_0011 (227) by Daniel Osvaldo Caso, on Flickr
I found useful to make both holes at once to avoid needing to align the second one if not done this way...
 IMG_0012 (202) by Daniel Osvaldo Caso, on Flickr
 IMG_0014 (176) by Daniel Osvaldo Caso, on Flickr
Because as you knoiw my trees keep jumping from the layout to one diorama and then to the other and so on, I like to use the strongest version of PVA vor the pinning.
As soon as the branch is in place, I spread a bit off the Balsa sawdust on the wet glue, just as a filler that later will get sanded to fit...
 IMG_0016 (174) by Daniel Osvaldo Caso, on Flickr
 IMG_0015 (174) by Daniel Osvaldo Caso, on Flickr
... anbd I also give the trunck a pin for fastening the tree in it's final place...
 IMG_0017 (191) by Daniel Osvaldo Caso, on Flickr
 IMG_0018 (190) by Daniel Osvaldo Caso, on Flickr
 IMG_0019 (179) by Daniel Osvaldo Caso, on Flickr
Here the tree factory:
I buy a 10cm X 20cm X 130cm block of Balsa wood at the local finewood provider for 15 euro.
It is not same quality as the one one get at hobbyshops but for this purpose is much better: it has more visible wood grain and it is a lot stronger than the super soft balsa used for hobby. I have seen this type of Balsa used for packing expensive old forniture.
I would certainly use this type of balsa and NOT the usual hobby one if my tress must be H0 or 00 sclae so to avoid the branches being too weak.
Anyways the trees I am making now are very small for 1/32 but not too big for 00 or H0.
For making the armatures there are many times more methods as people in this poor planet and I love to try as many ways as possible but this time I do this...
IMG_0001 (273) by Daniel Osvaldo Caso, on FlickrThe first rough cut of the balsa wood I made with the band saw because I have one but before I did it several times with a jig saw and before that with simply a hand saw and a couple of sharp knives...
IMG_0002 (247) by Daniel Osvaldo Caso, on FlickrIMG_0003 (223) by Daniel Osvaldo Caso, on FlickrFor the sanding I used BOSCH P.40 sandpaper but keeps at hand reach the much rougher one for 'detailing' (...) the armature onbce complete...
When cutting the trunk a lot of small piueces of wood fall to the ground but I spare them for making branches...
IMG_0004 (233) by Daniel Osvaldo Caso, on FlickrIMG_0006 (238) by Daniel Osvaldo Caso, on FlickrIMG_0005 (239) by Daniel Osvaldo Caso, on FlickrIMG_0008 (221) by Daniel Osvaldo Caso, on FlickrIMG_0009 (213) by Daniel Osvaldo Caso, on FlickrIMG_0010 (208) by Daniel Osvaldo Caso, on FlickrToothpicks and a 2mm drill bit in a Dremel.
IMG_0011 (227) by Daniel Osvaldo Caso, on FlickrI found useful to make both holes at once to avoid needing to align the second one if not done this way...
IMG_0012 (202) by Daniel Osvaldo Caso, on FlickrIMG_0014 (176) by Daniel Osvaldo Caso, on FlickrBecause as you knoiw my trees keep jumping from the layout to one diorama and then to the other and so on, I like to use the strongest version of PVA vor the pinning.
As soon as the branch is in place, I spread a bit off the Balsa sawdust on the wet glue, just as a filler that later will get sanded to fit...
IMG_0016 (174) by Daniel Osvaldo Caso, on FlickrIMG_0015 (174) by Daniel Osvaldo Caso, on Flickr... anbd I also give the trunck a pin for fastening the tree in it's final place...
IMG_0017 (191) by Daniel Osvaldo Caso, on FlickrIMG_0018 (190) by Daniel Osvaldo Caso, on FlickrIMG_0019 (179) by Daniel Osvaldo Caso, on FlickrMy new Flickr:
https://www.flickr.com/photos/158027525@N08/
My old Flickr:
https://www.flickr.com/photos/daniel_1_32_scale/page223
Being right is one thing, but being true is quite another.
https://www.flickr.com/photos/158027525@N08/
My old Flickr:
https://www.flickr.com/photos/daniel_1_32_scale/page223
Being right is one thing, but being true is quite another.

Re: Oh...NO...! Not another 1/32 diorama...!!!
I do that glue and filings/shavings trick as a filler when I work using resin. It works well too though with resin I am using superglue.
Is balsa expensive over there? Here I was offered a bag of balsa offcuts and the shopkeeper wanted silly money for them. He said that it was exceptionally cheap compared to the normal cost of balsa wood. I never did buy balsa. I did have an odd piece given to me on occasions as my Dad was a carpenter and he really loved is wood and the different types and he would bring offcuts of wood home just to share any unusual wood he had been using so that he could show us them.
Is balsa expensive over there? Here I was offered a bag of balsa offcuts and the shopkeeper wanted silly money for them. He said that it was exceptionally cheap compared to the normal cost of balsa wood. I never did buy balsa. I did have an odd piece given to me on occasions as my Dad was a carpenter and he really loved is wood and the different types and he would bring offcuts of wood home just to share any unusual wood he had been using so that he could show us them.
Modelling On A Budget ---》 https://www.newrailwaymodellers.co.uk/F ... 22&t=52212
Re: Oh...NO...! Not another 1/32 diorama...!!!
Mountain wrote:I do that glue and filings/shavings trick as a filler when I work using resin. It works well too though with resin I am using superglue.
Is balsa expensive over there? Here I was offered a bag of balsa offcuts and the shopkeeper wanted silly money for them. He said that it was exceptionally cheap compared to the normal cost of balsa wood. I never did buy balsa. I did have an odd piece given to me on occasions as my Dad was a carpenter and he really loved is wood and the different types and he would bring offcuts of wood home just to share any unusual wood he had been using so that he could show us them.
Hi Mountain,
yes, balsa wood was already expensive but with the rising inflation was already becoming more and more expensive since some time because the climate considerations what one must accept. A few months ago, as the inflation started to grow, it's prices did too. Now, with the criminal invasion of Ukranie and all it's consequences one shouldn't expect it to get any cheaper.\
One thing I have in mind is as soon as I get my hollyday money (end of May) I will go arround and look for second hand discarded old furniture one can buy for little money. I've found that a great source for, for example, very old ceder boards from drawers, great source for old good quality ply and more things. Such wood was by then already good dry when machined but forty or more years later it is pure delight to work and excellent material for modeling. For example if you want to model from scratch a Rowan steam railcar in 1/22 scale...
Nice what you tell about your Dad.
Here nearby, there was a tiny old house now demolished, when some kind of shop had been long before. When I saw it for first time it was just a home but still with the wood & glass door at the middle and at each side a big shop window. The people living there had filled the two huge windows with shelves as if it would be a book shop, but, instead of rows of book they had filled all shelves with an amazing beautiful collection of simple pieces of wood of all imaginable types. I mean, that is the same love that made your Dad wanting to share with you at home withbringing the pieces of wood.
Daniel
My new Flickr:
https://www.flickr.com/photos/158027525@N08/
My old Flickr:
https://www.flickr.com/photos/daniel_1_32_scale/page223
Being right is one thing, but being true is quite another.
https://www.flickr.com/photos/158027525@N08/
My old Flickr:
https://www.flickr.com/photos/daniel_1_32_scale/page223
Being right is one thing, but being true is quite another.
Re: Oh...NO...! Not another 1/32 diorama...!!!
We have news at the Lijnbaansgracht:
 IMG_0047 (110) by Daniel Osvaldo Caso, on Flickr
... if you know what it means...
 IMG_0048 (98) by Daniel Osvaldo Caso, on Flickr
At the modeling front there are also some unexpected news:
 IMG_0004 (234) by Daniel Osvaldo Caso, on Flickr
Yes, it is all gone. Ageing is no joke and harmonizing the still growing joy of freedom with such a memory decay is not really guaranteed. Caught by the stream of enthousiasm I wanted to widen the transparant lip at the top of the waterfall. I applied a very generous layer of GOLDEN Light Molding Paste and waited and waited to see it becoming transparant... Well, it didn't. It turned even more opaque and white. Then I rememred: that it's what it always do! Then I saw on the other workbench the kit pistol laughing at me...
 IMG_0006 (239) by Daniel Osvaldo Caso, on Flickr
This morning I saw my hand taking the big knife and, horrorized, saw it wildly but at the same time enthousiastically cutting the whole strip of effects...
 IMG_0007 (220) by Daniel Osvaldo Caso, on Flickr
 IMG_0008 (223) by Daniel Osvaldo Caso, on Flickr
Strangely, I felt a deep sense of relief and realized that with what I've learned over the past few days, I'm in a position to enjoy another try.
 IMG_0001 (275) by Daniel Osvaldo Caso, on Flickr
IMG_0047 (110) by Daniel Osvaldo Caso, on Flickr... if you know what it means...
IMG_0048 (98) by Daniel Osvaldo Caso, on FlickrAt the modeling front there are also some unexpected news:
IMG_0004 (234) by Daniel Osvaldo Caso, on FlickrYes, it is all gone. Ageing is no joke and harmonizing the still growing joy of freedom with such a memory decay is not really guaranteed. Caught by the stream of enthousiasm I wanted to widen the transparant lip at the top of the waterfall. I applied a very generous layer of GOLDEN Light Molding Paste and waited and waited to see it becoming transparant... Well, it didn't. It turned even more opaque and white. Then I rememred: that it's what it always do! Then I saw on the other workbench the kit pistol laughing at me...
IMG_0006 (239) by Daniel Osvaldo Caso, on FlickrThis morning I saw my hand taking the big knife and, horrorized, saw it wildly but at the same time enthousiastically cutting the whole strip of effects...
IMG_0007 (220) by Daniel Osvaldo Caso, on FlickrIMG_0008 (223) by Daniel Osvaldo Caso, on FlickrStrangely, I felt a deep sense of relief and realized that with what I've learned over the past few days, I'm in a position to enjoy another try.
IMG_0001 (275) by Daniel Osvaldo Caso, on FlickrMy new Flickr:
https://www.flickr.com/photos/158027525@N08/
My old Flickr:
https://www.flickr.com/photos/daniel_1_32_scale/page223
Being right is one thing, but being true is quite another.
https://www.flickr.com/photos/158027525@N08/
My old Flickr:
https://www.flickr.com/photos/daniel_1_32_scale/page223
Being right is one thing, but being true is quite another.
-
Nevadablue
- Posts: 75
- Joined: Sun Apr 18, 2021 5:54 am
- Location: Nevada, USA
Re: Oh...NO...! Not another 1/32 diorama...!!!
Well, I hope you get pictures of the baby coots when they arrive.
I thought someone upstream was doing laundry. All the streams in Nicaragua look like that at any rapids or falls. I’m sure it is common all over the world, even in ancient, rural France.
I thought someone upstream was doing laundry. All the streams in Nicaragua look like that at any rapids or falls. I’m sure it is common all over the world, even in ancient, rural France.
Re: Oh...NO...! Not another 1/32 diorama...!!!
Yes, I'll post some photos of the babies as soon as they appear (if I manage to see them before they get eaten by rats or -now with the climate change- by crocodiles or piranhas.)Nevadablue wrote:Well, I hope you get pictures of the baby coots when they arrive.
I thought someone upstream was doing laundry. All the streams in Nicaragua look like that at any rapids or falls. I’m sure it is common all over the world, even in ancient, rural France.
Yes again, such water falls are typical of the regions with stratified limestone and stratified limestone happen to be more or less evewrywhere.
Rapids, I understand, are something different, much more dramatic.
Today's news (not the ones from V. Poothing's slaughter wich has thrown a layer of deep sadness everywhere, but the good ones) is I have a new love.
Unexpectedly appeared in my life and is mean to stay:
 IMG_0010 (214) by Daniel Osvaldo Caso, on Flickr
It is something as the average acrylic gel in it's transparant gloss version but mixed with a lot of tiny also transparant glass beads.
It appears white when applied but turns totally transparant after half an hour. I am really delighted with it...
 IMG_0004 (237) by Daniel Osvaldo Caso, on Flickr
To make it understandable:
The milky area is acrylic gloss lack drying which will be totally transparant too once dried.
The thick transparant stroke on tope of the fall edge forming the lip that appears when the water pass fromvery tranquile to fall is BISON Poly Max Crystal Express transparant
The glass beads is being applied in the areas of falling water but will be more visible in the last couple of images...
 IMG_0006 (240) by Daniel Osvaldo Caso, on Flickr
 IMG_0007 (221) by Daniel Osvaldo Caso, on Flickr
 IMG_0008 (224) by Daniel Osvaldo Caso, on Flickr
 IMG_0009 (215) by Daniel Osvaldo Caso, on Flickr
 IMG_0001 (278) by Daniel Osvaldo Caso, on Flickr
 IMG_0002 (248) by Daniel Osvaldo Caso, on Flickr
 IMG_0003 (232) by Daniel Osvaldo Caso, on Flickr
 IMG_0004 (238) by Daniel Osvaldo Caso, on Flickr
 IMG_0005 (241) by Daniel Osvaldo Caso, on Flickr
 IMG_0006 (241) by Daniel Osvaldo Caso, on Flickr
 IMG_0007 (222) by Daniel Osvaldo Caso, on Flickr
 IMG_0008 (225) by Daniel Osvaldo Caso, on Flickr
I applied the glass beads gel with one of my best bad brushes...
 IMG_0011 (232) by Daniel Osvaldo Caso, on Flickr
Now the beads gel is drying...
 IMG_0019 (184) by Daniel Osvaldo Caso, on FlickrIMG_0019 (184) by Daniel Osvaldo Caso, on Flickr
 IMG_0024 (168) by Daniel Osvaldo Caso, on Flickr
 IMG_0026 (163) by Daniel Osvaldo Caso, on Flickr
 IMG_0027 (165) by Daniel Osvaldo Caso, on Flickr
 IMG_0028 (149) by Daniel Osvaldo Caso, on Flickr
 IMG_0030 (149) by Daniel Osvaldo Caso, on Flickr
 IMG_0032 (146) by Daniel Osvaldo Caso, on Flickr
 IMG_0033 (141) by Daniel Osvaldo Caso, on Flickr
 IMG_0015 (182) by Daniel Osvaldo Caso, on Flickr
My new Flickr:
https://www.flickr.com/photos/158027525@N08/
My old Flickr:
https://www.flickr.com/photos/daniel_1_32_scale/page223
Being right is one thing, but being true is quite another.
https://www.flickr.com/photos/158027525@N08/
My old Flickr:
https://www.flickr.com/photos/daniel_1_32_scale/page223
Being right is one thing, but being true is quite another.
Re: Oh...NO...! Not another 1/32 diorama...!!!
... AND HERE WE GO...
 IMG_0001 (280) by Daniel Osvaldo Caso, on Flickr
That white is not the still wet gel which is already totally dry. That is a subtle drybrushing with fan brushes and matt acrylic white paint.
The whole needs still some retouching but I want to do first the flat water in above level so the last retouching will involve both levels AND the surtroundings...
 IMG_0005 (243) by Daniel Osvaldo Caso, on Flickr
 IMG_0007 (223) by Daniel Osvaldo Caso, on Flickr
 IMG_0011 (235) by Daniel Osvaldo Caso, on Flickr
Yes, that blue and the pother white spots are accidents. Magoo half awake, still in his pajamas & slippers doing the drybrushing at four in the morning is not a full warranty of refinement, but still the work is done and I like it so far...
 IMG_0012 (211) by Daniel Osvaldo Caso, on Flickr
That blue spot will be disguised or removed but the ral floating effect gaves me an idea... (...No, no: more than one...!)
IMG_0001 (280) by Daniel Osvaldo Caso, on FlickrThat white is not the still wet gel which is already totally dry. That is a subtle drybrushing with fan brushes and matt acrylic white paint.
The whole needs still some retouching but I want to do first the flat water in above level so the last retouching will involve both levels AND the surtroundings...
IMG_0005 (243) by Daniel Osvaldo Caso, on FlickrIMG_0007 (223) by Daniel Osvaldo Caso, on FlickrIMG_0011 (235) by Daniel Osvaldo Caso, on FlickrYes, that blue and the pother white spots are accidents. Magoo half awake, still in his pajamas & slippers doing the drybrushing at four in the morning is not a full warranty of refinement, but still the work is done and I like it so far...
IMG_0012 (211) by Daniel Osvaldo Caso, on FlickrThat blue spot will be disguised or removed but the ral floating effect gaves me an idea... (...No, no: more than one...!)
My new Flickr:
https://www.flickr.com/photos/158027525@N08/
My old Flickr:
https://www.flickr.com/photos/daniel_1_32_scale/page223
Being right is one thing, but being true is quite another.
https://www.flickr.com/photos/158027525@N08/
My old Flickr:
https://www.flickr.com/photos/daniel_1_32_scale/page223
Being right is one thing, but being true is quite another.
Re: Oh...NO...! Not another 1/32 diorama...!!!
...
 IMG_0010 (216) by Daniel Osvaldo Caso, on Flickr
 IMG_0009 (218) by Daniel Osvaldo Caso, on Flickr
 IMG_0011 (234) by Daniel Osvaldo Caso, on Flickr
IMG_0010 (216) by Daniel Osvaldo Caso, on FlickrIMG_0009 (218) by Daniel Osvaldo Caso, on FlickrIMG_0011 (234) by Daniel Osvaldo Caso, on FlickrMy new Flickr:
https://www.flickr.com/photos/158027525@N08/
My old Flickr:
https://www.flickr.com/photos/daniel_1_32_scale/page223
Being right is one thing, but being true is quite another.
https://www.flickr.com/photos/158027525@N08/
My old Flickr:
https://www.flickr.com/photos/daniel_1_32_scale/page223
Being right is one thing, but being true is quite another.
-
Nevadablue
- Posts: 75
- Joined: Sun Apr 18, 2021 5:54 am
- Location: Nevada, USA
Re: Oh...NO...! Not another 1/32 diorama...!!!
. . . . . . . .

. . . . . . . .
. . . . . . . .
Re: Oh...NO...! Not another 1/32 diorama...!!!
Nevadablue wrote:. . . . . . . .
. . . . . . . .
My new Flickr:
https://www.flickr.com/photos/158027525@N08/
My old Flickr:
https://www.flickr.com/photos/daniel_1_32_scale/page223
Being right is one thing, but being true is quite another.
https://www.flickr.com/photos/158027525@N08/
My old Flickr:
https://www.flickr.com/photos/daniel_1_32_scale/page223
Being right is one thing, but being true is quite another.