
Glue problems?
Oh for the good old days back in the 60's (perhaps even late 50's?) when, unless my memory and brain fail me, the original Kitmaster kits included a small plastic capsule (resembling a cod-liver oil capsule) with a narrow extension into which you stuck a pin to release the glue.
Those were the days!
(Didn't stop me from jamming up the motion though.)
Diary of a Kit Modeler
-
Bigglesof266
- Posts: 1037
- Joined: Tue Feb 10, 2009 9:59 am
- Location: Australia
Re: Diary of a Kit Modeler
Facts here from Bufferstop.Bufferstop wrote:The plastic used in Dapol's kits is softer than that used by Airfix and Kitmaster in the 60s, as a consequence even if you don't get glue between the journal and the rod there will be a high level of friction trying to prevent you turning the wheels. Unless you are planning to mount them on a running chassis I think you have to accept them as static models. The prototype Celtic at least offers the possibility of inserting some bearings and pinpoint axle wheelsets.
Dapol use utterly rubbish plastic in their kits which is very soft and will turn to molten mush with overapplication of an aggressive glue in 1960s kid 'more will make it stronger' fashion, yet needs a reasonably aggressive glue because of the fit (lack of it or warped part stress) and that 'orrible plastic. Tamiya Cement (White or Orange cap) will do a great job, and more viscous and aggressive Revell Contacta Pro in the needle applicator bottle will too. These Dapol kits are the perfect subject for Revell Contacta Pro by needle applicator.
With Dapol rolling stock in particular if you're going to put them to dynamic purpose, use of metal bearings is mandatory.
An aside. Even contemporary relatively precision fitting Airfix kits made in India these days use a plastic compound which whilst not as horrendous as Dapol's, is different in comparison with the best. Tamiya, Hasegawa, Eduard, Dragon, MENG et al. I vehemently dislike it. For me to buy an Airfix kit these days, it has to be a unique subject I really really crave which no one else offers in an equivalent or better alternative. Fortunately that's exceptionally rarely in my areas of interest/focus.
-
ChrisGreaves
- Posts: 394
- Joined: Sun Feb 21, 2021 12:32 pm
- Contact:
Re: Diary of a Kit Modeler
Hi Bufferstop, and thanks for your two-pennorth (Worth many $ where I reside in splenid isolation!).Bufferstop wrote:The plastic used in Dapol's kits is softer than that used by Airfix and Kitmaster in the 60s, as a consequence even if you don't get glue between the journal and the rod there will be a high level of friction trying to prevent you turning the wheels. Unless you are planning to mount them on a running chassis I think you have to accept them as static models. The prototype Celtic at least offers the possibility of inserting some bearings and pinpoint axle wheelsets.
I do remember my brief career as a welder-of-plastic around age 14
That was my idea the first few months I moved in here, four years ago this month.static models.
I had no houseplants, snow covered the ground, I knew practically nobody, let alone bodies that could spare a few cuttings.
Kit modelling was the ideal hobby.
I had in mind a set of boxes, perspex rather than glass, pegged on the walls in various places, each a display case with a plastic loco in 00-scale
You are about to hear how I managed to mangle one of the six coupling pins; my theory back than, and now, was that that side could face the wall, and no-one else would know.
Four years later I have advanced to the view that most of the locos can sit in a small spur on each of my nine 6' boards, looking as if they are ready to leap into action the minute the motorized shunter has uncoupled from the mainline rake.
Of course that might changes should I decide to go N-gauge
My short term objective was to see if I was physically capable of doing what, at my age, is fine-scale stuff. Cheaper to bash a few plastic kits and then (gasp!) toss them into the garbage and try to learn to play piano than inve$t in a half-dozen DCC motorized beauties and all that that would entail.
I have to keep focused for now on the idea that this was supposed to be a two-month project to tide me through the winter months until I could start work in the garden on what turned out to be the first of my four (and counting) summers on the island.
And speaking of Ireland, I had not realized that Eire has a 3,300hp diesel electric.
Cheers, Chris
-
ChrisGreaves
- Posts: 394
- Joined: Sun Feb 21, 2021 12:32 pm
- Contact:
Re: Diary of a Kit Modeler
Thanks Geoff for the encouraging wordsDad-1 wrote:Have you noticed that after counting to 100 the small piece you were tacking ...
I have not progressed yet to the stage where I can reach 100 before things start falling apart.
Cheers, Chris
-
ChrisGreaves
- Posts: 394
- Joined: Sun Feb 21, 2021 12:32 pm
- Contact:
Re: Diary of a Kit Modeler
Hi Biggles. I had recognized the kits as Airfix/Kitmaster - they were probably identified as such on the sales portal, but I would not have known about the change in plastics. There again, very few people realize what 60 years of Industrial Chemistry can do to improve powdered milk.Bigglesof266 wrote: Dapol kits as you're undoubtedly already aware are ancient Kitmaster and Airfix moulds, and the plastic Dapol choose to mould their kits from tends to warp. Dapol even reference the fact or rather how to fix it it, in their instructions. So the fit isn't great in the first place.
Now I have no knowledge of, no experience of, any other plastic kit. In Perth, W.A. in the 1950s Airfix/Kitmaster was all you could get. (Perth is the most isolated capital city in the world)With Wills and Ratio kits,
"★This cement is for use assembling plastic (styrene) models. ★Comes in a stable hexagonal bottle 47mm tall. ★Contents: 20ml. ★Features a brush for application on the reverse side of the cap."Here's Tamiya's intention for the relevant application of those two glues.
Product data is always suspect. Apart from the question about why I would want to apply glue to the reverse side of the cap
That is in part why I regret not buying that (apparently) squeeze bottle with a hollow needle.Tamiya Extra Thin Cement You can also apply spot apply this to a point or small surface areas and fit the mating part.
A brush with plastic bristles that splay out is NOT an ideal device for a spot of glue in a coupling rod pin hole in a wheel.
I suspect I will use one of my darning needles as an applicator for tricky bits.
Thanks for this link!And here's a general overview of those two hobby cements from a highly credible, experienced and practical hands on prolific model builder.
Cheers, Chris
-
ChrisGreaves
- Posts: 394
- Joined: Sun Feb 21, 2021 12:32 pm
- Contact:
Re: Diary of a Kit Modeler
YES!!Ex-Pat wrote:... the original Kitmaster kits included a small plastic capsule (resembling a cod-liver oil capsule) with a narrow extension into which you stuck a pin to release the glue.
What I want to know is - how do we get back to those glorious days?
Cheers, Chris
-
ChrisGreaves
- Posts: 394
- Joined: Sun Feb 21, 2021 12:32 pm
- Contact:
Re: Diary of a Kit Modeler
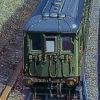
My smallest bit can still be twirled by my fingers (see “Scarred fingertips” in earlier post) and I manage to scour out enough paint and a digestible chunk of grey plastic to make what looks to these tired eyes like a countersunk screw hole I made in carpentry class back in 1961.
The bottom-left corner of the image shows a coupling rod with pin that I used to test the hole for freedom of movement.
Onward and ever upward, Chris
Re: Diary of a Kit Modeler
And then there is the nuclear option. Early Bachmann versions of the production Deltic are relatively cheap, and the mechanism will fit with minor trimming of the plastic ends of the chassis, and construction of the kit body as an 'open shell' guided by the dimensions of the Bachmann body shell. It's not 100% accurate, but few will spot this. Needs a 30" minimum radius to run, as the bogie end wheelsets will otherwise machine their way through the body sides...Bufferstop wrote:The prototype Deltic at least offers the possibility of inserting some bearings and pinpoint axle wheelsets.
-
ChrisGreaves
- Posts: 394
- Joined: Sun Feb 21, 2021 12:32 pm
- Contact:
Re: Diary of a Kit Modeler
Ah!Bigmet wrote:... as the bogie end wheel-sets will otherwise machine their way through the body sides...
The exciting New Frontier of fully-automated kit modification!
Cheers, Chris
-
Bigglesof266
- Posts: 1037
- Joined: Tue Feb 10, 2009 9:59 am
- Location: Australia
Re: Diary of a Kit Modeler
1960s Airfix kit plastic was superior to work with than what Airfix use today IMPE&O. That said, today there's far better used by almost every other manufacturer.ChrisGreaves wrote:I would not have known about the change in plastics. There again, very few people realize what 60 years of Industrial Chemistry can do to improve powdered milk.
Know what you mean about Perth. My wife's sister and brother in law who grew up in Perth live there today. I grew up in Brisbane in the 1950s & 1960s, which at the time was just a big country town albeit not as isolated as Perth geographically. 1950s were before my model building time, nevertheless familiar with '50s manufactured Airfix product as there was plenty of it on the shelves here when I did. Heck, you can still buy their ancient kit moulds. e.g. DH88 Comet in 1/72. Actually, that's the specific model that kicked off my impulse buy and return to concurrently playing with plastic too for other than railway accessory purposes whilst railway modelling a decade or so ago.In Perth, W.A. in the 1950s Airfix/Kitmaster was all you could get. (Perth is the most isolated capital city in the world)
Reading the above, you don't yet accurately comprehend the respective cement applications or applicators and have a false perception.A brush with plastic bristles that splay out is NOT an ideal device for a spot of glue in a coupling rod pin hole in a wheel.
To attempt to clarify. Both of those Tamiya cements or their close clone equivalents from a now ever increasing number of manufacturers e.g. Mr. Hobby, MiG Ammo, AK Interactive are far superior to Revell Contacta Professional in composition and practical application.
The brush in the White cap Tamiya bottle is wider than the brush in the Green cap bottle. Tamiya thinking of everything as usual have manufactured the former so its larger brush and bristles properly used as intended don't "splay out". If they're splaying out, it's either intentional as in joining two wing halves, or you're applying too much pressure on delicate part or in spot application and probably too much volume trying to use it like an old fashioned tube styrene cement. Remember less is more with these liquid cements.
For spot application of Tamiya (White or Orange cap) Cement, wipe the brush like a paint brush on the side of the bottle to remove excess, and spot apply the tip to or lightly brush the part to be joined, then fit the parts together. Again, less is more. e.g. Think WWII German Panzer road wheels, of which there are many. Works perfectly for these without glue overapplication or going everywhere including onto adjacent parts you don't want it to.
Their Green capped bottle has a fine tipped smaller softer bristled brush. It's what you use for accurate spot and precision application where you don't want excess, and particularly, glue going where you don't want it to to deface surface detail. However you can also use it for the former example of road wheel assembly too if preferred. Some modellers use nothing else in their entire builds, e.g. Andy, however I prefer having the range available in the right tool for the job methodology mindset.
For the kinds of fine parts you don't want a glue that's going to soften and melt the begeezuz out of the part, particularly minuscule parts, nor to deface the part or surface detail where it's being attached. That's what that Extra Thin and Extra Thin Fast Setting cements are for. You can pre-apply the Extra Thin, but it's really designed for post dry fit application where it runs into the seam or joint assisted by capillary action for a thorough bond. For static models, less is more. It just needs to hold the two parts together on the shelf, in the cabinet or displayed on the layout. They've not being subjected to dynamic stress loads or used as toys for play as when we were kids.
Revell Contacta Pro requires more judicious application if you don't want to deface the part, surface detail or be cleaning up excess squeezed out the sides which will melt plastic where you don't want it to in the process. Revell's needle applicator does a pretty good job, but FMM it's not in the same league as modern brush on cements or their applicators. It is both more viscous and more aggressive. I would class it as OK. The liquid cements OTOH are as close to perfect for purpose as have yet been developed. As always, people develop preferences so the the caveat OMMV.
Re: Diary of a Kit Modeler
It's a piece of cake with the array of RTR mechanisms now available in OO and HO. I cut my teeth on this using Athearn PA1 mechanisms in Brush type 2 bodies, back in the day when even the 'best for exterior accuracy' RTR OO models had lousy bogie undrives. Lost count now of how many 'current standard drives' I have transplanted into old kit and RTR bodies various.ChrisGreaves wrote:...The exciting New Frontier of fully-automated kit modification!

Re: Diary of a Kit Modeler
That was glue? I thought it was a suppository....Ex-Pat wrote:Glue problems?
Oh for the good old days back in the 60's (perhaps even late 50's?) when, unless my memory and brain fail me, the original Kitmaster kits included a small plastic capsule (resembling a cod-liver oil capsule) with a narrow extension into which you stuck a pin to release the glue.
Those were the days!
(Didn't stop me from jamming up the motion though.)
Tony
Men with false teeth may yet speak the truth.......
Re: Diary of a Kit Modeler
Could explain why I made a bum job of it.Lysander wrote:
That was glue? I thought it was a suppository....
Tony
Re: Diary of a Kit Modeler
Highly recommended to convince anyone that what they previously thought was stinging pain in the rubbish chute was nothing like it...Lysander wrote:That was glue? I thought it was a suppository....
(This was the party piece of a late friend who had accidentally received an enema of Xylene. Nearly as funny as the account by the man who attempted to wash off a spillage of permanent ink in his lap, by use of Omo. Both had endured wartime combat and were totally frank and direct in manner, to a degree rarely encountered among us peacetime softies.)
-
ChrisGreaves
- Posts: 394
- Joined: Sun Feb 21, 2021 12:32 pm
- Contact:
Re: Diary of a Kit Modeler
Brilliant! Thank you.Bigglesof266 wrote:The brush in the White cap Tamiya bottle is wider than the brush in the Green cap bottle. ...
For spot application of Tamiya (White or Orange cap) Cement, ...
Their Green capped bottle has a fine tipped smaller softer bristled brush. ...
For the kinds of fine parts you don't want a glue that's going to soften and melt the begeezuz out of the part,...
I am not (yet) the smartest guy in the world.
Thinking that I'd bought two bottles of GLUE, I focused on the GLUE.
I treated the brushes as incidental :doh:
The Green as you call it, cap, has indeed a very fine tip.
I have this afternoon had cause to use both tips (no, I'm not (yet) that stupid! One at a time...)
I used the green/fine tip to deposit a tiny drop of glue inside the hole in the wheel that takes a coupling-rod pin.
I used the broader brush to tack the front of the cab (that abuts the boiler) to the boiler. I remember reading somewhere over the past few days - probably that brilliant video recommended by, er, ah, well, by him, and once the two plastics were tacked, did a kind of fill-in on the seam on the outside.
That I had painted the plates green in a fit of misguided enthusiasm two years ago is neither here nor there, but is absolutely in the past.
All in all this would have been a successful afternoon had I plunged the pin in the glue-filled hole before tackling the cab business.
Still, I feel that I can speak for most of us when I say "We're not all perfect!"
Cheers, Chris