
never looked as i have picked up stuff over many years and look and work out my own methods , but i'm never closed to viewing other things so will give it a look thanks !!amsie wrote:I don't know if your've tried or heard of "the art of weathering"?
pauls paint thread
Re: pauls paint thread
Re: pauls paint thread
before getting to far in i'll show a very valuable tool in painting ( tricky to understand at first ) but a most valuble tool in painting , this helps with colour theory also
introducing the colour wheel !!
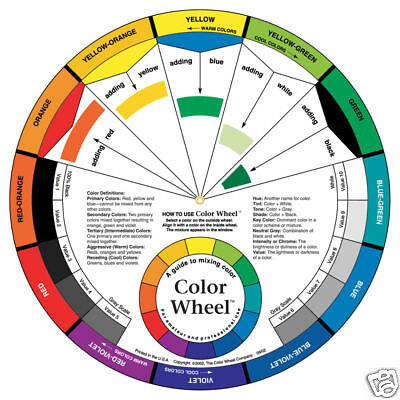
first we have to understand colour in effect there is no colour !! surprising but true colour is light reflected off objects in difrent frequency like radio waves perfect black absorbs all the waves so reflects none back to the eye whereas white at the opposite end reflects all the colours of the spectrum in equal amounts so technicaly white and true black are not colours
it is complicated to go into and is a tool best used in unison with painting as there are many variables on it to aid in paint mixing
in essence it tells you values etc but most useful for us presently is its main functions
1 ..tells you primary colours ( colours not obtainable by mixing )
2 .. secondary colours ( colours obtainable by mixing neighbouring primary colours )
3... complimentary colours ( colours directly opposite each other on the wheel ) if you watched the video earlier you would notice him saying using red for shading green this works because complimentarys fight each other for promminence and look vibrant together but can also work as said for shading if the red is toned down to a browny red( comes into the huge subject of colour theory )
4... monochromatic colours tints tones or shades of one colour
5... analogus colours using colours adjacent to each other on the wheel but only up to five colours in one scene
mixing colours opposite each other on the wheel will give difrent types of grey depending on mixing and requirements
it can do this and lots more and believe it or not because colour is colour i also use it as a photography aid !!
introducing the colour wheel !!
first we have to understand colour in effect there is no colour !! surprising but true colour is light reflected off objects in difrent frequency like radio waves perfect black absorbs all the waves so reflects none back to the eye whereas white at the opposite end reflects all the colours of the spectrum in equal amounts so technicaly white and true black are not colours
it is complicated to go into and is a tool best used in unison with painting as there are many variables on it to aid in paint mixing
in essence it tells you values etc but most useful for us presently is its main functions
1 ..tells you primary colours ( colours not obtainable by mixing )
2 .. secondary colours ( colours obtainable by mixing neighbouring primary colours )
3... complimentary colours ( colours directly opposite each other on the wheel ) if you watched the video earlier you would notice him saying using red for shading green this works because complimentarys fight each other for promminence and look vibrant together but can also work as said for shading if the red is toned down to a browny red( comes into the huge subject of colour theory )
4... monochromatic colours tints tones or shades of one colour
5... analogus colours using colours adjacent to each other on the wheel but only up to five colours in one scene
mixing colours opposite each other on the wheel will give difrent types of grey depending on mixing and requirements
it can do this and lots more and believe it or not because colour is colour i also use it as a photography aid !!
Last edited by tornado64 on Thu Oct 11, 2012 9:55 am, edited 1 time in total.
Re: pauls paint thread
I have to repaint my Px48 and I know that there isn't a suitable shade of green "in a tin" so will have to mix some, what's the best way to go about it?
Re: pauls paint thread
gather you mean the polish railways loco in green !! tricky to say realy as it depends where you want to be !!b308 wrote:I have to repaint my Px48 and I know that there isn't a suitable shade of green "in a tin" so will have to mix some, what's the best way to go about it?
factory fresh you would find nearest green and add blue or yellow depending on wich way it needs to go then lighten with white or darken with a small blob of black or very dark green
but there can be many variations of weathering inbetween
tones can also depend on the blue used as some can be ultramarine type blues whilst others will be pthalo type blues
i reccon looking at pictures the starting point would be a pthalo green colour then adjust as required

if brush painting buy a mixing plate and add colours gradualy till desired colour is reached
if spraving mix in a small glass paint bottle then if a larger quantity is required you can pour into a tin or paint jar !!
Last edited by tornado64 on Thu Oct 11, 2012 10:17 am, edited 1 time in total.
Re: pauls paint thread
Cheers! I was thinking of "lightly weathered" rather than ex works...
Re: pauls paint thread
also depends if you are airbrushing or brushing after the 47 i am planning to do an 08 shunter that will show paint fade , for paint fade in airbrushing you would just add white to the colour but the whole effect starts with pre shading or by priming in black paint !!b308 wrote:Cheers! I was thinking of "lightly weathered" rather than ex works...
but mines going to be heavily weathered as BR blue was quite often in the early 80's
Re: pauls paint thread
Hi
I have just purchased my first airbrush to try my hand at re paints.
I have a Pug, which at the moment is in BR black, I want to repaint it to Turkish red which I am informed is the red used on the Bass locos, the reason I want to use this colour is I am modeling the Bass railway-- http://www.nationalbrewerycentre.co.uk/ ... dlands.htm the loco is at the bottom of the attractions page.
Is Turkish red available, if not which colours would i need to mix to get a near match.
Great thread
I
Tim
aka Forfarian
aka Forfarian
Re: pauls paint thread
doubt it will be readily available daylight has gone now so will check tomorow for you on a mixing guide at a guess i'd say a browny red and adjust with red and yellow
Re: pauls paint thread
reasonably easy mix as it goes !! i got it by mixing 3 parts " humbrol 100 " red brown with 1 part "humbrol 54" white to lighten it off ( i got a better image of the loco for comparison off flickr !!
these are humbrol matt colours so if aplying decals coat afterwards in humbrol gloss coat varnish to hide decal carrier films then spray in your desired humbrol clear coat of either gloss , matt or silk !!

these are humbrol matt colours so if aplying decals coat afterwards in humbrol gloss coat varnish to hide decal carrier films then spray in your desired humbrol clear coat of either gloss , matt or silk !!
Re: pauls paint thread
Many thanks for that Tornado64, I'm sure your experience will be called on by many on here.tornado64 wrote:reasonably easy mix as it goes !! i got it by mixing 3 parts " humbrol 100 " red brown with 1 part "humbrol 54" white to lighten it off ( i got a better image of the loco for comparison off flickr !!
these are humbrol matt colours so if aplying decals coat afterwards in humbrol gloss coat varnish to hide decal carrier films then spray in your desired humbrol clear coat of either gloss , matt or silk !!
Once again many thanks
Tim
aka Forfarian
aka Forfarian
Re: pauls paint thread
loco roof has been dry brushed with windsor and newton artists grade white "oil colour !!" to bring out detail highlights such as the grilles over the fans

bogies and underframes have been painted in a thickish wash of atellier artists acrylics "mars black " it is then dabbed off and smeared with fingers to get it in all the recesses
once dried i dabbed a little windsor and newton raw umber and paynes grey " oil colours " around on the tank sides for a subtle fuel oil and grime effect i then dry brushed the highlights in windsor and newtons artists quality white oil paint to highlight raised detail
-
Essex2Visuvesi

- Posts: 2318
- Joined: Thu Aug 28, 2008 4:51 pm
- Location: Finland, Finland, Finland!
Re: pauls paint thread
Looks like an early Jackson Pollock.... chuck it on E-Bay loltornado64 wrote:reasonably easy mix as it goes !! i got it by mixing 3 parts " humbrol 100 " red brown with 1 part "humbrol 54" white to lighten it off ( i got a better image of the loco for comparison off flickr !!
these are humbrol matt colours so if aplying decals coat afterwards in humbrol gloss coat varnish to hide decal carrier films then spray in your desired humbrol clear coat of either gloss , matt or silk !!
Have to say your thread is very interesting.... Thanks for taking the time to post
Si quam primum vos operor non successio , impono
The only stupid question is the one I didn't ask
Proud member of the OAM
(Order of the Armchair Modeller
The only stupid question is the one I didn't ask
Proud member of the OAM
(Order of the Armchair Modeller
Re: pauls paint thread
depending on oppinion but i don't think jackson can paint !!
anyway som light muck is now on the loco sides to break up that single blue expanse
this was a mix of "vallejo acrylics " 70873 U.S. field drab with a little 70.950 black to tone it down a little ( note this does not have to be a precise colour ) just a nice dark earthy colour
it was then airbrushed on to give a nice uniformed grime pattern
Re: pauls paint thread
mixing
mixing is something that few modellers realy get thier heads around often liking to buy a specific colour ready mixed wich is to some degree all well and good
but for the world of railway modelling we are not only making a pristine out of the factory prototype but we are moddelling many degrees of sun fade , dirt , etc etc
when deciding we want to open up to the world of mixing there are of course basic factors to remember and this is where people get twitchy about it
the very first thing to remmember is to mix paints of the same kind ( ie enamels , acrylics , celluloses ( to some degree celluloses are banned now but some as i do will still have some humbrol clear colours for tail lights etc ... the old ones were a cellulose paint ( i ruined many a brush till i worked out it wasn't enamel and i had to buy cellulose paint thinners !!
and that is the big golden rule to follow stick to one paint system for all paints thinners and cleaning materials
for mixing you also only need the barest minimum of materials
1 a rag
2 a brush that holds quite a bit of the paint or some pippetes/eye droppers
3 a paint mixing bowl , plate , palate , tupperware box lid etc etc
a pallate like this is particularly good as you can experiment with colours you place around the edge to reach your desired mix in the centre any unwanted colour mistakes can be wiped out of the centre for you to try another mix without loosing your other colours

once used to mixing it is suprising how few colours you could actualy manage with to mix colours you actualy require even black is not a necessity in fact some artists i know do not even posses a tube of black for paintings prefering mixing thier own from blue and brown as it gives more life
for mixing acrylics particularly for the airbrush i will also use additives like , flow enhancers , etc i often put a drop of washing up liquid in my mixing water sometimes to break down surface tension personaly i'm pretty sure that is pretty much what flow enhancer will be anyway
also remmember acrylic paint nearly always dries a little darker than the wet colour
mixing is something that few modellers realy get thier heads around often liking to buy a specific colour ready mixed wich is to some degree all well and good
but for the world of railway modelling we are not only making a pristine out of the factory prototype but we are moddelling many degrees of sun fade , dirt , etc etc
when deciding we want to open up to the world of mixing there are of course basic factors to remember and this is where people get twitchy about it
the very first thing to remmember is to mix paints of the same kind ( ie enamels , acrylics , celluloses ( to some degree celluloses are banned now but some as i do will still have some humbrol clear colours for tail lights etc ... the old ones were a cellulose paint ( i ruined many a brush till i worked out it wasn't enamel and i had to buy cellulose paint thinners !!
and that is the big golden rule to follow stick to one paint system for all paints thinners and cleaning materials
for mixing you also only need the barest minimum of materials
1 a rag
2 a brush that holds quite a bit of the paint or some pippetes/eye droppers
3 a paint mixing bowl , plate , palate , tupperware box lid etc etc
a pallate like this is particularly good as you can experiment with colours you place around the edge to reach your desired mix in the centre any unwanted colour mistakes can be wiped out of the centre for you to try another mix without loosing your other colours
once used to mixing it is suprising how few colours you could actualy manage with to mix colours you actualy require even black is not a necessity in fact some artists i know do not even posses a tube of black for paintings prefering mixing thier own from blue and brown as it gives more life
for mixing acrylics particularly for the airbrush i will also use additives like , flow enhancers , etc i often put a drop of washing up liquid in my mixing water sometimes to break down surface tension personaly i'm pretty sure that is pretty much what flow enhancer will be anyway
also remmember acrylic paint nearly always dries a little darker than the wet colour
Re: pauls paint thread
stripping paint ..
first off you will need , object requiring paint stripping in this case lima 37 body with godawful paint job, mr muscle oven cleaner and a plastic bag

first off spray the body or your object liberaly with the oven cleaner

next put in polythene bag , carriers are ideal stops spray drying out i also spray a little more on before sealing the bag

after about 2 and a half to 3 hours take out of the bag and wash in warm water and washing up liquid rubbing lightly with a nylon pan scourer and using a toothbrush on grilles etc

first go has removed most of the paint but it is now going to get a second go around basicaly repeat process from begginning again
after 3 goes round in roughly 6 hours the process is complete


some paints like enamels and factory paint will take longer for such paints i'd probably try going the two hours for the first shot then five hour intervals afterwards
first off you will need , object requiring paint stripping in this case lima 37 body with godawful paint job, mr muscle oven cleaner and a plastic bag
first off spray the body or your object liberaly with the oven cleaner
next put in polythene bag , carriers are ideal stops spray drying out i also spray a little more on before sealing the bag
after about 2 and a half to 3 hours take out of the bag and wash in warm water and washing up liquid rubbing lightly with a nylon pan scourer and using a toothbrush on grilles etc
first go has removed most of the paint but it is now going to get a second go around basicaly repeat process from begginning again
after 3 goes round in roughly 6 hours the process is complete
some paints like enamels and factory paint will take longer for such paints i'd probably try going the two hours for the first shot then five hour intervals afterwards