
I thought he meant this for collecting suppliesBufferstop wrote:Looking good already Dave. So that's what you meant by getting out the chopper
John W
aka Bufferstop
Scratchbuilt scrapwagons- 0121modeller "show's you how"
-
Essex2Visuvesi

- Posts: 2318
- Joined: Thu Aug 28, 2008 4:51 pm
- Location: Finland, Finland, Finland!
Re: Scratchbuilt bogies , an attempt to make out of styrene
Si quam primum vos operor non successio , impono
The only stupid question is the one I didn't ask
Proud member of the OAM
(Order of the Armchair Modeller
The only stupid question is the one I didn't ask
Proud member of the OAM
(Order of the Armchair Modeller
-
0121modeller
- Posts: 1205
- Joined: Sun Mar 09, 2008 1:16 am
- Location: Erdington, Birmingham,.... but can also be found at various railway bridges !
Re: Scratchbuilt bogies , an attempt to make out of styrene
^ ^  Excellent !! -
I love your humour E2V , that sort of Chopper brings back some childhood memories .
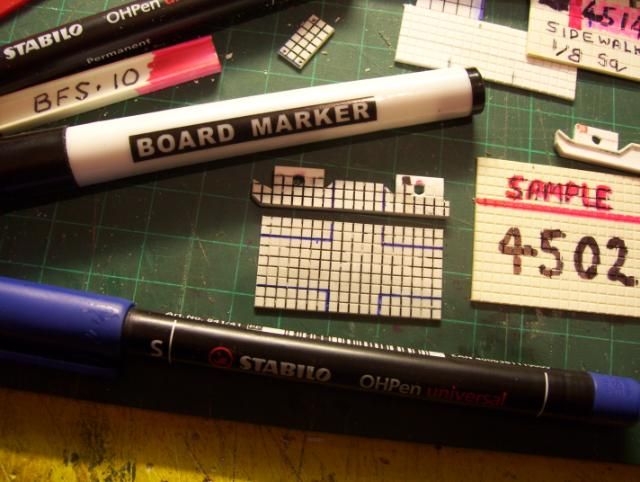
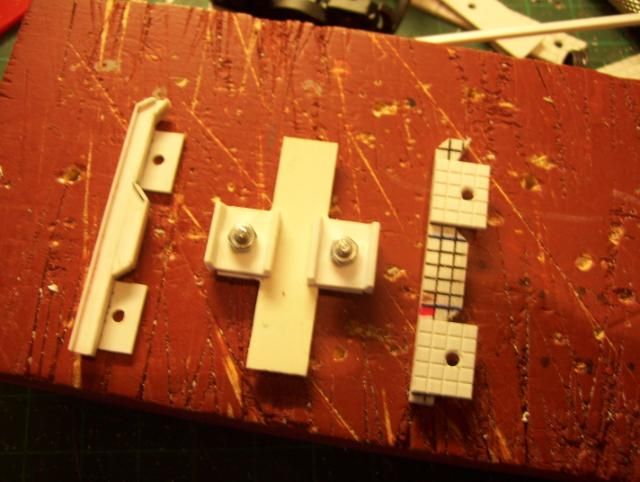
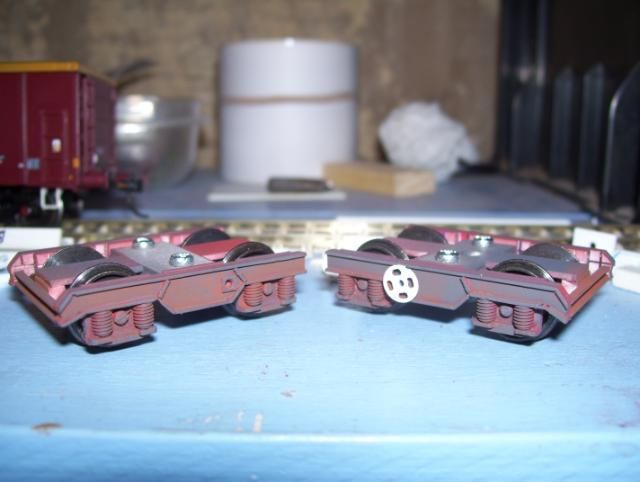
Yesterday evening, I spent time toying the idea of how to construct the top portion of bogies that hold the bogie sideframes together & fit to chassis when required, the top plate shown is one of a few different size plates, its gives a basic idea of what I have in mind, although its still at an experimental stage regarding which size plate to use.
The Plastruct BFS10 girder profile will play an important part to holding together the bogie sideframes & top, all will be revealled in my later posts...
The 3mm diameter x 4mm grubscrews arrived
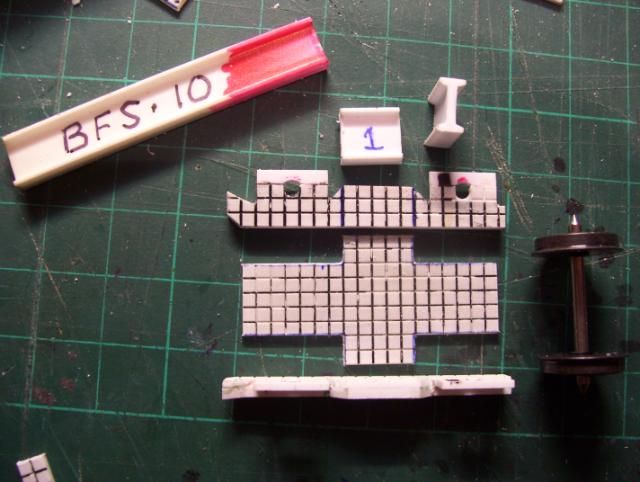
I reckon the grub screws give a fairly good representation of coil springs, but even after fileing they still prodrude outside of bogie girder, they need to be level with the girder frame flange, so...,
due to the grub screw protrudeing too far out from underneath bogie girder, the area's marked green will be removed from each bogie side frame as to allow more recess for "coil springs" (grub screws)
Duplicate componants were made & 2mm holes drilled in each of them for brass bearings, the marked green area's in photo will be removed & a plate replacing them.
To be continued...
I love your humour E2V , that sort of Chopper brings back some childhood memories
Yesterday evening, I spent time toying the idea of how to construct the top portion of bogies that hold the bogie sideframes together & fit to chassis when required, the top plate shown is one of a few different size plates, its gives a basic idea of what I have in mind, although its still at an experimental stage regarding which size plate to use.
The Plastruct BFS10 girder profile will play an important part to holding together the bogie sideframes & top, all will be revealled in my later posts...
The 3mm diameter x 4mm grubscrews arrived
I reckon the grub screws give a fairly good representation of coil springs, but even after fileing they still prodrude outside of bogie girder, they need to be level with the girder frame flange, so...,
due to the grub screw protrudeing too far out from underneath bogie girder, the area's marked green will be removed from each bogie side frame as to allow more recess for "coil springs" (grub screws)
Duplicate componants were made & 2mm holes drilled in each of them for brass bearings, the marked green area's in photo will be removed & a plate replacing them.
To be continued...
Scratchbuilding 4mm scale JXA scrapwagons ; - http://www.newrailwaymodellers.co.uk/Fo ... =6&t=37620
Scratchbuilt & kit built grappler claw cranes ; - http://www.newrailwaymodellers.co.uk/Fo ... =6&t=36342
Scratchbuilt & kit built grappler claw cranes ; - http://www.newrailwaymodellers.co.uk/Fo ... =6&t=36342

Re: Scratchbuilt bogies , an attempt to make out of styrene
Heres an idea Dave... 
You remember that casting material you bought a while ago? Could be worth making one good bogie, or bogie component such as a single sideframe, and then taking a mould and replicating it with a much more durable material like resin or whitemetal. If you did just the sideframe you could actually then simply graft it on to a proprietary RTR or kit sourced bogie, and make as many as you need (and replace any breakages much more easily too!)
You remember that casting material you bought a while ago? Could be worth making one good bogie, or bogie component such as a single sideframe, and then taking a mould and replicating it with a much more durable material like resin or whitemetal. If you did just the sideframe you could actually then simply graft it on to a proprietary RTR or kit sourced bogie, and make as many as you need (and replace any breakages much more easily too!)
-
0121modeller
- Posts: 1205
- Joined: Sun Mar 09, 2008 1:16 am
- Location: Erdington, Birmingham,.... but can also be found at various railway bridges !
Re: Scratchbuilt bogies , an attempt to make out of styrene
Yes indeed Zunnan, the bogie side frames especially, I've made enough sideframe componants for 4 bogies plus 1 spare bogie (just the sideframes) for haveing a go at casting those.
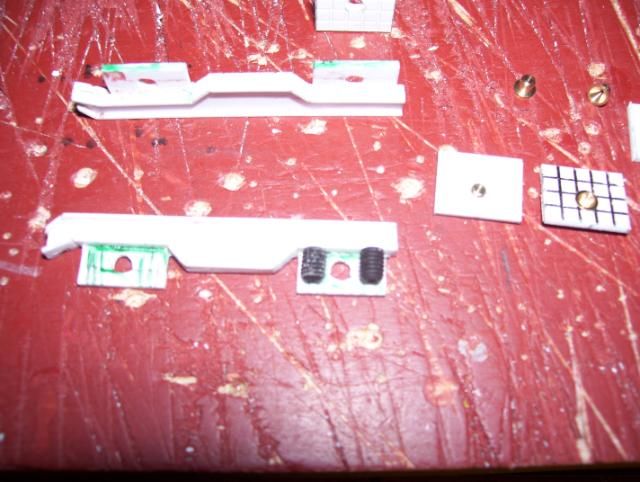
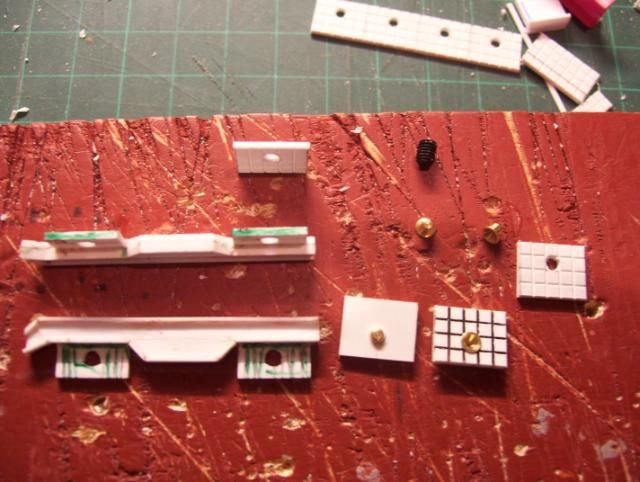
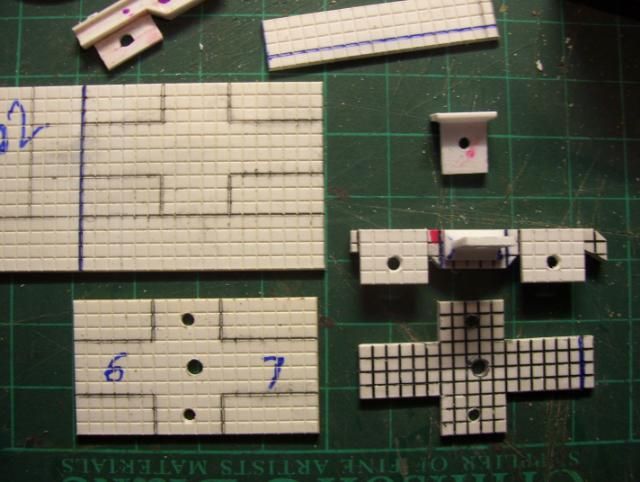
I removed the area's I've marked with green pen,
Removeing the last green shaded area. , The new axle holder / backing pieces for coil springs (grub screws) were then fitted onto the rear of #4502 main side frames.
Achieveing accurate alignment was easy quick & accurate, as the embossed recessed lines gives a natural guide to this, I've highlighted the recessed lines with pen for clarity - I strongly recomend the versatility & usage of the Evergreen embossed card range for this sort of thing- I've used Evergreen sheet #4502 mostly for this project so far.
For the bracket, I decided to use cut sections of Plastruct BFS12 rather than BFS10, modified them & drilled 2mm holes dead centre of these & the #4502 base plate.
the bracket & base componant bolted together with M2 x 6mm bolts & nuts. The #4502 base plate itself will be strengthened (to avoid age brittleing and warping) with styrene strip lengthways & crossways.... I get quite obsessive about things I make & I've a habit of over-engineering things like this all will be revealled later today
To be continued...
I removed the area's I've marked with green pen,
Removeing the last green shaded area. , The new axle holder / backing pieces for coil springs (grub screws) were then fitted onto the rear of #4502 main side frames.
Achieveing accurate alignment was easy quick & accurate, as the embossed recessed lines gives a natural guide to this, I've highlighted the recessed lines with pen for clarity - I strongly recomend the versatility & usage of the Evergreen embossed card range for this sort of thing- I've used Evergreen sheet #4502 mostly for this project so far.
For the bracket, I decided to use cut sections of Plastruct BFS12 rather than BFS10, modified them & drilled 2mm holes dead centre of these & the #4502 base plate.
the bracket & base componant bolted together with M2 x 6mm bolts & nuts. The #4502 base plate itself will be strengthened (to avoid age brittleing and warping) with styrene strip lengthways & crossways.... I get quite obsessive about things I make & I've a habit of over-engineering things like this
To be continued...
Last edited by 0121modeller on Sat May 19, 2012 10:22 pm, edited 1 time in total.
Scratchbuilding 4mm scale JXA scrapwagons ; - http://www.newrailwaymodellers.co.uk/Fo ... =6&t=37620
Scratchbuilt & kit built grappler claw cranes ; - http://www.newrailwaymodellers.co.uk/Fo ... =6&t=36342
Scratchbuilt & kit built grappler claw cranes ; - http://www.newrailwaymodellers.co.uk/Fo ... =6&t=36342
-
Bufferstop

- Posts: 13904
- Joined: Thu Mar 11, 2010 12:06 pm
- Location: Bottom end of N. Warks line
Re: Scratchbuilt bogies , an attempt to make out of styrene
I hope not the painful ones resulting from unexpected violent contact with that 'T bar' gearshift. Usually caused by the characteristic failure to engage of the Sturmey Archer hub gear.0121modeller wrote:^ ^
I love your humour E2V , that sort of Chopper brings back some childhood memories
John W
aka Bufferstop
Growing old, can't avoid it. Growing up, forget it!
My Layout, My Workbench Blog and My Opinions
My Layout, My Workbench Blog and My Opinions
-
0121modeller
- Posts: 1205
- Joined: Sun Mar 09, 2008 1:16 am
- Location: Erdington, Birmingham,.... but can also be found at various railway bridges !
Re: Scratchbuilt bogies , an attempt to make out of styrene
The gearshifter on the original Choppers were classic, furthest I cycled was to & from Small heath B'ham to Stourport or Worcester (I forget which, as I was 15) - Very tired afterwards !I hope not the painful ones resulting from unexpected violent contact with that 'T bar' gearshift. Usually caused by the characteristic failure to engage of the Sturmey Archer hub gear.
A little more progress on my scratchbuilding Schierlen bogies;
Using Evergreen #4502, several plates were marked up for cutting out, the Plastruct BFS12 pieces were modified with a file & a 3mm hole was drilled dead centre of bogie plates
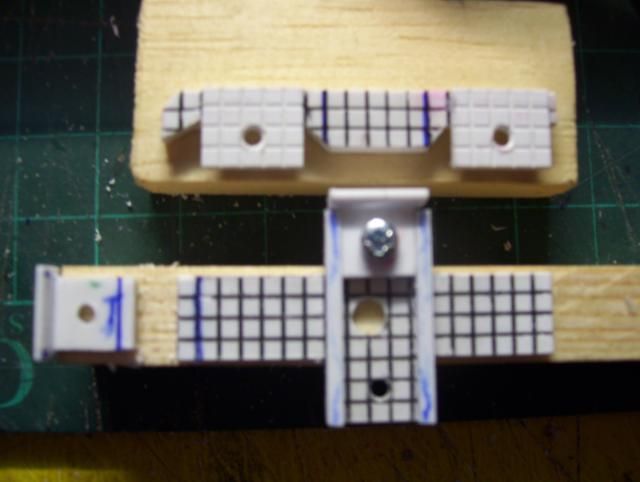
Evergreen strip #151 (1.5mm x 1.5mm) was cut placed both sides where shown - this would strengthen and also prevent pivoted movement of bogie side frames as each bogie sideframe needs to stay rigid to #4502 baseplate & held in by M2 x 6mm bolts,
It is intended that the side frames can slide out for whatever reason.
Test fitting the brackets is shown in above photo, all is good to go , so both brackets were welded to inner sideframes, as seen in photo below,
I still need to apply other detailing to the bogie sidefrrames, handbrake wheel (6mm press stud), coil springs (grub screws) , and apply other specific feature detail to the girders.
With those modified BFS12 now welded onto innerside of side frame, I'll need to drill an 8mm clearance hole in a scrap piece of plywood as to enable me to add detail to the bogie sideframes when they're dis-connected.
To be continued...
Scratchbuilding 4mm scale JXA scrapwagons ; - http://www.newrailwaymodellers.co.uk/Fo ... =6&t=37620
Scratchbuilt & kit built grappler claw cranes ; - http://www.newrailwaymodellers.co.uk/Fo ... =6&t=36342
Scratchbuilt & kit built grappler claw cranes ; - http://www.newrailwaymodellers.co.uk/Fo ... =6&t=36342
-
0121modeller
- Posts: 1205
- Joined: Sun Mar 09, 2008 1:16 am
- Location: Erdington, Birmingham,.... but can also be found at various railway bridges !
Re: Scratchbuilt bogies , an attempt to make out of styrene
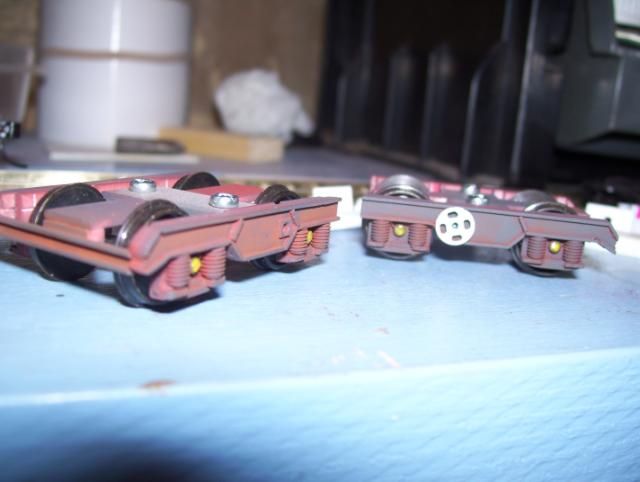
Latest progress with this, I'm currently awaiting delivery of more 3mm x 4mm grubscrews, I mis-calculated the amount I'd need as to make 4 bogies,

I made the rear girderlike frames & attatched these to centre plate rather than bogie sideframes
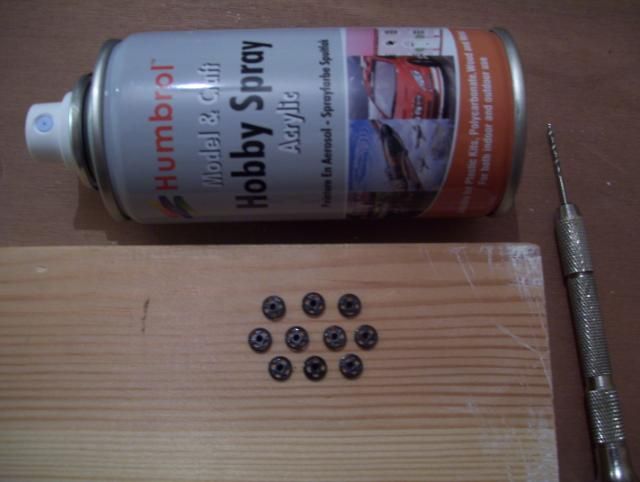
Awaiting my order of more grub screws to come, I decided to paint the handbrake wheels white (I've used 6mm press studs) .
To enable me to spray these without the pressure of spraycan blowing them away, I drilled 1.5mm holes in a piece of wood & pushed press studs in holes as to keep press studs in place whilst I sprayed them,
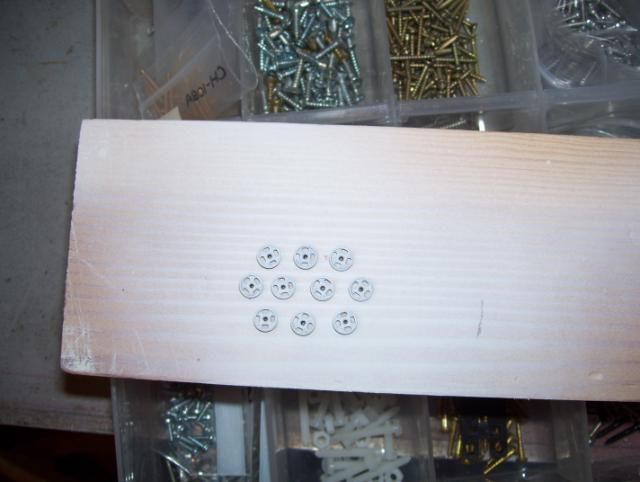
Sprayed up white, the 6mm press stud give a fairly good representation of the type of handbrake wheels seen on many photos of PR3100 type scrapwagons fitted with Scherlien bogies as seen on Paul Bartletts photo website.
I made the rear girderlike frames & attatched these to centre plate rather than bogie sideframes
Awaiting my order of more grub screws to come, I decided to paint the handbrake wheels white (I've used 6mm press studs) .
To enable me to spray these without the pressure of spraycan blowing them away, I drilled 1.5mm holes in a piece of wood & pushed press studs in holes as to keep press studs in place whilst I sprayed them,
Sprayed up white, the 6mm press stud give a fairly good representation of the type of handbrake wheels seen on many photos of PR3100 type scrapwagons fitted with Scherlien bogies as seen on Paul Bartletts photo website.
Scratchbuilding 4mm scale JXA scrapwagons ; - http://www.newrailwaymodellers.co.uk/Fo ... =6&t=37620
Scratchbuilt & kit built grappler claw cranes ; - http://www.newrailwaymodellers.co.uk/Fo ... =6&t=36342
Scratchbuilt & kit built grappler claw cranes ; - http://www.newrailwaymodellers.co.uk/Fo ... =6&t=36342
-
0121modeller
- Posts: 1205
- Joined: Sun Mar 09, 2008 1:16 am
- Location: Erdington, Birmingham,.... but can also be found at various railway bridges !
Re: Scratchbuilt bogies , an attempt to make out of styrene
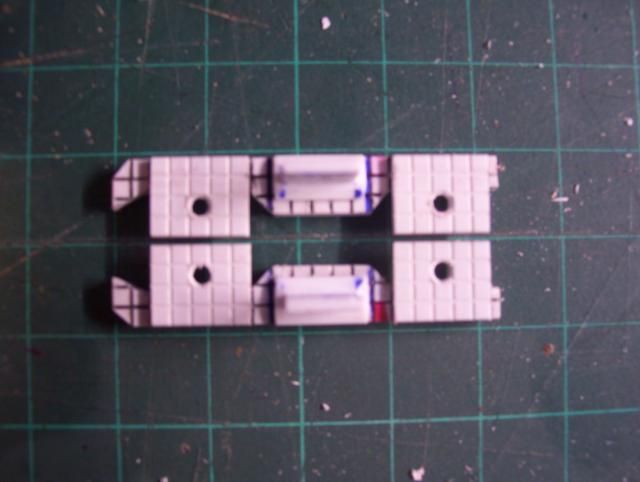
Contined progress from the above, More grubscrews came via mail order today, but I've now decided to just crack on to complete just 2 bogies.
I added more fiddly detail to the bogie side frames & glued those grubscrews in place with "Revel Contacta Special" solution.
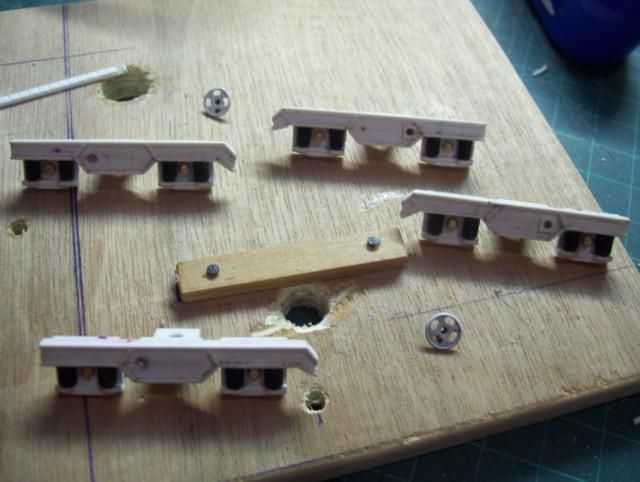
1.5mm holes were drilled into each side frames , the two bogies will have a handbrake wheel on one side of bogie, on the bogie sides that does'nt have a handbrake wheel I've drilled a 1mm hole into a 1.5mm square plate & fitted them on where the option of fitting a handbrake that side would go,
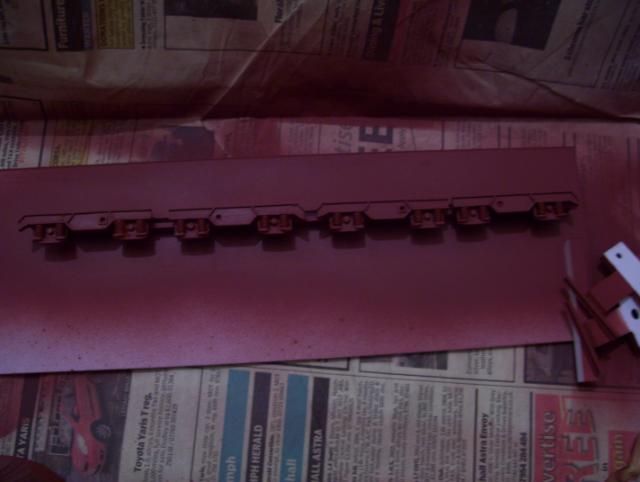
Bogie side frames & front end frame girders were sprayed up using Halfords red oxide plastic primer, allowing to fully dry overnight ready for painting black / brown / rust.,
I'm keen to start scratchbuilding the chassis & bodywork !
I added more fiddly detail to the bogie side frames & glued those grubscrews in place with "Revel Contacta Special" solution.
1.5mm holes were drilled into each side frames , the two bogies will have a handbrake wheel on one side of bogie, on the bogie sides that does'nt have a handbrake wheel I've drilled a 1mm hole into a 1.5mm square plate & fitted them on where the option of fitting a handbrake that side would go,
Bogie side frames & front end frame girders were sprayed up using Halfords red oxide plastic primer, allowing to fully dry overnight ready for painting black / brown / rust.,
I'm keen to start scratchbuilding the chassis & bodywork !
Scratchbuilding 4mm scale JXA scrapwagons ; - http://www.newrailwaymodellers.co.uk/Fo ... =6&t=37620
Scratchbuilt & kit built grappler claw cranes ; - http://www.newrailwaymodellers.co.uk/Fo ... =6&t=36342
Scratchbuilt & kit built grappler claw cranes ; - http://www.newrailwaymodellers.co.uk/Fo ... =6&t=36342
-
0121modeller
- Posts: 1205
- Joined: Sun Mar 09, 2008 1:16 am
- Location: Erdington, Birmingham,.... but can also be found at various railway bridges !
Re: Scratchbuilt bogies , an attempt to make out of styrene
The bogies now completed;
Time to get my "chopper" again out as to start cutting strip components for body & chassis
Time to get my "chopper" again out as to start cutting strip components for body & chassis
Scratchbuilding 4mm scale JXA scrapwagons ; - http://www.newrailwaymodellers.co.uk/Fo ... =6&t=37620
Scratchbuilt & kit built grappler claw cranes ; - http://www.newrailwaymodellers.co.uk/Fo ... =6&t=36342
Scratchbuilt & kit built grappler claw cranes ; - http://www.newrailwaymodellers.co.uk/Fo ... =6&t=36342
-
0121modeller
- Posts: 1205
- Joined: Sun Mar 09, 2008 1:16 am
- Location: Erdington, Birmingham,.... but can also be found at various railway bridges !
Now building the bodywork of Sheerness steel scrapwagons
I decided to complete the other pair of bogies that I'd started , as to enable me to build 2x Sheerness Steel scrapwagons of the same general design (series PR3100 -50)
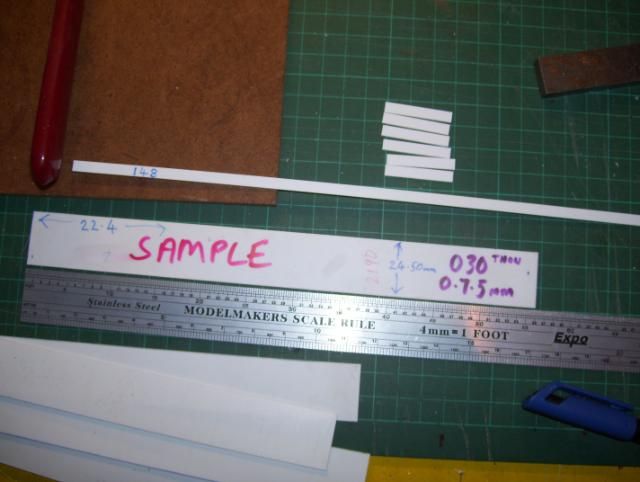
I have a Railway Modeller article about building similar scrapwagons..., the author advises using 0.40 thou thick plasticard for bodysides(1.0mm thick) , but I decided this was too *thick* (*scalewise), so I opted to use 0.30 thou (0.75mm) using 0.30 thou would be easier to create dents, tears & bulges in the "metal" to the slightly thinner styrene sheet, also, I'd estimate the thickness of steel on real examples to be approx 1/2" thick - the 3"x4" vertical brace supports giveing the "main strength" externally, I've used #144 for vertical braceings, the top horizontal bracer is a #154 - as seen on the real examples (Paul Bartlett website & photo's) they're slightly proud of the vertical bracers.
For the solebar , I used an Evergreen #137 & added some angled pieces for both lower ends,
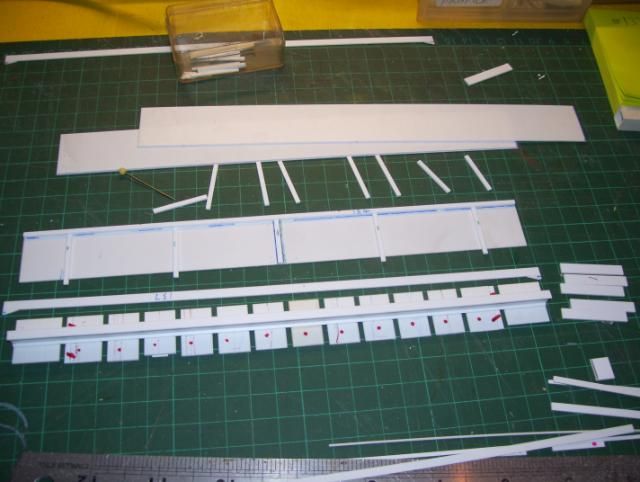
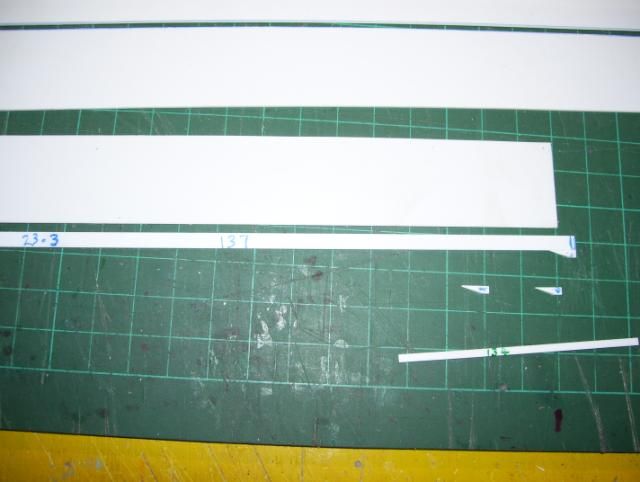
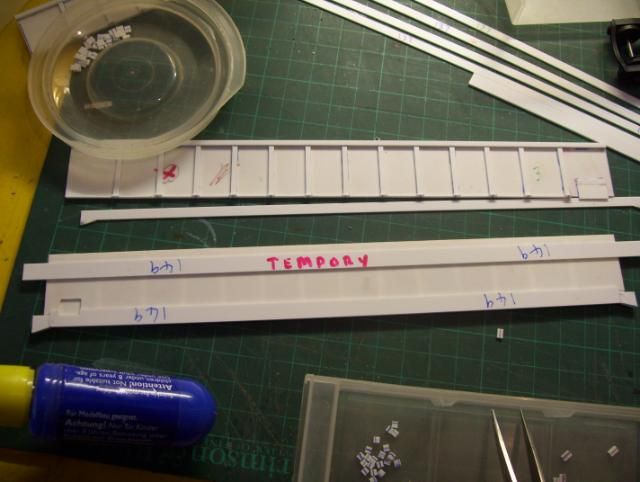
The jig I made for spacing of vertical stiffeners, as I'm building more than one scrapwagon of this type they need to be correctly positioned & it also saves time in the long run, especially if I later decided to build a few of them !
Notice that the 1st & 2nd spaceings for both vehicle ends are wider than those inbetween which are all equal spaceings, as on my spaceing jig.

The underside view of my jig for spaceing of vertical stiffeners, - notice how I've added 0.4mm thick strip to the bottom with edge clearance - this is to help prevent the jig becomeing un-intentionally stuck when stiffeners are put into place with Revel Contacta (or similar solvent as to weld styrene),
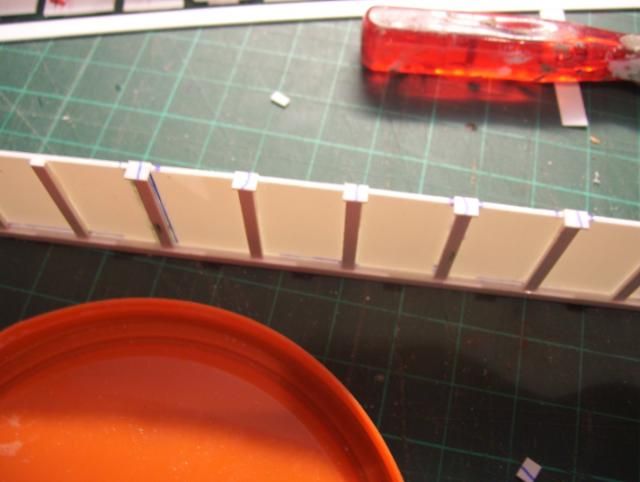
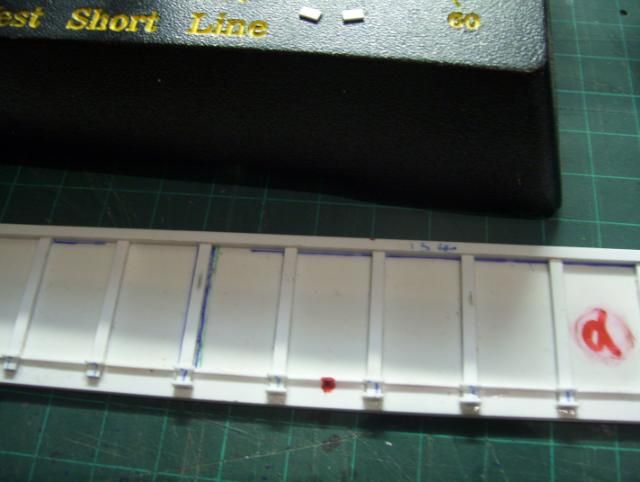
I used a lightweight G-clamp to hold the bodyside vertically in position as for me to add detailing, (#123 & 126)
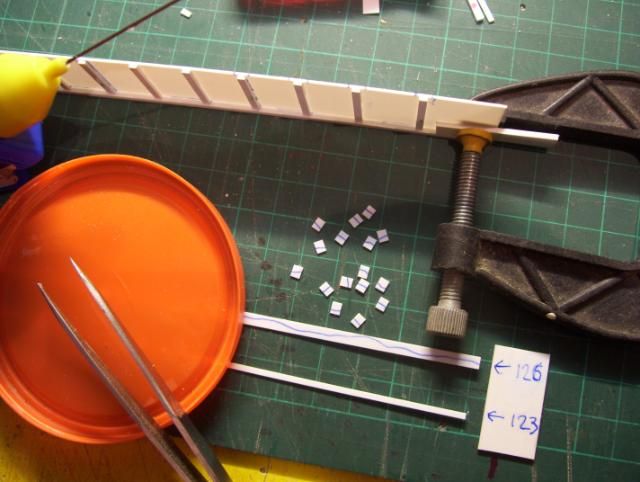
enough Evergreen #126 were chopped to 3mm for the detailing on stiffeners , #123 were cut at 12mm as to fit inbetween each of these, beneath this will be the solebar componant - as seen in other photo,
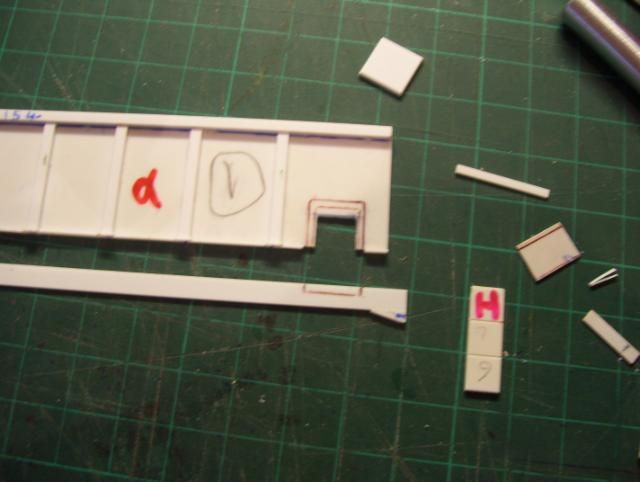
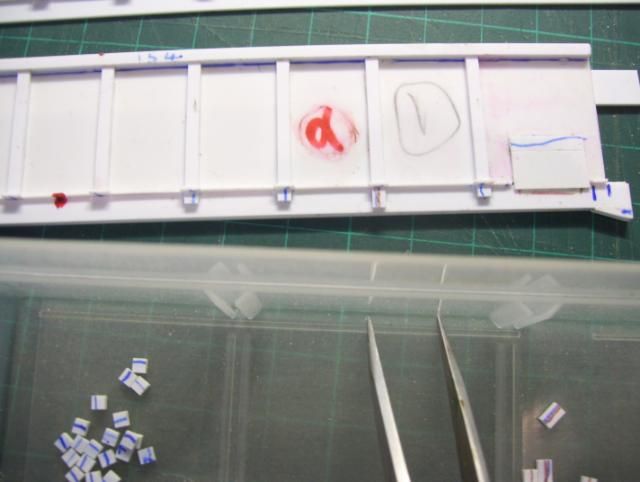
At this stage, a cut-out was made for the door/hatch on end of wagon,
Next,the cut-out will have a backing framework using #124, then a hatch/door will be fitted.
To be continued....
I have a Railway Modeller article about building similar scrapwagons..., the author advises using 0.40 thou thick plasticard for bodysides(1.0mm thick) , but I decided this was too *thick* (*scalewise), so I opted to use 0.30 thou (0.75mm) using 0.30 thou would be easier to create dents, tears & bulges in the "metal" to the slightly thinner styrene sheet, also, I'd estimate the thickness of steel on real examples to be approx 1/2" thick - the 3"x4" vertical brace supports giveing the "main strength" externally, I've used #144 for vertical braceings, the top horizontal bracer is a #154 - as seen on the real examples (Paul Bartlett website & photo's) they're slightly proud of the vertical bracers.
For the solebar , I used an Evergreen #137 & added some angled pieces for both lower ends,
The jig I made for spacing of vertical stiffeners, as I'm building more than one scrapwagon of this type they need to be correctly positioned & it also saves time in the long run, especially if I later decided to build a few of them !
Notice that the 1st & 2nd spaceings for both vehicle ends are wider than those inbetween which are all equal spaceings, as on my spaceing jig.
The underside view of my jig for spaceing of vertical stiffeners, - notice how I've added 0.4mm thick strip to the bottom with edge clearance - this is to help prevent the jig becomeing un-intentionally stuck when stiffeners are put into place with Revel Contacta (or similar solvent as to weld styrene),
I used a lightweight G-clamp to hold the bodyside vertically in position as for me to add detailing, (#123 & 126)
enough Evergreen #126 were chopped to 3mm for the detailing on stiffeners , #123 were cut at 12mm as to fit inbetween each of these, beneath this will be the solebar componant - as seen in other photo,
At this stage, a cut-out was made for the door/hatch on end of wagon,
Next,the cut-out will have a backing framework using #124, then a hatch/door will be fitted.
To be continued....
Scratchbuilding 4mm scale JXA scrapwagons ; - http://www.newrailwaymodellers.co.uk/Fo ... =6&t=37620
Scratchbuilt & kit built grappler claw cranes ; - http://www.newrailwaymodellers.co.uk/Fo ... =6&t=36342
Scratchbuilt & kit built grappler claw cranes ; - http://www.newrailwaymodellers.co.uk/Fo ... =6&t=36342
-
Bufferstop
- Posts: 13904
- Joined: Thu Mar 11, 2010 12:06 pm
- Location: Bottom end of N. Warks line
Re: Scratchbuilt bogies & Sheerness Steel scrapwagons
Well done on the bogies Dave, they look the business!
John W
aka Bufferstop
John W
aka Bufferstop
Growing old, can't avoid it. Growing up, forget it!
My Layout, My Workbench Blog and My Opinions
My Layout, My Workbench Blog and My Opinions
-
0121modeller
- Posts: 1205
- Joined: Sun Mar 09, 2008 1:16 am
- Location: Erdington, Birmingham,.... but can also be found at various railway bridges !
Re: Scratchbuilt bogies & Sheerness Steel scrapwagons
Cheers John
More progress on the scratchbuilding of the bodysides, here's how I did them...
Various pots & containers were obtained as to store duplicate cuts of many different components,
Duplicates of evergreen #144 were cut to 2mm, some were cut at 3.5mm , these were welded onto solebar as shown, notice the 2nd bracing thats in-line with the centre of each bogie I've used a #144 cut at 3.5mm.
A hatch / door backing frame was made using #129 & 124, another #129 will be positioned over this to represent the hatch/door that will be detailed with hinges etc at a later stage using tiny Evergreen microstrips,
On the reverse side, I lightly tacked a spare #149 , this temporary #149 would be so the whole item would be kept flat whilst I worked upon the outer lower sides.
Notice that Ive made a small cut- out of the #149 at the hatch/door areas of each side panel, - pointless having a door / hatch the other side if cut-out ins'nt included !
So, as to re-iterate, solebar is #137 (0.30 thou thickness/ 0.75mm x 4.0mm), the backing for this is a #149 (1.0mm x 6.3mm) as to enable joining reverse of solebar to reverse of bottom bodyside, also re-enforceing the angled area, the #149 cut short 6.3mm each end of length of solebar, so the 6.3 pieces needed can go vertically so it goes over the angled piece & join for maximum strength, trim the angle of #149 to suit the same as solebar profile when fully dry.
More duplicates of Evergreen #126 was cut on my Chopper, this time at 2mm for the lower most of #144 verticle braceings on the solebar seen here,
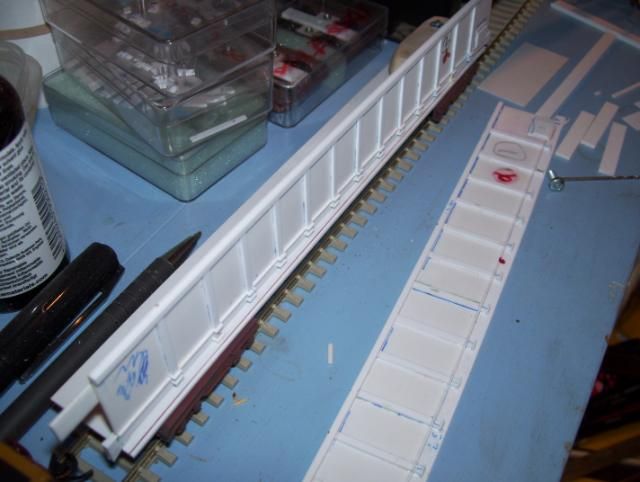
The sides & ends of the wagons will fit on the outside of the floor/chassis, this here is position just to give me an idea of what it'll look like,
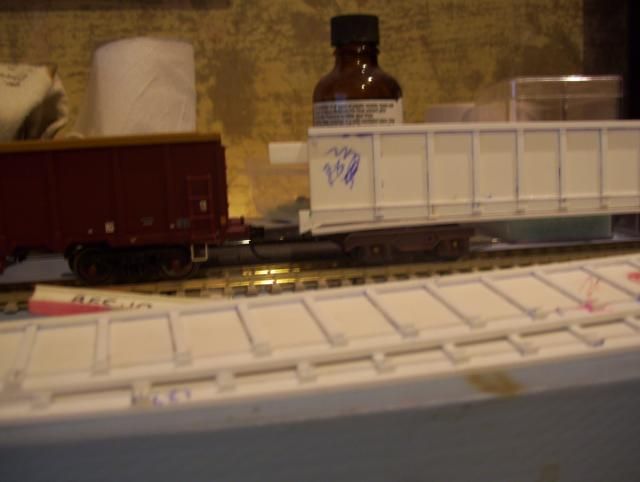
The height of the wagon sides at approx 10'6" seemed to look right positioned next to a Bachmann MBA ,
To be continued...
More progress on the scratchbuilding of the bodysides, here's how I did them...
Various pots & containers were obtained as to store duplicate cuts of many different components,
Duplicates of evergreen #144 were cut to 2mm, some were cut at 3.5mm , these were welded onto solebar as shown, notice the 2nd bracing thats in-line with the centre of each bogie I've used a #144 cut at 3.5mm.
A hatch / door backing frame was made using #129 & 124, another #129 will be positioned over this to represent the hatch/door that will be detailed with hinges etc at a later stage using tiny Evergreen microstrips,
On the reverse side, I lightly tacked a spare #149 , this temporary #149 would be so the whole item would be kept flat whilst I worked upon the outer lower sides.
Notice that Ive made a small cut- out of the #149 at the hatch/door areas of each side panel, - pointless having a door / hatch the other side if cut-out ins'nt included !
So, as to re-iterate, solebar is #137 (0.30 thou thickness/ 0.75mm x 4.0mm), the backing for this is a #149 (1.0mm x 6.3mm) as to enable joining reverse of solebar to reverse of bottom bodyside, also re-enforceing the angled area, the #149 cut short 6.3mm each end of length of solebar, so the 6.3 pieces needed can go vertically so it goes over the angled piece & join for maximum strength, trim the angle of #149 to suit the same as solebar profile when fully dry.
More duplicates of Evergreen #126 was cut on my Chopper, this time at 2mm for the lower most of #144 verticle braceings on the solebar seen here,
The sides & ends of the wagons will fit on the outside of the floor/chassis, this here is position just to give me an idea of what it'll look like,
The height of the wagon sides at approx 10'6" seemed to look right positioned next to a Bachmann MBA ,
To be continued...
Last edited by 0121modeller on Sat Jun 16, 2012 10:40 pm, edited 1 time in total.
Scratchbuilding 4mm scale JXA scrapwagons ; - http://www.newrailwaymodellers.co.uk/Fo ... =6&t=37620
Scratchbuilt & kit built grappler claw cranes ; - http://www.newrailwaymodellers.co.uk/Fo ... =6&t=36342
Scratchbuilt & kit built grappler claw cranes ; - http://www.newrailwaymodellers.co.uk/Fo ... =6&t=36342
Re: Scratchbuilt bogies & Sheerness Steel scrapwagons
Hi Dave,
I'm following this thread with the same keen interest as I did with your grab crane. I admire your skill and devotion to detail very much.
I'm interested in your 'guillotine' if you get time would you like to give us some more info on it, like where you got it from, it's cost and how it works.
keep the posts coming, I'm itching for the next installment.
regards Roly
I'm following this thread with the same keen interest as I did with your grab crane. I admire your skill and devotion to detail very much.
I'm interested in your 'guillotine'
keep the posts coming, I'm itching for the next installment.
regards Roly
-
0121modeller
- Posts: 1205
- Joined: Sun Mar 09, 2008 1:16 am
- Location: Erdington, Birmingham,.... but can also be found at various railway bridges !
Re: Scratchbuilt bogies & Sheerness Steel scrapwagons
Hi Roly,
Thanks for your compliments & interest
"The Chopper" can be obtained from 4D Modelshop; 120 Leman street, London E1 8EU
http://www.google.co.uk/url?sa=t&rct=j& ... wGKbCT7A2Q
or E.M.A. Model supplies , here should be a link to E.M.A ; http://www.ema-models.co.uk/index.php/ (or enter "chopper" into EMA shop "search" box on EMA's home website page)
The NWSL Chopper is an excellent tool, the cost of them (between around £35 - £45) may seem a little expensive, but this really does reflect the excellent quality , convenience for cutting duplicates of styrene strip & the precise cutting, also comes with templates for making angled cuts.
I have both NWSL Chopper versions, (as there are an MDF base version & a cast metal framed with inlayed cutting mat version, the latter being more expensive but giving top results & more robustly built.
I would recomend cutting styrene strip using the Chopper to be of no denser height than 3mm , as the blade is wafer thin, so I use a razor saw for cutting anything with thick & wide profile or squareish dense dimension, but I find I rarely need dupliates of styrene cut that has a thick or dense dimension.
Spare blades are also availble compatable with both chopper versions from EMA Model supplies & also 4D Modelshop in London.
Dave.
Scratchbuilding 4mm scale JXA scrapwagons ; - http://www.newrailwaymodellers.co.uk/Fo ... =6&t=37620
Scratchbuilt & kit built grappler claw cranes ; - http://www.newrailwaymodellers.co.uk/Fo ... =6&t=36342
Scratchbuilt & kit built grappler claw cranes ; - http://www.newrailwaymodellers.co.uk/Fo ... =6&t=36342
Re: Scratchbuilt bogies & Sheerness Steel scrapwagons
A great tutorial and very thorough job.