
Lol I have kits in oxes longer than thatDad-1 wrote: For a guide - I started one aircraft kit in 1983 and finished it in 1995, although it did get a Commended at the international exhibition.
Geoff T.
Dean Sidings "Killin Pug" conversion set.
-
Essex2Visuvesi

- Posts: 2318
- Joined: Thu Aug 28, 2008 4:51 pm
- Location: Finland, Finland, Finland!
Re: Dean Sidings "Killin Pug" conversion set.
Si quam primum vos operor non successio , impono
The only stupid question is the one I didn't ask
Proud member of the OAM
(Order of the Armchair Modeller
The only stupid question is the one I didn't ask
Proud member of the OAM
(Order of the Armchair Modeller
Re: Dean Sidings "Killin Pug" conversion set.
Hi E2V,
That was not sitting in a box, but was started with some bits glued together ....... it was a Vacform and my first of that type !
Back to tonight....................
I decided I needed to cut off just inboard of the guard irons which left a small stub from the front coupling.
Plasticard out , it seemed the gap between the remains of the front coupling and bottom of the buffer beam was around 1.5 mm. A laminate was made that came to just under that and was superglued to what remained at the front. Then 2 small gap fillers were cut and stuck just inboard of the piston slot in the cylinders. Note : I decided to fill the slot and roughly blend in with some filler.

Then another filler strengthener was added on top of the resin piston block going out to the front of the small gap fillers.

To try and judge the results I did a quick coat of matt black paint.

Then added the body and took a photo to see if the white background could be seen. Just fine cracks, which when clamped together with superglue should all but vanish.

While I type this a laminate that I'll try and carve into two guard irons is drying on my cutting mat.
All in all no problem, just something I wasn't expecting. Another unexpected mod will be reducing the supplied rear chassis blocks height. When touching the cab floor it sits a little over a mm beneath the rear buffer beam which should be sitting on it.
Time to pack up for today ............ still need to get that chip in the chassis to see if it runs OK. By hand it'll go around 1st radius curves, but seems a little tight and I wonder if there's drag in one of the pistons.
Geoff T.
That was not sitting in a box, but was started with some bits glued together ....... it was a Vacform and my first of that type !
Back to tonight....................
I decided I needed to cut off just inboard of the guard irons which left a small stub from the front coupling.
Plasticard out , it seemed the gap between the remains of the front coupling and bottom of the buffer beam was around 1.5 mm. A laminate was made that came to just under that and was superglued to what remained at the front. Then 2 small gap fillers were cut and stuck just inboard of the piston slot in the cylinders. Note : I decided to fill the slot and roughly blend in with some filler.
Then another filler strengthener was added on top of the resin piston block going out to the front of the small gap fillers.
To try and judge the results I did a quick coat of matt black paint.
Then added the body and took a photo to see if the white background could be seen. Just fine cracks, which when clamped together with superglue should all but vanish.
While I type this a laminate that I'll try and carve into two guard irons is drying on my cutting mat.
All in all no problem, just something I wasn't expecting. Another unexpected mod will be reducing the supplied rear chassis blocks height. When touching the cab floor it sits a little over a mm beneath the rear buffer beam which should be sitting on it.
Time to pack up for today ............ still need to get that chip in the chassis to see if it runs OK. By hand it'll go around 1st radius curves, but seems a little tight and I wonder if there's drag in one of the pistons.
Geoff T.
Remember ... I know nothing about railways.
http://www.newrailwaymodellers.co.uk/Fo ... 22&t=32187 and Another on http://www.newrailwaymodellers.co.uk/Fo ... &sk=t&sd=a
http://www.newrailwaymodellers.co.uk/Fo ... 22&t=32187 and Another on http://www.newrailwaymodellers.co.uk/Fo ... &sk=t&sd=a
Re: Dean Sidings "Killin Pug" conversion set.
OMG
what will we find when we wake uo?
Oh dear, not that!
Oh dear
Oh dear
rocketman
what will we find when we wake uo?
Oh dear, not that!
Oh dear
Oh dear
rocketman
Re: Dean Sidings "Killin Pug" conversion set.
That is amazing progress!
rocketman
rocketman
Re: Dean Sidings "Killin Pug" conversion set.
Morning progress - unavoidable delay
Well what would your choice be - I work in the kitchen, my dear wife decided to bake 4 apple cakes ..... with cider. NO contest, I kept well out of her way until all was in the oven !!
All I've done so far today is make a wire coupling loop on the front. I have loads of paperclips and decided I could use these to make my loops. First bend with tight corners and have 10 mm long legs. A paperclip is 0.80 mm thick so I drilled 0.90 mm holes each side into the remaining stub of the original coupling moulding. To get a flat area to drill I ended up with these holes slightly closer together than the original 13 mm plan. To accommodate this the arms were angled in, with a reverse kink close to the end. When fed through the drilled holes it's quite secure even before a dab of superglue at the back of each mounting.


I'm happy with the resulting component, so will use the same idea at the rear, although that will need a more complex bending.
Getting hungry from the smell of baking !!!!!!!!!!!!!!!
Geoff T.
Well what would your choice be - I work in the kitchen, my dear wife decided to bake 4 apple cakes ..... with cider. NO contest, I kept well out of her way until all was in the oven !!
All I've done so far today is make a wire coupling loop on the front. I have loads of paperclips and decided I could use these to make my loops. First bend with tight corners and have 10 mm long legs. A paperclip is 0.80 mm thick so I drilled 0.90 mm holes each side into the remaining stub of the original coupling moulding. To get a flat area to drill I ended up with these holes slightly closer together than the original 13 mm plan. To accommodate this the arms were angled in, with a reverse kink close to the end. When fed through the drilled holes it's quite secure even before a dab of superglue at the back of each mounting.
I'm happy with the resulting component, so will use the same idea at the rear, although that will need a more complex bending.
Getting hungry from the smell of baking !!!!!!!!!!!!!!!
Geoff T.
Remember ... I know nothing about railways.
http://www.newrailwaymodellers.co.uk/Fo ... 22&t=32187 and Another on http://www.newrailwaymodellers.co.uk/Fo ... &sk=t&sd=a
http://www.newrailwaymodellers.co.uk/Fo ... 22&t=32187 and Another on http://www.newrailwaymodellers.co.uk/Fo ... &sk=t&sd=a
Re: Dean Sidings "Killin Pug" conversion set.
Sharing a kitchen is soooo difficult !!
The rear 'paperclip' coupling now made up and mounted in the rear filler/extension block.
First as mentioned previously the block to fit and extend the rear chassis is too deep. It's rather a home made laminate of plasticard and when resting in place is more or less one laminate thickness too deep. Note it's on the lean because I'd already started trying to cut some off !!


The coupling needed to be a different shape to be anchored in the extension block.

Viewed from side and rear.


Honest Rocketman it's easy - I'm being a bit fussy and only started on Friday, so anyone with basic skills should get this finished in a week. That is with the exception of a Caledonian blue fully lined paint job !! Think I'll allow 10 days just for finishing !!
Geoff T.
The rear 'paperclip' coupling now made up and mounted in the rear filler/extension block.
First as mentioned previously the block to fit and extend the rear chassis is too deep. It's rather a home made laminate of plasticard and when resting in place is more or less one laminate thickness too deep. Note it's on the lean because I'd already started trying to cut some off !!
The coupling needed to be a different shape to be anchored in the extension block.
Viewed from side and rear.
Honest Rocketman it's easy - I'm being a bit fussy and only started on Friday, so anyone with basic skills should get this finished in a week. That is with the exception of a Caledonian blue fully lined paint job !! Think I'll allow 10 days just for finishing !!
Geoff T.
Remember ... I know nothing about railways.
http://www.newrailwaymodellers.co.uk/Fo ... 22&t=32187 and Another on http://www.newrailwaymodellers.co.uk/Fo ... &sk=t&sd=a
http://www.newrailwaymodellers.co.uk/Fo ... 22&t=32187 and Another on http://www.newrailwaymodellers.co.uk/Fo ... &sk=t&sd=a
Re: Dean Sidings "Killin Pug" conversion set.
I think your progress is remarkable. I would not have got past the apple cakes yet. It seems to be coming together very nicely. I found an old discussion about things Caley on the old RM web which mentions that DJH were still producing kits of your 4-4-0T in 2007, so you may be lucky with that too.
http://www.rmweb.co.uk/forum/viewtopic.php?f=24&t=12636
Regards
rocketman
http://www.rmweb.co.uk/forum/viewtopic.php?f=24&t=12636
Regards
rocketman
Re: Dean Sidings "Killin Pug" conversion set.
I'm going to have an evening off .....
Can't find my fine wire that was intended to extend the chip to rails pickups. I remember sealing the black & red into their little snap packets - but where did I put them !!
and can't do more on the body until I have a little more reference material - have to wait for my book !!
Also need to check around for hooks with 3 links ....
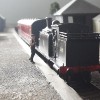
Here she stands and probably for a few days like this.

Geoff T.
Can't find my fine wire that was intended to extend the chip to rails pickups. I remember sealing the black & red into their little snap packets - but where did I put them !!
and can't do more on the body until I have a little more reference material - have to wait for my book !!
Also need to check around for hooks with 3 links ....
Here she stands and probably for a few days like this.
Geoff T.
Remember ... I know nothing about railways.
http://www.newrailwaymodellers.co.uk/Fo ... 22&t=32187 and Another on http://www.newrailwaymodellers.co.uk/Fo ... &sk=t&sd=a
http://www.newrailwaymodellers.co.uk/Fo ... 22&t=32187 and Another on http://www.newrailwaymodellers.co.uk/Fo ... &sk=t&sd=a
Re: Dean Sidings "Killin Pug" conversion set.
Well, the ballast in your kitchen looks rather chunky! I presume they are not chunks of apple. Otherwise it is as near perfect as you can get without measuring everything and easily good enough for me. Well done!
Have you thought about coaching stock yet?...
Maybe this is why I don't start.
sorry, laughing...
rocketman
Have you thought about coaching stock yet?...
Maybe this is why I don't start.
sorry, laughing...
rocketman
Re: Dean Sidings "Killin Pug" conversion set.
Geoff,that looks SUPERB! The pugs look far better with closed cabs.
Considering all the efforts you have put in,you should be very proud of it
Considering all the efforts you have put in,you should be very proud of it
Re: Dean Sidings "Killin Pug" conversion set.
Hi
Unless the Killin branch line was an exception.
As far as I am aware you want black for the locomotive I could be wrong on this one but i thought all the pugs where black, and it was only the big classy passenger engines that where blue
Not sure which one but one of the old Airfix MR mags (I think) had an article and track plans for the Killin branch.
Do you have contact details for Dean sidings I have not been able to find a web site for them
or one that mentions them as i need small engines for my line and this one is a little different to the norm in fact its the only 0-4-2 I have seen other than Hornby's Oliver
regards John
A model railway can be completed but it's never finished
Re: Dean Sidings "Killin Pug" conversion set.
Dean Sidings
PO Box 68
Lydney
Gloucestershire
GL15 6WW
Tel No: +44 (0) 1594 842318
E-mail: daveslater7@msn.co.uk
No Website that I know of, yet.
rocketman
PO Box 68
Lydney
Gloucestershire
GL15 6WW
Tel No: +44 (0) 1594 842318
E-mail: daveslater7@msn.co.uk
No Website that I know of, yet.
rocketman
Re: Dean Sidings "Killin Pug" conversion set.
Blue on Westinghouse-fitted engines including tank engines and 0-6-0s so fitted, Westinghouse engines being used on passenger trains. The Hornby blue pug is fictional, although there were two built for the Glasgow & Paisley Joint Committee which were red with CR-style lining (white/black/white).buz wrote:Hi
Unless the Killin branch line was an exception.
As far as I am aware you want black for the locomotive I could be wrong on this one but i thought all the pugs where black, and it was only the big classy passenger engines that where blue
Really enjoying this !
Portwilliam - Southwest Scotland in the 1960s, in OO - http://stuart1968.wordpress.com/
Re: Dean Sidings "Killin Pug" conversion set.
Hi stuartp
The Hornby pug is a genuine CR loco just painted the wrong color.
and annoyingly not sold with the home brew tender they often had,
due to lack of coal carrying capacity.
Hornby has been guilty of fictional locos in the past and probably will be in the future
but in this case of only the color is wrong it should be black.
regards John
A model railway can be completed but it's never finished
Re: Dean Sidings "Killin Pug" conversion set.
Hi stuartp
The Hornby pug is a genuine CR loco just painted the wrong color.
and annoyingly not sold with the home brew tender they often had,
due to lack of coal carrying capacity.
Hornby has been guilty of fictional locos in the past and probably will be in the future
but in this case of only the color is wrong it should be black.
regards John
The Hornby pug is a genuine CR loco just painted the wrong color.
and annoyingly not sold with the home brew tender they often had,
due to lack of coal carrying capacity.
Hornby has been guilty of fictional locos in the past and probably will be in the future
but in this case of only the color is wrong it should be black.
regards John
A model railway can be completed but it's never finished