Back to N...Under construction. Building Bridges.

Post pictures and information about your own personal model railway layout that is under construction. Keep members up-to-date with what you are doing and discuss problems that you are having.
User avatar
Zunnan
Posts: 1208
Joined: Mon Dec 03, 2007 2:54 pm
Location: On the cusp of spaghetti...B23

Re: Back to N...Now under construction!

Post by Zunnan »

The second chest is now complete and the 00 layout successfully stowed away. I have used hinges to join the two chests, the hinges of the type that you can pull the pin out to release them and it works incredibly well. The whole unit is entirely mobile (if a little heavy) so it can be positioned pretty much wherever needed and be moved fairly easily to clean underneath and behind.

Image
To give a general scale to it, the near scale length N Gauge train on top is sitting on the entrely visible section of the layout. On the plan this would be where the passing loop to the steel terminal is shown, although when built this section of line will be 50mm higher on a slight downward gradient falling to the left.
Last edited by Zunnan on Wed Mar 09, 2011 9:14 pm, edited 1 time in total.
Under Construction N Gauge dog bone.
Canon Street. N Gauge
The Workbench.
User avatar
SouthernBoy
Posts: 1753
Joined: Sun Oct 08, 2006 11:01 pm
Location: The past: We do things differently there

Re: Back to N...Now under construction!

Post by SouthernBoy »

Very neat Zunnan, all very compact, transportable and practical. And it should make life easier if you have to move home.
If you can make the top hinged for easy access to electrics I think it would be a good idea too.

But best of all, I like the serving hatch pictured behind the layout : You can send through for snacks and liquid refreshments without interruption to your modelling - now that's a stroke of genius and shows great dedication. I think every layout should have one! :)

Anyway, judging by the standard of Canon Street, this is going to be a layout to follow. Good luck.
User avatar
pointstaken
Posts: 399
Joined: Fri Jan 06, 2006 5:22 pm
Location: Fleet, Hampshire

Re: Back to N...Now under construction!

Post by pointstaken »

What a nifty idea ! Nice one , Zunnan. Really needs an extension freight only line through the serving hatch to keep you supplied with refreshments !
But seriously, looks a highly presentable piece of carpentry - I'm sure some of us on here would like to aspire to that level of skill.

Dennis
I know nothing, but much I believe
User avatar
Zunnan
Posts: 1208
Joined: Mon Dec 03, 2007 2:54 pm
Location: On the cusp of spaghetti...B23

Re: Back to N...Now under construction!

Post by Zunnan »

Trust me on the carpentry involved in making those chests, the only thing I measured was the bracing timbers. Everything else is as it came off the shelves in the timber yard! Simple ideas work the best, a bit of paint is all that it took to tidy them up to make them look presentable. The serving hatch was there already, sadly I'm not quite that advanced when it comes to construction...but I do know a few good builders! :wink: One reason for the layout to be on wheels, I can roll it forward a few feet for those hot summer days so I can pester the missus to hand me cold beverages from the fridge. I can see that lasting all of 5 minutes before I get a slap :lol:

I'm definately going to at least trial hinging the baseboards, the problem being that the layout is split into two boards, so I will have to find an alternative to using dowels for track alignment. Bolts through brass tube drilled into the baseboard framework is at the moment the most likely and also the simplest solution. I'm at the stage now where this is the next thing on the agenda as the first board is all but complete including cork and lower level storage loops. It really only needs wiring up!

Image
One storage loop down, the harder suspended one to go...It won't always look this empty :wink:

I've opted to isolate the loops themselves rather than faffing around with the passing loop for reverse modules or fancy DC switching arrangements. For DC each loop will be fed via a centre off DPDT switch which will correspond to the line the train is operating from. In short: train enters loop, stops, switch thrown, train now under control of the other line to continue. If I want continuous running, the running lines will also be fed via DPDT switches so I just set all the relevant swithes to 1 (or all to 2) and turn the knob on the chosen controller. If or when the time comes for DCC, it will be a simple hack job on the back of the switches; loops go to reverse module, running lines and freight yard to controller.

Image
This shows the clearnace available from 50mm gained via the originally planned 1:60 incline. I can just get my fingers in on top of the vehicle under the ply, enough to reach the centre line, but I may well elect to increase the climb to 55mm. Because I've widened the layout by 4" and lengthened it by 2", the increase in radius at the far end of the layout from 2nd (10 3/8") to 13" means that the gradient can remain at 1:60 and comfortably accommodate the additional climb.
Last edited by Zunnan on Wed Mar 09, 2011 9:15 pm, edited 1 time in total.
Under Construction N Gauge dog bone.
Canon Street. N Gauge
The Workbench.
User avatar
Zunnan
Posts: 1208
Joined: Mon Dec 03, 2007 2:54 pm
Location: On the cusp of spaghetti...B23

Re: Back to N...Now under construction!

Post by Zunnan »

I have now managed to all but exhaust my scrap pile of anything of use to me. The 2 1/2" x 3/4" framework is complete enough to support the inclined 9mm ply trackbed which is missing the final section which covers the upper storage loops. A trip to the timber yard is now in order so that I can plug the gaps, one of them quite large requiring a 2' 6" x 4' 3" sheet, the other gap to fill being the level area for the steel terminal/freight yard. The offcut I have left over from building the incline is 5" too narrow and 3" too short and the other sheet of ply I have which IS large enough to do the job is 4mm ply but it is certainly not up to the job in terms of strength. Also needed is a copious amount of cork, what I did have has however served me very well.

Image
How to hide a multitude of sins...Cork over them! (sins include: making joins in the trackbed on inclines because the wood I do have is too short/narrow for the job; using ply of differing origin meaning that the trackbed when joined isn't flat; making these joins on a 180 degree bend. TWICE!) All I can say is, thanks for that rusty old plane Grandad! It made a crap job good enough to cover up :lol:

Something else I've managed to dig out of my junk pile has been a handful of code 80 points and an almost full box of code 80 flexible track. I don't even remember buying it, let alone it making the house move unnoticed! Must have been for Canon Street before I had decided on going the code 55 route. None of the points are of much use, this is a relatively compact plan which calls for medium radius pointwork, and all of the points I found are large, but they have allowed me to lay out the basic steel terminal/yard track plan for a full scale mockup.

Image
3 cargowaggons posed for scale in what will be the sidings for the overhead crane, maximum capacity should be a length of 4 of these vehicles per siding and 3 inside the shed itself (represented by the lentil box from our last takeout order :lol:) As can be seen in the foreground, the trackbed on the incline itself is wide enough for 4 tracks. I am still considering making this section appear as a 4 track main line rather than 2 with a passing loop providing access to the yard. That however would then require a radical redesign of the upper storage loops to accomodate, unless the fourth line is merely cosmetic and would also raise the issue of bridge building and me wanting to hide the tight curvature.

Tomorrow is deep breath day at the vets, so I will know when I will next be able to do something to progress this layout. Technically speaking I do have most of the wire needed and also a lot of the DPDT switches too so I could busy myself wiring up the lower storage loop and perhaps cobbling together a control panel. I think I'd rather wait and get the boards completely done before I charge on and start another job though.
Last edited by Zunnan on Wed Mar 09, 2011 9:15 pm, edited 1 time in total.
Under Construction N Gauge dog bone.
Canon Street. N Gauge
The Workbench.
User avatar
Zunnan
Posts: 1208
Joined: Mon Dec 03, 2007 2:54 pm
Location: On the cusp of spaghetti...B23

Re: Back to N...Now under construction!

Post by Zunnan »

After exploring the possibilities with using the extra space I allowed for the track bed I decided to have a play with how this would affect the upper storage loop. Initially this was to have been an identical mirror image for the lower loop, but providing a 4 track line made me have a rethink towards providing just 2 loops per pair of running lines rather than 3 as per the lower loop, this would extend the capacity to 4 loops, 2 for the outer 'slow' lines and 2 for the inner 'fast' lines. The outer loops also being capable of acting as a headshunt to the yard while still holding a full length train, especially on the outer loop.

Image
This shows the reworking of the original plan. The track spacing as trains enter the loops needs to be at streamline spacing ideally, but I can alter the configuration of the 4 track lines spacing to have the wider spacing at the outside edge rather than in the center as shown here which will help with clearances. Clearances shouldn't be too much of an issue though, the Peak and Mk3 posed on the entry show that theres still plenty of room.

On the to fix list already is to replace the Setrack pointwork on the lower loop at the rear (the 47 is sitting on them) with medium radius Streamline pointwork. The Setrack switchbacks are too limiting in what trains can use the center siding without derailing on the pointwork here, so both upper and lower loops will lose the Setrack pointwork in this location. On the to do list is to wire up and thoroughly test the lower storage loop so that I can fix the upper board in place and get it corked ready for track laying. I also need to cut up some copperclad sheet to make the board joins. What I'm thinking here is to file a sleeper pattern into the copper sheet so that when painted it will be easier to blend in with the trackwork than just a flat lump of copperclad board. Once this is done it will allow me to lay the complete inner line to join up the storage loops for the first time. The pointwork amendments will have to wait unfortunately, but with half of the running lines down I will be able to at least guesstimate on the bridging requirements and possibly make a start on that.
Last edited by Zunnan on Wed Mar 09, 2011 9:15 pm, edited 1 time in total.
Under Construction N Gauge dog bone.
Canon Street. N Gauge
The Workbench.
locoworks
Posts: 842
Joined: Mon Nov 27, 2006 10:00 pm
Location: isle of man

Re: Back to N...Now under construction!

Post by locoworks »

very late in the day to be chiming in with an idea as it all seems set in stone, and very nice too. but as you are using code 80 track ( atleast in the storage area for sure ) had you considered using the peco OO9 points? obviously the sleepering is all wrong but in a storage area so what. they are 12 inch radius and live frog so the reverse curve may not have been an issue and running would obviously be better ( not that bo bo's and co co's suffer on dead frogs anyway but if you get an 04 or 08 for the fun of it? ) you may have lost a tiny bit of loop length, but the benefits may have been worth it. i only have the Y point in OO9 to look at, but you could shorten the rails at the toe end to loose 1/4 inch in length and maybe a little the other end too, but it would still be around and inch longer than a set track point.
User avatar
Zunnan
Posts: 1208
Joined: Mon Dec 03, 2007 2:54 pm
Location: On the cusp of spaghetti...B23

Re: Back to N...Now under construction!

Post by Zunnan »

I hadn't even considered 009 points to be honest. I wish I had though, thats a damn good idea when it comes to using as much live frog pointwork as is possible. The only downside would be losing the setrack geometry which the loops are based upon, but once the loops are laid using setrack points then it should be more than possible to graft 009 points in as a replacement. Nothing is set in stone, even when its laid out and pinned down; half of the storage pointwork is already earmarked for medium radius electrofrog replacement with the setrack stuff remaining where needed only for the tight curvature. Food for thought once I get the main circuit operable and can fit the upper storage loops permanently, if running suffers through the setrack pointwork then 009 will be the next port of call for certain. The freight yard will have at least two resident 08s, so at the very least I can see one more of the points getting replaced as the upper loop now forms part of the headshunt so will see a lot of Gronk movements.

There is an update coming by the way, work hasn't halted just yet. My Canon Street scrap box is full of handy scenery making odds and ends, and a few old features are undergoing a rebuild to fit this layout as well as scaling down some of the tricks I picked up when doing the 00 layout. :wink:
Under Construction N Gauge dog bone.
Canon Street. N Gauge
The Workbench.
locoworks
Posts: 842
Joined: Mon Nov 27, 2006 10:00 pm
Location: isle of man

Re: Back to N...Now under construction!

Post by locoworks »

maybe worth buying a pair and seeing what the track centres are nose to nose. also something else i did consider was to strip the plastic sleepers from the point in sections and replace with copperclad of a suitable size and thickness so you ended up with a 12 inch radius live frog N gauge point in every respect. the only other possible consideration would be flangeway clearances?? many OO9 loco's and stock use N gauge wheel sets and chassis so i guess they should be ok and set for N gauge clearances, but if they are set for 4mm wheels then it may be an issue?? but i don't think that is the case. i did many years ago rip out a dead frog of a set track point and replace it with a rail built version which was live frog. i had issues with the fact that a farish J94 wouldn't crawl through a set track point. but it wasn't worth the effort really. it did cure the problem, but i went with streamline live frogs in the end and won't use another dead frog point again in N
User avatar
Zunnan
Posts: 1208
Joined: Mon Dec 03, 2007 2:54 pm
Location: On the cusp of spaghetti...B23

Re: Back to N...Now under construction!

Post by Zunnan »

Following Daves (0121modeller) visit, heres the latest update on the latest goings on of the layout.

Electrics & trackwork

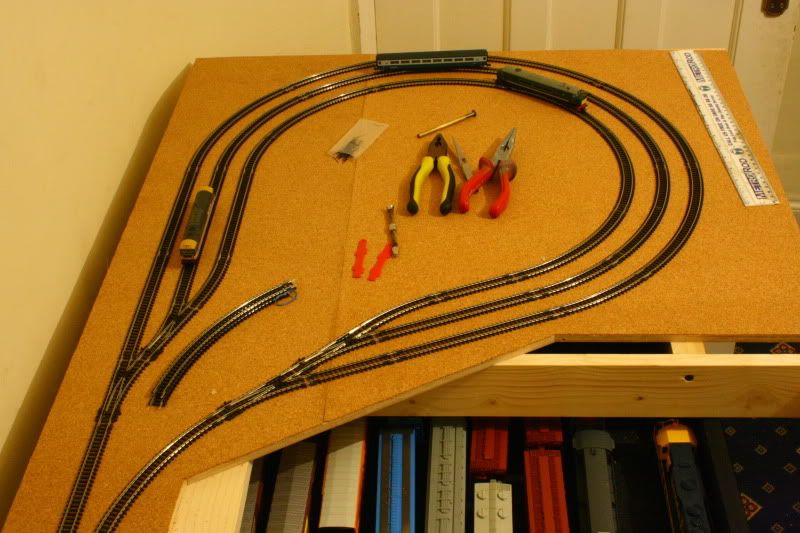
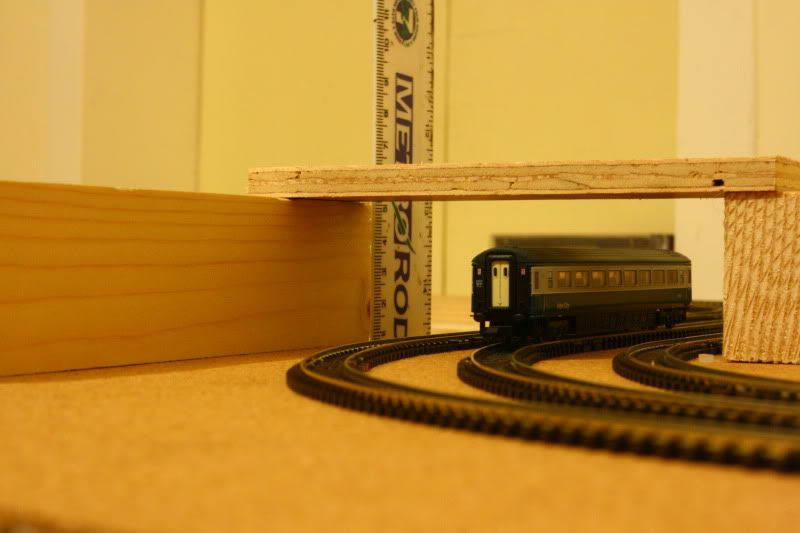
First off, Dave arrived literally as the soldering iron was cooling off having completed the preliminary wiring for the track feeds and was there to witness the first train running under its own power on both the up and down lines as well as through the low level storage loop. Naturally with the layout being built on two boards this meant that there is a board join to cross over. A thread started by m8internet sowed the seeds for an idea which has resulted in me using copperclad PCB and deeply engraving a sleeper pattern into it. The rails are soldered to the remaining copper, and once ballasting commences the fine size of 2mm ballast should more than fill the engraved gaps.

Image

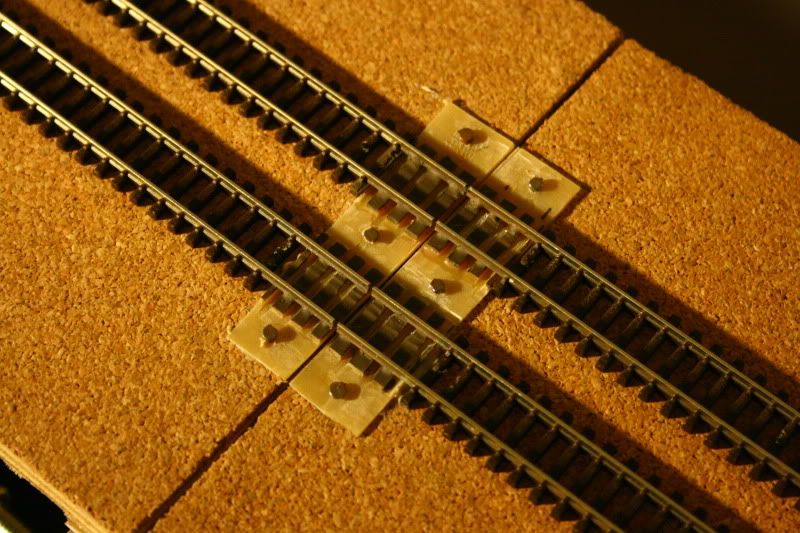
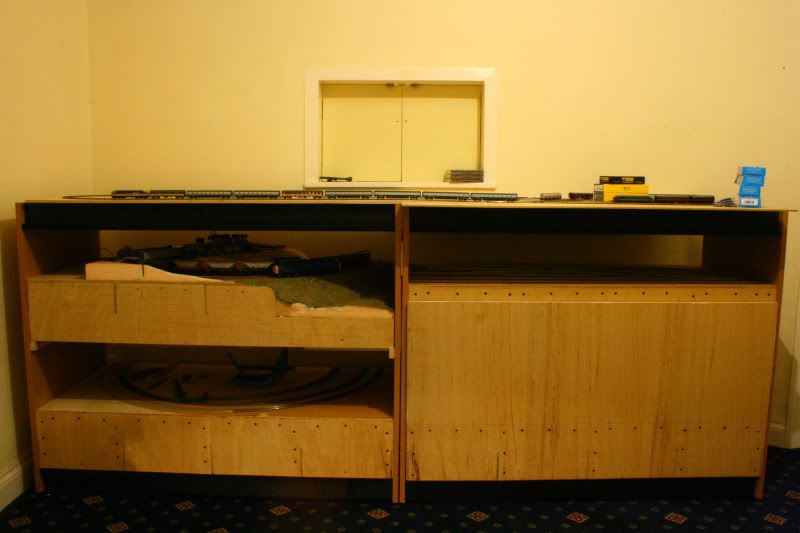
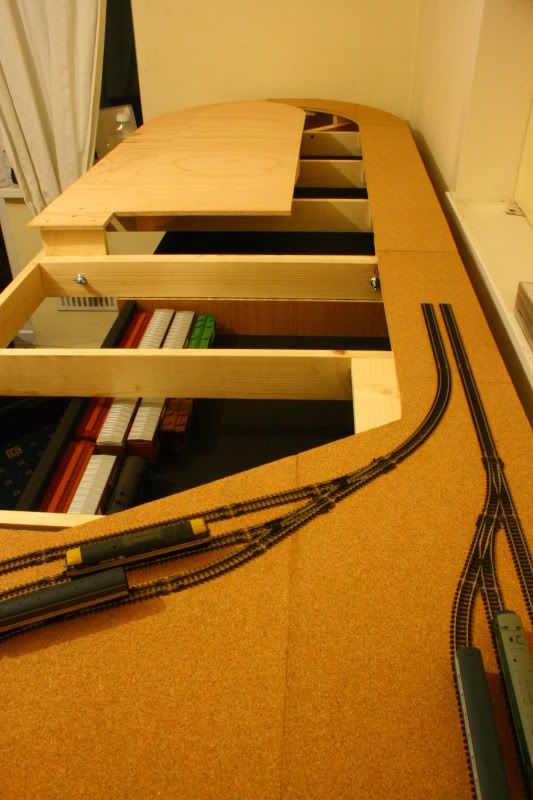
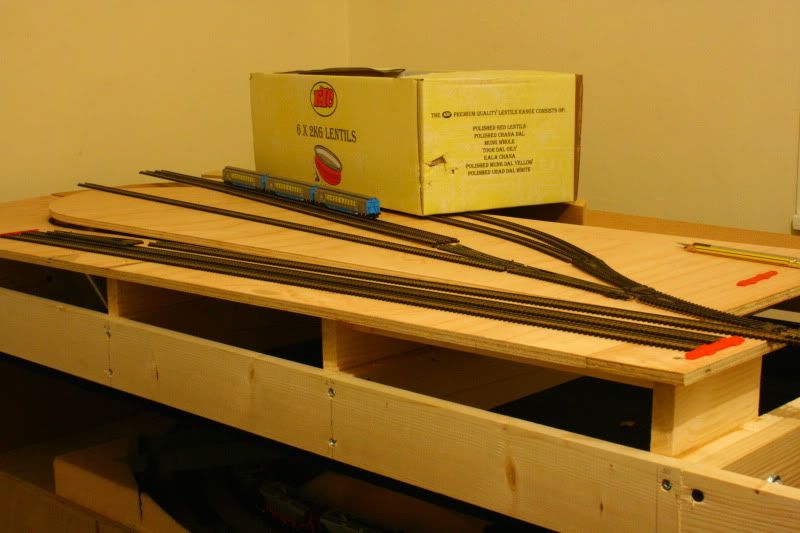
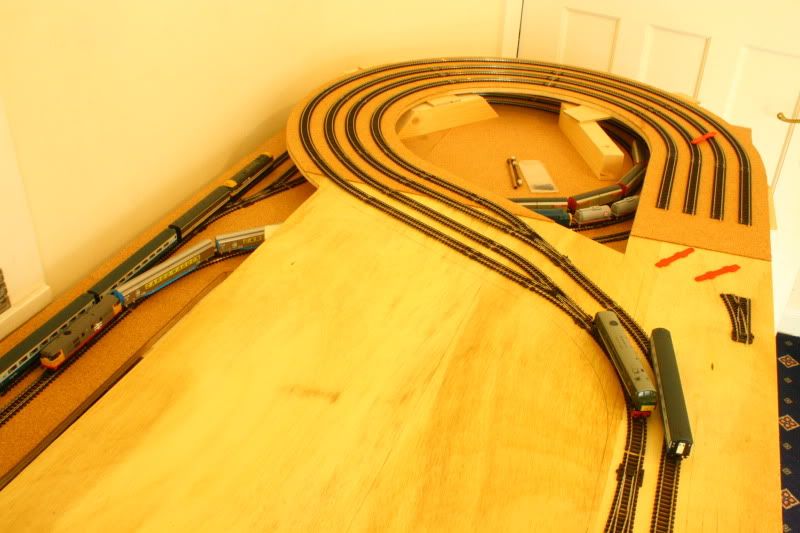
As can be seen, a lick of paint has been applied which really does wonders in disguising the soldered up copperclad. The layout hinges at the rear in two sections, and so far this track joint has proven reliable in a few dozen lifts while I wired the rest of the laid track. And even though the timber at the board edge has warped my a few millimeters, the track join is still maintaining sufficient alignment for reliable running. As I mentioned earlier, trains are now able to run for a short distance on the layout. The entire board for the upper storage loops is still to be mounted while I wait for payday to be able to finish wiring up the point motors on the lower storage loops, so track laying has been forced to end at the passing loop for the goods yard. Still, that gives me roughy 20 feet of fully operable running line. The board for the goods yard is also on the needs to do list now, but this too needs to wait for the upper storage loop to be installed so that it is fixed at the correct height.

Tunnels & Bridges

In an earlier post I eluded to the re-emergence of some Canon Street landmarks. Naturally these haven't been recycled and butchered to fit a different layout, but they have been used to measure up and even provide templates for structures on this layout. Anyone who was following Canon Street will remember 
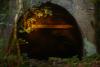
THIS scratch built tunnel mouth; today that very tunnel mouth became a plastic primer demonstration :lol:, but not before it donated its template for the following...

Image
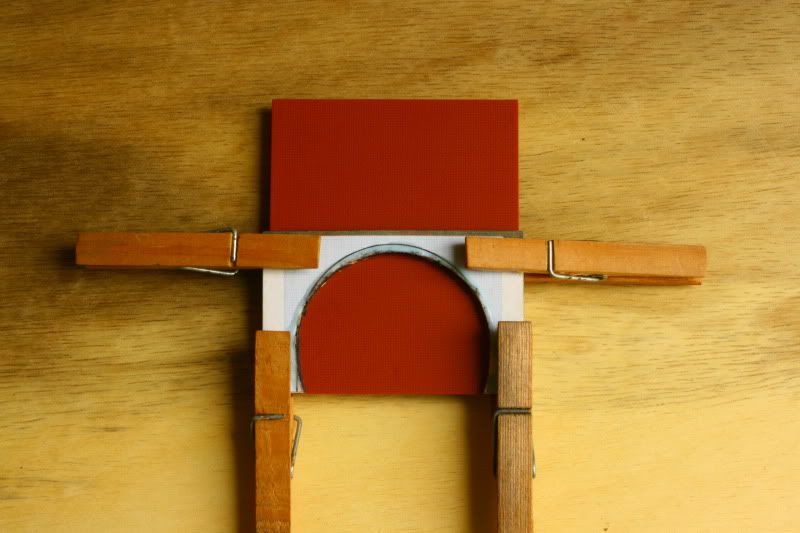
A card template of the original transfers the tunnel mouth profile to a blank sheet of Ratio plasticard.

Image

Image
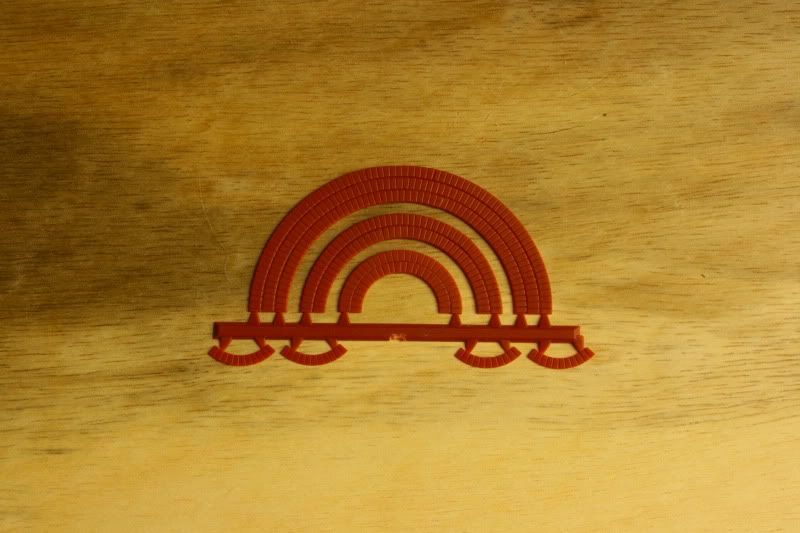
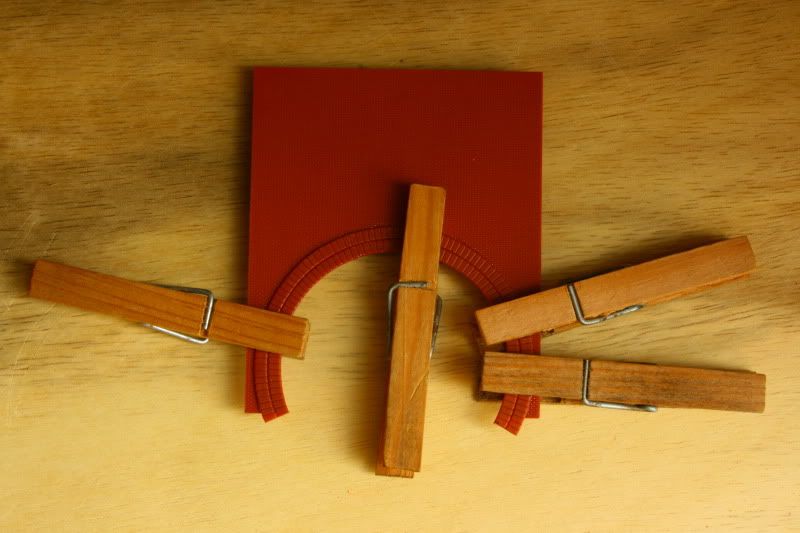
Ratio 00 arches this time provide the brickwork as I was unhappy with the appearance of the original, so have attacked the 'face' of this one in a different manner.

Image

Image
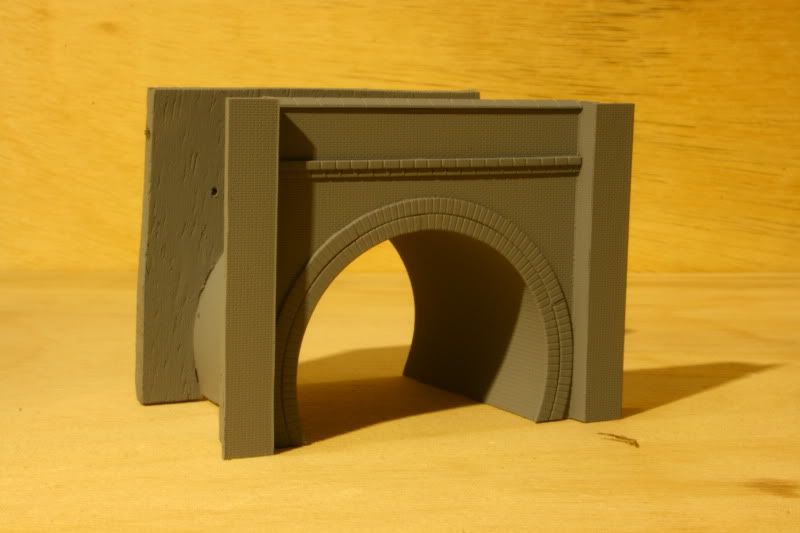
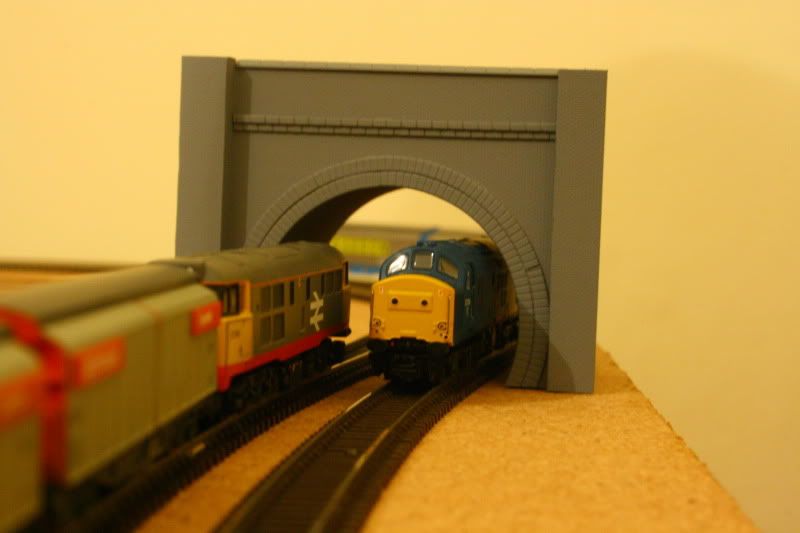
A few embellishments such as the capping, butresses and a few other tweaks to the original as well as using 00 brick plasticard for a lining and this tunnel mouth really does have a more substantial feel to it over its original. The retaining walls will also see a similar revamping, they will be made in the same way as originally and use the same materials, but at the same time will be assembled differently to match the new tunnel mouth rather than the original work.

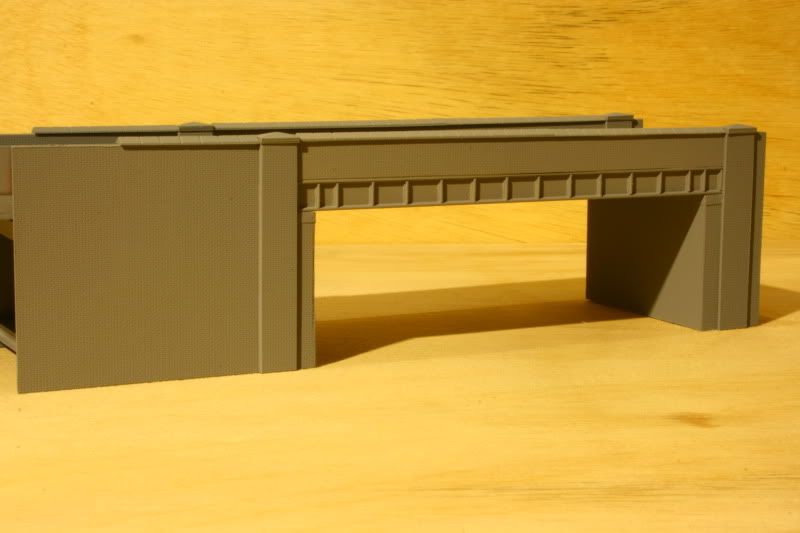
The girder overbridge (page 2 on the Canon Street thread) has also donated much of its original design and dimensions to a new build. The original was skewed to span 3 tracks at an angle, the new build is at 90 degrees to the rails but is now to span a 4 track main line carrying a main road rather than a two track railway, so the parapet wall on the deck also needs modifying to represent the different usage of the bridge. I was never particularly happy with the parapet walls of the original, so like the tunnel mouth, the original design while kept to in essence has been completely reworked and produced in a completely different way. As the original, this is a 3 piece bridge consisting of the bridge deck with girders and brick parapet wall (instead of the original handrails) and two abutments with completely reworked parapet walls.

Image

Image
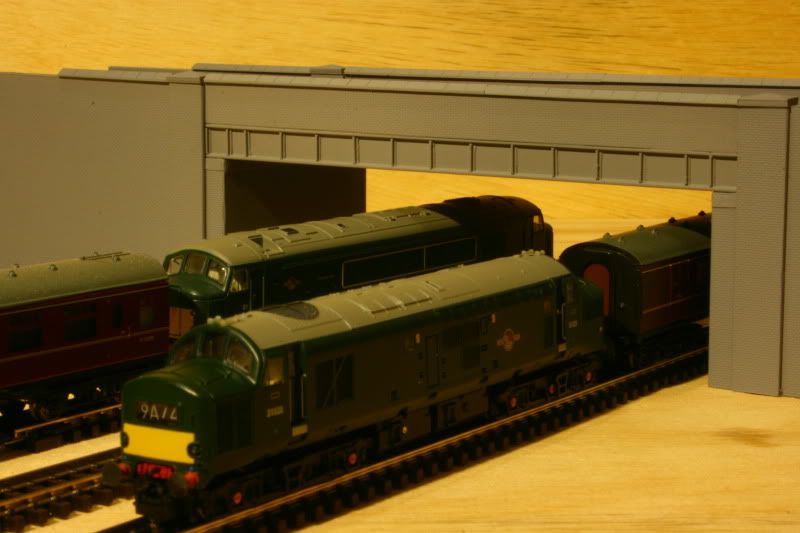
A pair of Canon Street stalwarts survey the new work.

Like the tunnel mouth, there is almost no comparison between the original and the rebuild. You can certainly see the DNA of where it came from, but a few years of building models in other scales has given me a new arsenal of tricks to employ when scratch building. Things like the bedstones, home made capping stones, even the way the butresses are built so that the girders slot into them rather than just rest on top of the abutments. Not to mention that it was quicker to build than the original was too!

Bring on those retaining walls!!!
Last edited by Zunnan on Wed Mar 09, 2011 9:17 pm, edited 1 time in total.
Under Construction N Gauge dog bone.
Canon Street. N Gauge
The Workbench.
locoworks
Posts: 842
Joined: Mon Nov 27, 2006 10:00 pm
Location: isle of man

Re: Back to N...Now under construction!

Post by locoworks »

absolutely fantastic. the engraved out copperclad in a sleeper pattern is a marvelous idea, although i'm sure very time consuming without a mini milling machine. it could even be used with code 55, you would just need to grind off the bottom web of the rail first. the arches for 4mm is also a great idea for use as N tunnel mouth surrounds. i'm very impressed and it gives me some enthusiasm to press on a bit with my own new layout ( still in the dreaming/planning stage ) where it has been for quite a while. :)
User avatar
Zunnan
Posts: 1208
Joined: Mon Dec 03, 2007 2:54 pm
Location: On the cusp of spaghetti...B23

Re: Back to N...Now under construction!

Post by Zunnan »

5-10 minutes with a Dremel cutting disc :wink: It actually took longer to mark out the track spacing and sleeper pattern than it took to carve the copperclad. I have another join like this to do once the upper storage loops are in place, although the next one has a 4 track line crossing it and also a part of the yard pointwork. Having made and been able to test the 2 track join I now have every confidence that a bigger join will be equally as reliable.
Under Construction N Gauge dog bone.
Canon Street. N Gauge
The Workbench.
locoworks
Posts: 842
Joined: Mon Nov 27, 2006 10:00 pm
Location: isle of man

Re: Back to N...Now under construction!

Post by locoworks »

a longer joint does not have to be done as a single piece of PCB. two lots of what you have already done would suffice. it would also make any adjustment a little easier.
User avatar
SouthernBoy
Posts: 1753
Joined: Sun Oct 08, 2006 11:01 pm
Location: The past: We do things differently there

Re: Back to N...Now under construction!

Post by SouthernBoy »

Impressive work Zunnan: You've definitely acquired skills and confidence during your break from N gauge - everything you've done there is top class and inspiring - and excellently photographed too. I can't wait for more :)
0121modeller
Posts: 1205
Joined: Sun Mar 09, 2008 1:16 am
Location: Erdington, Birmingham,.... but can also be found at various railway bridges !

Re: Back to N...Now under construction!

Post by 0121modeller »

Hi Zunnan, I'm really impressed on the latest update & seeing the high level baseboard in its position.
I also like that idea of using that copperclad fashioned sleepers & was amazed at how realistic those last few sleepers actually looks so being alike to the other tracks. Its something I'm going to try myself when it comes to that part of the "dreaded" baseboard joins, as the risk of the rail ends snagging out of chairs I think would be greatly reduced using this method in my new N project.
However, as Zunnan knows, I've an obsession (one of a few :oops: ) with allowing for fine adjustnet for alignment as to counteract the natural movement of wood over time, so in my case I would have the copperclads screwed down (maybe this'll permit fractional adjustment if needed) or based on the same teqnique I religously used on my 00 project of allowing a plywood section with tracks attached fixed with bolt & wingnut, this being at baseboard joins & bolted as to move sideways & height adjustment to adjoining baseboard , no need to worry about those hinge pins wearing loose or possible frame warping issues :wink:

In any case, I've a suggestion/idea as for the otherside of the hi-level adjoining tracks;.. an idea came to me as to hide the solder work to rails to copperclad/paxolin & so avoid the need to cutting the copperclad/paxolin as to resemble sleepers...;- I was thinking of something like a brick or tarmac infill level crossing or on a similar basis seen at Tyseley ?,.. using Wills or Ratio styrene sheet built upto sleeper level & lipped over as to prevent outward rail movement & use maybe araldite or UHU for fixing the chosen infilling between rails onto the paxolin, maybe use this method on one baseboard join only as to make this less obvious.

During my visit to see your project & kindly sharing your knowlegde & help with a related issue :D , I was honoured to see your dedication & passion for your projects.
The bridgework & tunnel mouth ideas are also very inspiring, as it gives inspiration for the Wills & Ratio arches certainly being suitable for both 00 & N gauge too, so I'll be exploring this more now I've seen you adapt them for N gauge use. The arches are so very brittle though I've noticed, so reducing a line of string course & filing groups of segment'd sections as to widen (or otherwise extend) the arch as shown must've been very time consuming, but its really well worth the end result.

Seeing all this has inspired me & gave me a few new ideas for my new project in N, (I'll need to finish the painting & decors in my 5yr old sons bedroom before i progress further with my own project). Our discussion of the "Duddeston" area has further inspired me with further thoughts on this as an ideal subject theme for my project.

All the best & looking forward to future updates :D
Dave.
Scratchbuilding 4mm scale JXA scrapwagons ; - http://www.newrailwaymodellers.co.uk/Fo ... =6&t=37620
Scratchbuilt & kit built grappler claw cranes ; - http://www.newrailwaymodellers.co.uk/Fo ... =6&t=36342
Post Reply