
Felixburgh Branch (Ex-Newburgh): Eastern Region Seaside
-
the weston guy

- Posts: 198
- Joined: Sun Apr 18, 2010 12:34 pm
'Felixburgh Branch' (Ex-Newburgh): Eastern Region Seaside Br
Guess i never came back... Just thought i'd show what one and a bit years of difference makes. I will post the layout timeline progress in another post (This time i will be back  ) but for now i give you Felixburgh:
- Attachments
-
- DSC_0509 - Copy.JPG (119.01 KiB) Viewed 3083 times
-
- DSC_0473 - Copy resize.jpg (108.24 KiB) Viewed 3083 times
-
- DSC_0470 - Copy resize.jpg (123.77 KiB) Viewed 3083 times
-
luckymucklebackit
- Posts: 3716
- Joined: Mon Jul 18, 2011 7:05 am
- Location: Eaglesham (Again)
- Contact:
Re: Newburgh: Eastern Region Seaside Branch
That looks really good, can you post some more photographs
Jim
Jim
This Signature Left Intentionally Blank, but since I have written this and I intended to do it, this Signature is intentionally not blank. Paradox or What?
My layout - Gateside and Northbridge

My layout - Gateside and Northbridge

Re: Newburgh: Eastern Region Seaside Branch
I agree with Jim, this is an excellent layout. The sand on the beach looks especially effective - what is it made from (sand?)?
-
the weston guy
- Posts: 198
- Joined: Sun Apr 18, 2010 12:34 pm
Re: Newburgh: Eastern Region Seaside Branch
Afternoon all. In regards to the sand it's builder sand stuck onto shaped polystyrene fixed using the same method as ballasting (Spray with water then soaked with 50/50 water and pva with a drop of washing up liquid). Once it's all set i used the same gluing method with many bags of different colours and grain of scenic stone to give the beach a range of tones and textures.
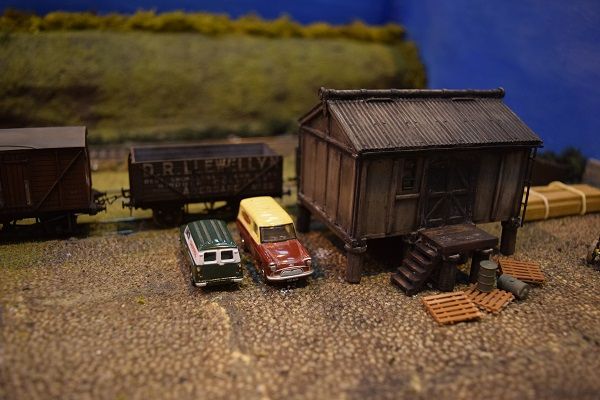
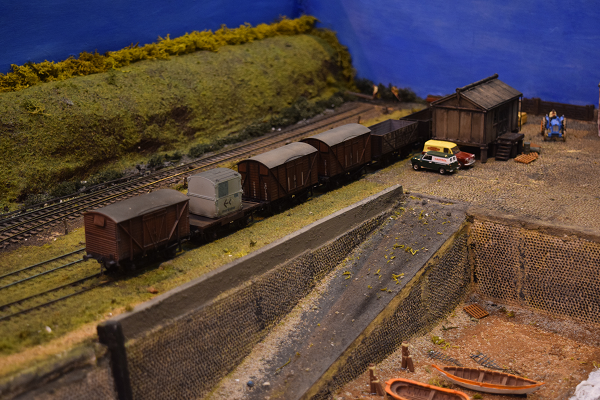
The story then, when i left here i had just finished the ballasting on the layout. I had gone for a 2:1 buff to grey colour and when i finished i thought it was too creamy coloured. I was planning on weathering the track so i wasn't too fussed at this point. I also then went on to 'cobble' the goods sidings. I went for the wills scenic sheets and i think i went through at least 8 packets. I went to cover the whole area. If you've read my first post you may have thought the area below the track would have been a scrap yard/other town features, i thought how much i'd like to model the coastline itself so i changed my plan. Hence the cobbled goods yard became a sort of dock (Or equivalent coastal good yard).
I then set about the challenge of weathering the track. I had a cheapy airbrush and air canister and decided to play around. I mixed colours around and settled for a brown colour, i was trying to balance out with the creamy ballast but it sort of went completely brown... but i quite like it. The challenge was trying to get the cheapy airbrush to spray consistently and many times it just emptied the whole contents of the bottle onto the track >.< . In the end i got it to work and was happy with the result. I then painted the sleepers and point rodding by hand to highlight them from the ballast. After cleaning the track i had a play to make sure everything worked .
.
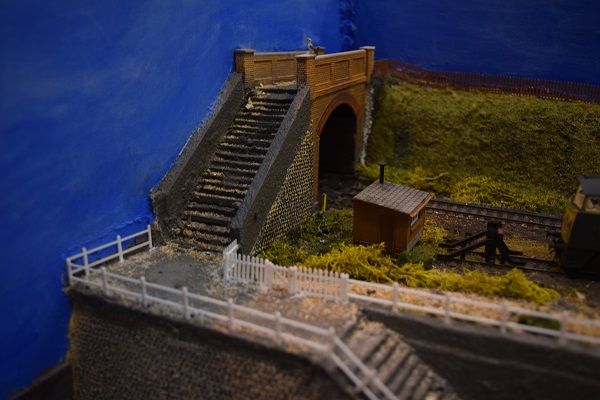
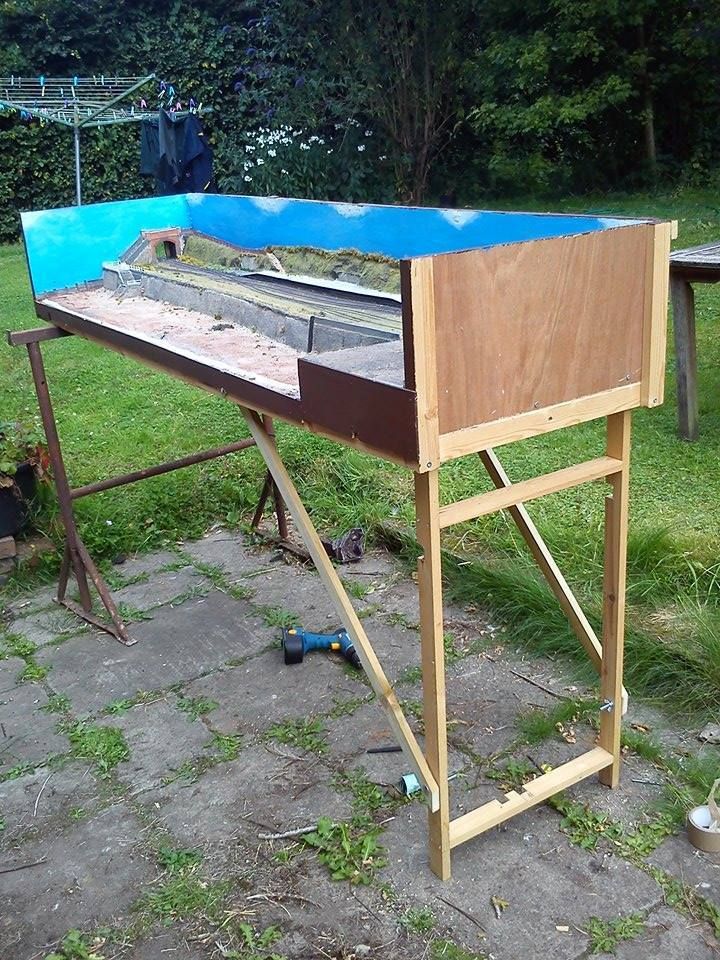
Then came the exams 0_0 not much happened and the layout took a back bench. However after a few months it soon came to the list of my priorities when i was asked would it be ready for an exhibition in September. This was mid juneish and i assumed it wouldn't take that long to plonk some sand down and some greenery and have a working layout? How i was wrong . My first challenge was to build the sea wall, once again out of wills sheets. The challenge was to create a flint wall effect, anyone from Suffolk would know flint is the main building material. Once i built the wall the plan was to spray is a stone colour then paint the cobbles black, but i soon found this to look naff so i rubbed sand/grit mixture into the cobbles to get a better texture, which improved the wall significantly. I also scratch built some steps from the rail level to the beach out of balsa, using greenscene texture paint to create a concrete effect.
A bridge was then needed to get people from the station to the beach, in which i faced my biggest problem.. East Anglia is really flat! I could have used a foot crossing but then the trains would have exited the board straight from the back scene, which i didn't want. So i decided to do some research and went for a wills brick bridge but followed the colour scheme for a bridge in Thurston, which had orange coloured bricks. So i followed that scheme and i was happy with the bridge.
I then realised the exhibition was in two weeks!! So i decided to temporarily add the platform and other scenic items also leaving the water for after the exhibition so i could do a 'proper' job with the scenery. So after placing turf everywhere and tacking down a platform i exhibited Felixburgh at Ludlow.
It was a good show and the layout performed well except the fiddle yard wasn't quite right and derailment occurred with longer engines. So after the show it was back to the drawing board for the fiddle yard. I constructed a new frame for the fiddle yard and mounted the traverser in the middle with 1ft either end for stabling locos. This meant i could smoothern the gradient going from the scenic board to the fiddle yard. I then set to construct a grass bank for the scenic section to bring some depth to the layout, also allowing a permanent fixture for the platform. I added static grass to whole thing and started to tone down the goods yard's cobbles. The water was created using woodlands scenics water resign with the water effects to create waves.
This brings the layout to where it is now. I haven't got pictures of everything I've done and i've not mentioned everything but i can answer any questions. I'll do another post with some more pics of other projects as i can only put 5 attachments on!
The story then, when i left here i had just finished the ballasting on the layout. I had gone for a 2:1 buff to grey colour and when i finished i thought it was too creamy coloured. I was planning on weathering the track so i wasn't too fussed at this point. I also then went on to 'cobble' the goods sidings. I went for the wills scenic sheets and i think i went through at least 8 packets. I went to cover the whole area. If you've read my first post you may have thought the area below the track would have been a scrap yard/other town features, i thought how much i'd like to model the coastline itself so i changed my plan. Hence the cobbled goods yard became a sort of dock (Or equivalent coastal good yard).
- Progress of Ballasting and Cobble.
- DSC_0896 resize.png (505.73 KiB) Viewed 3024 times
I then set about the challenge of weathering the track. I had a cheapy airbrush and air canister and decided to play around. I mixed colours around and settled for a brown colour, i was trying to balance out with the creamy ballast but it sort of went completely brown... but i quite like it. The challenge was trying to get the cheapy airbrush to spray consistently and many times it just emptied the whole contents of the bottle onto the track >.< . In the end i got it to work and was happy with the result. I then painted the sleepers and point rodding by hand to highlight them from the ballast. After cleaning the track i had a play to make sure everything worked
- Weathered Track.
- DSC_0810 resize.jpg (96.85 KiB) Viewed 3024 times
Then came the exams 0_0 not much happened and the layout took a back bench. However after a few months it soon came to the list of my priorities when i was asked would it be ready for an exhibition in September. This was mid juneish and i assumed it wouldn't take that long to plonk some sand down and some greenery and have a working layout? How i was wrong
- Progress of seawall and steps.
- 11303448_845850615503856_715957538_n resize.jpg (78 KiB) Viewed 3024 times
A bridge was then needed to get people from the station to the beach, in which i faced my biggest problem.. East Anglia is really flat! I could have used a foot crossing but then the trains would have exited the board straight from the back scene, which i didn't want. So i decided to do some research and went for a wills brick bridge but followed the colour scheme for a bridge in Thurston, which had orange coloured bricks. So i followed that scheme and i was happy with the bridge.
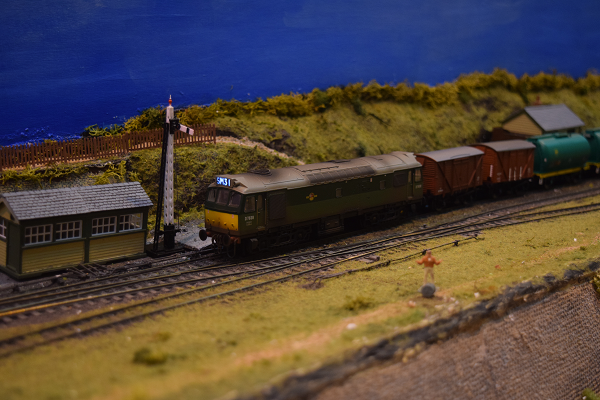
- View of the bridge with my Wessie D1026 'Western Centurion'. **Note this is a photo from the layout recently**
- DSC_0477 resize.jpg (128.97 KiB) Viewed 3024 times
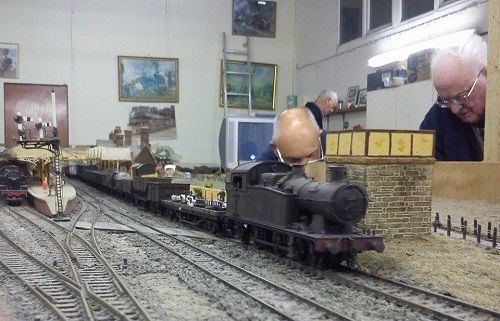
I then realised the exhibition was in two weeks!! So i decided to temporarily add the platform and other scenic items also leaving the water for after the exhibition so i could do a 'proper' job with the scenery. So after placing turf everywhere and tacking down a platform i exhibited Felixburgh at Ludlow.
- Layout operation at Ludlow in progress with yours truly on the left :) This was before any of the major scenic work started.
- 10406342_718727161549536_8447492119172835554_n resize.jpg (67.16 KiB) Viewed 3024 times
It was a good show and the layout performed well except the fiddle yard wasn't quite right and derailment occurred with longer engines. So after the show it was back to the drawing board for the fiddle yard. I constructed a new frame for the fiddle yard and mounted the traverser in the middle with 1ft either end for stabling locos. This meant i could smoothern the gradient going from the scenic board to the fiddle yard. I then set to construct a grass bank for the scenic section to bring some depth to the layout, also allowing a permanent fixture for the platform. I added static grass to whole thing and started to tone down the goods yard's cobbles. The water was created using woodlands scenics water resign with the water effects to create waves.
This brings the layout to where it is now. I haven't got pictures of everything I've done and i've not mentioned everything but i can answer any questions. I'll do another post with some more pics of other projects as i can only put 5 attachments on!
-
the weston guy
- Posts: 198
- Joined: Sun Apr 18, 2010 12:34 pm
Re: Newburgh: Eastern Region Seaside Branch
Me again... thought i'd put some more pics of the layout as it is:


Re: Newburgh: Eastern Region Seaside Branch
The long break in transmission was definitely worth the wait - I like this very much. Thank you.
-
the weston guy
- Posts: 198
- Joined: Sun Apr 18, 2010 12:34 pm
'Felixburgh Branch' (Ex-Newburgh): Eastern Region Seaside Br
Thank you whynot for the positive comments . Back three days in a row! I thought i'd post some sub-projects that I've been doing. One of the most significant projects was scratch building a station building. Originally the layout was to based in a town like Aldeburgh, however i didn't want to copy the building at Aldeburgh as it had an overall roof and also i felt i didn't have the confidence to build something like it. I settled to copy the plans of a scalescenes station but instead of using card i would use materials such as texture sheets from slaters and wills. The frame of the model was made from thick plastic sheet. Then once door and window holes were cut out i stuck on the brick sheet and then worked on the roof (made from Wills sheets). The window frames are brassmaster products that they supply for scalescenes. The doors were scratch built using plastic card.
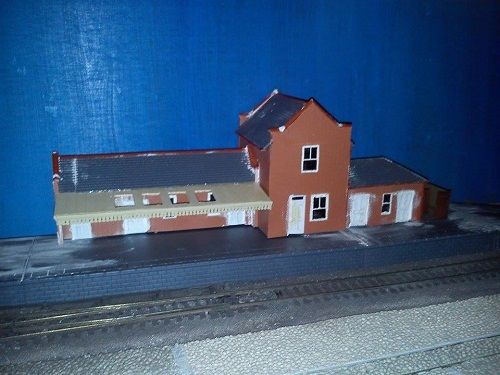
I looked at many suffolk buildings to try and get the colours right and settled for a lime stone colour. I struggled to find any colour images of Aldeburgh itself and by chance in a Locomotives Illustrated magazine on first gen DMUs found an image of a met-cam DMU in front of Aldeburgh station in colour! Using this i based the the colour for the station:
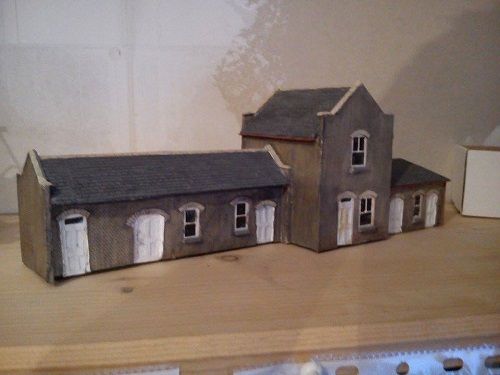
After i was happy with the brick colour i played around with details. I built the canopy and the chimneys. The canopy uses an evergreen sheet with valances and the chimneys are scratch built with Wills parts. Most of the detailing parts came from Ratio/Wills sources which aided the ease of construction. The final part was the most important and was painting the doors/pipes Eastern region blue!
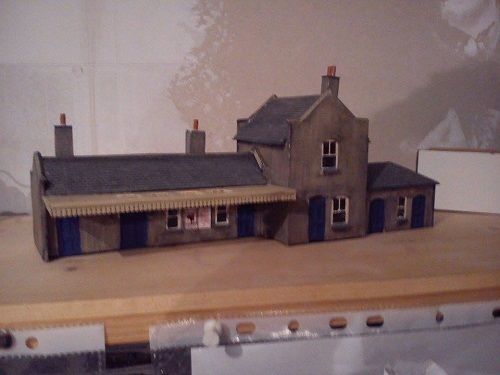
I am very pleased with the final result as it was my first proper scratch building project. The photos are a bit crummy as they're from my phone but i'll put some better images up in the future.
But Wait! Why isn't this on the layout i hear you ask?
Well the building wasn't done for the Ludlow exhibition layout and instead i used a small building i built a while ago, and during the exhibition a visitor commented how she liked the remoteness of the layout. I soon changed the layout to a rural theme xD. So once again the layout changed guise to a rural halt, sort of based on Thorpeness Halt on the Aldeburgh Branch. I prefer this guise as it explains the simple track layout.
The scatch build project though will find a new use in the future. Due to the size of the boards of the current layout it can only be transported by a horse trailer. Soonish i shall be learning to drive and as a result i hope to build an extension which could fit in the back of a car, also rebuilding a fiddle yard which could fit in the back of a car. This extension will be more based on a town so i can use my buildings. I plan to make this run with the Beach section so i could have 'Felixburgh Beach' and 'Felixburgh Town' hence having the 'Felixburgh Branch'. Being able to run with a passing loop at the Beach section. However this is just ideas at this point so i'm not confirming anything!

I looked at many suffolk buildings to try and get the colours right and settled for a lime stone colour. I struggled to find any colour images of Aldeburgh itself and by chance in a Locomotives Illustrated magazine on first gen DMUs found an image of a met-cam DMU in front of Aldeburgh station in colour!

After i was happy with the brick colour i played around with details. I built the canopy and the chimneys. The canopy uses an evergreen sheet with valances and the chimneys are scratch built with Wills parts. Most of the detailing parts came from Ratio/Wills sources which aided the ease of construction. The final part was the most important and was painting the doors/pipes Eastern region blue!

I am very pleased with the final result as it was my first proper scratch building project. The photos are a bit crummy as they're from my phone but i'll put some better images up in the future.
But Wait! Why isn't this on the layout i hear you ask?
Well the building wasn't done for the Ludlow exhibition layout and instead i used a small building i built a while ago, and during the exhibition a visitor commented how she liked the remoteness of the layout. I soon changed the layout to a rural theme xD. So once again the layout changed guise to a rural halt, sort of based on Thorpeness Halt on the Aldeburgh Branch. I prefer this guise as it explains the simple track layout.
The scatch build project though will find a new use in the future. Due to the size of the boards of the current layout it can only be transported by a horse trailer. Soonish i shall be learning to drive and as a result i hope to build an extension which could fit in the back of a car, also rebuilding a fiddle yard which could fit in the back of a car. This extension will be more based on a town so i can use my buildings. I plan to make this run with the Beach section so i could have 'Felixburgh Beach' and 'Felixburgh Town' hence having the 'Felixburgh Branch'. Being able to run with a passing loop at the Beach section. However this is just ideas at this point so i'm not confirming anything!
-
luckymucklebackit
- Posts: 3716
- Joined: Mon Jul 18, 2011 7:05 am
- Location: Eaglesham (Again)
- Contact:
Re: Newburgh: Eastern Region Seaside Branch
Very nice indeed, you have managed to capture that run down look extremely well
Jim
Jim
This Signature Left Intentionally Blank, but since I have written this and I intended to do it, this Signature is intentionally not blank. Paradox or What?
My layout - Gateside and Northbridge
My layout - Gateside and Northbridge
-
the weston guy
- Posts: 198
- Joined: Sun Apr 18, 2010 12:34 pm
Felixburgh Branch (Ex-Newburgh): Eastern Region Seaside
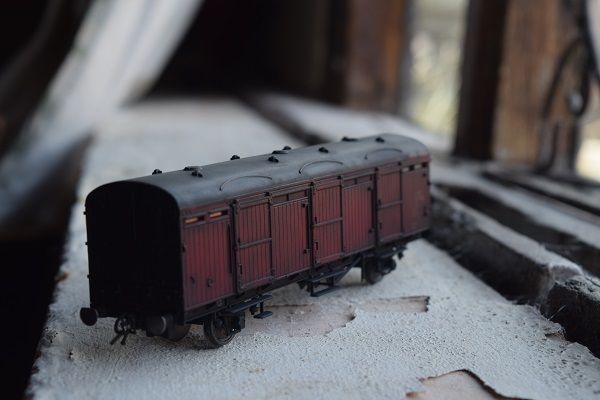
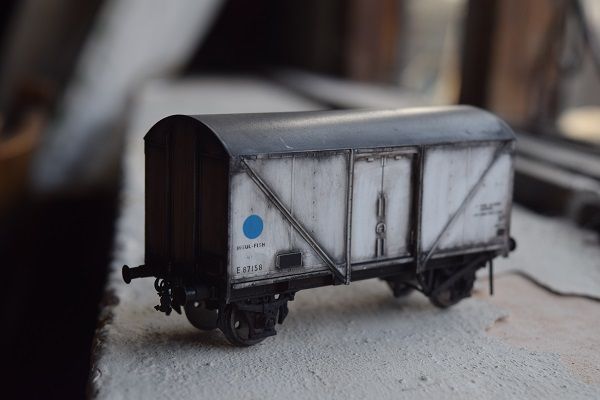
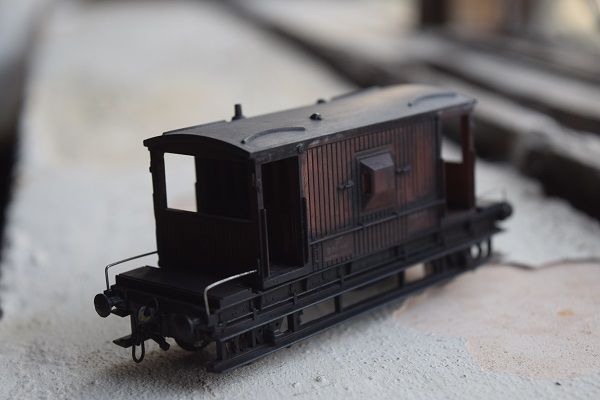
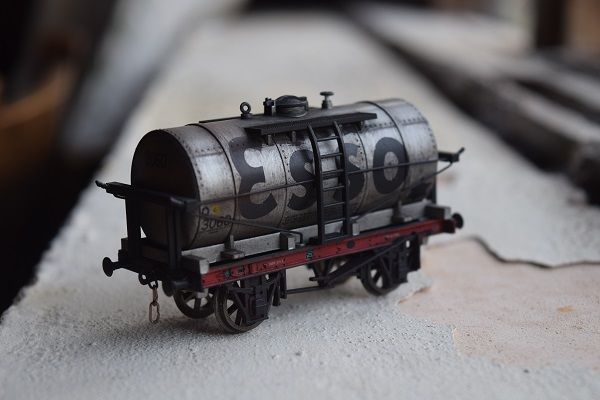
Thanks for the comment, i do prefer the run down scene on a railway, makes it more real. On the subject of run down and grime i thought i'd share some of the weathering i undertake on my rolling stock. I work mainly with powders, paints and spirits and i'm yet to venture into airbrushes. I find this to be one of the most enjoyable parts of modelling for me and it really changes stuff from toys to scale models.
Hornby Ex-LNER CCT:
Hornby BR Fish Van:
Mainline BR 20t Brakevan:
Hornby 4 Wheel Esso Tank:
Hornby PO 5 Plank:

I've only tried weathering on one loco, a pre-weathered Bachmann 56xx, which i attempted to scruff up a bit more:
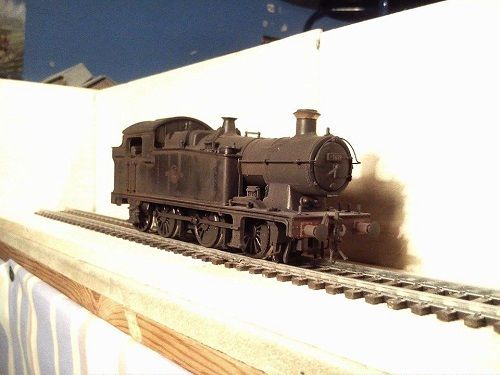
**I didn't realise that there was a part of the loco's boiler that was also part of the chassis that didn't get weathered but i fixed that after this photo**
Here she is running on our club's layout Craven Arms:
Hornby Ex-LNER CCT:

Hornby BR Fish Van:

Mainline BR 20t Brakevan:

Hornby 4 Wheel Esso Tank:

Hornby PO 5 Plank:

I've only tried weathering on one loco, a pre-weathered Bachmann 56xx, which i attempted to scruff up a bit more:

**I didn't realise that there was a part of the loco's boiler that was also part of the chassis that didn't get weathered
Here she is running on our club's layout Craven Arms:

Re: Felixburgh Branch (Ex-Newburgh): Eastern Region Seaside
You're right - the weathering makes all the difference.
-
the weston guy
- Posts: 198
- Joined: Sun Apr 18, 2010 12:34 pm
Re: Felixburgh Branch (Ex-Newburgh): Eastern Region Seaside
Hey All,
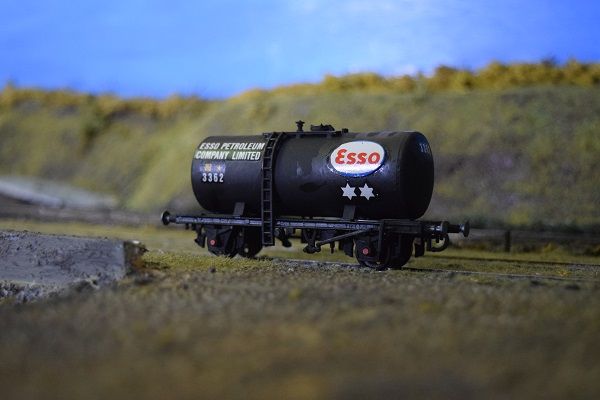
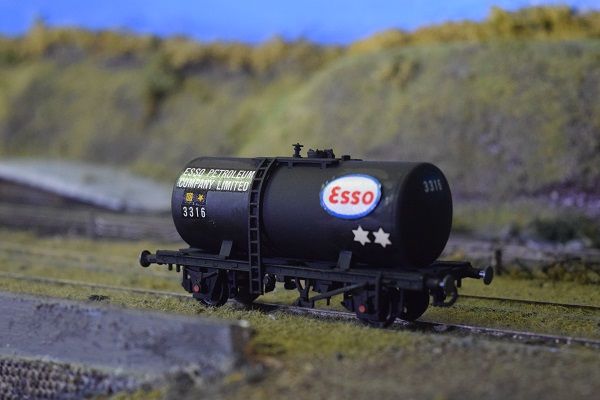
Not much has been done on the layout, i'm waiting to finish a couple of AS exams before going to work the layout. In the mean time I've been playing around with some rolling stock. I've been working on a big project I've been wanting to do for ages, building a rake of Dapol Esso tanker wagons that originate as old Kitmaster products. The kits are good for their age so i decided to build 2 as prototypes (i.e to avoid future mess ups) then a further 10 in a batch. They're fairly easy to build and with some filler finish very nicely. At this point I've built and painted all 12 tanks and am about half way through them with the decals.. which has lead to a problem. The instructions show that the two stars below the Esso logo should be directly under the logo (the first 5 of my tanker have this). However after some googling I've found that the starts actually sat to the edge of the tanker, offset to the bottom right of the logo! The remaining will have this set up but it's somewhat annoying that they don't match, although i suppose weathering is to cover up any errors in modelling . They all need to be weathered and have smiths couplings fitted but that could take some time.
A tanker with an incorrect star position:
A tanker with a correct star position:
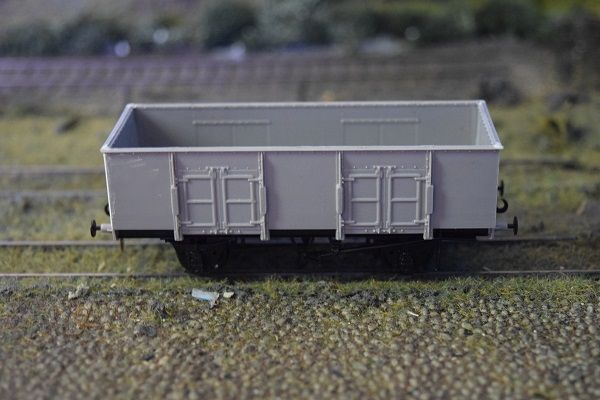
I've also tried a Parkside Dundas kit for the first time. I wanted to see how it compared to a Dapol kit, so i went for a simple model of a Ex-LNER 21t coal wagon. It was a lot nicer to build and the parts seem a lot crisper and detailed. I understand the Dapol kits are old but the Parkside Dundas are roughly the same price and finish as better models. Also they come with bearings which do sound better when running. The only problem is you need to order the transfers for the models from a separate source but in the case of batch building kits it's not too much of an issue. I'd recommend anyone having a try of building one.
Ex-LNER 21t Mineral Wagon. Need to paint and apply transfers.

Not much has been done on the layout, i'm waiting to finish a couple of AS exams before going to work the layout. In the mean time I've been playing around with some rolling stock. I've been working on a big project I've been wanting to do for ages, building a rake of Dapol Esso tanker wagons that originate as old Kitmaster products. The kits are good for their age so i decided to build 2 as prototypes (i.e to avoid future mess ups) then a further 10 in a batch. They're fairly easy to build and with some filler finish very nicely. At this point I've built and painted all 12 tanks and am about half way through them with the decals.. which has lead to a problem. The instructions show that the two stars below the Esso logo should be directly under the logo (the first 5 of my tanker have this). However after some googling I've found that the starts actually sat to the edge of the tanker, offset to the bottom right of the logo!
A tanker with an incorrect star position:

A tanker with a correct star position:

I've also tried a Parkside Dundas kit for the first time. I wanted to see how it compared to a Dapol kit, so i went for a simple model of a Ex-LNER 21t coal wagon. It was a lot nicer to build and the parts seem a lot crisper and detailed. I understand the Dapol kits are old but the Parkside Dundas are roughly the same price and finish as better models. Also they come with bearings which do sound better when running. The only problem is you need to order the transfers for the models from a separate source but in the case of batch building kits it's not too much of an issue. I'd recommend anyone having a try of building one.
Ex-LNER 21t Mineral Wagon. Need to paint and apply transfers.


Re: Felixburgh Branch (Ex-Newburgh): Eastern Region Seaside
Can I recommend that you use a suitable varnish on those models - it's so annoying to lose transfers through accidental contact with the skin, which can often be enough to remove them. Other than that, the wagons are looking great, keep it up.
-
the weston guy
- Posts: 198
- Joined: Sun Apr 18, 2010 12:34 pm
Re: Felixburgh Branch (Ex-Newburgh): Eastern Region Seaside
I meant to mention that. I do put varnish on the transfers as i know the pain of losing a perfectly placed transfer through weathering. Also when i finish i give them a spray of matt cote
-
the weston guy
- Posts: 198
- Joined: Sun Apr 18, 2010 12:34 pm
Re: Felixburgh Branch (Ex-Newburgh): Eastern Region Seaside
Hey all. AS Exams are over and i'm back on the layout!
My first task is to replace the legs on the layout. As this is an exhibition layout i need legs that are removable but strong enough to hold the layout. The current installation works by having two sets of legs joined up that bolted to the frame with strengthening braces for support. This is a good as it holds the layout securely but does mean that when the layout is not in use i have 4 sets of legs that are taking up a lot of space (They also require more space when transporting the layout). Also it requires three people to put up, which is fine at exhibitions but not so good for home use. As a result I've decided to make hinged legs which will fold out and be braced from the feet to the frame using bolts.
The first task was to dismantle the current legs and rebuilt them to allow the hinges to work. I had to shorten the width of the legs to accommodate the hinges then finally screwed the bits together with a little wood glue.
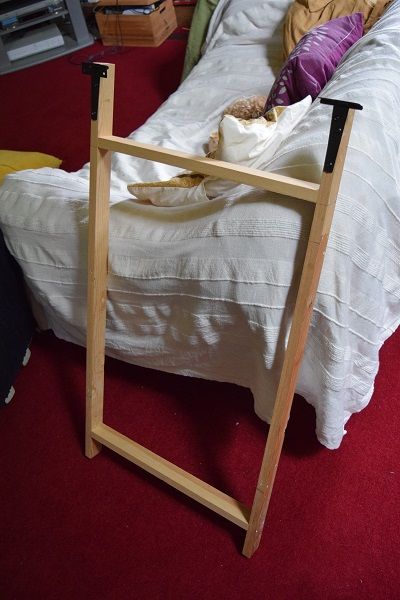
The hinges i'm using are standard hinges used on doors etc My thinking is that if they can hold a door they can hold a layout!
My plan now is to attach them to the layout, which in turn requires a way to lift the layout higher than it's normal standing height. Then i can attach them and also fit bracing that fixes them at 90 degrees.
My first task is to replace the legs on the layout. As this is an exhibition layout i need legs that are removable but strong enough to hold the layout. The current installation works by having two sets of legs joined up that bolted to the frame with strengthening braces for support. This is a good as it holds the layout securely but does mean that when the layout is not in use i have 4 sets of legs that are taking up a lot of space (They also require more space when transporting the layout). Also it requires three people to put up, which is fine at exhibitions but not so good for home use. As a result I've decided to make hinged legs which will fold out and be braced from the feet to the frame using bolts.
The first task was to dismantle the current legs and rebuilt them to allow the hinges to work. I had to shorten the width of the legs to accommodate the hinges then finally screwed the bits together with a little wood glue.

The hinges i'm using are standard hinges used on doors etc My thinking is that if they can hold a door they can hold a layout!

My plan now is to attach them to the layout, which in turn requires a way to lift the layout higher than it's normal standing height. Then i can attach them and also fit bracing that fixes them at 90 degrees.
-
the weston guy
- Posts: 198
- Joined: Sun Apr 18, 2010 12:34 pm
Re: Felixburgh Branch (Ex-Newburgh): Eastern Region Seaside
Finally some progress!
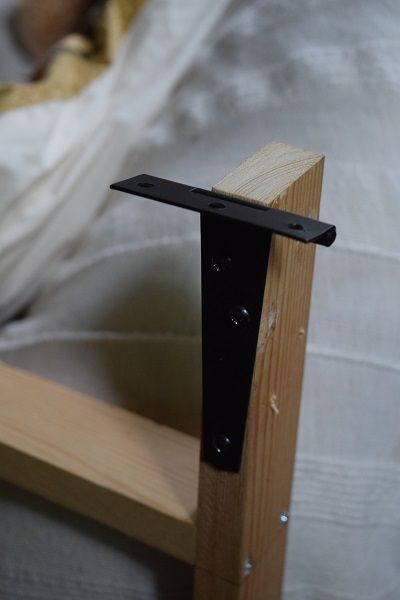
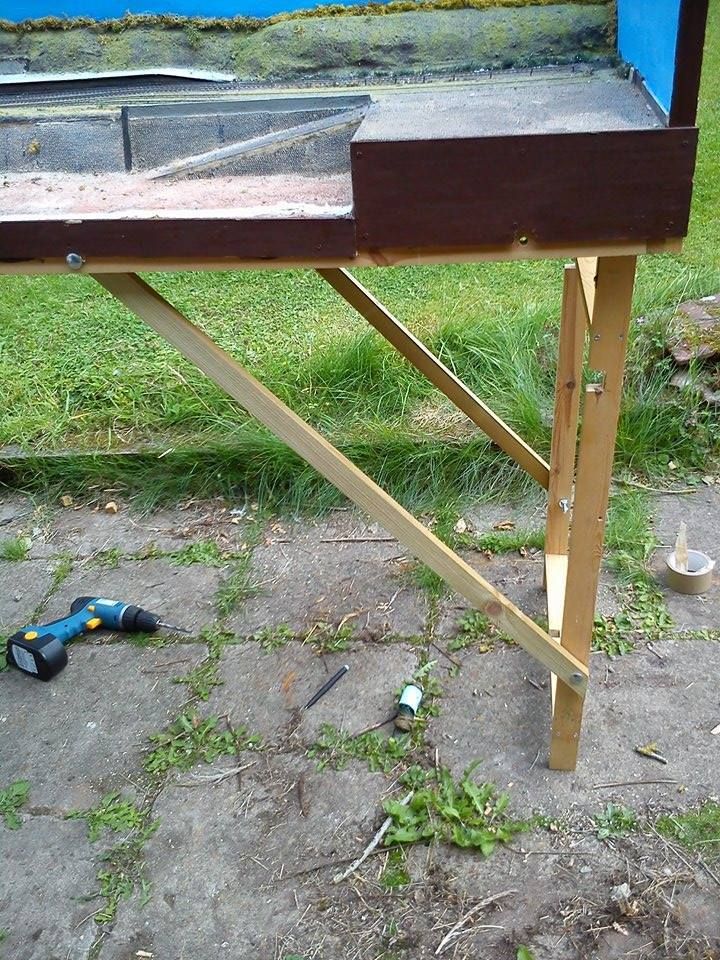
The folding legs are completed for the scenic section of the layout. I can't actually do it inside the house so I've had to wait for good clear days when I haven't been working or been distracted by something else. The legs are attached to the board via hinges which allow the legs to sit perpendicular when the layout is standing, or parallel to the board when the layout is being transported. This set up vs the old legs set up (Bolted on) is a lot more convenient at exhibitions as the number of people required to set up is less, the time taken to set up is less and also with legs that sit inside the frame the layout takes up less space when being transported. There was the issue that the folding legs would not sit in the frame as the cross pieces clashed, so i had to cut out half from the frame cross pieces (from underneath the layout), and half from the legs. I would recommend spending more time on legs at the start of building your layout as sawing the frame from underneath is very difficult. The legs are then bolted to the frame for support. These are removable and travel separately. The overall construction was much sturdier than my old system so it was worth it.
Apologies for the quality of the images as i used my 'Smart' phone
Legs secured by diagonal supports:
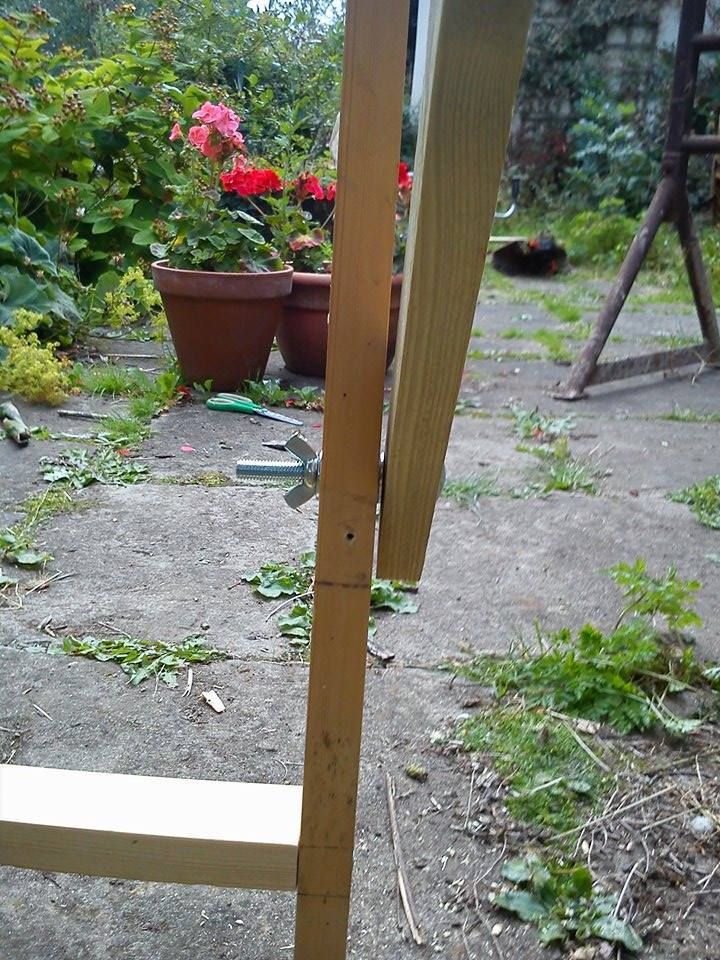
Supports are bolted to legs using bolts with washers inbetween sections and a butterfly nut:
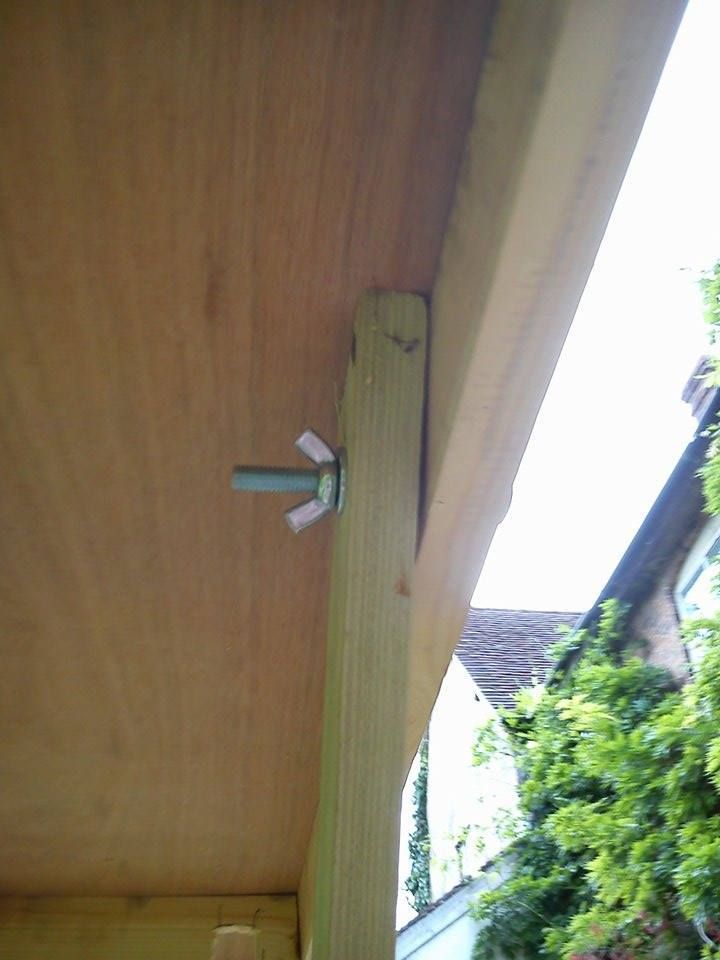
The supports are bolted to the frame using the same method as above:
The layouts due for Ludlow exhibition 22nd August so i'll try to keep posting work i do on the layout.
The folding legs are completed for the scenic section of the layout. I can't actually do it inside the house so I've had to wait for good clear days when I haven't been working or been distracted by something else. The legs are attached to the board via hinges which allow the legs to sit perpendicular when the layout is standing, or parallel to the board when the layout is being transported. This set up vs the old legs set up (Bolted on) is a lot more convenient at exhibitions as the number of people required to set up is less, the time taken to set up is less and also with legs that sit inside the frame the layout takes up less space when being transported. There was the issue that the folding legs would not sit in the frame as the cross pieces clashed, so i had to cut out half from the frame cross pieces (from underneath the layout), and half from the legs. I would recommend spending more time on legs at the start of building your layout as sawing the frame from underneath is very difficult. The legs are then bolted to the frame for support. These are removable and travel separately. The overall construction was much sturdier than my old system so it was worth it.
Apologies for the quality of the images as i used my 'Smart' phone

Legs secured by diagonal supports:

Supports are bolted to legs using bolts with washers inbetween sections and a butterfly nut:

The supports are bolted to the frame using the same method as above:

The layouts due for Ludlow exhibition 22nd August so i'll try to keep posting work i do on the layout.