Various scratch/kit built rolling stock - MR wagons and LNER teaks

Have any questions or tips and advice on how to build those bits that don't come ready made.
User avatar
flying scotsman123
Posts: 2233
Joined: Thu Jan 12, 2012 5:29 pm
Location: err, down there round the corner... not that one!!!

Various scratch/kit built rolling stock - MR wagons and LNER teaks

Post by flying scotsman123 »

Edit - I've turned this thread into somewhere for me to post some of my standalone modelling projects that aren't part of something greater. I'm easily distracted! Anything that's not really related to my main layout project I'll try and post here.

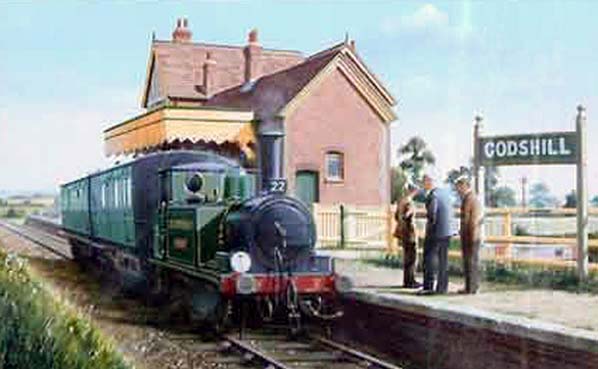
Well I've been spurred on to post some stuff up from that thread wondering where all the activity has gone. So here goes - something completely off topic for me, a "Ventnor West" set, comprising a Terrier and two LCDR 4 wheel coaches. I was very taken with this extremely small complete train when I visited the IoW last year:

Image

There are many things that I'd like to model, most of them sit in the back of my mind and never get much further, but I came across a complete Wills Terrier on eBay which I won for a whole ten pounds, inspired by some of Lysander's excellent restorations. It was in pretty poor condition, battered bufferbeams, a rather thick paint job, heavy with the glue and the chassis was completely seized up. I'm afraid I failed to take any progress photos of this, so a brief description will have to do. As it was whitemetal body with brass chassis, after extracting the motor and a couple of other delicate things it had a week long bath in industrial strength Nitromors, which soon saw to virtually all of the above problems.

Once all the bits were cleaned up (and it was just bits after that!) it was mostly a case of gluing them back together a bit more carefully, with the aid of some milliput to tidy things up. I did take a hacksaw to the bunker, I wanted the IoW extended edition. The rear of the bunker was a separate piece, but the toolbox was also mouled on as a solid lump of metal. So that was hacked off, but II'd have spent years filing it smooth. So with a bit of cunning and a vice, I encouraged the flare in the other direction and stuck it back in back to front.

Then it was out with the paint, and I decided I'd have a go at lining it out using a bowpen. It's not perfect, and nor is it finished, but here it is:

Image

Still needs boiler bands doing, along with some other details adding, pipes, safety valves etc (the originals were unusable). And I still haven't got back to wiring it up again. But I flitted...

...To the carriages....

I cobbled together some drawings on AutoCAD using a combination of some drawings I had of similar carriages and photos of the actual ones I wanted to model. Probably not exact, but they look right. A few bits of plastic were duly fed into the Silhouette cutter and with a bit of work, out popped this:

Image

This carriage has an extra layer of panelling, but all on the same principle. I took this picture to illustrate how I form the tumbehome. On the right is the main carriage side in 20 thou plastic, with 10 thou panelling layers. On the left is a 30 thou backing layer, with horizontal strips the right thickness to form the tumbehome. The 20 thou side is gently pre-bent, then the layers brought together with solvent which holds it all in the right shape. Easy, consistent tumblehome which also leaves a perfect gap for glazing later.

Image

Here the sides have been brought together to form the whole body, but the ends here are still loose, just a slide fit, going snugly inbetween the sides. The Strngth is all in a very thick floor (about 100 thou) along with "false" ends positioned slightly inward from the real end, as well as any intermediate compartment walls (not many with these as they're saloons) You can also see the beginnings of the roof here. The 30 thou side layer is slightly reduced in height compared to the side proper, leaving a ledge for a false roof to sit in, and the roof formers have been glued in place.

Next stage in roof production is 2-3mm strips of plastic laid longitudinally along the roof formers:

Image

Once set, a good sand down, test fitting until it is flush with the top edge of the ends. Followed by adding the roof proper like so:

Image

Pre-curving the plastic first helps, then plenty of solvent.

Here's things with a few more steps, both literally and figuratively:

Image

Hopefully all fairly obvious, the torpedo vents are ratio, everything else is bits of plastic sheet, plus some brass wire for the comms cord.

Then it was time for some paint, hurrah!

Image

and another excursion for the bowpen. It looks a bit thicker in the photo than in real life, but I was extremely pleased how it came out.

Finally, with some homemade transfers applied and blended in with a dab of paint and a small brush, and a scattering of other whitemetal components, here it all is:

Image

So there we are, a "Ventnor West" set, Terrier, LCDR saloon and brake third 4 wheelers. As I say, the Terrier still needs a little finishing off at some point, but it's largely a complete project, and now sits on a shelf in my room. One day it might get a little diorama, if the fancy takes me, but for now, this was a nice little self contained project.
Last edited by flying scotsman123 on Thu Dec 03, 2020 1:47 pm, edited 4 times in total.
Image
Stone station in pre-grouping days, my layout. Workbench for other projects here.
User avatar
Lysander
Posts: 2348
Joined: Wed Aug 22, 2007 9:53 pm

Re: A brief distraction on the Isle of Wight

Post by Lysander »

Absolutely fantastic coach building there. The lining and general livery application is superb. I like your Terrier, too. What motor have you in it?

Tony
Men with false teeth may yet speak the truth.......
Ex-Pat
Posts: 2201
Joined: Tue Feb 08, 2011 10:51 pm
Location: Newry Northern Ireland

Re: A brief distraction on the Isle of Wight

Post by Ex-Pat »

Stunning jobs - will you run them on Stone?
User avatar
flying scotsman123
Posts: 2233
Joined: Thu Jan 12, 2012 5:29 pm
Location: err, down there round the corner... not that one!!!

Re: A brief distraction on the Isle of Wight

Post by flying scotsman123 »

Lysander wrote:Absolutely fantastic coach building there. The lining and general livery application is superb. I like your Terrier, too. What motor have you in it?

Tony
Well at this precise moment, none at all, but it came with a 5-pole open frame motor, with a whacking great big flywheel that filled the cab. Is that what it would have come with originally? I haven't even got round to applying some volts to it yet to see if it runs, let alone plumbing it back in. In fact I'm not 100% sure where it is at the moment... When I'm in the mood for doing something electric-y (the urge does come every now and then, but not often!) I'll get it out and see what's what, but actually running it isn't a priority.
Ex-Pat wrote:Stunning jobs - will you run them on Stone?
Nope! I'm willing to be a little flexible with what I run on Stone, but not quite that much! Purely shelf eye-candy, and a souvenir of my trip to the Island, where I spent 2 excellent days on the railway, one in the company of their C+W head enjoying a full site tour and one during their all island engines gala. The carriages were good practice for trying out some coach-building techniques though, which will be thoroughly applied to things that will run on Stone, both North Staffs and a little beyond, but not quite as far as LCDR!
Image
Stone station in pre-grouping days, my layout. Workbench for other projects here.
User avatar
Mountain
Posts: 5884
Joined: Mon Oct 24, 2016 3:43 pm
Location: UK.

Re: A brief distraction on the Isle of Wight

Post by Mountain »

Excellent. Love that terrier. It has a character which makes it more attractive then the factory made products... And those lovely coaches!
Michaelaface
Posts: 429
Joined: Wed Nov 02, 2011 1:51 am

Re: A brief distraction on the Isle of Wight

Post by Michaelaface »

those coaches are outstanding, well done!
Bigmet
Posts: 10256
Joined: Tue Aug 14, 2007 2:19 pm

Re: A brief distraction on the Isle of Wight

Post by Bigmet »

flying scotsman123 wrote:...it came with a 5-pole open frame motor, with a whacking great big flywheel that filled the cab. Is that what it would have come with originally? I haven't even got round to applying some volts to it yet to see if it runs, let alone plumbing it back in. In fact I'm not 100% sure where it is at the moment... When I'm in the mood for doing something electric-y (the urge does come every now and then, but not often!) I'll get it out and see what's what...
I am pretty sure the Terrier will have taken the same 'special chassis' that Wills sold for the J69 and one or two other small tank locos with 3'9" or 4' nominal diameter driving wheels. This was designed to take the K's mk2 motor, so that will be most likely what you have, and the circa 15mm diameter wheels were available separately via Wills. Oh, and you will need a set of Romford gears, and crankpins most likely too, and you might want to find some stuff to build the pick ups from.
(Those were the days when 'kit' meant 'nothing like all the pieces to make a complete working model': you will need to graft away at finding a retailer prepared to obtain all the pieces required. My favourite in this department a Stephen Poole chassis kit which included a piece of nickel silver wire for the driving wheel pick ups, just long enough to reach between the driving wheel flange backs when straight. Bend it slightly to to give it spring pressure for contact, too short. But it didn't matter because there was only a 4mm wide slot inside the boiler for the motor, so you had plenty of time to find some longer piece of wire while you spent days excavating the excess whitemetal to allow a small motor to fit - at a time when rotary tools with side cutters were only easily available to dentists. But I digress.)

I'd be thinking a modern motor and gearbox which will run sweetly and be fully concealed, High Level probably the best place to look.
User avatar
flying scotsman123
Posts: 2233
Joined: Thu Jan 12, 2012 5:29 pm
Location: err, down there round the corner... not that one!!!

Re: A brief distraction on the Isle of Wight

Post by flying scotsman123 »

Thanks for the comments folks. :) Bigmet, thank you for that description, it does sound like I've got all original parts. Like I say, as it isn't for anything, making it run isn't a high priority, certainly not enough to justify buying a shiny new motor for it. Bear in mind the loco cost £10 and the carriages I think maybe £5 for both of them in materials and bits? But I've got the necessaries for contacts etc. so if the original motor does run, I might as well get it going.
Image
Stone station in pre-grouping days, my layout. Workbench for other projects here.
User avatar
Chops
Posts: 884
Joined: Mon Oct 08, 2018 8:25 am

Re: A brief distraction on the Isle of Wight

Post by Chops »

Brilliant modeling. I could never achieve that. I didn’t know the Isle of Wight had a preserved line.
You have to be the decider, of course, but to see that charming set huffing around a very small,
but intricately detailed layout would, excuse the pun, riveting.
Nessie rocks!
User avatar
flying scotsman123
Posts: 2233
Joined: Thu Jan 12, 2012 5:29 pm
Location: err, down there round the corner... not that one!!!

Re: A brief distraction on the Isle of Wight

Post by flying scotsman123 »

Chops wrote:Brilliant modeling. I could never achieve that. I didn’t know the Isle of Wight had a preserved line.
You have to be the decider, of course, but to see that charming set huffing around a very small,
but intricately detailed layout would, excuse the pun, riveting.
Thanks Chops. Oh it's a superb little heritage railway. It's about 5 miles long, but for me the biggest attraction by far is their pre-grouping carriages which have been magnificently restored; bogie carriages fro the LBSCR and SECR and 4 wheel carriages from the IoW Central, LCDR, LBSCR, and NLR. Plus of course Terriers and the unique O2.

Yes a very small, intricately detailed layout is extremely tempting! And like I said, I may build a little diorama for it one day. I'm a big fan of these types of paintings:

Image

So something like that would be very nice, or perhaps a small scene from the preserved railway. One day, but for now, it sits looking pretty on my shelf, I have other modelling priorities!
Image
Stone station in pre-grouping days, my layout. Workbench for other projects here.
User avatar
flying scotsman123
Posts: 2233
Joined: Thu Jan 12, 2012 5:29 pm
Location: err, down there round the corner... not that one!!!

Re: Scratchbuilt GWR Toplights

Post by flying scotsman123 »

Rather than create new threads every time I start (or even occasionally finish) a random bit of modelling unconnected with my main layout interests, I'll carry on posting them here, and update the thread title to reflect the latest thing. Once I've put up the few projects that I've quietly been working on over the last few months it may not get used for a while, who knows!

Anyway, I like building carriages, and GWR toplights are I think some of the most elegant and finely liveried coaches ever built when painted in the fully panelled style. They're also quite fiddly, and I like a challenge. So using similar methods, here we are:

Image

Image

The only real difference in construction to the LCDR coaches above is the roof, because these GWR toplights have gutters. The gutters are part of the side; simply a thin strip of 20 thou plasticard with a groove scribed in. The roof is constructed in the same way up to "planking" it with strips of plasticard over formers, but once sanded down artist's cartridge paper is stuck over the top with double-sided sellotape. It then sits inbetween the gutters, an on top of the top edge of the inner side.

I'll get round to doing underframes and building some bogies at some point, but it was the exercise of making the bodies that was the main challenge for these.
Image
Stone station in pre-grouping days, my layout. Workbench for other projects here.
User avatar
Lysander
Posts: 2348
Joined: Wed Aug 22, 2007 9:53 pm

Re: Scratchbuilt GWR Toplights

Post by Lysander »

I simply love Toplights, and yours are excellent.

Tony
Men with false teeth may yet speak the truth.......
User avatar
flying scotsman123
Posts: 2233
Joined: Thu Jan 12, 2012 5:29 pm
Location: err, down there round the corner... not that one!!!

Re: Scratchbuilt GWR Toplights

Post by flying scotsman123 »

Thanks Tony, I thought they'd be right up your street! :)
Image
Stone station in pre-grouping days, my layout. Workbench for other projects here.
User avatar
flying scotsman123
Posts: 2233
Joined: Thu Jan 12, 2012 5:29 pm
Location: err, down there round the corner... not that one!!!

Re: Various scratch/kit built rolling stock - IoW & Toplights

Post by flying scotsman123 »

I thought I'd put a few non NSR bits of modelling that I've been working on recently, that nonetheless will see some use on my layout, up here. Firstly a couple of LMS carriages in early livery:

Image

These are the humble mainline period 1 coaches, I snapped 4 up for a good price, I wanted to see how easy they'd be to line out in the earlier style, the panelling all being moulded crisply it came out quite well. The newly formed LMS didn't doo much with Stone until about 1930ish when they re-signalled it, so that's sort of my cut-off date, allowing me some leeway for early LMS and also to run some neighbouring pre-grouping stock if I fancy.

No excuses are needed for wagons from different companies though. The Cambrian and NSR certainly did trade, so a couple of kits from Cambrian themselves were thrown together:

Image

Again, the main attraction for me was the rather neat livery they carried. Rather than pay through the nose for transfers which I hate doing, these were cut out from plain white transfer sheet using my silhouette cutter. It did mean that as well as each letter having to be applied separately, each bit of the crest had to be too, but with a bit of patience I got what I think is quite a good result.

Finally, a style of coach I've been dying to have a crack at modelling for ages, the LNWR Wolverton diners, like these:

Image

The LNWR's Euston-Manchester Express went through Stone, and I'm assuming there was a dining car in the consist. I didn't need much convincing it has to be said. :) Well, it's very much a work in progress, but the sides are nearly complete:

Image

And not looking too shabby. With a bit of willpower I managed to convince the 20 thou plastic sides to make those rather tight radii curves, with the persuasion of a fair amount of Mek-Pak, which was the main challenge (so far) with these style of coaches. I'm determined to make some more progress on my layout now first before coming back to these, but it may not last...
Image
Stone station in pre-grouping days, my layout. Workbench for other projects here.
Ex-Pat
Posts: 2201
Joined: Tue Feb 08, 2011 10:51 pm
Location: Newry Northern Ireland

Re: Various scratch/kit built rolling stock - LMS period 1 coaches, LNWR diner, Cam Rys wagons

Post by Ex-Pat »

I'm not familiar with that diner and think it comes over to me at first glance as more American than English. It's a really intricate challenge - and already looking extremely convincing (as indeed are the other coaches & wagons).
Post Reply