
Thanks, the Oldburys were lined with a bow pen... The GNR Directors Saloon I actually can't remember... Lol 8t was done months ago... Might be in a video I did on how to do wood effects... But I image it was done with a bow pen or a cocktail stick.flying scotsman123 wrote:That is exquisite Matt. I think the barely visible print lines really enhance the wood effect. Likewise the oldburys. I presume the lining is with a bowpen? Extremely neat anyhow.
BMR Workbench.
Re: BMR Workbench.
- Youtube/bluebellModelrailway
- https://railway-modeller-mw.weebly.com/
- VECTIS 3D: mademe.co.uk/shop/vectis-3d-models/
- https://railway-modeller-mw.weebly.com/
- VECTIS 3D: mademe.co.uk/shop/vectis-3d-models/
Re: BMR Workbench.
Thanks yes need to give that a run... But it's an interesting thing certainly gets people talking when it goes out and gets a run or just display... Its a bit of fun.Bufferstop wrote:The might have been air smoothed Schools looks great, it is an example of the generation of steam locos we never got to see. The American streamlined 4-4-0s of the thirties and fourties were great looking locos that set a style statement that the first generation diesels had to live up to.
- Youtube/bluebellModelrailway
- https://railway-modeller-mw.weebly.com/
- VECTIS 3D: mademe.co.uk/shop/vectis-3d-models/
- https://railway-modeller-mw.weebly.com/
- VECTIS 3D: mademe.co.uk/shop/vectis-3d-models/
Re: BMR Workbench.
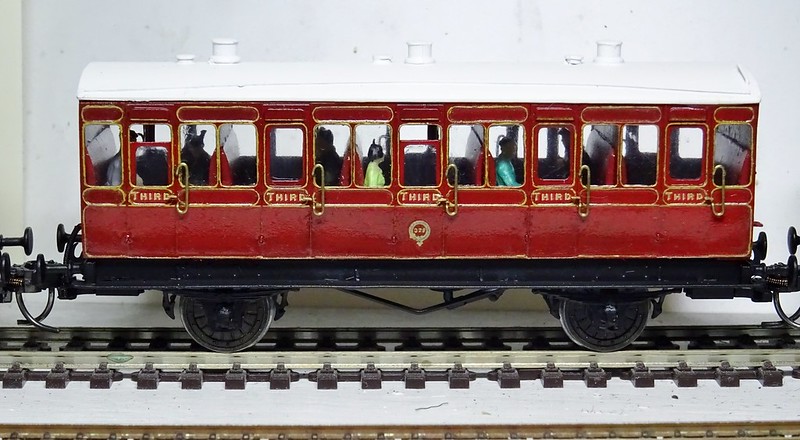
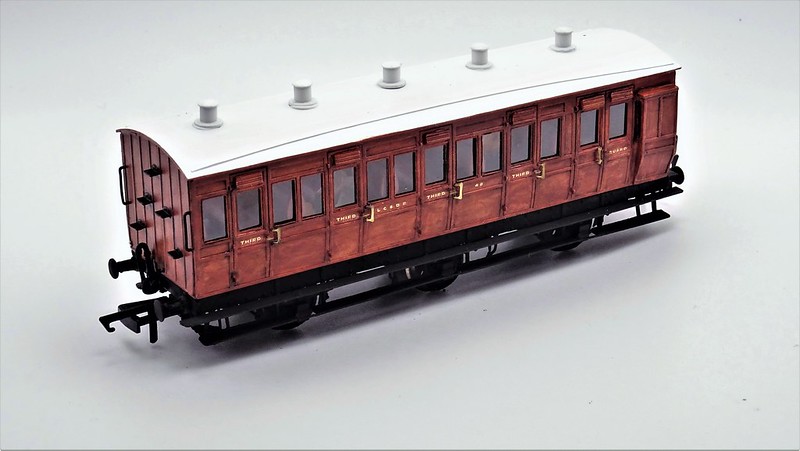
Isolation lockdown progress, completed a kit purchased back in August, All Third Roxey Mouldings kit, which is a feature of my YouTube workbench series...
- Youtube/bluebellModelrailway
- https://railway-modeller-mw.weebly.com/
- VECTIS 3D: mademe.co.uk/shop/vectis-3d-models/
- https://railway-modeller-mw.weebly.com/
- VECTIS 3D: mademe.co.uk/shop/vectis-3d-models/

Re: BMR Workbench.
That looks lovely!
Modelling On A Budget ---》 https://www.newrailwaymodellers.co.uk/F ... 22&t=52212
Re: BMR Workbench.
Might as well update this while I am here...
So lockdown, Covid, meant a very busy time for me and people finding those hobbies again and doing all those little jobs.
I did find some time to do some items for me...
Hornby S15, Repaint
So looking to replace my old DJH S15, that's done a good job over the years, and was looking for some reliability, haha, so I saw a cheapish Hornby S15 with the bogie flat sided tender, in the late BR livery, for me I would need to repaint, line, and number it to 847.Model was checked as I know they have motor issues, and also electronic issues... that went fine, and tested ok.
So model was stripped down, cleaned, masked, print removed, and first coats of Railmatch olive green put on lightly, I lined the model with HMRS LNER lining sheet, and hand lined the running plate, the numbers and lettering were from the Maunsell letting and numbers sheet, and the etched plates from Narrow Planet.
Then the motor went up in smoke traced to a fault on the DCC plug board, I removed that and replaced it with more standard part from something else, new motor was added, and has been fine ever since hopefully...
Completed June 2019, Image gallery: https://flic.kr/s/aHsmEunbtV

Rails / Dapol Terrier.
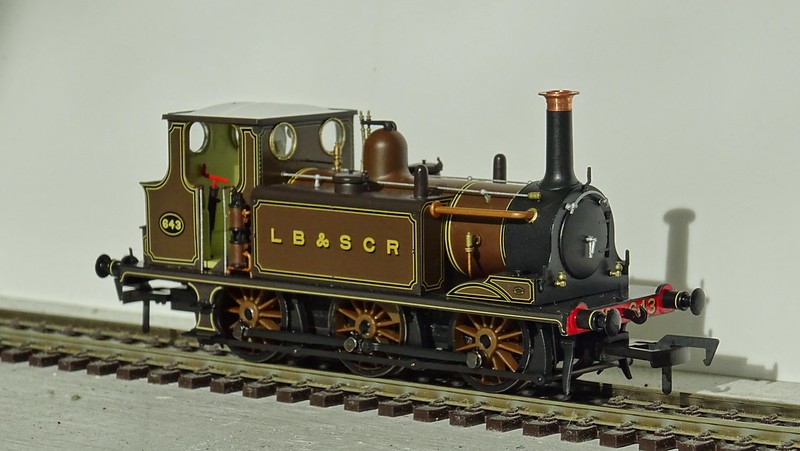
So brought LBSCR Umber ex-Gypsy Hill, I think it was... and we all know what I like to do to terriers, So dome was moved forwards 3mm ish... additional pipework added, New smokebox door with correct straps, Rename and renumber, later the brake blocks were changed to the later A1X type, from DCC supplies who are the Dapol spares provider.
Finished in May 2020, full gallery here: https://flic.kr/s/aHsmNojMPY

Branchlines, Ex LBSC, All First Bogie
This was a different kit maker I have never made before, not as difficult as the LBSCR directors, but close, all parts included, the brass roof was a bit of a pain, and decided to move away from the instructions in a few places, finished in SR olive green and lined... oh what fun... numbered 7598. it was a challenging kit, builds up ok, some room for the maker to improve bits and pieces, overall came out pretty good.
Completed in August 2020, image gallery: https://flic.kr/s/aHsmMmVTdX

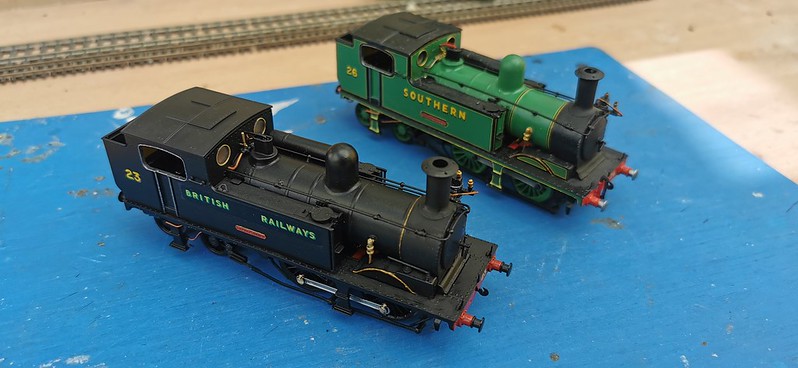
Some Isle of Wight O2, ex DJM O2's
These were basically prototypes, one brought from ebay, another given to me by someone who did research for the project for Kernow, which was motorless... I wanted to change the identities, so the eBay O2, was stripped and cleaned, as it was a mainland version I could stick with it and it in 1930's condition or I could 3D print an extension plate, so I picked the latter, and chose Whitwell w26, in Malachite, with my own 3D printed pump and tanks.
The other was a Calbourne deco sample, and this one being black, I stripped, and 3D printed any missing parts like the tank fillers, or the front of the tank and step, I had to also source a motor, again Dcc supplies had limited DJM spares, so sourced the motor and DCC wiring... I removed the body molding of the strengthening plate on the tanks so it could become W23 Totland.
Both models have a unique way of collecting power so had to make the Bronze wipers under the running plate that picked up power from the chassis block.
I made a decision on a double livery, as it was in the transition period, So one side is Southern and the other British Railways, many thanks to Precision Labels who made up the British Railways Sunshine lettering for the O2's as Foxes were over size.
Transfers were a mix of HMRS, Fox lining, and Model Master for the etched plates.
Paint from Halfords, and Railmatch.
June 2021, W23: https://flic.kr/s/aHsmUxHfhE
June 2021, W26: https://flic.kr/s/aHsmL218sJ


That's all folks...
So lockdown, Covid, meant a very busy time for me and people finding those hobbies again and doing all those little jobs.
I did find some time to do some items for me...
Hornby S15, Repaint
So looking to replace my old DJH S15, that's done a good job over the years, and was looking for some reliability, haha, so I saw a cheapish Hornby S15 with the bogie flat sided tender, in the late BR livery, for me I would need to repaint, line, and number it to 847.Model was checked as I know they have motor issues, and also electronic issues... that went fine, and tested ok.
So model was stripped down, cleaned, masked, print removed, and first coats of Railmatch olive green put on lightly, I lined the model with HMRS LNER lining sheet, and hand lined the running plate, the numbers and lettering were from the Maunsell letting and numbers sheet, and the etched plates from Narrow Planet.
Then the motor went up in smoke
Completed June 2019, Image gallery: https://flic.kr/s/aHsmEunbtV
Rails / Dapol Terrier.
So brought LBSCR Umber ex-Gypsy Hill, I think it was... and we all know what I like to do to terriers, So dome was moved forwards 3mm ish... additional pipework added, New smokebox door with correct straps, Rename and renumber, later the brake blocks were changed to the later A1X type, from DCC supplies who are the Dapol spares provider.
Finished in May 2020, full gallery here: https://flic.kr/s/aHsmNojMPY
Branchlines, Ex LBSC, All First Bogie
This was a different kit maker I have never made before, not as difficult as the LBSCR directors, but close, all parts included, the brass roof was a bit of a pain, and decided to move away from the instructions in a few places, finished in SR olive green and lined... oh what fun... numbered 7598. it was a challenging kit, builds up ok, some room for the maker to improve bits and pieces, overall came out pretty good.
Completed in August 2020, image gallery: https://flic.kr/s/aHsmMmVTdX
Some Isle of Wight O2, ex DJM O2's
These were basically prototypes, one brought from ebay, another given to me by someone who did research for the project for Kernow, which was motorless... I wanted to change the identities, so the eBay O2, was stripped and cleaned, as it was a mainland version I could stick with it and it in 1930's condition or I could 3D print an extension plate, so I picked the latter, and chose Whitwell w26, in Malachite, with my own 3D printed pump and tanks.
The other was a Calbourne deco sample, and this one being black, I stripped, and 3D printed any missing parts like the tank fillers, or the front of the tank and step, I had to also source a motor, again Dcc supplies had limited DJM spares, so sourced the motor and DCC wiring... I removed the body molding of the strengthening plate on the tanks so it could become W23 Totland.
Both models have a unique way of collecting power so had to make the Bronze wipers under the running plate that picked up power from the chassis block.
I made a decision on a double livery, as it was in the transition period, So one side is Southern and the other British Railways, many thanks to Precision Labels who made up the British Railways Sunshine lettering for the O2's as Foxes were over size.
Transfers were a mix of HMRS, Fox lining, and Model Master for the etched plates.
Paint from Halfords, and Railmatch.
June 2021, W23: https://flic.kr/s/aHsmUxHfhE
June 2021, W26: https://flic.kr/s/aHsmL218sJ
That's all folks...
- Youtube/bluebellModelrailway
- https://railway-modeller-mw.weebly.com/
- VECTIS 3D: mademe.co.uk/shop/vectis-3d-models/
- https://railway-modeller-mw.weebly.com/
- VECTIS 3D: mademe.co.uk/shop/vectis-3d-models/
Re: BMR Workbench.
They look lovely!
Modelling On A Budget ---》 https://www.newrailwaymodellers.co.uk/F ... 22&t=52212
Re: BMR Workbench.
I can. That S15 looks the business! I will have one like a shot if I ever find evidence that one made it to Ferme Park (KX end of the ECML) in BR days. (The Q1 and smaller Southern 0-6-0 classes definitely did, working London area transfer freight, so I have Mr Bulleid's giant Coffeepot and a dainty C.)
Re: BMR Workbench.
Thanks for the comments.
So another one to add as this has been on going for 3 years.
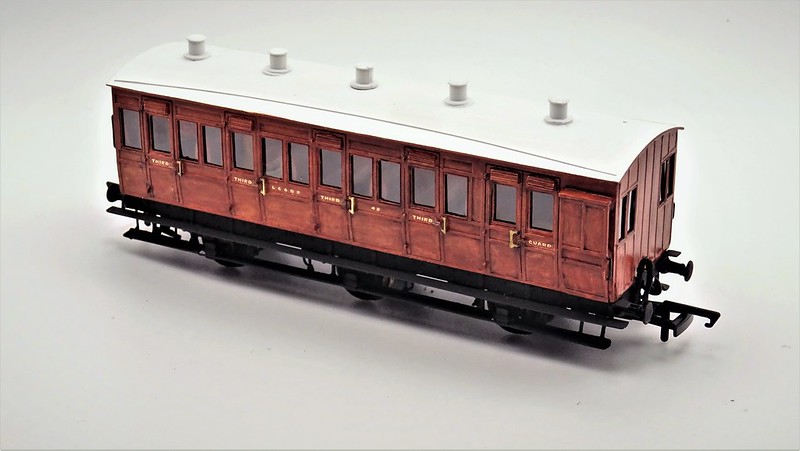
D&S kit, LC&DR Brake Second/Third numbered 48, borrowing information from my Bluebell contacts, its been a challenge as its under a tarpaulin and the only LCDR liveried carriage is 114, luckily my contact told me about a few plans like adding the duckets on the brake taken from the peoples millions carriage, where the duckets were removed and saved.. so helped a bit with decisions on what parts to use.
Second challenge was Transfers, currently to my knowledge and also makers of LCDR Roxey Mouldings, there is no one (apart from in Australia) that does LC&DR transfers in OO.
So that took about 3/4 months to draw some up, and also make a few up from other letters ect... so least they are available now if anyone wants them.
Finished in Teak colours... was quite a labour and research intensive kit to build, but quite pleased with the result considering the really poor instructions.
Photo's of the kit build: https://flic.kr/s/aHsmW8PPd8
So another one to add as this has been on going for 3 years.
D&S kit, LC&DR Brake Second/Third numbered 48, borrowing information from my Bluebell contacts, its been a challenge as its under a tarpaulin and the only LCDR liveried carriage is 114, luckily my contact told me about a few plans like adding the duckets on the brake taken from the peoples millions carriage, where the duckets were removed and saved.. so helped a bit with decisions on what parts to use.
Second challenge was Transfers, currently to my knowledge and also makers of LCDR Roxey Mouldings, there is no one (apart from in Australia) that does LC&DR transfers in OO.
So that took about 3/4 months to draw some up, and also make a few up from other letters ect... so least they are available now if anyone wants them.
Finished in Teak colours... was quite a labour and research intensive kit to build, but quite pleased with the result considering the really poor instructions.
Photo's of the kit build: https://flic.kr/s/aHsmW8PPd8
- Youtube/bluebellModelrailway
- https://railway-modeller-mw.weebly.com/
- VECTIS 3D: mademe.co.uk/shop/vectis-3d-models/
- https://railway-modeller-mw.weebly.com/
- VECTIS 3D: mademe.co.uk/shop/vectis-3d-models/
Re: BMR Workbench.
You know how much I love lining right?
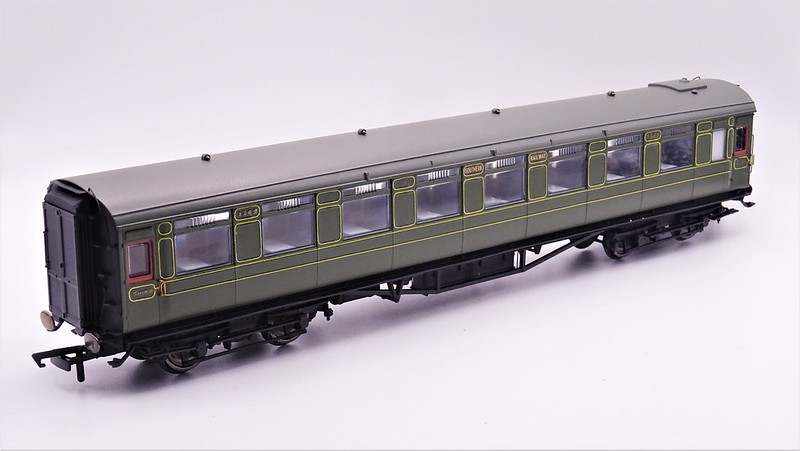
I received my Hornby Maunsell Third Dining saloon, when announced it was going to be lined olive maunsell greet, for what ever reason this changed when the decoration was shown, to plain olive so 1940's but unfortunately or fortunately for me the body shell tooling remained 30's there's some small paneling differences between the two.. but as I say no idea why... either cost or more profit who knows... just means more work for me.
So 10 hours, multiple Fox Transfer sheets later, and some custom SR letting as it's not standard... I finally reached the end, and also it has lights
- Youtube/bluebellModelrailway
- https://railway-modeller-mw.weebly.com/
- VECTIS 3D: mademe.co.uk/shop/vectis-3d-models/
- https://railway-modeller-mw.weebly.com/
- VECTIS 3D: mademe.co.uk/shop/vectis-3d-models/
Re: BMR Workbench.
You have patience and it really looks good! I only line if I have to, but lining does bring out the character of the item. My lining is admittedly painted on freehand and is not that great, so when I see lovely lining even by transfers I really appreciate it. Makes you glad you are not trying to do it in N gauge. I am amazed by the tallents of people.
Modelling On A Budget ---》 https://www.newrailwaymodellers.co.uk/F ... 22&t=52212
Re: BMR Workbench.
Indeed, I probably couldn't see it in 2mm, which is why I don't do 2mm repairs these days, as I just can't see it.Mountain wrote:You have patience and it really looks good! I only line if I have to, but lining does bring out the character of the item. My lining is admittedly painted on freehand and is not that great, so when I see lovely lining even by transfers I really appreciate it. Makes you glad you are not trying to do it in N gauge. I am amazed by the tallents of people.
Anyway round 2... the Restaurant car..
I picked this up from a well-known auction site for £30 which was reasonable. I didn't want to pay too much for a few reasons, mainly costs, and what I thought it was worth as there was so much missed in the painting stage it just smells of Hornby cutting corners. It was released as ever, unlined, so another lining job for me... but the more I looked at it, the main window glazing the edges were left clear and not painted like those on the dining saloon above... just another job to do... I decided to do one side at a time, using Fox transfer again.. with HMRS for the lettering/numbers. Railmatch satin to seal it all in.
First I look at photos of the carriage from that era, and of it lined... of which Hornby say it was never lined... which is BS.. as there's one on the donation form of the Bluebell's carriage.
Having got a reference, I then put all the corners in place to make up the boxes then I will add the straight lines to join them all up.
The carriage has its letters and numbers removed, so thinners and cotton bud, let it soak in and rub away and they come off very easily.
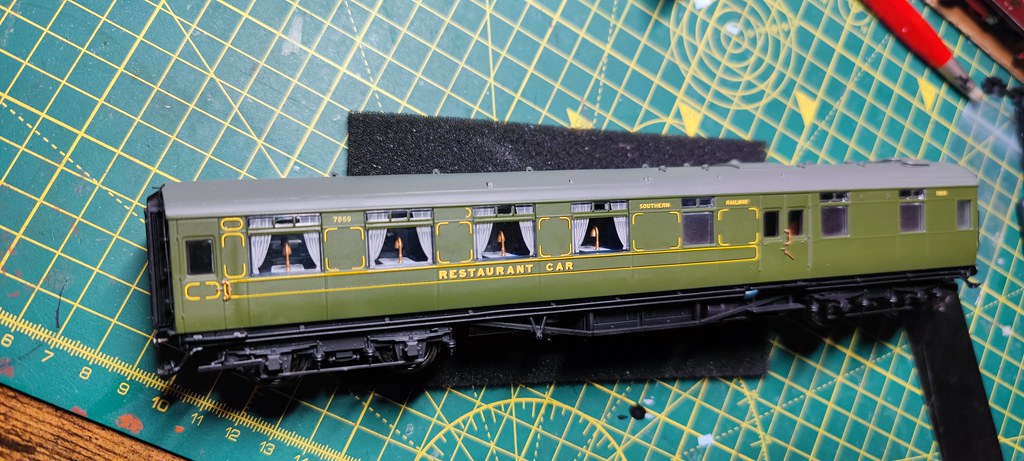


This was side one done, but windows required some attention.
The edges on the main seating windows were painted at the top but not round the edges of the lower big window, just left clear.. which is pretty poor. So small paint brush, and I have some top Teak paint, painting teak is 3 stages usually, white, cream, and teak weathered top paint to finish, as I am just doing the edges and the drop lights on the doors, I am just going to use the top weathered coat. I am using a mix/copy of Pheonix paints which I got mixed down at a certain orange DIY store, for £2.... bit cheaper than the £25 it would cost to get the paint to my location.


After finishing, and varnish it was of course side 2... and same again same process... before I do move on, I varnished with the windows in, these were taped off to stop damage, I was considering removing the windows but as they are very well glued in on the Saloon, and I didn't want to chip the edges, I decided to keep them in on this occasion.. which worked out fine.
Anyway here's a photo step by step..
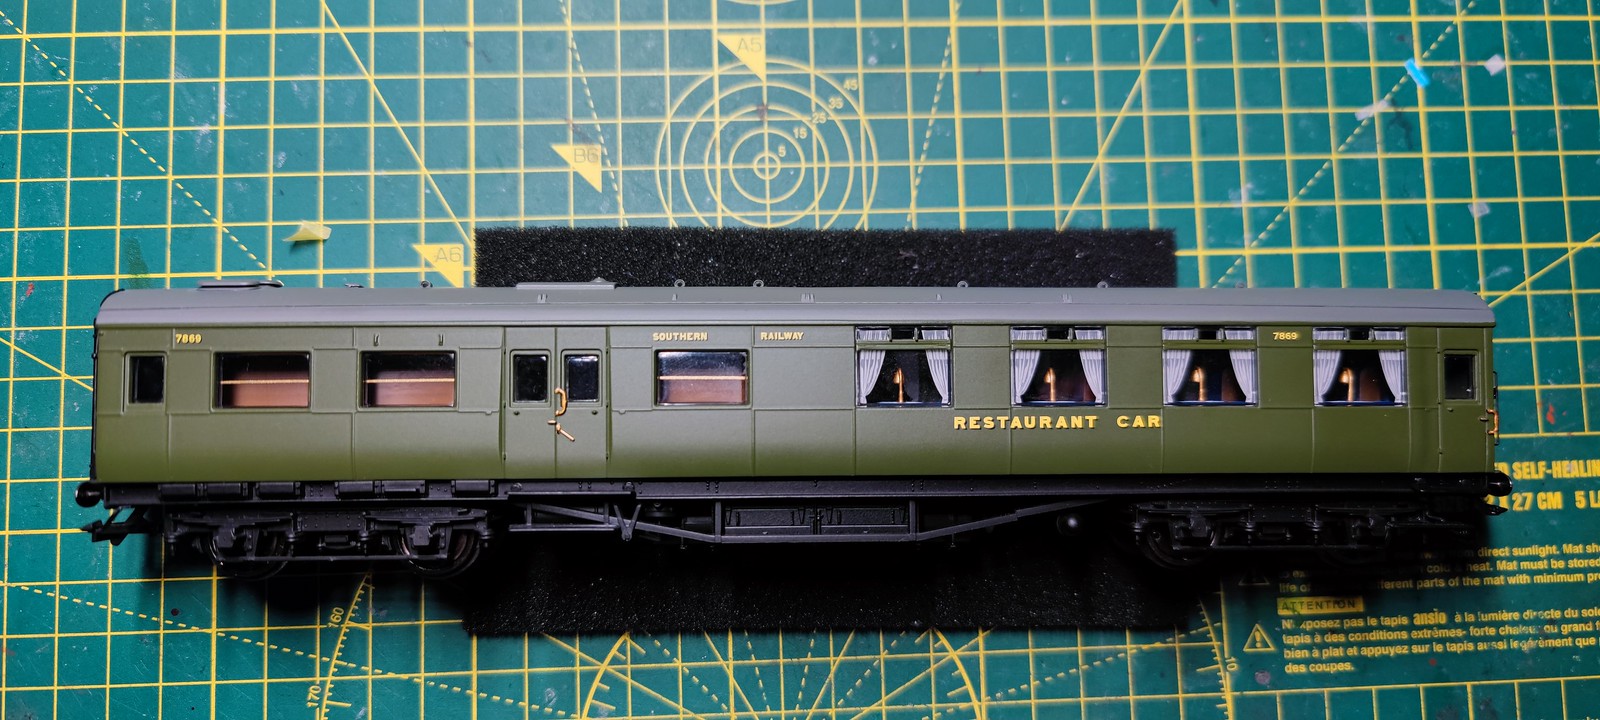


And that is the pair of those complete, as you can see the lining and the window edging really does lift an otherwise bland paint job... and even in a way changes the colour and what the eye sees.
- Youtube/bluebellModelrailway
- https://railway-modeller-mw.weebly.com/
- VECTIS 3D: mademe.co.uk/shop/vectis-3d-models/
- https://railway-modeller-mw.weebly.com/
- VECTIS 3D: mademe.co.uk/shop/vectis-3d-models/