From a "Hunt" to a "Shire"

What are you up to on your workbench
Ex-Pat
Posts: 2201
Joined: Tue Feb 08, 2011 10:51 pm
Location: Newry Northern Ireland

Re: From a "Hunt" to a "Shire" - & The Lady Vanishes

Post by Ex-Pat »

A minority of the D11/2’s had a curved handrail on the smokebox door and had the numberplate lowered to immediately above the opening handle.  “Lord Glenallan” fell into this category.<br />This shot was taken before I realized that the smokebox door actually opens on this model and can be removed, thus making work on it much easier.<br />The 60079 numberplate is a spare and I was thinking I could use it if I found a way of replacing the “00” with “26”.
A minority of the D11/2’s had a curved handrail on the smokebox door and had the numberplate lowered to immediately above the opening handle. “Lord Glenallan” fell into this category.
This shot was taken before I realized that the smokebox door actually opens on this model and can be removed, thus making work on it much easier.
The 60079 numberplate is a spare and I was thinking I could use it if I found a way of replacing the “00” with “26”.
P1060976.JPG (201.81 KiB) Viewed 3148 times
The smokebox door has now had the previously higher numberplate cut/filed away and also the handrail knobs removed.
P1060978.JPG (163.79 KiB) Viewed 3148 times
The handrail knobs were pushed out from the back of the door.
P1060979.JPG (162.09 KiB) Viewed 3148 times
The 60079 numberplate has had the “00” filed down and has been attached.
P1060982.JPG (152.97 KiB) Viewed 3148 times
Attention was then switched to applying the name transfers.  “Flora McIvor” donated the “LOR”, and “Clan Mckinnon” donated the “LAN”.  Every other letter had to be individually cut out and applied.<br />Here I have reached the stage of having applied the new number and am in the throes of aligning the end of the name.<br />The camera is of course notoriously cruel for showing up the slightest blemish and the transfer film is evident – hopefully eventual weathering will cover it up!
Attention was then switched to applying the name transfers. “Flora McIvor” donated the “LOR”, and “Clan Mckinnon” donated the “LAN”. Every other letter had to be individually cut out and applied.
Here I have reached the stage of having applied the new number and am in the throes of aligning the end of the name.
The camera is of course notoriously cruel for showing up the slightest blemish and the transfer film is evident – hopefully eventual weathering will cover it up!
P1060983.JPG (142.68 KiB) Viewed 3148 times
T.B.C.
Ex-Pat
Posts: 2201
Joined: Tue Feb 08, 2011 10:51 pm
Location: Newry Northern Ireland

Re: From a "Hunt" to a "Shire" - & The Lady Vanishes

Post by Ex-Pat »

The curved handrail has been fitted.  I couldn’t think of a way to produce the “26” on the numberplate so I just applied transfers instead.
The curved handrail has been fitted. I couldn’t think of a way to produce the “26” on the numberplate so I just applied transfers instead.
P1060992.JPG (172.91 KiB) Viewed 3147 times
Only one more job to do now – the cabside lining on 62679 is not the rectangle as shown here, but follows the contour of the footplate.
P1060994.JPG (187.8 KiB) Viewed 3147 times
It was therefore necessary to scrape off the bottom of the rectangle.
P1060997.JPG (172.47 KiB) Viewed 3147 times
Lining finished – didn’t have correct curved lining so had to use several short straight pieces.  The Route Availability marking “RA6” also needs to be re-sited but I haven’t got the transfers yet – Warley shopping list started already.
Lining finished – didn’t have correct curved lining so had to use several short straight pieces. The Route Availability marking “RA6” also needs to be re-sited but I haven’t got the transfers yet – Warley shopping list started already.
P1070001.JPG (150.13 KiB) Viewed 3147 times
Then the sting in the tail - only now did Sod’s/Murphy’s Law play its part – on trawling for the Route Availability transfers I just happened to notice that Modelmaster no longer produce set 4007A but instead now produce the full range of the D11/2 Class names – so I could have saved a lot of letter cutting!!!

Much weathering now needed methinks.
User avatar
luckymucklebackit
Posts: 3712
Joined: Mon Jul 18, 2011 7:05 am
Location: Eaglesham (Again)
Contact:

Re: From a "Hunt" to a "Shire"

Post by luckymucklebackit »

Could think of another name to go on there :D

Starts with "L" and ends in "backit" (but is spelt correctly!!!!

Jim
This Signature Left Intentionally Blank, but since I have written this and I intended to do it, this Signature is intentionally not blank. Paradox or What?
My layout - Gateside and Northbridge
Image
Ex-Pat
Posts: 2201
Joined: Tue Feb 08, 2011 10:51 pm
Location: Newry Northern Ireland

Re: From a "Hunt" to a "Shire"

Post by Ex-Pat »

Long time not posted - but something different. (Sorry Jim - I haven't worked it out yet!)

This is a partially finished Kirk coach kit that I shamefully started possibly 3 years ago, and just put to one side.
I didn’t start taking photos until this stage had been reached.  The upper half of the body has already been painted custard (adviseable to do so before gluing in the glazing strip).
I didn’t start taking photos until this stage had been reached. The upper half of the body has already been painted custard (adviseable to do so before gluing in the glazing strip).
Holes have been drilled in the roof for the torpedo vents which are just lying there loosely.
The constituent parts for the bogies are laid out.
The axle bushes have been glued into the frames.
Attachments
A trial fitting of the roof.
Ex-Pat
Posts: 2201
Joined: Tue Feb 08, 2011 10:51 pm
Location: Newry Northern Ireland

Re: From a "Hunt" to a "Shire"

Post by Ex-Pat »

The bogies are now assembled - the brown marks are residues of the production process
Although they ran freely, I found a couple of days later that they had seized up and therefore had to break the joints and insert small pieces of plastikard.
Not a good photo, but you can see the small square of plastikard about to be inserted in the gap which is being held open by some implement or other
A test couple-up.
A test couple-up.
Attention is turned to affixing the underframe trusses.
Bogies attached and that satisfying time has arrived being able to test-push it round the layout.
T.B.C.
Last edited by Ex-Pat on Sat Jan 20, 2018 7:53 pm, edited 1 time in total.
User avatar
flying scotsman123
Posts: 2233
Joined: Thu Jan 12, 2012 5:29 pm
Location: err, down there round the corner... not that one!!!

Re: From a "Hunt" to a "Shire"

Post by flying scotsman123 »

Looking very nice - I quite like the colour scheme it's in at the moment even though its only half done, looks like it could be some sort of pre-grouping livery! I know what you mean about leaving coach kits, I still haven't finished my first LNWR ratio coach, I built most of it and painted one side and was so sick of the intricate livery I couldn't bring myself to do the other! Still, I'll get to it eventually.
Image
Stone station in pre-grouping days, my layout. Workbench for other projects here.
User avatar
carnehan
Posts: 1319
Joined: Mon Jan 07, 2013 9:44 pm

Re: From a "Hunt" to a "Shire"

Post by carnehan »

Lovely work as usual railwayjim.

Paul
User avatar
manna
Posts: 1124
Joined: Mon May 31, 2010 10:13 am
Location: S Aust or Qld

Re: From a "Hunt" to a "Shire"

Post by manna »

G'Day Gents

I usually cheat on Kirk kits, I buy Bachmann 'Thompson' bogies, I have made Kirk's bogies but life's to short :lol:

manna
EDGWARE GN. Steam in the Suburbs
Ex-Pat
Posts: 2201
Joined: Tue Feb 08, 2011 10:51 pm
Location: Newry Northern Ireland

Re: From a "Hunt" to a "Shire"

Post by Ex-Pat »

Thanks all for your comments.

Yes flying scotsman123 - it could be a trial watered-down G.W.R. livery.

Sorry manna - I couldn't cheat like that, but I don't think the Kirk bogies are that time-consuming (unless a lot of remedial work is necessary) - Must take a closer look at your coaches now!

I always find the brake cylinder gear more fiddly.
This end has worked reasonably well.
But I'm going to have fun with this one as the angled lever (seen on the block of wood) snapped when cutting it from the sprue.
And the snapped lever was enough to make me put it to one side yet again.

However as the Winter Olympics have now started I shall shortly be back with a rather appropriate topic.
Ex-Pat
Posts: 2201
Joined: Tue Feb 08, 2011 10:51 pm
Location: Newry Northern Ireland

Re: From a "Hunt" to a "Shire" and Hornby Ski Slope A3's

Post by Ex-Pat »

Following Mike Parkes’ post of 9th November 2017 here:

viewtopic.php?f=16&t=27613&start=150#p639913

I started researching what is popularly described as the Hornby Ski Slope A3 and found virtually a whole thread devoted to it on the other channel:

http://www.rmweb.co.uk/community/index. ... law/page-2

It’s first mentioned at (7) in Post number 26, occurring with “Book Law” initially and then other versions.

I persevered, read the whole thread, and then set to work on my 2 purchases of “Minoru”.
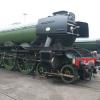
This shows how the tender buffers are in line with those of the wagon.
And this illustrates the problem by showing how the front buffers are not! – and you can also see the Ski Slope effect (although I think Aircraft Carrier is a better analogy).
There is even a buffer height difference between the 2 models.
So, the bodies came off and finger/thumb pressures were exerted at the front to try and correct the footplate distortion. It was rather interesting to note that the 2 models reacted rather differently to the same technique.

The buffer steps on the first example fell off, but those on the other didn’t (rather annoying as the loco right-hand side step was splayed outwards, and took quite a bit of cutting and filing (of glue lumps) to get it off and glue it back correctly).

Also the second model emitted a rather loud cracking sound, and the pipes into the smokebox on the left-hand side came out! All fixable, but I’m glad it didn’t happen with the first model as it might have made me reluctant to start with the second model!

I’m now going to cover some basic procedures for anybody who would like to rename a loco but has not felt confident enough to do it.
This shows the etched nameplates with one each of the number and name plates having been cut out (using Xuron photo-etch shears).  You just need to be careful not to bend the plates as you snip them out of the etch.  You can see where I have made what I consider to be stress-free snips.
This shows the etched nameplates with one each of the number and name plates having been cut out (using Xuron photo-etch shears). You just need to be careful not to bend the plates as you snip them out of the etch. You can see where I have made what I consider to be stress-free snips.
You then need to decide whether or not to remove the existing nameplate. If you do then it is more fiddly to glue the new one perfectly upright. If you don’t then you might have an unacceptably thick nameplate with the new glued on to the old.

Of course you may have no choice in the matter if your chosen new nameplate is shorter than the existing and in which case you will have to remove the existing.
Here I have snipped off the existing nameplate.
The new one is then simply fixed in place.
Ex-Pat
Posts: 2201
Joined: Tue Feb 08, 2011 10:51 pm
Location: Newry Northern Ireland

Re: From a "Hunt" to a "Shire"

Post by Ex-Pat »

This was the original splayed out footstep
and this is it after cutting off and re-gluing.
The proof of the pudding – the buffers, although not perfect, now line up much better with the wagon
and the ski slope is nowhere near apparent as previously.
At £92 for each loco (loco-driven examples at that) and £8.75 for the nameplates I’m well satisfied.

Almost tempted to see if Hattons still have any, buy one but leave it untouched, and enquire about customised “Eddie the Eagle” nameplates!
User avatar
Mountain
Posts: 5881
Joined: Mon Oct 24, 2016 3:43 pm
Location: UK.

Re: From a "Hunt" to a "Shire"

Post by Mountain »

Very nice. Like the coach. Bogies are impressive. Nice job on the loco.
Ex-Pat
Posts: 2201
Joined: Tue Feb 08, 2011 10:51 pm
Location: Newry Northern Ireland

A tender cab shelter for 65331

Post by Ex-Pat »

This follows on from the introduction in my layout thread (viewtopic.php?f=22&t=50019&start=165#p664200).
– the first job was to prepare rough scaling sketches from a drawing I had obtained from the North British Railway Study Group. You can also see a sheet of plastikard marked up with the centres of the 2 round spectacle plate window openings.  It was important to ensure these 2 holes were accurate from the outset.
– the first job was to prepare rough scaling sketches from a drawing I had obtained from the North British Railway Study Group. You can also see a sheet of plastikard marked up with the centres of the 2 round spectacle plate window openings. It was important to ensure these 2 holes were accurate from the outset.
– the 2 window holes were gradually drilled through (starting with a small drill and then several more of increasing size).
– the sides of the shelter were one piece of plastikard curved round the spectacle plate.  I used calipers to help form the curve (but, as I know from the coaling stage warping problems, plastikard has a mind of its own and once out of the calipers it more or less just sprang back to its original state!).
– the sides of the shelter were one piece of plastikard curved round the spectacle plate. I used calipers to help form the curve (but, as I know from the coaling stage warping problems, plastikard has a mind of its own and once out of the calipers it more or less just sprang back to its original state!).
– I had to remove the (?) tool box (?) in order to site the spectacle plate in the right position.  (In retrospect I think I might have been able to just twist it off rather than saw and chisel it off.)  A word of warning – the tender “lion” emblem is not that durable, and suffered some disintegration whilst I was sawing off the toolbox.  I had to replace it with Methfix transfers.
– I had to remove the (?) tool box (?) in order to site the spectacle plate in the right position. (In retrospect I think I might have been able to just twist it off rather than saw and chisel it off.) A word of warning – the tender “lion” emblem is not that durable, and suffered some disintegration whilst I was sawing off the toolbox. I had to replace it with Methfix transfers.
– I was acutely aware that the plastikard would try to resist being formed and glued to the spectacle plate.   So I pinned down the spectacle plate and made an initial tack in the centre of the roof and gradually worked my way round the rest of the spectacle plate.
– I was acutely aware that the plastikard would try to resist being formed and glued to the spectacle plate. So I pinned down the spectacle plate and made an initial tack in the centre of the roof and gradually worked my way round the rest of the spectacle plate.
T.B.C.
Last edited by Ex-Pat on Wed Jan 23, 2019 9:28 am, edited 1 time in total.
Ex-Pat
Posts: 2201
Joined: Tue Feb 08, 2011 10:51 pm
Location: Newry Northern Ireland

A tender cab shelter for 65331

Post by Ex-Pat »

– the assembly was then clamped in the calipers whist it set fully.
- It was then a matter of “chivvying” away gradually at the structure until this stage was reached, and it was a reasonable fit on the tender.  (3 strips had been added to the rear of the spectacle plate in accordance with photographs.)  The unevenness at the top was caused by being too liberal with the Mekpak fluid, but I consoled myself by assuming that rust had started to appear!
- It was then a matter of “chivvying” away gradually at the structure until this stage was reached, and it was a reasonable fit on the tender. (3 strips had been added to the rear of the spectacle plate in accordance with photographs.) The unevenness at the top was caused by being too liberal with the Mekpak fluid, but I consoled myself by assuming that rust had started to appear!
– this was a rough “first fit” on the tender.
The “Haig” model only has 1 set of handrails on the tender side (at the cab end). However several J36’s had a further set of handrails on the side of the tender at the rear. As this was the case with 65331 it was necessary to drill holes (using a drill too small for my pin-chuck - so I had to twist it between thumb and finger) and form and fit handrails.
The handrail holes have been drilled.
Wire was then bent to shape (these handrails on the tender do not utilize handrail knobs) and a piece of plastikard was inserted to maintain the correct depth whilst the glue dried.
T.B.C.
Ex-Pat
Posts: 2201
Joined: Tue Feb 08, 2011 10:51 pm
Location: Newry Northern Ireland

A tender cab shelter for 65331

Post by Ex-Pat »

This is the finished tender after applying the new transfers.
It’s worth taking a look at the superbly detailed cab interior.
Ready for duties!
Ready for duties!
Looking forward to doing 65317 later this year perhaps.
Post Reply