
Dragonfly's Workbench

Re: Dragonfly's Workbench
You are really getting into the swing of things there Dragonfly. I was planning a little production of waggons for my layout but at the moment I have a few things going on before I devote time to a project like that. I have already explored a few designs in my mind so they should work fine.
Modelling On A Budget ---》 https://www.newrailwaymodellers.co.uk/F ... 22&t=52212

Re: Dragonfly's Workbench
Absolutely; with how cheap these are, and how well they turn out (so far), I've been able to really get into it.
And like yourself I've started planning a few of my own designs based on the underframes; tank wagons, hoppers, and the like.
And like yourself I've started planning a few of my own designs based on the underframes; tank wagons, hoppers, and the like.
Re: Dragonfly's Workbench
Go for it!  Now you see why I love 7mm narrow gauge. The possibilities of using ones own designs and mixing them with kit built items...They usually blend in nicely because the builder is painting the kits and the scratchbuilds... Consistency! That is the key.
What are you going to pull them with? Smallbrook Studio Ceto looks an easy kit to make. (Mike Raynor lists them as 0e rather then 0-16.5 which is basically the same thing).
One thing I would recommend if you are open to a little experimenting is a Sylmasta Resin Casting Kit. The number of things I have cast... Use the rubber mould material to form moulds for the common items you want to make and use playdough to cast one off items in. Always have some spare item to cast if mixing resin as a little bit of resin goes a long way. You can fill a mould half full and fill the rest at a later date. It works fine! That way if you have a little spare which 90% of the time when mixing up resin you will have, you habe something to pour it in rather then waste it.
(The green coach side is plastic which I formed to the shape I wanted to use to press into playdough so I can cast another the same. I formed the from a side of the coach. In other words, I used one plastic side as it is (Though shortened as the coach used to have four wjndows) and copied it in resin for the coach. The side I had left I used plasticard to form a central door and smaller windows and I cast a few of these. I have not built them up into coaches yet. The axlebox assemblies were copies of old coach bogies which have been split to form four seperate axle boxes for this coach. They are drilled to add Romford top hat type bearings. Romford 10.5mm wheels were used).
- Attachments
-
-
-
-
Modelling On A Budget ---》 https://www.newrailwaymodellers.co.uk/F ... 22&t=52212
Re: Dragonfly's Workbench
Absolutely. I first dabbled in it when I was in my teens, but didn't stick with it until about five years ago when I started assisting a few 7mmNG layouts. We've got one club layout in this gauge, and four of our members have/had layouts as well, so have been out and about with it quite a lot since then, as recently as last weekend (Ludlow), and I'm booked to assist a few more times this year (Great Central, 2 x Burton on Trent, Stoke on Trent (at which I should be debuting my stock)), so plenty of exposure. It's a great gauge to work in; has the best features of 00 and 0, and it all being freelance means you can have a lot of fun with it.Mountain wrote:Go for it!
That's my intention. That's why I try to get all of each type of stock from one supplier. All my wagons from this one, all my coaches so far are from Port Wynnstay (which is why I'm so anxious about his return to business, so I can buy more - I spoke to him earlier in the year and it sounded promising), etc. And the homebrew designs will be based on this range's underframes, so should fit in well.Mountain wrote:The possibilities of using ones own designs and mixing them with kit built items...They usually blend in nicely because the builder is painting the kits and the scratchbuilds... Consistency! That is the key.
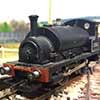
I have a Smallbrook Thor that I got second hand last year, awaiting repainting and naming, and will be getting about three more from their range at some point.Mountain wrote:What are you going to pull them with? Smallbrook Studio Ceto looks an easy kit to make. (Mike Raynor lists them as 0e rather then 0-16.5 which is basically the same thing).
I'll have to have a look into that, particularly for things like loads, crates etc, would be very useful, and a bit of fun. Hell, if Port Wynnstay doesn't reappear, and if I do get proficient enough, I might just have a go at designing my own rakes of coaches, much as you have.Mountain wrote:One thing I would recommend if you are open to a little experimenting is a Sylmasta Resin Casting Kit. (...)
Re: Dragonfly's Workbench
The coach above wasn't exactly my design, but it went through so many modifications to make it fit my narrow gauge loading gaue specifications, that it may as well have been my design!
It started off as a Faller four wheel 0 gauge coach and was converted from there. The chassis was removed and the balconies were cut from the chassis ready to use with this coach. Each wall was seperately removed, shortened in both length and height for the sides, and shortened in width and height for the ends. The roof was greatly reduced in both width and length. I fact, the inner surround which supported the internal walls which was set in by a cm or more all round now became the outer bit where its lip sat snugly around the outer bit of the body walls. I had not planned this but took full advantage when the new reduced size of the body became a perfect fit. I had to make myself a new floor from plasticard, new bench seats from wood, and you have seen the resin castings which now hold the wheels on.
I was also fortunate that the end balconies were narrower then the body when it was in 0 gauge form and lined up a perfect match when things were re-assembled in the new narrow gauge form.
So what started off as a £10 (Or was it £15... Can't remember. Elaines Trains had it for sale online) Christmas gift ended up in many bits and pieces with a gut feeling of "What have I done to this beautiful Faller coach!" and then was reserected with a determination to reassemble it and make it back into a lovely thing. I have yet to fit couplings to it. I tend to do the difficult tasks and leave the simpler things for another day!
- Attachments
-
Modelling On A Budget ---》 https://www.newrailwaymodellers.co.uk/F ... 22&t=52212
Re: Dragonfly's Workbench
Evening all,
So nothing to update on the 7mmNG wagons yet, as they had been put to one side while I've had a major sort out of my half of the garage, and reorganised how things are done.
Firstly, I've bought a few racking units (link). As the vertical beams are 2 sections, you can build them as pictured or as two half-height units. So I've now got four half-height units along one side of my workspace, to act as a storage area (huge shelf) in the short term while everything else is sorted, then to be a base for my layouts' baseboards. That way I don't need to have legs on the baseboards.
No photos of these, yet, but they will follow soon.
I've then got a couple more of these units along the other side of my workspace, to act as my workbench.
But lighting was an issue. Light in the garage is via one window at one end, a door that I keep screened off at the other, and two yellowy light bulbs, nowhere near close, nor bright, nor white enough for decent photos or good quality work, certainly. The conditions look something like this (excuse the clutter):
Not great. But then a couple of weeks ago I found a Youtube video (link) about turning broken TVs into lights. So that's what I've done. On to eBay, and sourced a very cheap 49 inch (biggest I can fit in the car) flatscreen TV. With a smashed screen.
Now, I don't have a full set of photos of the disassembly, due to phone battery issues and it being a bit uninteresting, but basically you take away the circuit boards from the back, and the screen from the front, and you're left with the backlighting light-box behind the screen, consisting of a few rows of LEDs and special diffusing perspex. I had to remove the existing LEDs as they were designed for a higher voltage, so I replaced them with a reel of cheap eBay 12v LEDs and wired in to a new 12v supply:
Then reattached the perspex sheets and put the TV case back together:
Yes you can still make out the rows of LEDs, so it's not as good as that on the Youtube video, but for my purposes this won't be a problem.
The next issue was going to be that of mounting. I didn't want to hang this from the roof rafters, for obvious reasons, so instead I bought and built a full-height racking unit, with a shelf at desk height and shelf bars near the top to simply rest the "TV" on. Another shelf was added to the very top due to the regular presence of my assistant feline, who likes to explore the rafters and other high places. But the final result was thus:
Total cost was likely approaching £70, but could have been done for just over £50. Not bad for a workbench desk and very good lighting rig. Especially as £40+ is just for the racking unit!
So nothing to update on the 7mmNG wagons yet, as they had been put to one side while I've had a major sort out of my half of the garage, and reorganised how things are done.
Firstly, I've bought a few racking units (link). As the vertical beams are 2 sections, you can build them as pictured or as two half-height units. So I've now got four half-height units along one side of my workspace, to act as a storage area (huge shelf) in the short term while everything else is sorted, then to be a base for my layouts' baseboards. That way I don't need to have legs on the baseboards.
No photos of these, yet, but they will follow soon.
I've then got a couple more of these units along the other side of my workspace, to act as my workbench.
But lighting was an issue. Light in the garage is via one window at one end, a door that I keep screened off at the other, and two yellowy light bulbs, nowhere near close, nor bright, nor white enough for decent photos or good quality work, certainly. The conditions look something like this (excuse the clutter):
The next issue was going to be that of mounting. I didn't want to hang this from the roof rafters, for obvious reasons, so instead I bought and built a full-height racking unit, with a shelf at desk height and shelf bars near the top to simply rest the "TV" on. Another shelf was added to the very top due to the regular presence of my assistant feline, who likes to explore the rafters and other high places. But the final result was thus:
Re: Dragonfly's Workbench
A little bit more progress on the workbench itself (now that my Workbench thread appears to be about the workbench itself):
I've added a narrower (40cm deep) racking unit behind the workbench unit, giving a bit more desk space and a couple of shelves. These will hold my 3D printer and my laptop when I am working on the workbench itself. It also gives enough bench space to hold my next mini-project when in use. This unit also adds massively to the stability of the unit; when attached together as a series, these units are great, but somewhat too flexible if used singly.
I've also added a 120x60cm half-height unit to the left, as a general purpose table, currently not very visible due to being covered in everything while the rest of the garage sort-out happens. Behind this is my wood store.
Re: Dragonfly's Workbench
Superb idea, I love it! Wish I'd thought of this before I got rid of my old TV...
Frontington & Backwoods Railway: https://www.matthewdawkins.co.uk/catego ... way-build/
LocoSound - sound effects for DC model railways: https://mafu-d.github.io/loco-sound
LocoSound - sound effects for DC model railways: https://mafu-d.github.io/loco-sound
Re: Dragonfly's Workbench
Post cleared; thread closed.
Last edited by Dragonfly on Tue Apr 14, 2020 9:06 am, edited 3 times in total.
Re: Dragonfly's Workbench
Post cleared; thread closed.