Sarah's Workshop....

What are you up to on your workbench
User avatar
RuffnutThorston
Posts: 350
Joined: Tue Jan 01, 2008 7:44 pm
Location: The Island of Berk, Dragon’s Edge, or North Wales!
Contact:

Re: Sarah's Workshop....

Post by RuffnutThorston »

My one is also DCC fitted...

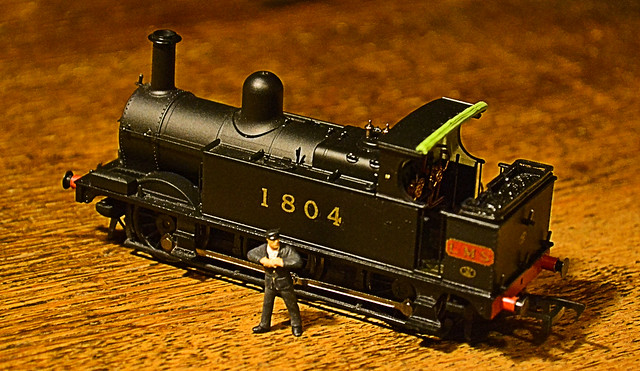
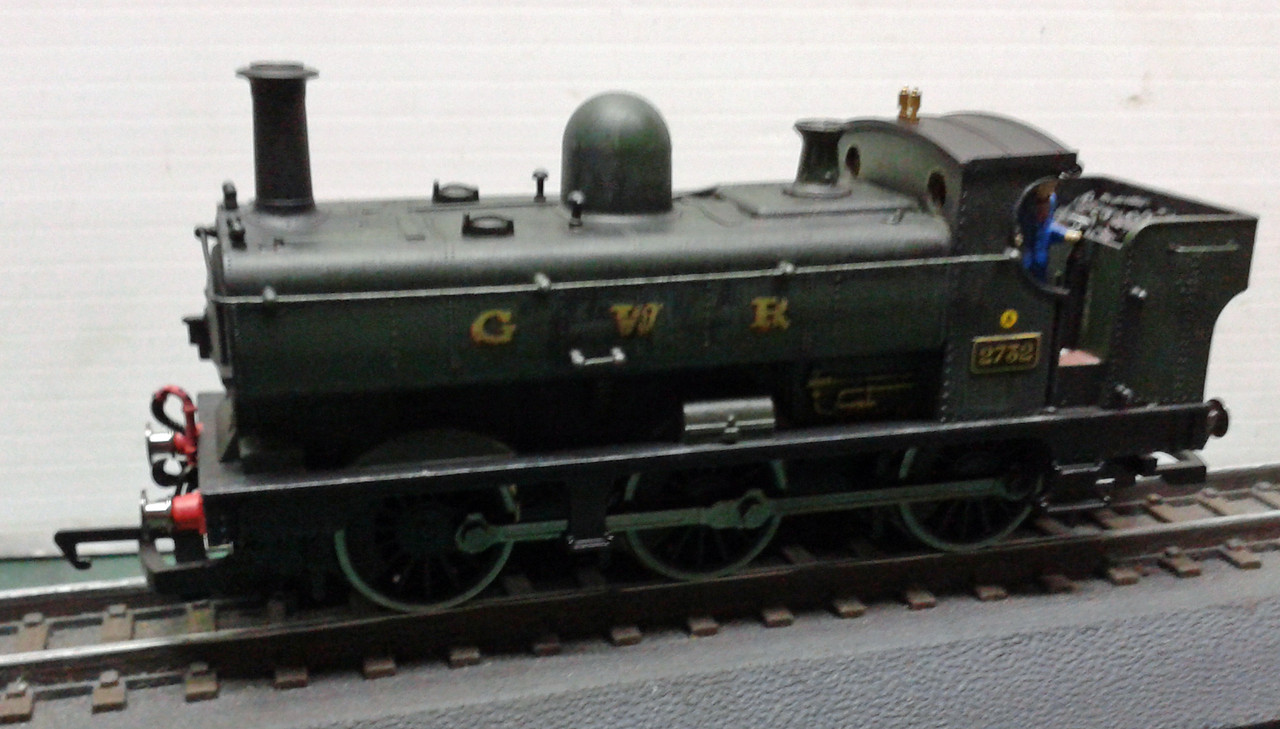
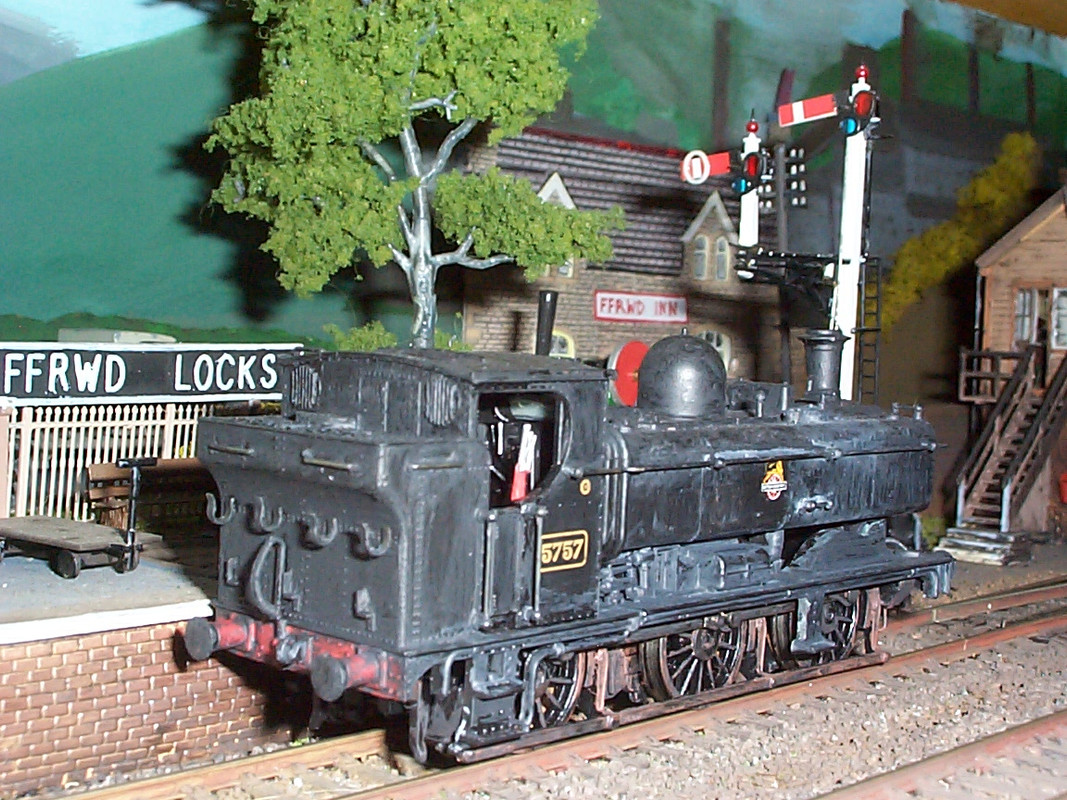
It uses the DCC fitted Jinty body and chassis, that is the Hornby 4-pin type.

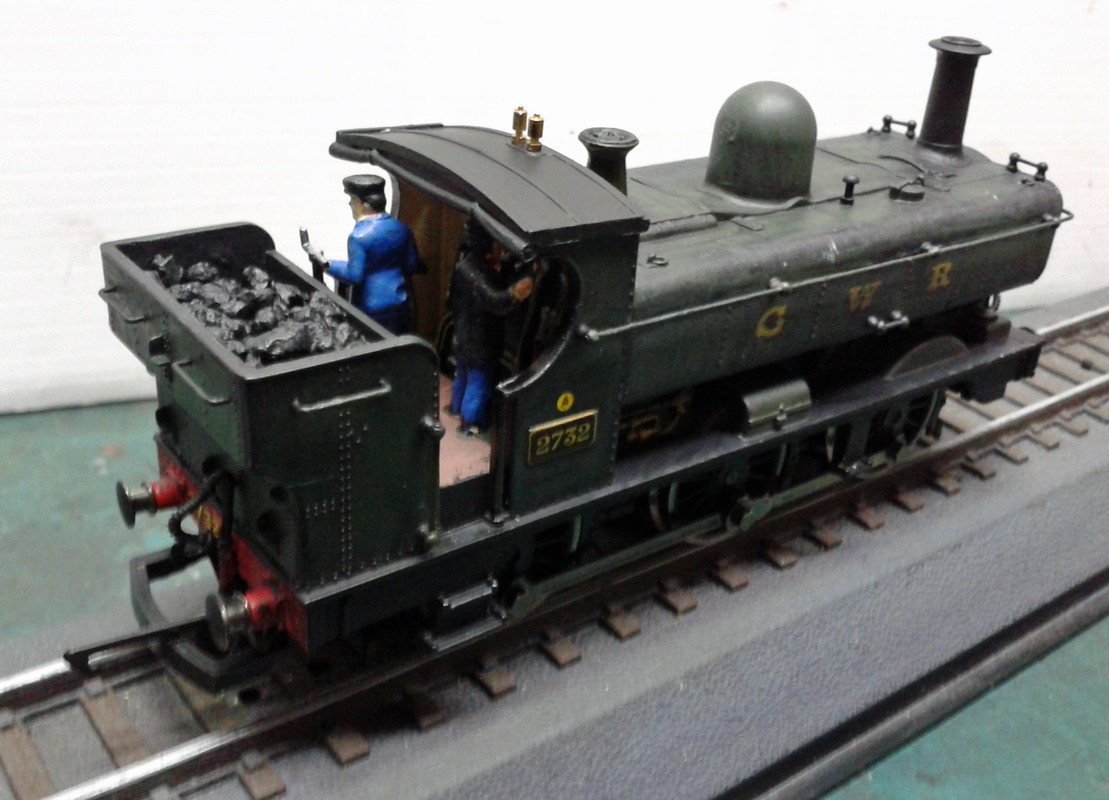
The main modification to the kit is the brass footplate floor, which needs a chunk taken out to clear the motor, which is mounted a bit further back in the newer chassis than the Front Wheel Drive Chassis...

The original kit only had to clear a pick-up and wire, and had a cut-out in the floor to clear that.

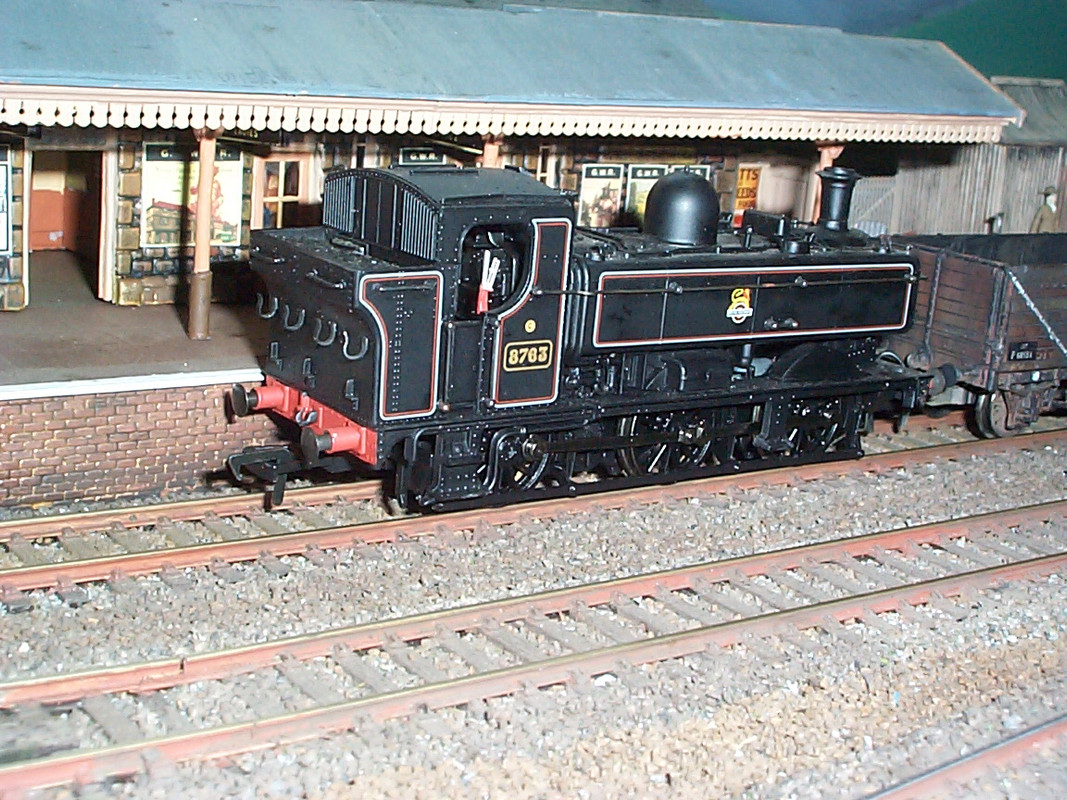
Basically, the moulded backhead juat covers the motor back, and so the floor needs to be cut back as far as the start of the wood grain, with tabs left (or re-attached!) each side of the firebox back.

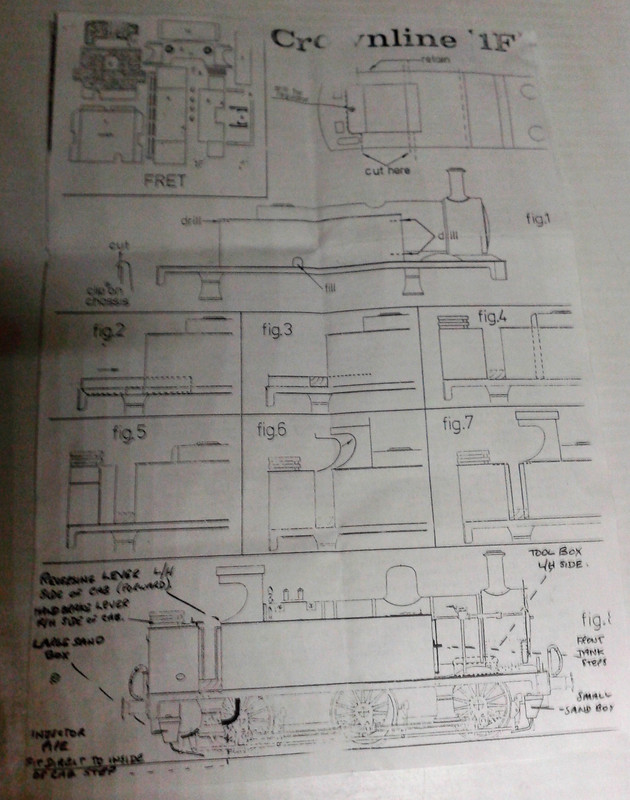
The Kit instructions...picture side....

Image

Image

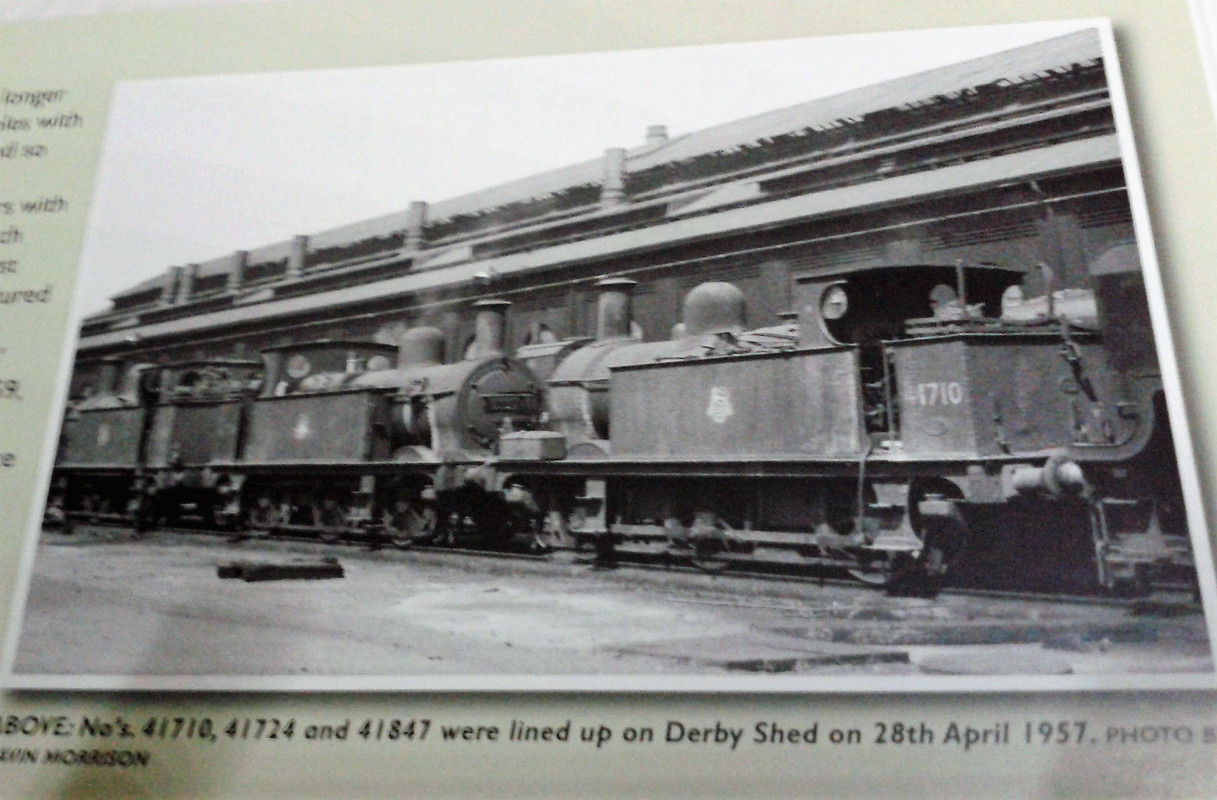
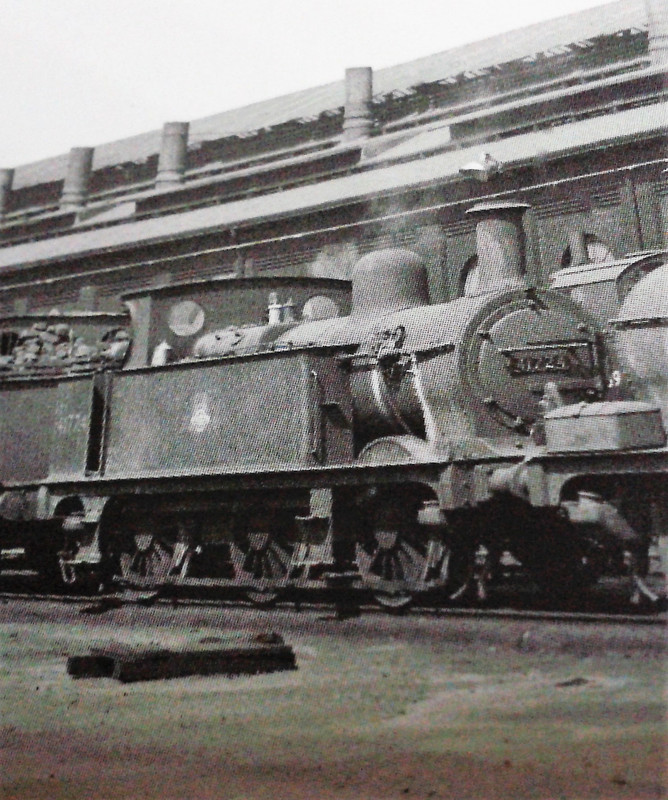
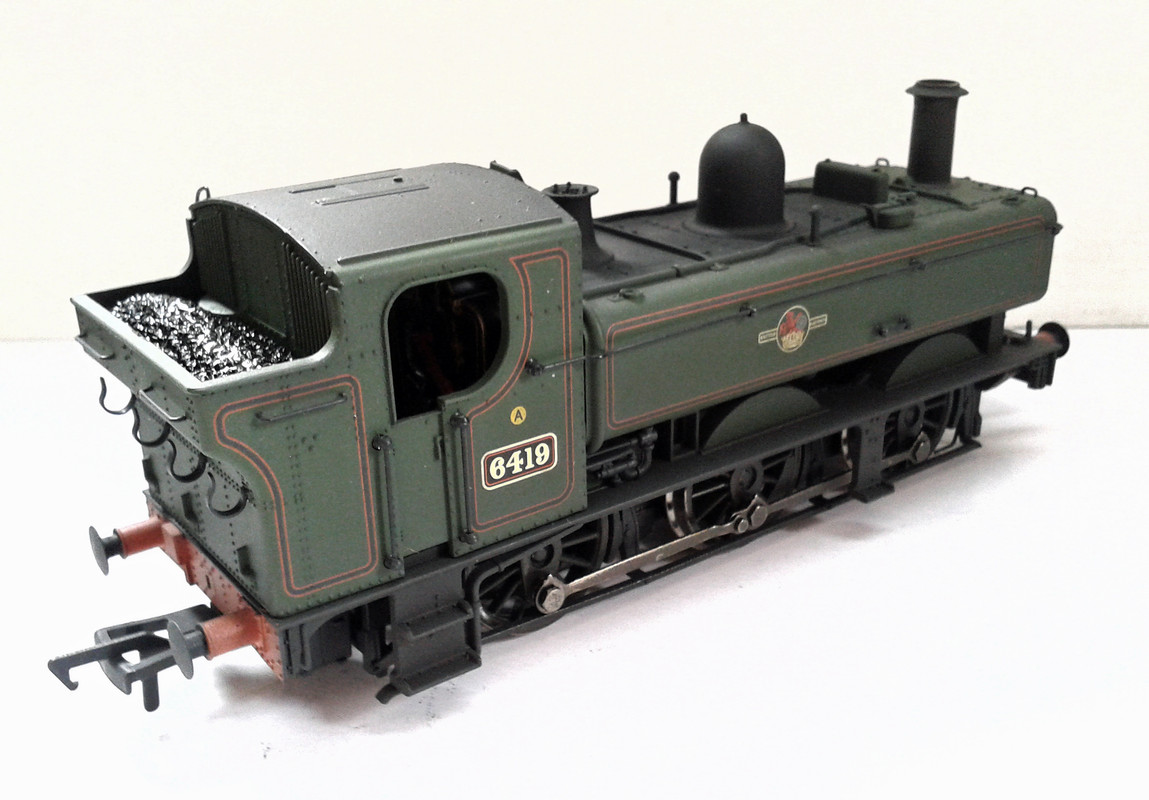
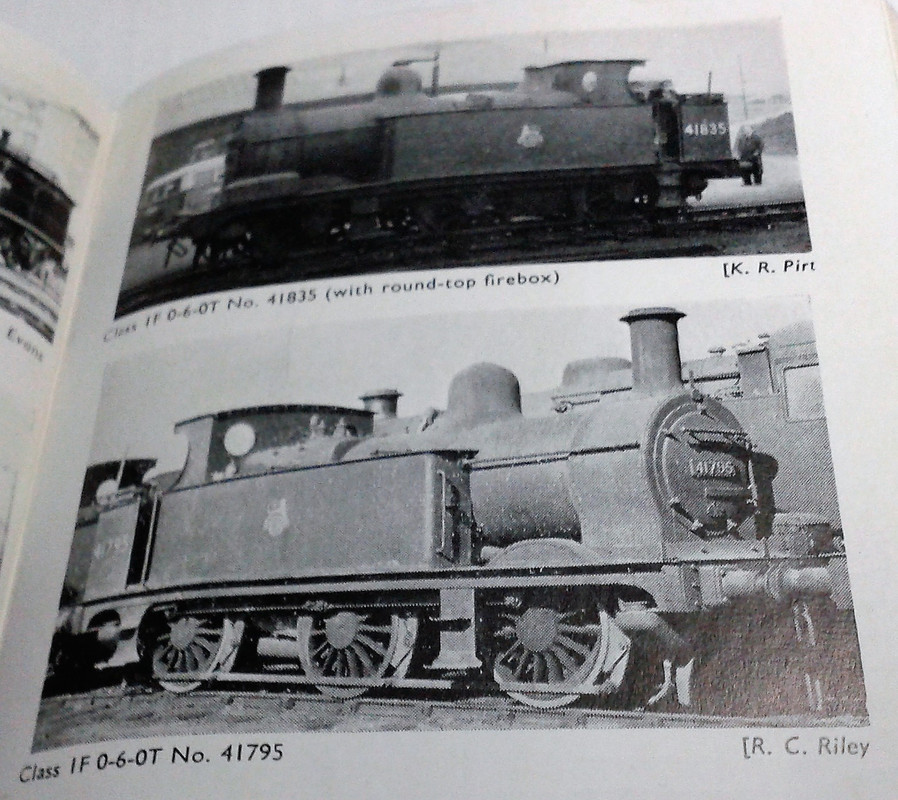
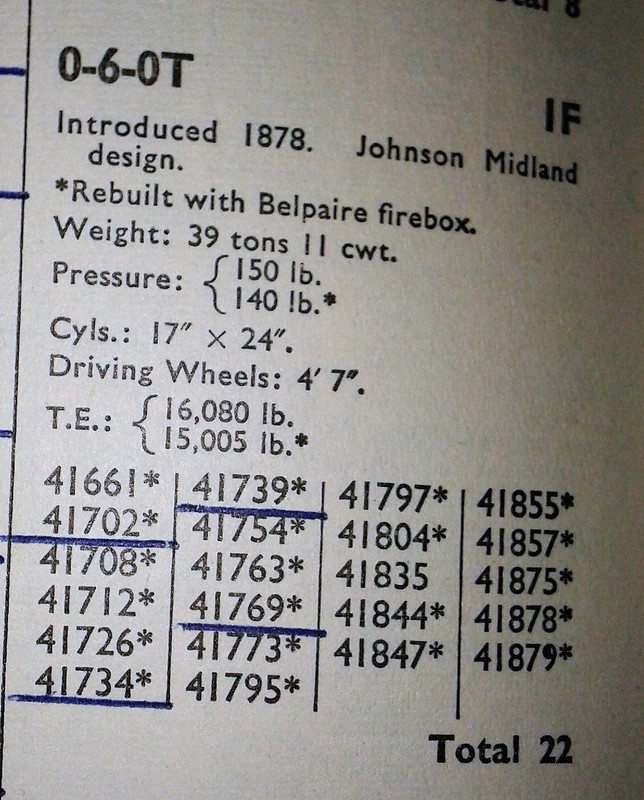
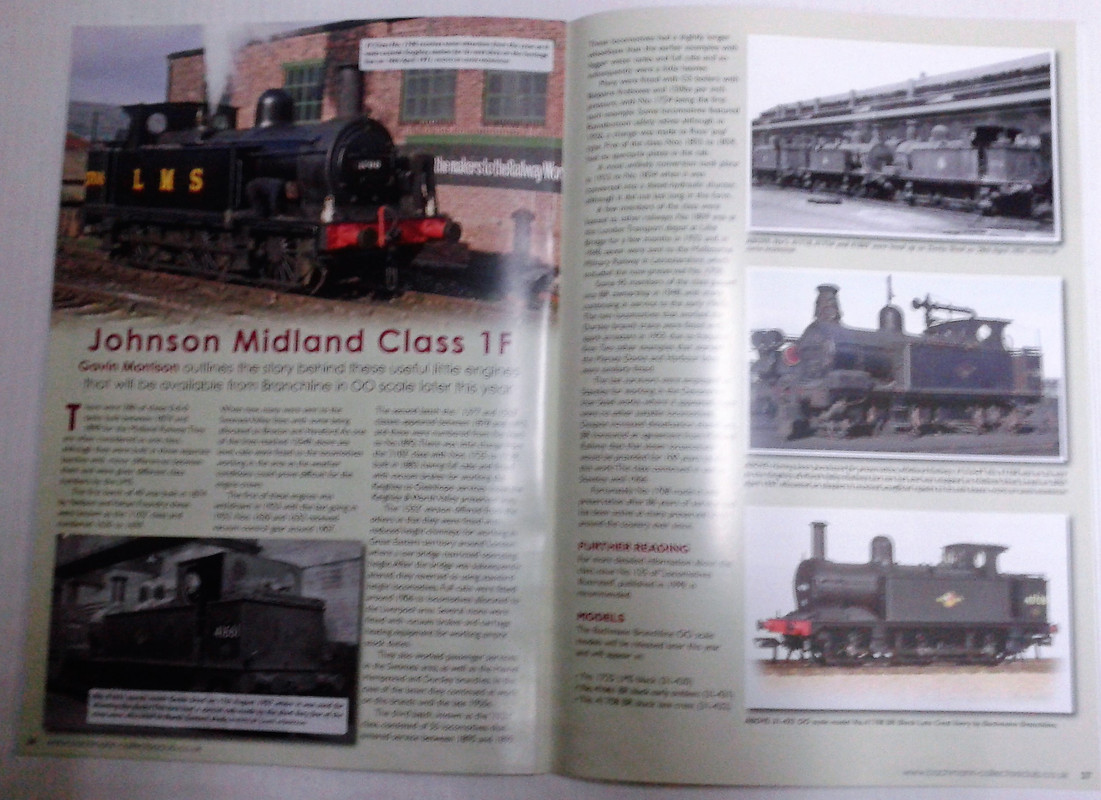
Reference pics from a 1959 Combined Volume ABC, and Bachmann Times (Bachmann Collectors Club...)

Image

Image

Image

Bachmann Times....

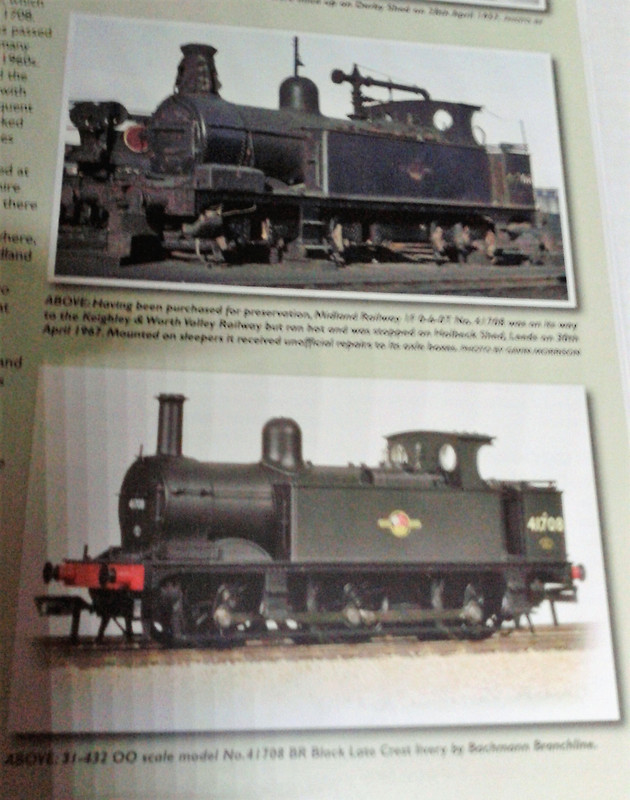
The preserved 41708 has been fitted with Vacuum Brakes, as can be seen by the hoses, and the pipe from the cab to the smokebox on the boiler side.
As can also be seen, the pipework between the Hoses, and the brake controls in the cab have been run along the side of the footplate.


Image

Image

This line up includes one of the Vaccum Fitted locos...with boiler mounted Ejector...


Image

Image
Last edited by RuffnutThorston on Sun Apr 15, 2018 7:38 pm, edited 1 time in total.
Ex-Pat
Posts: 2201
Joined: Tue Feb 08, 2011 10:51 pm
Location: Newry Northern Ireland

Re: Sarah's Workshop....

Post by Ex-Pat »

Very nice job on the 1F - and the photos take me back to childhood in Derby, so much so that I would put money on the loco to the right of 41710 being 45509.

How did you find the Crownline kit instruction-wise and quality-wise?

Dare I start my Crownline J36 kit, or just wait for Hornby's announcement?
Last edited by Ex-Pat on Fri Dec 29, 2017 3:13 pm, edited 1 time in total.
User avatar
Lysander
Posts: 2347
Joined: Wed Aug 22, 2007 9:53 pm

Re: Sarah's Workshop....

Post by Lysander »

In the absence of a Crownline kit, I backdated the original Bachmann open-cabbed 1F to an early LMS loco. Halfords matt black aersol was a perfect match for the Bachmann paint and after rubbing the BR emblems and numbers down, a quick spray was followed by Pressfix lettering. One of my favorite locos. It just awaits some small coal and rails to be bent up and applied to represent the cab's bad weather tarpaulin

Image

Tony
Men with false teeth may yet speak the truth.......
User avatar
RuffnutThorston
Posts: 350
Joined: Tue Jan 01, 2008 7:44 pm
Location: The Island of Berk, Dragon’s Edge, or North Wales!
Contact:

Re: Sarah's Workshop....

Post by RuffnutThorston »

Lysander wrote:SNIPPED...

Tony
Hi Tony.

In the absense of suitable photos at the moment, I am wondering how the tarpaulin would be stored when not in use.

Your loco seems to have the tarp secured on top of the roof?

The GWR 2721 (Hornby) has a representation of the tarp rolled up along the back of the roof....
User avatar
Lysander
Posts: 2347
Joined: Wed Aug 22, 2007 9:53 pm

Re: Sarah's Workshop....

Post by Lysander »

The tarp came ready moulded Sarah, as on the Hornby tank you mentioned, but on the very top edge of the roof rather than the back edge. It's very neat, and rolled and strapped as per the prototype, but the colour needs just a little toning down I think.

And purely because I like posting photos, here's one of the tarp on my detailed Hornby 0-6-0!

Image

Happy Christmas and a merry modelling New Year!

Tony
Men with false teeth may yet speak the truth.......
User avatar
End2end
Posts: 6010
Joined: Sun Jan 12, 2014 9:58 pm
Location: At the end....... and sometimes at the other end

Re: Sarah's Workshop....

Post by End2end »

So that's what those hooks are for on the rear! :idea:
Looks great. :)
Thanks for sharing.
End2end
"St Blazey's" - The progress and predicaments.
Welcome‎
Planning
Building
St. Blazey's Works & Depot thread
User avatar
RuffnutThorston
Posts: 350
Joined: Tue Jan 01, 2008 7:44 pm
Location: The Island of Berk, Dragon’s Edge, or North Wales!
Contact:

Re: Sarah's Workshop....

Post by RuffnutThorston »

Ex-Pat wrote:Very nice job on the 1F - and the photos take me back to childhood in Derby, so much so that I would but money on the loco to the right of 41710 being 45509.

How did you find the Crownline kit instruction-wise and quality-wise?

Dare I start my Crownline J36 kit, or just wait for Hornby's announcement?
The instructions are OK....but the 1F does have an error, as the drawing shews the toolbox alongside the front splasher (Port or Left Side). All the photos I have so far seen shew the toolbox to be just behing the Lamp Iron, and just impinging on the front of the splasher (So I had to move mine!)

The drawing is a bit flaky, in that the photocopier must have been running low on toner?

The roof has half-etched lines to form the side edges...the instructions here a a bit vague, or I was not thinking correcty, twice!

The instructiins say to fold the edges horizontal.....but I folded them vertical....

Then I re-read the instructions, and folded them right over onto the roof....well almost horizontal I was thinking!

Finally it clicked....the photos shewed my error, the roof edges actually overhang the cab sides!

So, finally correct! ;)

The J96....a NBR Loco....nice!

http://www.brdatabase.info/locoqry.php? ... &id=601036

I would say that there are two options....

Wait and see, and possibly gasp at the pricing? (And sell the kit on? )

Build the model, and possibly sell it to "upgrade" later?
User avatar
Lysander
Posts: 2347
Joined: Wed Aug 22, 2007 9:53 pm

Re: Sarah's Workshop....

Post by Lysander »

End2end wrote:So that's what those hooks are for on the rear! :idea:
Looks great. :)
Thanks for sharing.
End2end
Pleasure E2e - further details and lots of photos here:

https://srmg.org.uk/detailing-hornbys-a ... b-pannier/

Forgive the intrusion Sarah.

Tony
Men with false teeth may yet speak the truth.......
User avatar
End2end
Posts: 6010
Joined: Sun Jan 12, 2014 9:58 pm
Location: At the end....... and sometimes at the other end

Re: Sarah's Workshop....

Post by End2end »

Thanks Lysander. Bookmarked. :)
End2end
"St Blazey's" - The progress and predicaments.
Welcome‎
Planning
Building
St. Blazey's Works & Depot thread
User avatar
RuffnutThorston
Posts: 350
Joined: Tue Jan 01, 2008 7:44 pm
Location: The Island of Berk, Dragon’s Edge, or North Wales!
Contact:

Re: Sarah's Workshop....

Post by RuffnutThorston »

Lysander wrote:
End2end wrote:So that's what those hooks are for on the rear! :idea:
Looks great. :)
Thanks for sharing.
End2end
Pleasure E2e - further details and lots of photos here:

https://srmg.org.uk/detailing-hornbys-a ... b-pannier/

Forgive the intrusion Sarah.

Tony
Hi Tony....no problem! ;)

Ahhh....I was thinking that End2end was thinking of the hooks that are on the rear of the roof of some of the Bachmann 1fs....

Now I see that the hooks in question are the Fire Iron Hooks on the rear of the GWR loco bunkers! ;)

The Hornby 2721 only has vestiges of the hooks, the older 57XX (8750 cab version) wasn't much better.

A job for some thin brass or other metal strip..

One of two 2721 locos for Ffrwd. (The original Hornby one has been replaced...) (I haven't done the hooks yet!)

Image

Image

The other one has had a back fitted to the cab, using part of the Hornby "Jinty" cab removed to make the 1F!.

Image

Image


Bachmann locos have nice metal hooks, ready to load!

Image

Image

Image
Last edited by RuffnutThorston on Sun Apr 15, 2018 7:41 pm, edited 1 time in total.
User avatar
Lysander
Posts: 2347
Joined: Wed Aug 22, 2007 9:53 pm

Re: Sarah's Workshop....

Post by Lysander »

That's an interesting conversion, your enclosed cab 27XX - I think I might well explore one of those in the New Year.

I don't know why Hornby even bothered to model their version of the fire iron hooks on the 27XX. They are absolutely appalling and don't look anything like that which they are supposed to be representing. Thin brass strip and superglue makes for an extremely easy and visible improvement. One could go one step further and remove and replace their almost as bad lamp brackets. I wish I'd done that now.

Tony
Last edited by Lysander on Mon Dec 25, 2017 8:35 pm, edited 1 time in total.
Men with false teeth may yet speak the truth.......
User avatar
Lysander
Posts: 2347
Joined: Wed Aug 22, 2007 9:53 pm

Re: Sarah's Workshop....

Post by Lysander »

Double post - don't know how that happened....
Men with false teeth may yet speak the truth.......
User avatar
GeraldH
Posts: 1192
Joined: Fri Aug 13, 2010 6:10 pm
Location: Isle of Ballybongle
Contact:

Re: Sarah's Workshop....

Post by GeraldH »

I do like your work on the Hornby Pannier, I got rid of mine a year or so ago, but having seen what you've produced I'm beginning to regret it :) .
Gerald H - BNR Correspondent :-)

My layout: http://www.newrailwaymodellers.co.uk/Fo ... hp?t=28854
User avatar
6C
Posts: 1323
Joined: Fri Feb 15, 2008 1:45 pm
Location: Pingvollr, dans le Wirrale

Re: Sarah's Workshop....

Post by 6C »

Lovely work - as usual !

Good choice of number for the 1F too - backed up with photos - as a number of the 1Fs were provided with enclosed cabs - 41734 and 41853 to my certain knowledge - 41734 being one of the last in BR service - at Staveley..
Pete

Fetch me a bottle of your finest Chateau Bichon Frise '65 !!
User avatar
6C
Posts: 1323
Joined: Fri Feb 15, 2008 1:45 pm
Location: Pingvollr, dans le Wirrale

Re: Sarah's Workshop....

Post by 6C »

I fitted an early round window Bachmann Pannier cab to my 2721 to get an approximation of a cabbed 2021 class - not a quality job like your mods. though :oops:
Pete

Fetch me a bottle of your finest Chateau Bichon Frise '65 !!
Post Reply