new attic layout

Post your design ideas for any layout that you are planning to build in the future. Keep members up-to-date with your designs and future plans for your layout.
User avatar
End2end
Posts: 6010
Joined: Sun Jan 12, 2014 9:58 pm
Location: At the end....... and sometimes at the other end

Re: new attic layout

Post by End2end »

I just relised the right hand side might not be long enough for the incline back up so you could move the points back to the previous side.
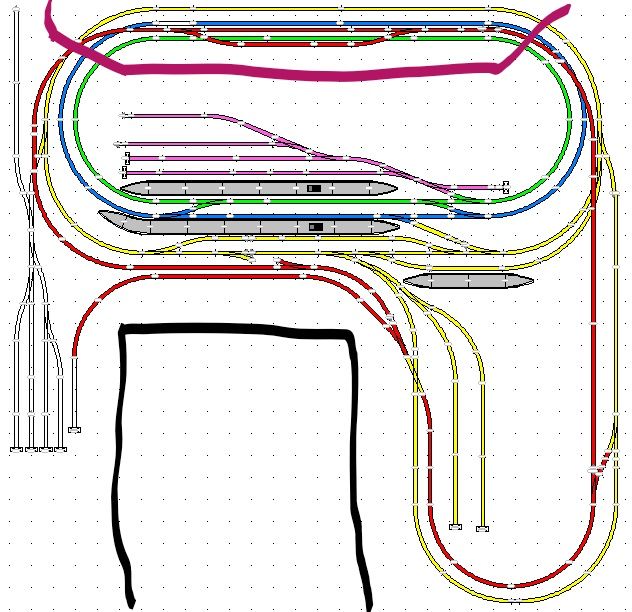
This should explain better.
layoutchange.jpg
layoutchange.jpg (68.73 KiB) Viewed 2587 times
Sadly I don't know if it is possible for clearances so I suggest to await other modellers input. :wink:
Hope it helps.
Thanks
End2end
"St Blazey's" - The progress and predicaments.
Welcome‎
Planning
Building
St. Blazey's Works & Depot thread
RodzRx7
Posts: 15
Joined: Tue Jan 24, 2017 11:04 pm

Re: new attic layout

Post by RodzRx7 »

TimberSurf wrote:Hello and welcome to the Forum Sean
Check out the control pages on my website, then look at http://www.brian-lambert.co.uk/ for in depth detail.
thanks for that link mate that has made some good reading so far and do see what you mean straight in at the deep end :shock:
the plan is to start with the simple loop then work outwards to the rest of the track doing a section at a time learning as I go, I would like the board to be portable so I can store easy while building it then move up into the attic as I finish(working on this when I do my turn around night for night shift so gives me some thing to work on and not fall asleep in front of the tv), I really need it portable as I will be moving house in the future.

only really got a stack load of Hornby track (drunk eBay job lot buy) so far and don't think I am far off what I require
RodzRx7
Posts: 15
Joined: Tue Jan 24, 2017 11:04 pm

Re: new attic layout

Post by RodzRx7 »

End2end wrote:That's looking good...and now for something completly different...
If your not going to have a station on the top red passing loop.........why not make the red line the lower line and the rest of the track raised, flipping the layout completly on it's head :?: :idea:
oh you are really turning it on the head there, not sure if that would be a step to far thought, and I like the idea of the 3 tunnels with trains running in other directions

Image


the track will be operated from the black box area
pink line is where I will have the tunnel and i want to have it open to the rear so can gain access to the track and trains, and wont be able to see the open back end from operational area?... I will have full access round the back of the layout its a little tight to get back there but can be done.
User avatar
End2end
Posts: 6010
Joined: Sun Jan 12, 2014 9:58 pm
Location: At the end....... and sometimes at the other end

Re: new attic layout

Post by End2end »

RodzRx7 wrote:I would like the board to be portable
I have seemed to have missed what gauge your working in as in OO that's going to be some board work. :shock:
I shall be watching closely at how this can be done.
For the open rear what about just screwing a bit of ply on the back so there's no light leakage then it's easy to remove to clean the track or sort out any derailments. :idea:
Thanks
End2end
"St Blazey's" - The progress and predicaments.
Welcome‎
Planning
Building
St. Blazey's Works & Depot thread
RodzRx7
Posts: 15
Joined: Tue Jan 24, 2017 11:04 pm

Re: new attic layout

Post by RodzRx7 »

Eerrr OO gauge.

Think I might be getting ahead of myself here but it will be fun
Wife says it can be kept in dining room while been built them move in the attic before she gets annoyed with it.

My good mate is a joiner so he is working out the best way to sort the base board out and how to join it

Sean
User avatar
TimberSurf
Posts: 2536
Joined: Wed Jan 08, 2014 5:47 pm
Location: N.Wales
Contact:

Re: new attic layout

Post by TimberSurf »

You need to do some research on "portable" layouts! Those that go to exhibitions, have the track cut precisely at the joins of the separate table boards and to keep alignment and rigidity, special brass screws are soldered to ends or copper clad sleepers are soldered on and glued to base!
My layout is being built as sections, as I know a house move is on the cards, I have not gone to the above level but certainly have track cut at edge of each board and have connected every section of the track every 2m, i.e. increases the amount of wires underneath and needs some kind of connector at each edge point. If above is not done, ballasted track will get ruined trying to remove it. You could build and just cut the track at each board join when needed for move, but reconnecting and ensuring power flows (with rail joiners or additional wires) will be troublesome! Unless you build each board and lay track to ultra precision dimensions downstairs, nothing will line up upstairs!
Image
Lumsdonia <--- Hit link to go to my website for full story and wiring advice!
RodzRx7
Posts: 15
Joined: Tue Jan 24, 2017 11:04 pm

Re: new attic layout

Post by RodzRx7 »

TimberSurf wrote:You need to do some research on "portable" layouts! Those that go to exhibitions, have the track cut precisely at the joins of the separate table boards and to keep alignment and rigidity, special brass screws are soldered to ends or copper clad sleepers are soldered on and glued to base
I am hoping I will only be moving this once upstairs maybe twice as I am in the same boat as you with a house move on the cards within the next 2 years, I am favouring your idea of build the boards together then cut the track at each joint and running more droppers to the track to ensure power is where it should be. now I have a track plan its a case of measuring and making the base board up for this, I would like to have all the boards in the garage for storage while building and simple clip it together when required :)
User avatar
End2end
Posts: 6010
Joined: Sun Jan 12, 2014 9:58 pm
Location: At the end....... and sometimes at the other end

Re: new attic layout

Post by End2end »

I don't know if they are any good but I think it was PECO that made a small piece of straight track that could be pulled back on itself to split track across a board join. Pushing it back into position reconnects it to the fishplate (somehow I think) on the next piece of track across the other side of the baseboard join.
Roughly about 2 x Hornby R610 long.
Perhaps another member has used these and can be of more assistance as to wether they are any good or not.
Thanks
End2end
"St Blazey's" - The progress and predicaments.
Welcome‎
Planning
Building
St. Blazey's Works & Depot thread
RodzRx7
Posts: 15
Joined: Tue Jan 24, 2017 11:04 pm

Re: new attic layout

Post by RodzRx7 »

well tonight I got all the track out I have acquired and built up the 1st part of the layout to see how things fit and run,

Image

I was very happy with it, however it will need some sorting out when the track gets put down but overall I was pleased with it and played for some time I was shocked at the noise coming from the 3 trains while running.

I have decided to go DCC just for the ease of wiring up and its the future so might as well jump on board now :D

is there a link for fitting a decoder, what to look for etc and some kind of how to guide for servicing a loco? I have used the search bar but I am not to sure what I am looking for haha

back to the noise issue and I have look at many posts about what to use as underlay, I am leaning towards the foam underlay, I am not plaining on ballasting at all, as the new house move will see me with a bigger attic and possibility's

thanks again guys for all the help
RodzRx7
Posts: 15
Joined: Tue Jan 24, 2017 11:04 pm

Re: new attic layout

Post by RodzRx7 »

End2end wrote:I don't know if they are any good but I think it was PECO that made a small piece of straight track that could be pulled back on itself to split track across a board join. Pushing it back into position reconnects it to the fishplate (somehow I think) on the next piece of track across the other side of the baseboard join.
Roughly about 2 x Hornby R610 long.
Perhaps another member has used these and can be of more assistance as to wether they are any good or not.
Thanks
End2end
that's good to hear I will get onto google just now as have a few beers left
cheers
User avatar
TimberSurf
Posts: 2536
Joined: Wed Jan 08, 2014 5:47 pm
Location: N.Wales
Contact:

Re: new attic layout

Post by TimberSurf »

If you intend to move more than once, I would recommend a portable type of rail connection, either solder a piece of copper clad PCB under the end like http://www.brian-lambert.co.uk/Hints%20 ... l#Portable shows, or screw a brass screw into board and solder rail end to it. Especially important if you don't intend to ballast, as its the ballast that would keep everything solid in position.
If you use foam like me (viewtopic.php?f=15&t=49151), I don't know of a source, but you can get it in grey!
Image
Lumsdonia <--- Hit link to go to my website for full story and wiring advice!
User avatar
Mountain
Posts: 5861
Joined: Mon Oct 24, 2016 3:43 pm
Location: UK.

Re: new attic layout

Post by Mountain »

carnehan wrote:To throw some numbers at you, a DCC decoder will cost you from as little as £14 per decoder but can go a lot higher. I use the NCE Powercab as my controller - you are talking in or around £100 for it.

I'd suggest you read round the subject but at least wire up your layout to future proof it should you decide at some point to go DCC.

Paul
Wow. They've go up since I last bought some as they started at £7.95 or £7.50 in bulk. Mind you, a couple of years before that they had just gone down from £30 to £17.95 for the cheaper ones, but that was before Bachmann got on the market with their £7.95 decoders. I think prices are zooming up again to be at £14 already as it was around 10 years ago I bought my last decoders.
Will DCC remain the mainstay with the likes of the new mini radio control for smaller scales, which recharge on the move if needed. Still in their infancy, it does mean more realism as one can drive them from a crawl up with no hesitating and this can be on realistically rusty rails, so it is not just DCC stay alive to bridge the gap, but total control with radio control.
I was amazed that when Hornby brought in their live steam in 00 gauge that they decided not to make them DCC compatable, as back then via boosters it was easy to send 8 or more amps down the rails.

I will say DCC is good. If you are on a budget keep to DC, but if you have the cash to pay a little extra luxury, head for DCC. Also depends what you want out of the hobby. For me I zoomed into DCC before most, and now prefer DC for its simplicity.
RodzRx7
Posts: 15
Joined: Tue Jan 24, 2017 11:04 pm

Re: new attic layout

Post by RodzRx7 »

Mountain wrote:
carnehan wrote:
I will say DCC is good. If you are on a budget keep to DC, but if you have the cash to pay a little extra luxury, head for DCC. Also depends what you want out of the hobby. For me I zoomed into DCC before most, and now prefer DC for its simplicity.
I have bought a Bachmann E-Z Controller so this will allow me to get going with DCC, I like the idea of digital for running the trains and wiring up the layout. how ever I do like the idea of rc trains that would make life easy.
for the points I was going to use a separate DC system for the motors and old school switches.
I am not to interested in going full on digital letting a computer run the layout I would like it to be hands on running for my son and nephew playing with switches and knobs to control the layout rather than having a complicated system.

however I have just been doing some reading (after as always) and this controller is a 1 amp system and maybe only capable of running 2 trains max
I would like the option to run 4 locos on the ovals and another 1 shunting.
what system would people recommend?
money is not to much of an issue but at the same time I am not after a full on pro setup.
User avatar
End2end
Posts: 6010
Joined: Sun Jan 12, 2014 9:58 pm
Location: At the end....... and sometimes at the other end

Re: new attic layout

Post by End2end »

RodzRx7 wrote:for the points I was going to use a separate DC system for the motors and old school switches.
however I have just been doing some reading (after as always) and this controller is a 1 amp system and maybe only capable of running 2 trains max
I will have the same as you RodzRx7. DCC for train control ONLY. As for the EZ Command. That quote doesn't sound right to me about only being able to run 2 trains at a time. I'll run some quick crawl tests with 3 loco's and see if it will run them and repost.
My layouts too small to run 4 at a time you lucky so and so! :lol:
Thanks
End2end
"St Blazey's" - The progress and predicaments.
Welcome‎
Planning
Building
St. Blazey's Works & Depot thread
User avatar
End2end
Posts: 6010
Joined: Sun Jan 12, 2014 9:58 pm
Location: At the end....... and sometimes at the other end

Re: new attic layout

Post by End2end »

Although at a crawl, yes I just had three trains running. A Class 25 diesel, a Class 03 (0-6-0) diesel and a 105 (2 car) DMU.
One thing that helped for hands on control with the Bachmann EZ command is to also get the EZ Companion. A 2nd slave controller that plugs into the back of the EZ Command giving you 2 knobs and selectability between all your loco's on both controllers. The EZ Companion is only a slimmed down slave controller so needs the EZ Command to work.
Image
I've also bought the seperate faceplate / panel to plug in the second controller once the faceplate / panel is installed on the layout.
Image
Another thing to bear in mind, keeping the simplicity of the EZ command controller does not mean you are limited to 1amp. You can also buy a 5amp booster for the EZ Command! :)
Image

This is why I went with the Bachmann EZ system. Expandable to a degree without breaking the bank and the ability to give me 2 knobs for control using the Companion.
I looked at their Dynamis system but wasn't impressed with it working over I.R. and Hornby...forget it. Far too many stories lending the me to think, "Can I be bothered with all it's possible foibals." Some people swear by them. I really couldn't be bothered. :| and the last thing I want is any PC near the layout. I spend too much time looking at screens.
Shhh!...... this forum doesn't count because we are sharing ideas and learning!! :D
The major downside for those wanting to go full DCC including layout control of say points is that you cannot manipulate C.V.'s. and not being able to run / address more than 9 DCC decoders wether they be loco's or other things using the EZ Command. You can however turn lights and sound on/off etc.
Not a problem on my megre layout, fleet (I only have 9 loco's :mrgreen: ) and preferred analogue physical switching of tactile point switches on a proper control panel.
Hope it helps
Thanks
End2end
"St Blazey's" - The progress and predicaments.
Welcome‎
Planning
Building
St. Blazey's Works & Depot thread
Post Reply