

I feel awful about the mix up.
My personal layout under endless (re)construction
Re: My personal layout under endless (re)construction
A new project! Sounds good.  Excellent idea. A stable?
I feel awful about the mix up.
I feel awful about the mix up.
Modelling On A Budget ---》 https://www.newrailwaymodellers.co.uk/F ... 22&t=52212
Re: My personal layout under endless (re)construction
I think something as the yard of the village's coal company:Mountain wrote:A new project! Sounds good.
at one side, along the wall, a row of carts (say three or four, one beside the other and all resting on their rear stirrup step and the poles pointing to the sky...
At the other side along the opposite wall of the yard, under a roof, the row of horses being cared for, eating, or just resting... One or two with their back covered by a tarp ...
Somewhere in a corner of the yard the smithy where one of the horses is being shod...
Nearby the area where the cart maintenance is done... A number of wheels of different sizes against the wall... a small forge & equipment...
At the back and both sides brick walls...
The roofs for the horses area and the smithy of corrugated metal plates...
No, NO!: Not a coal company but the local maintenace yard for all horse drawn vehicles of the village! (...then I can include a water cart and many other...)
Whatever the specific theme, it will be a cart maintenance yard and has a serious chance to get the third of the three 1,20m X 0,80m diorama frames I built an year ago....
Daniel
My new Flickr:
https://www.flickr.com/photos/158027525@N08/
My old Flickr:
https://www.flickr.com/photos/daniel_1_32_scale/page223
Being right is one thing, but being true is quite another.
https://www.flickr.com/photos/158027525@N08/
My old Flickr:
https://www.flickr.com/photos/daniel_1_32_scale/page223
Being right is one thing, but being true is quite another.
Re: My personal layout under endless (re)construction
Did you mix paint with your coffe or so or benzine in your soup?Mountain wrote:
I feel awful about the mix up.
If you feel awful can't be because the mix. It MUST be because your thoughts about the mix!
Drop them and smile!
Daniel
My new Flickr:
https://www.flickr.com/photos/158027525@N08/
My old Flickr:
https://www.flickr.com/photos/daniel_1_32_scale/page223
Being right is one thing, but being true is quite another.
https://www.flickr.com/photos/158027525@N08/
My old Flickr:
https://www.flickr.com/photos/daniel_1_32_scale/page223
Being right is one thing, but being true is quite another.
Re: My personal layout under endless (re)construction
I like your new ideas. I was thinking about a smithy.
Modelling On A Budget ---》 https://www.newrailwaymodellers.co.uk/F ... 22&t=52212
Re: My personal layout under endless (re)construction
Great.Mountain wrote:I like your new ideas. I was thinking about a smithy.
Now the question is what could be the general arrangement: a closed yard with a big gate is as I recall seeing such a scene in real life more than 65 years ago. I remember the horses where all dramatically overscaled!!!
But then one would be induced to look the scene from above which would totally destroy every particular spot.
I always prefer to use as many obstacles as needed so I only can really see the whole in small areas at a time and as much as possible from the point of view of a scale figure. My 'natural' (...) standard is to set the baseboard at 1,30m height and I am only 1,75m tall (... and already shrinking.
So I am going to see if a more open yard works convincing... Or may be an open yard with only two walls...
But that will be all, probably, the start of a new dedicated thread.
Daniel
My new Flickr:
https://www.flickr.com/photos/158027525@N08/
My old Flickr:
https://www.flickr.com/photos/daniel_1_32_scale/page223
Being right is one thing, but being true is quite another.
https://www.flickr.com/photos/158027525@N08/
My old Flickr:
https://www.flickr.com/photos/daniel_1_32_scale/page223
Being right is one thing, but being true is quite another.
Re: My personal layout under endless (re)construction
Where I used to live we had a pair of old cottages (Built before the 11th centuary. Today only one exists) and their land and our garage below was once an old smithy.
It had an interesting historic tale where the blacksmith was working on building an iron boat. When he was finished, the whole village came out to help and watch as they took it the two miles to the harbour for its launch. I imagine it was quite a journey by horse and cart in those days and it must have been on at least two more heavily built carts as this thing was fairly big.
On the day of its launch the whole village came down as well as those who lived in the new village (Used to all be one village area before the population grew around the harbour) to watch. They launched and it sank!
It lay there with two old metal canal barges which were used on the canal that preceeded the Burry Port And Gwendraeth Valley Railway... And these three vessels are now under the sand but had been visible lined up used as a sea defence for many years. Whilw most historians know of the two canal barges, few of them knew the identity of this third vessel. The iron boat!
The smithy itself was a stone built building that could house two cars side by side and still had plenty of room around them. It had heavy wooden doors and very well made hinges. There were four doors which two on each side of the large opening were fastened to the sturdy doorframe of the building, and the other two doors were fastened with equally heavy duty hinges onto the first two doors so that normally only one inner door (Inner right of the 4 doors) was opened to gain access, and then if one wanted to drive a car in there or something else, bolts at the top and bottom of the inside of the other doors would be slid and the opposite inner door would open and fold back on the outer doors, and further bolts on the outer pair of doors would fully open all the doors if that makes sense?
In the garage (Smithy) was a car pit for working on cars and other large items such as carts? It had heavy wooden planks which were useful foe working on my Dads Reliant Regal (First a saloon, and then a yellow Reliant Regal Supervan 3). The reason why this pit was useful for these cars was that one would drive the 3 wheeled car on the planks, then remove the planks leaving a plank or two where the front wheel was, and then one would walk down the steps into the pit to work under the vehicle.
The roof was made of heavy duty corrigated iron sheets which were also fitted on top of one of the two cotrages. (The other cottage that we lived in had been converted to have slate, which was unusual in that this slate was the lovely light blue Pembrokeshire slate unlike the purple or darker blue shades of slate on other houses in the village which came from North Wales).
Unfortunately we had the whole mountain behind go on fire during the heat wave and drought of 1976, and my Dad had to hastily demolish the thatched roof as the fire had reached right up to the field behind, and we had not long moved there and the whole one and a quarter acre land was overgrown with many old elm trees which had to be dug out when they had succome to dutch elm disease back then. As kids ever large tree root my Dad dug out which was a mamoth task, let alone saw and fell those huge trees first, left a rather large hole. My parents bought a large thick yellow polythene sheet designed for the early polytunnels, and put it in the hole, and we filled it up with water and it became a swimming pool. Then my dad would work on the next tree doing the same where the earth dug out while removing the next tree root would end up to fill the last swimming pool, and so we went on in that fashion for a fair few years like that until finally the whole land was open and by then we kinda ended up keeping goats.... Which wasn't planned, but an insurance sales man happened to have a pair of goats up on top of the mountain behind... And in the winter of 1976 he could not get to them even though they had a shelter. The whole mountain was snowed in. So he asked if we wanted them, and it went from there!
Sadly when we sold the property in 1986, the remains of the thatched cottage were completely demolished and removed, and a brand new property was built as a one for one. Those two cottages were some of the origional in the village and we were able to have an archeologist friend date them as when my Dad took the thatched roof off, he found a cats skull above the lintel, and the acheologist became very interested. He said it was an old Welsh tradition thought to ward off evil spirits which died out in Wales before the 11th centuary.
While the two cottages were identical, the one we lived in which was the better of the two as the thatched one was past living in, was last done up in the 1920's to 1930's with lovely metal window frames and ornamental shutters on the outside. Even the inside with its lovely old stairs was interesting. Sadly the new owners who were builders got rid of all the old interesting bits and rebuilt the cottage with mock vintage stairs which was nothing like the old origional stairs and not even in the same place! They demolished the other cottage and built a new room over half of it. They moved the kitchen to where our breakfast room was and widened it. They built a new driveway up which got rid of a lovely pathway up to the cottage with ornamental mature trees lining it. They also built a new house in the land behind, and split the property up in three with the Smithy being sold as one of the three properties. My parents could have done that but refused to as it would have ruined the charm of the property as a lovely village smallholding that it once used to be.
Modelling On A Budget ---》 https://www.newrailwaymodellers.co.uk/F ... 22&t=52212
Re: My personal layout under endless (re)construction
Well, Mountain, you are a constant source of surprises!
Well written story in which beauty and sadness seem to dance together.
You must have had a great childhood in such enviroment.
Thank you for sharing.
Daniel
Well written story in which beauty and sadness seem to dance together.
You must have had a great childhood in such enviroment.
Thank you for sharing.
Daniel
My new Flickr:
https://www.flickr.com/photos/158027525@N08/
My old Flickr:
https://www.flickr.com/photos/daniel_1_32_scale/page223
Being right is one thing, but being true is quite another.
https://www.flickr.com/photos/158027525@N08/
My old Flickr:
https://www.flickr.com/photos/daniel_1_32_scale/page223
Being right is one thing, but being true is quite another.
Re: My personal layout under endless (re)construction
Well, back to the steam boat, I recall now how I smoothed the hull made from a block of Balsa: I bought Balsa filler!
That went good but there are another two steam boats pushing my lone brain cell so at first I've made another two Balsa hulls but kept looking for alternatives.
I built a vacuumforming many years ago. It worked just great but to be an option I should make a new one because the hulls are too big for it.
Those familiar with vacuumforming knwo what I mean but those who don't may enjoy these films:
Here the simplest vacuumforminbg device I have ever seen:
https://www.youtube.com/watch?v=Nrfh9NBdx-o
but if you want you can go also for something -also homemade- more sofisticated this (two parts) film may please you:
https://www.youtube.com/watch?v=xV4L7REQ5ls
https://www.youtube.com/watch?v=CrX9xrVh_ps
Anyway, before I make a new one I want to try THIBRA.
I never heard about it until I bumped into it on the website where I buy my paintings and pastels. I didn't know what it was but YouTube explained to me:
https://www.youtube.com/watch?v=8Yk1SMJPB_8
So a couple of moths ago I bought a big plate of it and my hotair gun is very exited. That may bring some news soon at the waterfront.
Daniel
My new Flickr:
https://www.flickr.com/photos/158027525@N08/
My old Flickr:
https://www.flickr.com/photos/daniel_1_32_scale/page223
Being right is one thing, but being true is quite another.
https://www.flickr.com/photos/158027525@N08/
My old Flickr:
https://www.flickr.com/photos/daniel_1_32_scale/page223
Being right is one thing, but being true is quite another.
Re: My personal layout under endless (re)construction
It has been some time since I posted the above message,
Nothing done with the ships yet.
But may be a little about what is going to run across the village & the forest.
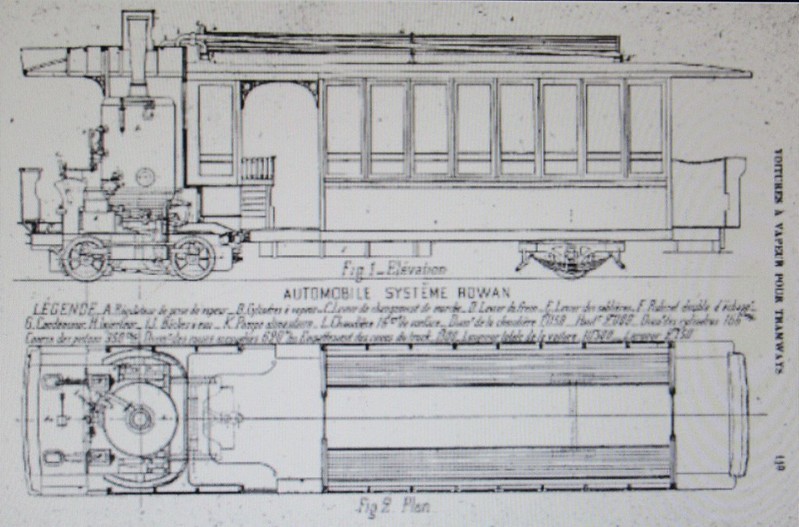
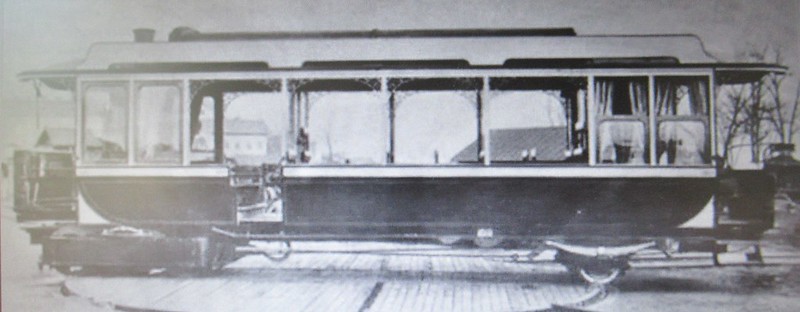
I discovered the Rowan steam railcars while searching the for me unknown at DELCAMPE's wonderful old postcards website.
Aa photo showing the Rowan steam railcar in Paris.
I have no idea where I have stored that photo but the next series of images will help to get an idea.
This was the basic Rowan design but many, MANY different versions have been built in many countries.
 IMG_0006 (2) by Daniel Osvaldo Caso, on Flickr
 IMG_0001 (2) by Daniel Osvaldo Caso, on Flickr
 IMG_0005 (2) by Daniel Osvaldo Caso, on Flickr
 IMG_0004 (2) by Daniel Osvaldo Caso, on Flickr
 IMG_0055 (2) by Daniel Osvaldo Caso, on Flickr
 IMG_0054 (2) by Daniel Osvaldo Caso, on Flickr
 IMG_0053 (2) by Daniel Osvaldo Caso, on Flickr
 IMG_0006 (2) by Daniel Osvaldo Caso, on Flickr
 IMG_0020 (2) by Daniel Osvaldo Caso, on Flickr
 IMG_0127 (2) by Daniel Osvaldo Caso, on Flickr
They were built in many different gauges and, of course, none for my 500mm gauge, but who cares? I was in love with the theme so designed one droping everything I liked from the prototypes and what imagination lent me to play in the mixer including one that was actually a bashing on rhe Decauville coach design:
This was the Decauville coach (Probably a meter gauge version)
 IMG_0058 (2) by Daniel Osvaldo Caso, on Flickr
and this the steam railcar:
 IMG_0057 (3) by Daniel Osvaldo Caso, on Flickr
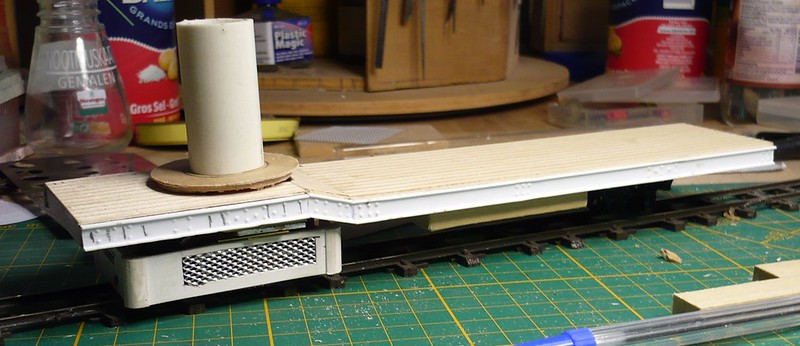
Of course the ornamental beauty of the Pariian and other versions running on standard gauge would never fit in a 500mm gauge version, so a huge amount of concessions, exaggerations, heresies, outright lies, omissions and of course errors provided a basic 500mm gauge design:
 P2220459 (2) by Daniel Osvaldo Caso, on Flickr
More in next message.
Daniel
Nothing done with the ships yet.
But may be a little about what is going to run across the village & the forest.
I discovered the Rowan steam railcars while searching the for me unknown at DELCAMPE's wonderful old postcards website.
Aa photo showing the Rowan steam railcar in Paris.
I have no idea where I have stored that photo but the next series of images will help to get an idea.
This was the basic Rowan design but many, MANY different versions have been built in many countries.
IMG_0006 (2) by Daniel Osvaldo Caso, on FlickrIMG_0001 (2) by Daniel Osvaldo Caso, on FlickrIMG_0005 (2) by Daniel Osvaldo Caso, on FlickrIMG_0004 (2) by Daniel Osvaldo Caso, on FlickrIMG_0055 (2) by Daniel Osvaldo Caso, on FlickrIMG_0054 (2) by Daniel Osvaldo Caso, on FlickrIMG_0053 (2) by Daniel Osvaldo Caso, on FlickrIMG_0006 (2) by Daniel Osvaldo Caso, on FlickrIMG_0020 (2) by Daniel Osvaldo Caso, on FlickrIMG_0127 (2) by Daniel Osvaldo Caso, on FlickrThey were built in many different gauges and, of course, none for my 500mm gauge, but who cares? I was in love with the theme so designed one droping everything I liked from the prototypes and what imagination lent me to play in the mixer including one that was actually a bashing on rhe Decauville coach design:
This was the Decauville coach (Probably a meter gauge version)
IMG_0058 (2) by Daniel Osvaldo Caso, on Flickrand this the steam railcar:
IMG_0057 (3) by Daniel Osvaldo Caso, on FlickrOf course the ornamental beauty of the Pariian and other versions running on standard gauge would never fit in a 500mm gauge version, so a huge amount of concessions, exaggerations, heresies, outright lies, omissions and of course errors provided a basic 500mm gauge design:
P2220459 (2) by Daniel Osvaldo Caso, on FlickrMore in next message.
Daniel
My new Flickr:
https://www.flickr.com/photos/158027525@N08/
My old Flickr:
https://www.flickr.com/photos/daniel_1_32_scale/page223
Being right is one thing, but being true is quite another.
https://www.flickr.com/photos/158027525@N08/
My old Flickr:
https://www.flickr.com/photos/daniel_1_32_scale/page223
Being right is one thing, but being true is quite another.
Re: My personal layout under endless (re)construction
I even dared a good version:
 P2220507 (2) by Daniel Osvaldo Caso, on Flickr
but didn't get really convinced so until now has been forgoten.
None of the rails in my layout knows what wires or electricity are so whatever want to move on them must go batteries on board = RC.
I wanted the steam unit to be skirted but with the lids made of mesh so a little of the valve gears in action can be seen.
The mechanism was going to be one of the two driving units from the overscaled (thanks God for that!) H0 Rivarossi #1340 Meyer loco...
 IMG_0066 (2) by Daniel Osvaldo Caso, on Flickr
while the other unit, togueter with another four will be used to build a couple of small 0-4-0 Couillets (after my eyes have had the long awaited surgery)
 P2220463 (2) by Daniel Osvaldo Caso, on Flickr
It is known to have been overscaled for H0 but it fits perfectly the Couillets proyect and by special decret also the 500mm gaughe Rowans.
 P2220462 (2) by Daniel Osvaldo Caso, on Flickr
Of course I have absolutelly no understanding about RC but John Vogelaar, a good friend, does so we had a talk, I made a couple of sketches and he sent me the mechanism remotorized with a Pololu motor and RC ready. The brass work is by him, the styrene construction by myself:
 P1080390 (2) by Daniel Osvaldo Caso, on Flickr
Later the whole styrene skirt was scraped and a new made.
 P1080393 (2) by Daniel Osvaldo Caso, on Flickr
 P1080388 (2) by Daniel Osvaldo Caso, on Flickr
 P1080387 (2) by Daniel Osvaldo Caso, on Flickr
 P1080389 (2) by Daniel Osvaldo Caso, on Flickr
 P1080391 (2) by Daniel Osvaldo Caso, on Flickr
The box will hide the tiny RC board and the LiPo batteries.
 P1080392 (2) by Daniel Osvaldo Caso, on Flickr
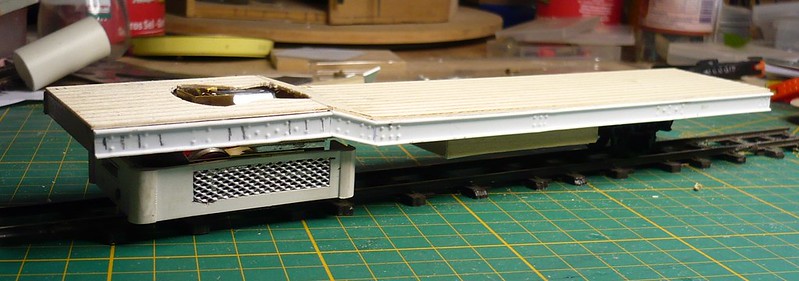
I was unhappy with my first intent to make the underframe so made a new one:
 IMG_0034 (2) by Daniel Osvaldo Caso, on Flickr
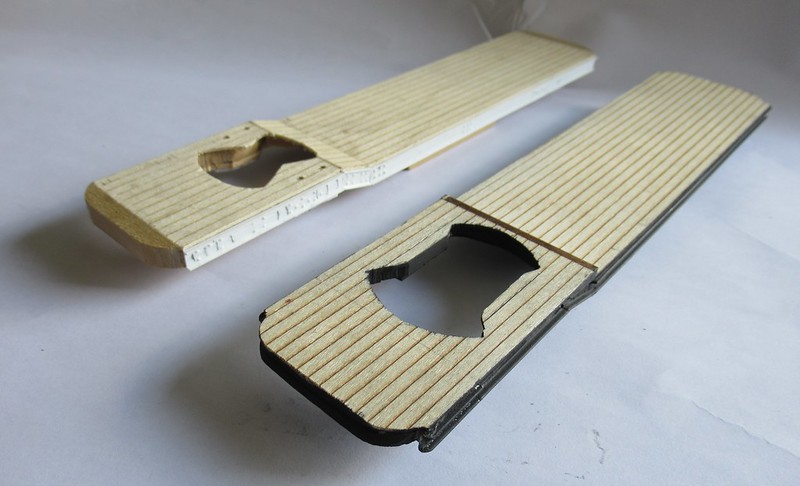
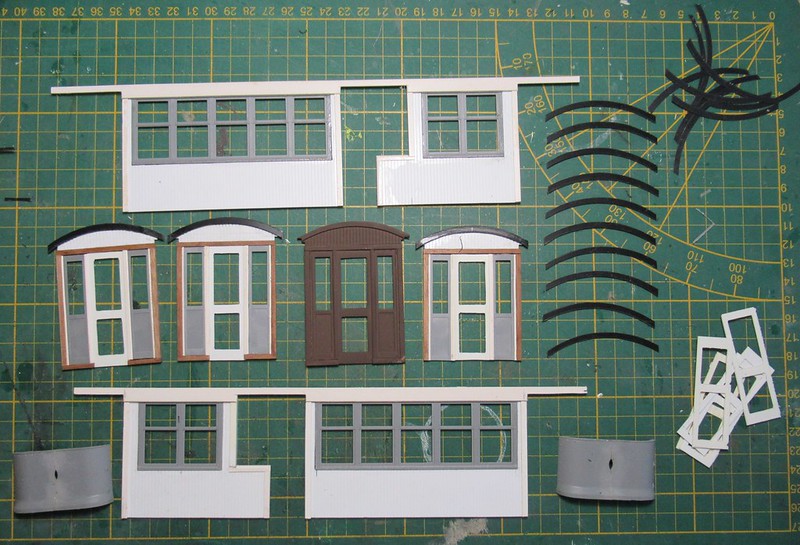
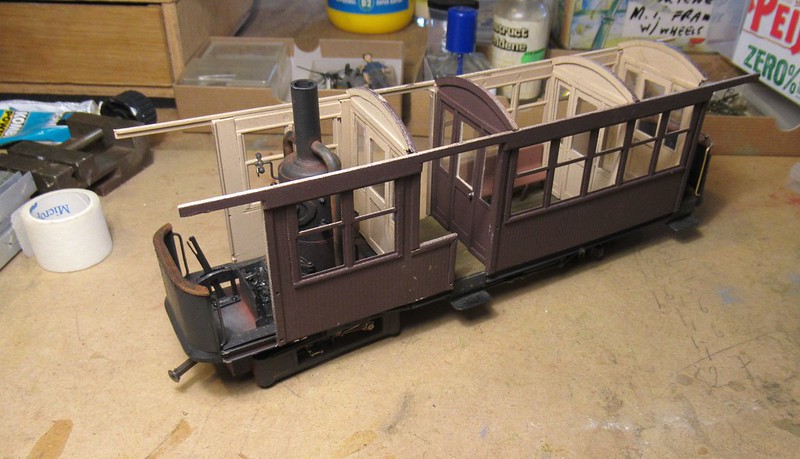
Then something very frustrating happened: my eyes couldn't get a row of win dows properly cut and after several waiting periods to get them laser cut or 3D printed, I concluded I was going to delete the whole project...
Then Saint Miniart came with the second edition of the 1/35 beautiful Russian tram and solved my problem.
60 euros for just a couple of plastic windows...??? !!!! Are you mad? (Mr. Wallet was furious and kept showing me his his clenched teeth until the end of the month... But passions are passions.)
I redesigned my plan so the Miniart windows would fit and that made me redesign almost all the rest too...
 IMG_0038 (2) by Daniel Osvaldo Caso, on Flickr
 IMG_0034 (2) by Daniel Osvaldo Caso, on Flickr
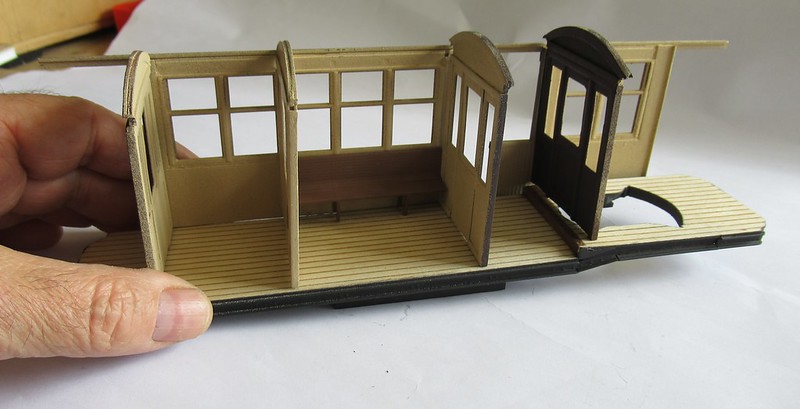
It made me cross a mountain of frustrations even using a huge magnifier, but at a certain point I notice it would be an acceptable model (well, for me at least!)
 IMG_0041 (2) by Daniel Osvaldo Caso, on Flickr
 IMG_0042 (2) by Daniel Osvaldo Caso, on Flickr
 IMG_0043 (2) by Daniel Osvaldo Caso, on Flickr
 IMG_0044 (2) by Daniel Osvaldo Caso, on Flickr
At this stage none of the walls was glued to the frame yet but slowly many of the errors were being more or less disguised...
 IMG_0045 (2) by Daniel Osvaldo Caso, on Flickr
 IMG_0046 (2) by Daniel Osvaldo Caso, on Flickr
 IMG_0047 (2) by Daniel Osvaldo Caso, on Flickr
 IMG_0051 (2) by Daniel Osvaldo Caso, on Flickr
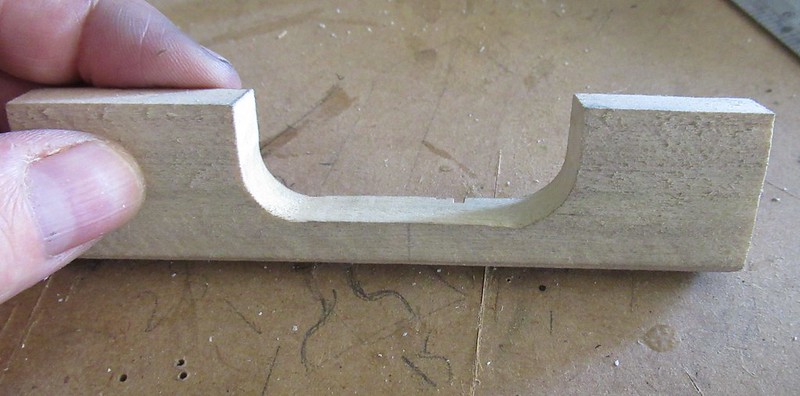
After different tries I decided not to give it a single rear axle but a diamond boguie that would look better.
The boguie was made using the sides and wheels from a -now sadly out of production- 0 scale Athearn archbar boguie. I also regauged it and replaced the bolster and the coil springs by a wooden block that should sugest leaf springs:
 IMG_0008 (2) by Daniel Osvaldo Caso, on Flickr
(Now, seeing the photos I see I must re-do that!)
 IMG_0024 (2) by Daniel Osvaldo Caso, on Flickr
... but then an accident:
 IMG_0023 (2) by Daniel Osvaldo Caso, on Flickr
More tomorrow.
Daniel
P2220507 (2) by Daniel Osvaldo Caso, on Flickrbut didn't get really convinced so until now has been forgoten.
None of the rails in my layout knows what wires or electricity are so whatever want to move on them must go batteries on board = RC.
I wanted the steam unit to be skirted but with the lids made of mesh so a little of the valve gears in action can be seen.
The mechanism was going to be one of the two driving units from the overscaled (thanks God for that!) H0 Rivarossi #1340 Meyer loco...
IMG_0066 (2) by Daniel Osvaldo Caso, on Flickrwhile the other unit, togueter with another four will be used to build a couple of small 0-4-0 Couillets (after my eyes have had the long awaited surgery)
P2220463 (2) by Daniel Osvaldo Caso, on FlickrIt is known to have been overscaled for H0 but it fits perfectly the Couillets proyect and by special decret also the 500mm gaughe Rowans.
P2220462 (2) by Daniel Osvaldo Caso, on FlickrOf course I have absolutelly no understanding about RC but John Vogelaar, a good friend, does so we had a talk, I made a couple of sketches and he sent me the mechanism remotorized with a Pololu motor and RC ready. The brass work is by him, the styrene construction by myself:
P1080390 (2) by Daniel Osvaldo Caso, on FlickrLater the whole styrene skirt was scraped and a new made.
P1080393 (2) by Daniel Osvaldo Caso, on FlickrP1080388 (2) by Daniel Osvaldo Caso, on FlickrP1080387 (2) by Daniel Osvaldo Caso, on FlickrP1080389 (2) by Daniel Osvaldo Caso, on FlickrP1080391 (2) by Daniel Osvaldo Caso, on FlickrThe box will hide the tiny RC board and the LiPo batteries.
P1080392 (2) by Daniel Osvaldo Caso, on FlickrI was unhappy with my first intent to make the underframe so made a new one:
IMG_0034 (2) by Daniel Osvaldo Caso, on FlickrThen something very frustrating happened: my eyes couldn't get a row of win dows properly cut and after several waiting periods to get them laser cut or 3D printed, I concluded I was going to delete the whole project...
Then Saint Miniart came with the second edition of the 1/35 beautiful Russian tram and solved my problem.
60 euros for just a couple of plastic windows...??? !!!! Are you mad? (Mr. Wallet was furious and kept showing me his his clenched teeth until the end of the month... But passions are passions.)
I redesigned my plan so the Miniart windows would fit and that made me redesign almost all the rest too...
IMG_0038 (2) by Daniel Osvaldo Caso, on FlickrIMG_0034 (2) by Daniel Osvaldo Caso, on FlickrIt made me cross a mountain of frustrations even using a huge magnifier, but at a certain point I notice it would be an acceptable model (well, for me at least!)
IMG_0041 (2) by Daniel Osvaldo Caso, on FlickrIMG_0042 (2) by Daniel Osvaldo Caso, on FlickrIMG_0043 (2) by Daniel Osvaldo Caso, on FlickrIMG_0044 (2) by Daniel Osvaldo Caso, on FlickrAt this stage none of the walls was glued to the frame yet but slowly many of the errors were being more or less disguised...
IMG_0045 (2) by Daniel Osvaldo Caso, on FlickrIMG_0046 (2) by Daniel Osvaldo Caso, on FlickrIMG_0047 (2) by Daniel Osvaldo Caso, on FlickrIMG_0051 (2) by Daniel Osvaldo Caso, on FlickrAfter different tries I decided not to give it a single rear axle but a diamond boguie that would look better.
The boguie was made using the sides and wheels from a -now sadly out of production- 0 scale Athearn archbar boguie. I also regauged it and replaced the bolster and the coil springs by a wooden block that should sugest leaf springs:
IMG_0008 (2) by Daniel Osvaldo Caso, on Flickr(Now, seeing the photos I see I must re-do that!)
IMG_0024 (2) by Daniel Osvaldo Caso, on Flickr... but then an accident:
IMG_0023 (2) by Daniel Osvaldo Caso, on FlickrMore tomorrow.
Daniel
My new Flickr:
https://www.flickr.com/photos/158027525@N08/
My old Flickr:
https://www.flickr.com/photos/daniel_1_32_scale/page223
Being right is one thing, but being true is quite another.
https://www.flickr.com/photos/158027525@N08/
My old Flickr:
https://www.flickr.com/photos/daniel_1_32_scale/page223
Being right is one thing, but being true is quite another.
Re: My personal layout under endless (re)construction
I love my errors' teachings!
Of course, it would be a lot easier to go further with the cab interior with the small section separated from the rest. And it was.
 IMG_0025 (2) by Daniel Osvaldo Caso, on Flickr
 IMG_0028 (2) by Daniel Osvaldo Caso, on Flickr
 IMG_0029 (2) by Daniel Osvaldo Caso, on Flickr
 IMG_0031 (2) by Daniel Osvaldo Caso, on Flickr
 IMG_0032 (2) by Daniel Osvaldo Caso, on Flickr
 IMG_0033 (2) by Daniel Osvaldo Caso, on Flickr
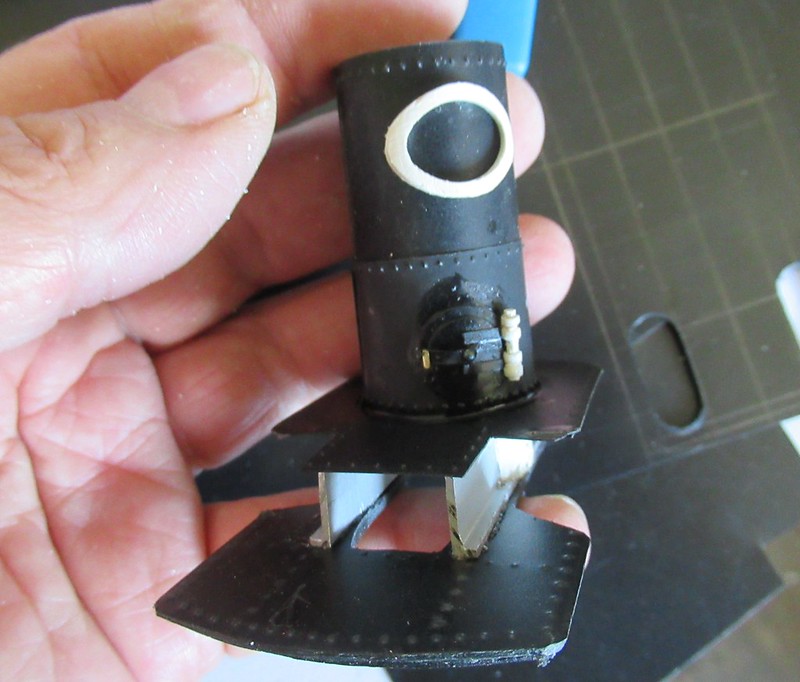
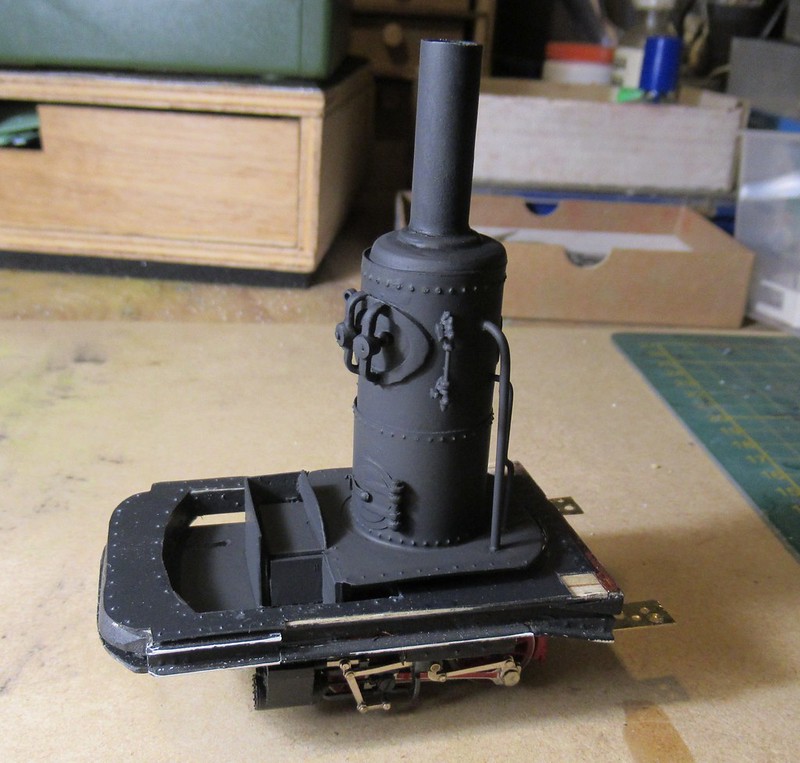
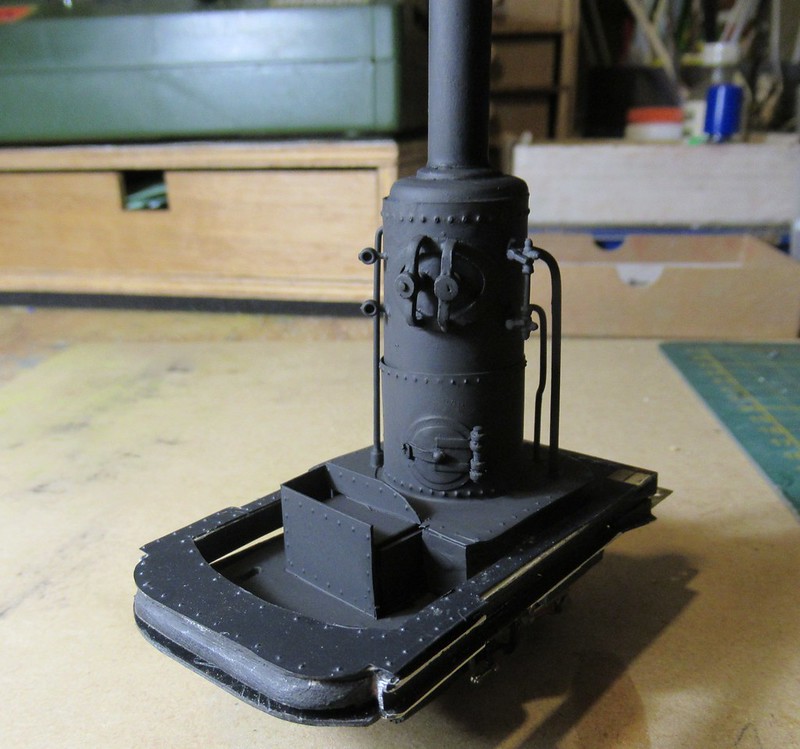
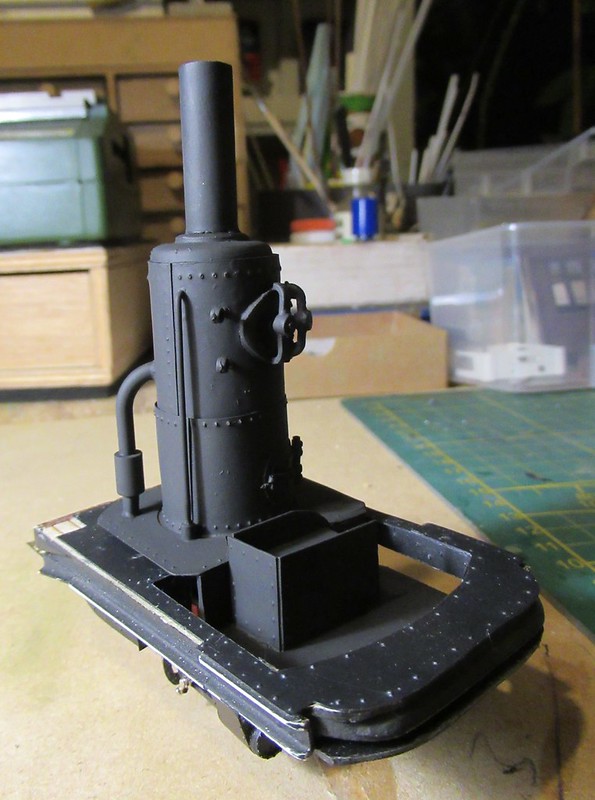
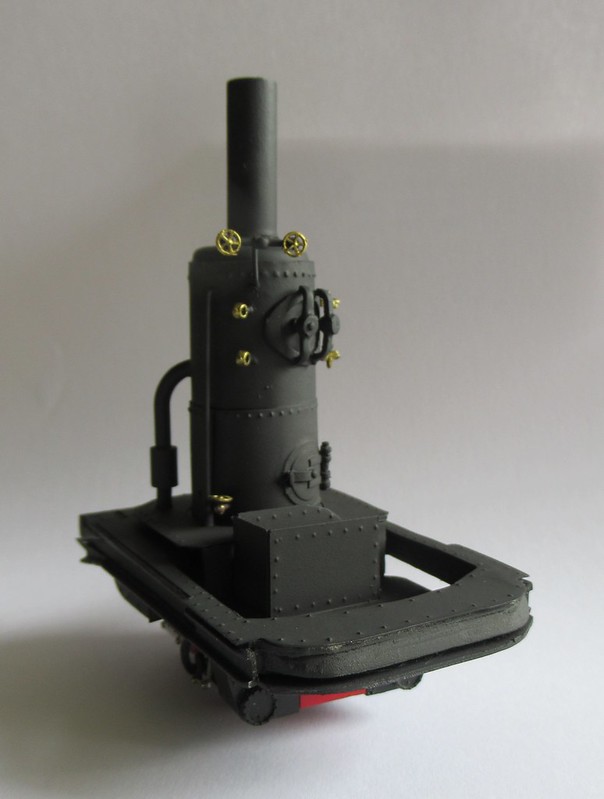
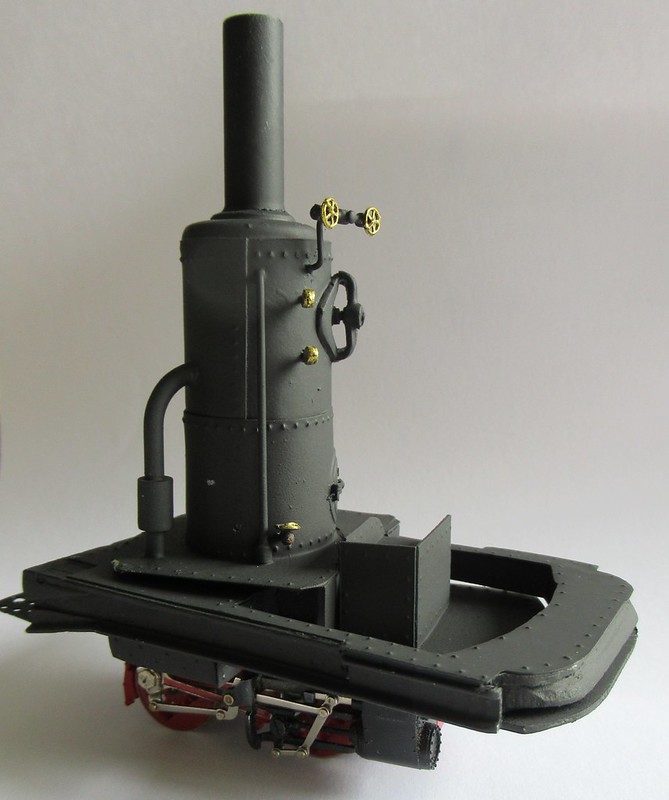
Just to be clear: I never learnt much about boilers and their funny plumbing but with my enthusiastically ageing lone brain cell's vanishing memory function I am forced to do what anyway I have been doing all the time: lie.
 IMG_0006 (2) by Daniel Osvaldo Caso, on Flickr
Well, clearly, cutting a big 0 in o,5mm styrene wouldn't be dificult... if you have better eyes than mine; so I seek support in indirect tricks:
 IMG_0007 (2) by Daniel Osvaldo Caso, on Flickr
 IMG_0008 (2) by Daniel Osvaldo Caso, on Flickr
 IMG_0010 (2) by Daniel Osvaldo Caso, on Flickr
 IMG_0011 (2) by Daniel Osvaldo Caso, on Flickr
 IMG_0012 (2) by Daniel Osvaldo Caso, on Flickr
 IMG_0017 (2) by Daniel Osvaldo Caso, on Flickr
 IMG_0018 (2) by Daniel Osvaldo Caso, on Flickr
 IMG_0019 (2) by Daniel Osvaldo Caso, on Flickr
 IMG_0021 (2) by Daniel Osvaldo Caso, on Flickr
 IMG_0027 (2) by Daniel Osvaldo Caso, on Flickr
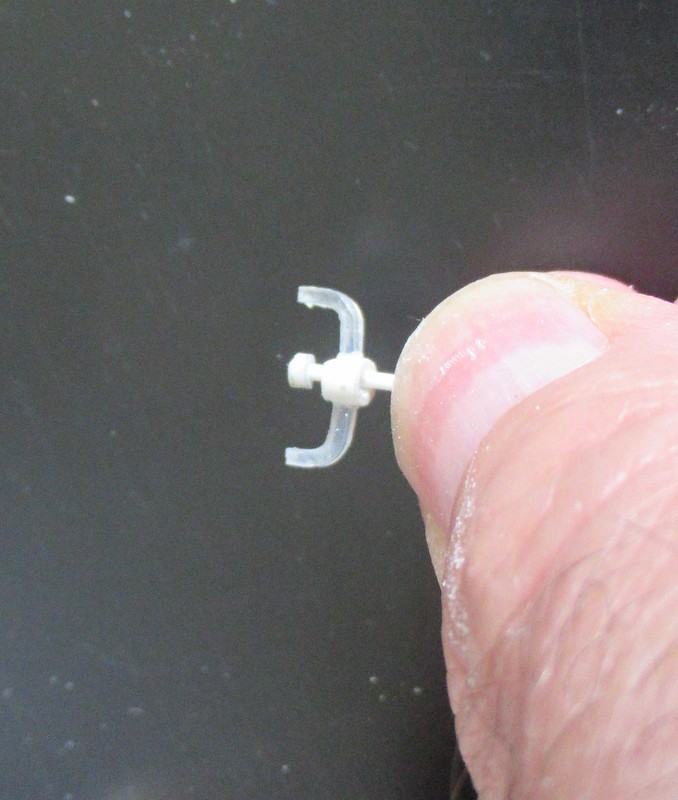
(Hmm... May be also a good method for making dome flanges...)
 IMG_0020 (2) by Daniel Osvaldo Caso, on Flickr
 IMG_0016 (2) by Daniel Osvaldo Caso, on Flickr
 IMG_0035 (3) by Daniel Osvaldo Caso, on Flickr
 IMG_0036 (2) by Daniel Osvaldo Caso, on Flickr
 IMG_0038 (2) by Daniel Osvaldo Caso, on Flickr
 IMG_0041 (2) by Daniel Osvaldo Caso, on Flickr
 IMG_0043 (2) by Daniel Osvaldo Caso, on Flickr
 IMG_0050 (2) by Daniel Osvaldo Caso, on Flickr
 IMG_0051 (2) by Daniel Osvaldo Caso, on Flickr
 IMG_0052 (2) by Daniel Osvaldo Caso, on Flickr
 IMG_0053 (2) by Daniel Osvaldo Caso, on Flickr
 IMG_0054 (2) by Daniel Osvaldo Caso, on Flickr
 IMG_0055 (2) by Daniel Osvaldo Caso, on Flickr
 IMG_0056 (2) by Daniel Osvaldo Caso, on Flickr
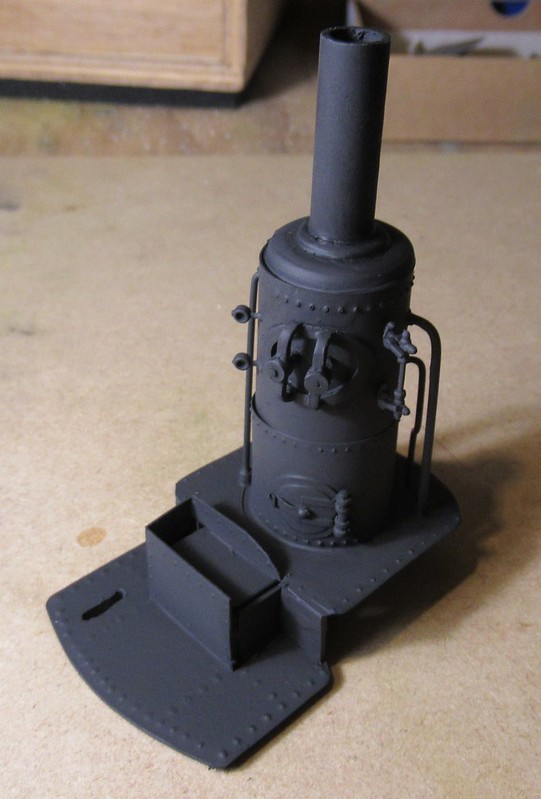
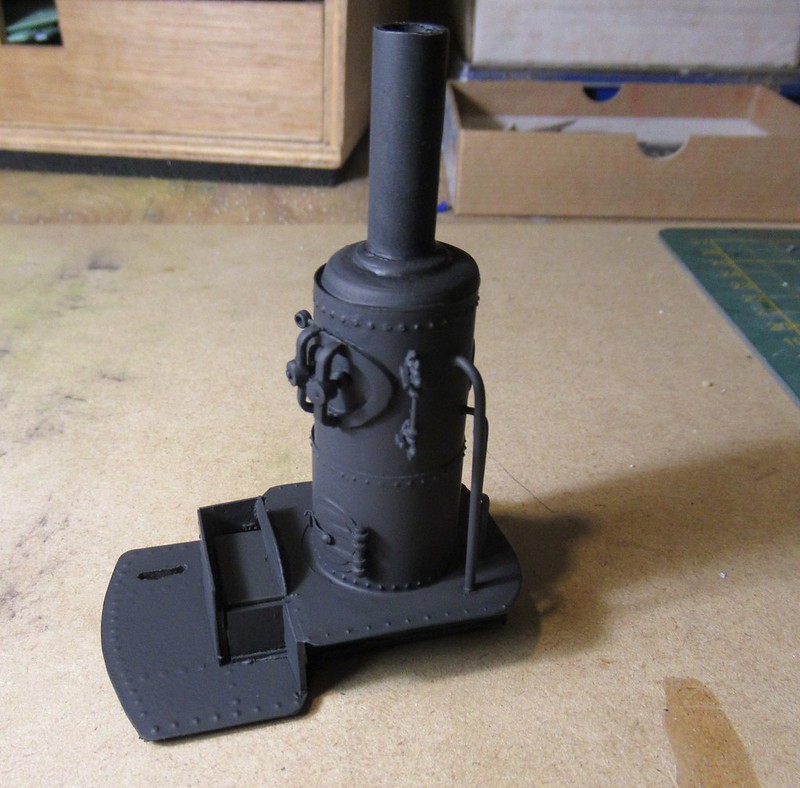
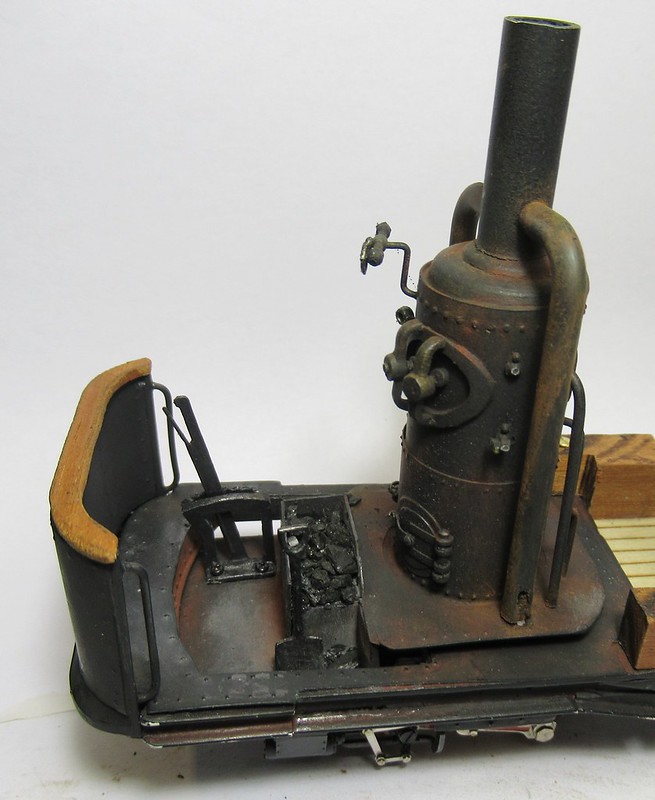
Not much will remain reallyt vissible so is enough to suggest things...
 IMG_0057 (2) by Daniel Osvaldo Caso, on Flickr
 IMG_0058 (2) by Daniel Osvaldo Caso, on Flickr
 IMG_0059 (2) by Daniel Osvaldo Caso, on Flickr
 IMG_0060 (2) by Daniel Osvaldo Caso, on Flickr
 IMG_0061 (2) by Daniel Osvaldo Caso, on Flickr
 IMG_0062 (2) by Daniel Osvaldo Caso, on Flickr
 IMG_0064 (2) by Daniel Osvaldo Caso, on Flickr
The figure is an 1/35 WWII German army deserter so a bit smaller than it would be in 1/32, but people comes in many sizes.
 IMG_0065 (2) by Daniel Osvaldo Caso, on Flickr
 IMG_0067 (2) by Daniel Osvaldo Caso, on Flickr
It wasn't reglued yet but this gives an idea of what is changing
 IMG_0001 (2) by Daniel Osvaldo Caso, on Flickr
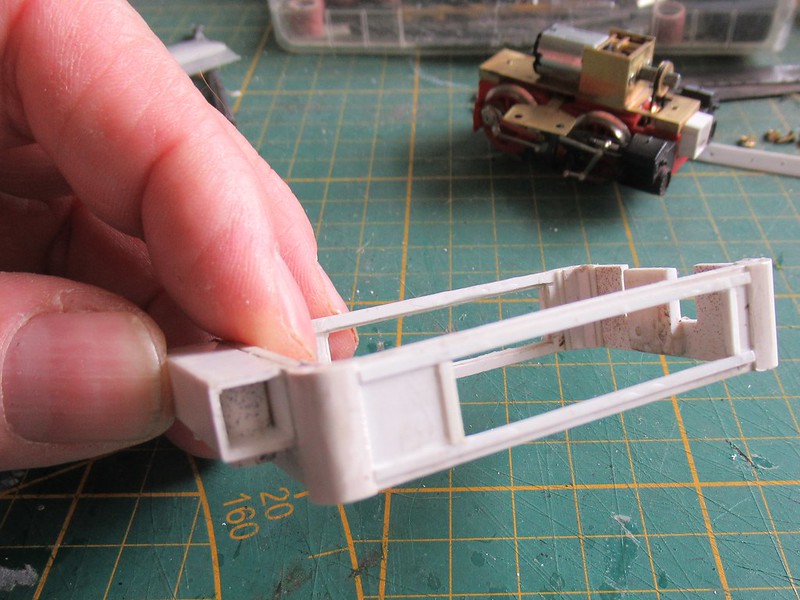
The photo show the two small brass brackets I've made for solving the weakness point issue. The holes are meant one for a small screw and the other for ensuring the epoxy will have grip enough to hold.
The two hardwood blocks are mean to take the screws but will be hidding inside the coal bunkers.
 IMG_0002 (2) by Daniel Osvaldo Caso, on Flickr
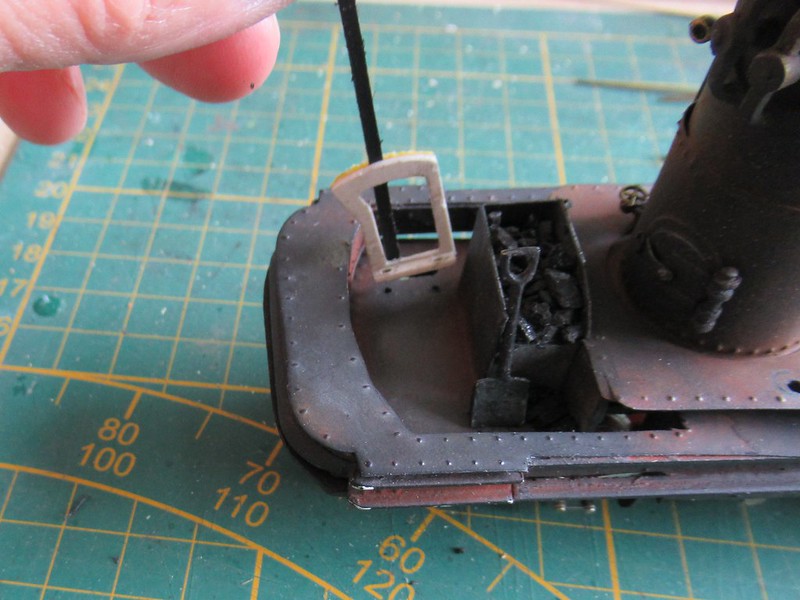
The coal bunkers will be 90% in the vestibule area but accesible from the cab:
 IMG_0004 (2) by Daniel Osvaldo Caso, on Flickr
 IMG_0005 (2) by Daniel Osvaldo Caso, on Flickr
 IMG_0006 (2) by Daniel Osvaldo Caso, on Flickr
 IMG_0001 (2) by Daniel Osvaldo Caso, on Flickr
 IMG_0003 (2) by Daniel Osvaldo Caso, on Flickr
 IMG_0002 (2) by Daniel Osvaldo Caso, on Flickr
 IMG_0006 (2) by Daniel Osvaldo Caso, on Flickr
More in next message
Of course, it would be a lot easier to go further with the cab interior with the small section separated from the rest. And it was.
IMG_0025 (2) by Daniel Osvaldo Caso, on FlickrIMG_0028 (2) by Daniel Osvaldo Caso, on FlickrIMG_0029 (2) by Daniel Osvaldo Caso, on FlickrIMG_0031 (2) by Daniel Osvaldo Caso, on FlickrIMG_0032 (2) by Daniel Osvaldo Caso, on FlickrIMG_0033 (2) by Daniel Osvaldo Caso, on FlickrJust to be clear: I never learnt much about boilers and their funny plumbing but with my enthusiastically ageing lone brain cell's vanishing memory function I am forced to do what anyway I have been doing all the time: lie.
IMG_0006 (2) by Daniel Osvaldo Caso, on FlickrWell, clearly, cutting a big 0 in o,5mm styrene wouldn't be dificult... if you have better eyes than mine; so I seek support in indirect tricks:
IMG_0007 (2) by Daniel Osvaldo Caso, on FlickrIMG_0008 (2) by Daniel Osvaldo Caso, on FlickrIMG_0010 (2) by Daniel Osvaldo Caso, on FlickrIMG_0011 (2) by Daniel Osvaldo Caso, on FlickrIMG_0012 (2) by Daniel Osvaldo Caso, on FlickrIMG_0017 (2) by Daniel Osvaldo Caso, on FlickrIMG_0018 (2) by Daniel Osvaldo Caso, on FlickrIMG_0019 (2) by Daniel Osvaldo Caso, on FlickrIMG_0021 (2) by Daniel Osvaldo Caso, on FlickrIMG_0027 (2) by Daniel Osvaldo Caso, on Flickr(Hmm... May be also a good method for making dome flanges...)
IMG_0020 (2) by Daniel Osvaldo Caso, on FlickrIMG_0016 (2) by Daniel Osvaldo Caso, on FlickrIMG_0035 (3) by Daniel Osvaldo Caso, on FlickrIMG_0036 (2) by Daniel Osvaldo Caso, on FlickrIMG_0038 (2) by Daniel Osvaldo Caso, on FlickrIMG_0041 (2) by Daniel Osvaldo Caso, on FlickrIMG_0043 (2) by Daniel Osvaldo Caso, on FlickrIMG_0050 (2) by Daniel Osvaldo Caso, on FlickrIMG_0051 (2) by Daniel Osvaldo Caso, on FlickrIMG_0052 (2) by Daniel Osvaldo Caso, on FlickrIMG_0053 (2) by Daniel Osvaldo Caso, on FlickrIMG_0054 (2) by Daniel Osvaldo Caso, on FlickrIMG_0055 (2) by Daniel Osvaldo Caso, on FlickrIMG_0056 (2) by Daniel Osvaldo Caso, on FlickrNot much will remain reallyt vissible so is enough to suggest things...
IMG_0057 (2) by Daniel Osvaldo Caso, on FlickrIMG_0058 (2) by Daniel Osvaldo Caso, on FlickrIMG_0059 (2) by Daniel Osvaldo Caso, on FlickrIMG_0060 (2) by Daniel Osvaldo Caso, on FlickrIMG_0061 (2) by Daniel Osvaldo Caso, on FlickrIMG_0062 (2) by Daniel Osvaldo Caso, on FlickrIMG_0064 (2) by Daniel Osvaldo Caso, on FlickrThe figure is an 1/35 WWII German army deserter so a bit smaller than it would be in 1/32, but people comes in many sizes.
IMG_0065 (2) by Daniel Osvaldo Caso, on FlickrIMG_0067 (2) by Daniel Osvaldo Caso, on FlickrIt wasn't reglued yet but this gives an idea of what is changing
IMG_0001 (2) by Daniel Osvaldo Caso, on FlickrThe photo show the two small brass brackets I've made for solving the weakness point issue. The holes are meant one for a small screw and the other for ensuring the epoxy will have grip enough to hold.
The two hardwood blocks are mean to take the screws but will be hidding inside the coal bunkers.
IMG_0002 (2) by Daniel Osvaldo Caso, on FlickrThe coal bunkers will be 90% in the vestibule area but accesible from the cab:
IMG_0004 (2) by Daniel Osvaldo Caso, on FlickrIMG_0005 (2) by Daniel Osvaldo Caso, on FlickrIMG_0006 (2) by Daniel Osvaldo Caso, on FlickrIMG_0001 (2) by Daniel Osvaldo Caso, on FlickrIMG_0003 (2) by Daniel Osvaldo Caso, on FlickrIMG_0002 (2) by Daniel Osvaldo Caso, on FlickrIMG_0006 (2) by Daniel Osvaldo Caso, on FlickrMore in next message
My new Flickr:
https://www.flickr.com/photos/158027525@N08/
My old Flickr:
https://www.flickr.com/photos/daniel_1_32_scale/page223
Being right is one thing, but being true is quite another.
https://www.flickr.com/photos/158027525@N08/
My old Flickr:
https://www.flickr.com/photos/daniel_1_32_scale/page223
Being right is one thing, but being true is quite another.
Re: My personal layout under endless (re)construction
 IMG_0001 (2) by Daniel Osvaldo Caso, on Flickr
 IMG_0002 (2) by Daniel Osvaldo Caso, on Flickr
 IMG_0005 (2) by Daniel Osvaldo Caso, on Flickr
 IMG_0006 (2) by Daniel Osvaldo Caso, on Flickr
 IMG_0007 (2) by Daniel Osvaldo Caso, on Flickr
 IMG_0011 (2) by Daniel Osvaldo Caso, on Flickr
 IMG_0018 (2) by Daniel Osvaldo Caso, on Flickr
 IMG_0014 (2) by Daniel Osvaldo Caso, on Flickr
 IMG_0015 (2) by Daniel Osvaldo Caso, on Flickr
 IMG_0013 (2) by Daniel Osvaldo Caso, on Flickr
 IMG_0017 (2) by Daniel Osvaldo Caso, on Flickr
Don't worry, the ugly 'golden' paint will go.
 IMG_0079 by Daniel Osvaldo Caso, on Flickr
 IMG_0009 (2) by Daniel Osvaldo Caso, on Flickr
 IMG_0010 (2) by Daniel Osvaldo Caso, on Flickr
 IMG_0015 (2) by Daniel Osvaldo Caso, on Flickr
Afterwards it probed noit necessary but I wanted the reverse lever to be removable so dismounting the motor unit wouldn't be a problem.
 IMG_0016 (2) by Daniel Osvaldo Caso, on Flickr
 IMG_0017 (2) by Daniel Osvaldo Caso, on Flickr
 IMG_0023 (2) by Daniel Osvaldo Caso, on Flickr
The 'balcony' fence was made by narrowing and modifying the one with the Miniart Kit. Afterwars it would have been easier to make them from scratch but Mr. Wallet's spirit is always looking over my shoulder so I wanted to make him see that he had not spent the 60euro just for the little windows ... (
 IMG_0024 (2) by Daniel Osvaldo Caso, on Flickr
 IMG_0025 (2) by Daniel Osvaldo Caso, on Flickr
 IMG_0026 (2) by Daniel Osvaldo Caso, on Flickr
... and same with the steps...
 IMG_0027 (2) by Daniel Osvaldo Caso, on Flickr
 IMG_0028 (2) by Daniel Osvaldo Caso, on Flickr
... ... ...
 IMG_0002 (2) by Daniel Osvaldo Caso, on Flickr
 IMG_0003 (2) by Daniel Osvaldo Caso, on Flickr
 IMG_0004 (2) by Daniel Osvaldo Caso, on Flickr
 IMG_0007 (2) by Daniel Osvaldo Caso, on Flickr
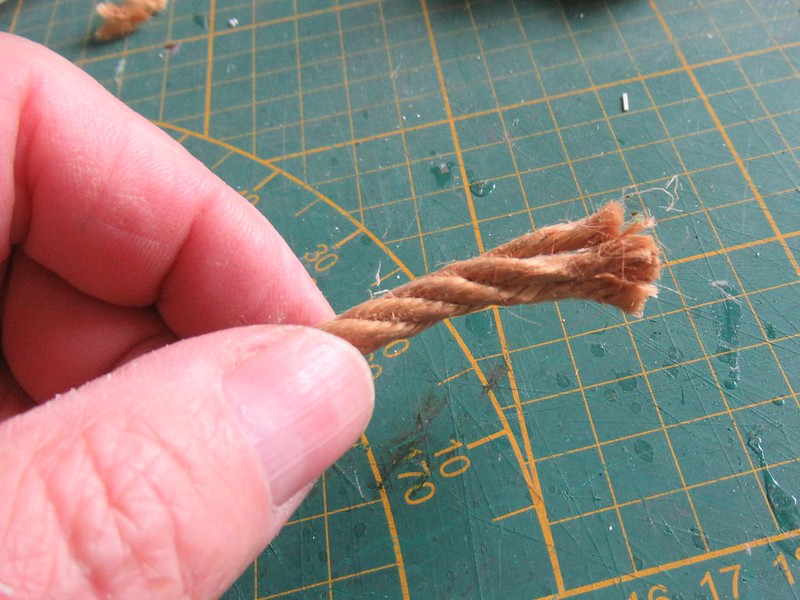 IMG_0009 (2) by Daniel Osvaldo Caso, on Flickr
 IMG_0010 (2) by Daniel Osvaldo Caso, on Flickr
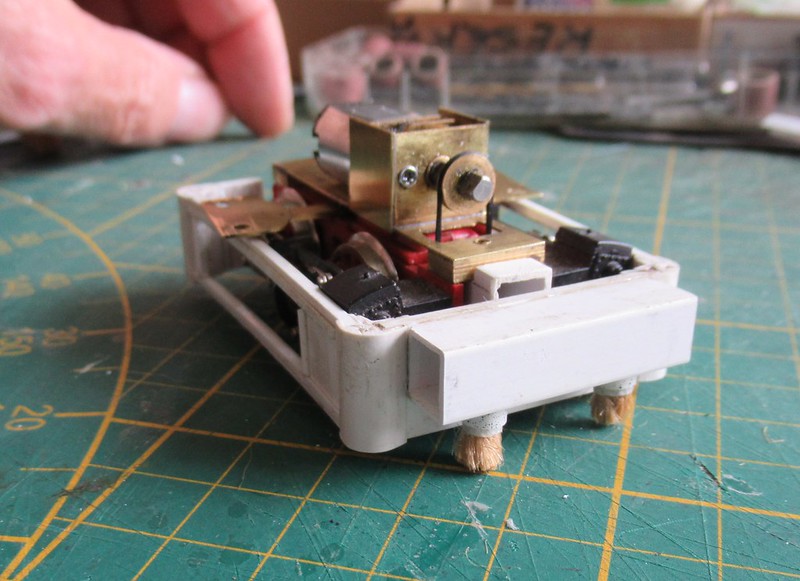 IMG_0012 (2) by Daniel Osvaldo Caso, on Flickr
(Well, I have no idea if somewhereelse than in the four first Hohenzollern locomotives of the Dutch 750mm gauge GTM such a system was used, but I liked a lot the idea of the railcar brushing it's track as I brush my teeth.)
 IMG_0013 (2) by Daniel Osvaldo Caso, on Flickr
 IMG_0014 (2) by Daniel Osvaldo Caso, on Flickr
 IMG_0015 (2) by Daniel Osvaldo Caso, on Flickr
 IMG_0016 (2) by Daniel Osvaldo Caso, on Flickr
 IMG_0017 (2) by Daniel Osvaldo Caso, on Flickr
 IMG_0020 (2) by Daniel Osvaldo Caso, on Flickr
Of course, the coupler is just cosmetic.
 IMG_0035 (2) by Daniel Osvaldo Caso, on Flickr
 IMG_0036 (2) by Daniel Osvaldo Caso, on Flickr
 IMG_0043 (2) by Daniel Osvaldo Caso, on Flickr
 IMG_0048 (2) by Daniel Osvaldo Caso, on Flickr
 IMG_0004 (2) by Daniel Osvaldo Caso, on Flickr
 IMG_0002 (2) by Daniel Osvaldo Caso, on Flickr
 IMG_0003 (2) by Daniel Osvaldo Caso, on Flickr
 IMG_0006 (2) by Daniel Osvaldo Caso, on Flickr
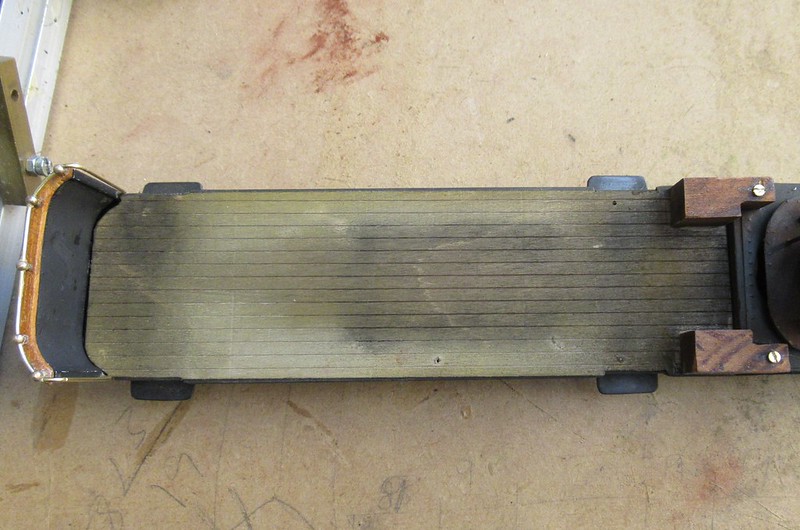 IMG_0007 (2) by Daniel Osvaldo Caso, on Flickr
 IMG_0001 (2) by Daniel Osvaldo Caso, on Flickr
 IMG_0003 (2) by Daniel Osvaldo Caso, on Flickr
 IMG_0034 (2) by Daniel Osvaldo Caso, on Flickr
More tomorrow.
Daniel
My new Flickr:
https://www.flickr.com/photos/158027525@N08/
My old Flickr:
https://www.flickr.com/photos/daniel_1_32_scale/page223
Being right is one thing, but being true is quite another.
https://www.flickr.com/photos/158027525@N08/
My old Flickr:
https://www.flickr.com/photos/daniel_1_32_scale/page223
Being right is one thing, but being true is quite another.
Re: My personal layout under endless (re)construction
That is looking good. Such an intracated thing to make.
Modelling On A Budget ---》 https://www.newrailwaymodellers.co.uk/F ... 22&t=52212
Re: My personal layout under endless (re)construction
Thank you, Mountain.
Yes, it is not the easiest build ever but doable.
It still may be the cause for me to ju7mp from 1/32 to 1/22 and make a much better version.
Actually I chopped already an LGB "STAINZ" so have the mechanism and if I manage to reduce the wheels' ugly overscaled flanges it may change my modeling world.
Why?
Because I want to see it running with one of those powerful (and expensive) synchonized steam generators and sound.
Daniel
My new Flickr:
https://www.flickr.com/photos/158027525@N08/
My old Flickr:
https://www.flickr.com/photos/daniel_1_32_scale/page223
Being right is one thing, but being true is quite another.
https://www.flickr.com/photos/158027525@N08/
My old Flickr:
https://www.flickr.com/photos/daniel_1_32_scale/page223
Being right is one thing, but being true is quite another.
Re: My personal layout under endless (re)construction
 IMG_0035 (2) by Daniel Osvaldo Caso, on Flickr
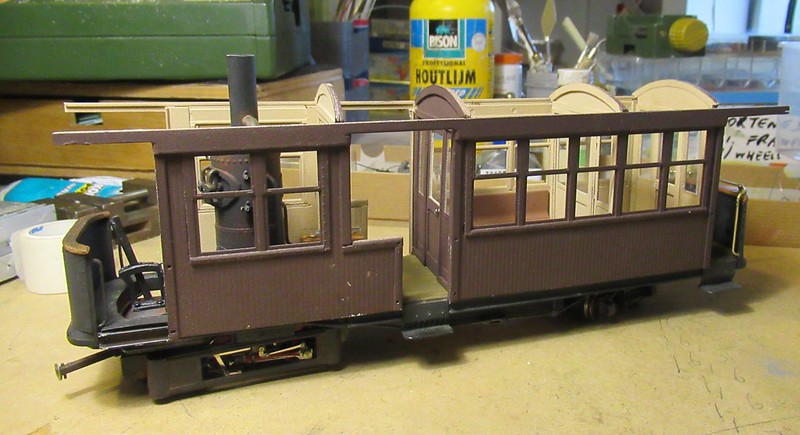 IMG_0036 (2) by Daniel Osvaldo Caso, on Flickr
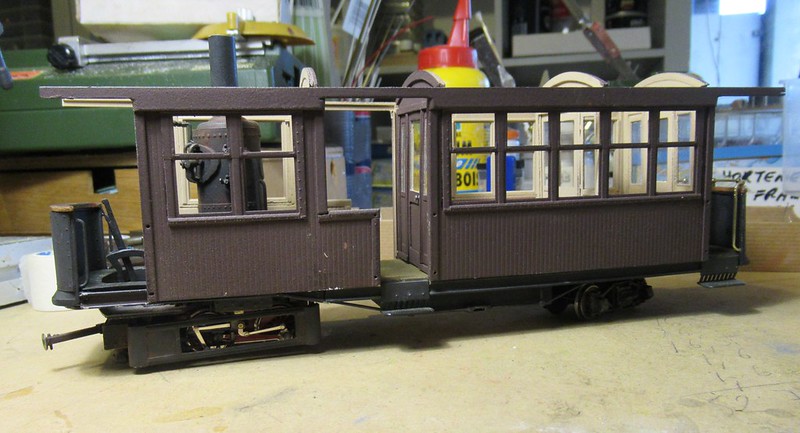 IMG_0037 (2) by Daniel Osvaldo Caso, on Flickr
 IMG_0040 (2) by Daniel Osvaldo Caso, on Flickr
 IMG_0001 (2) by Daniel Osvaldo Caso, on Flickr
 IMG_0002 (2) by Daniel Osvaldo Caso, on Flickr
 IMG_0004 (2) by Daniel Osvaldo Caso, on Flickr
Because until the body gets fastenned to the frame these two joins will be at serious risk, I decided to preventively reinforce them with brass rod...
 IMG_0005 (2) by Daniel Osvaldo Caso, on Flickr
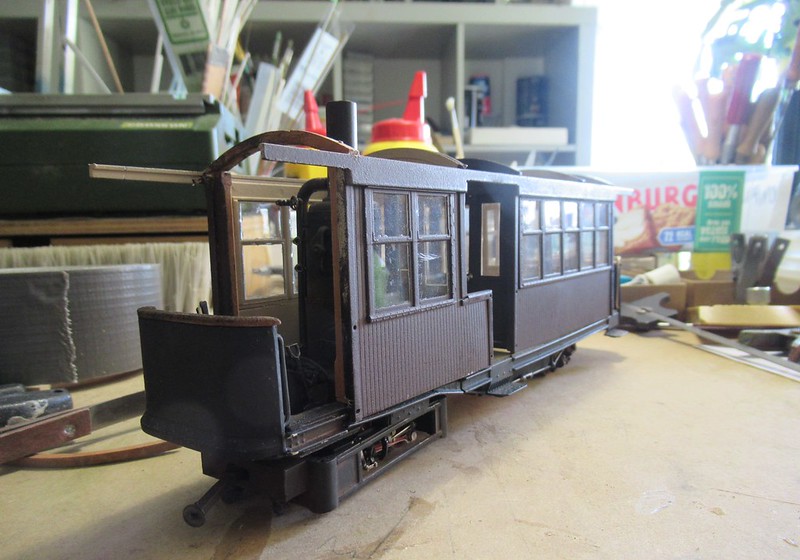 IMG_0007 (2) by Daniel Osvaldo Caso, on Flickr
 IMG_0009 (2) by Daniel Osvaldo Caso, on Flickr
The glassing was another of the dramas. I see clearly my errors and horrors in the enlarged photos but I couldn't see them with my best glasses. That is making me think I will end scraping this railcar, saving the motor unit and making a new version as soon as my eyes recover from the promissed surgery....
Also de join where the frame broke is now really ugly. I hope I will find a way to disguise it. Hopely more subtle that a passenger outside disperately hanging from the window...
 IMG_0010 (2) by Daniel Osvaldo Caso, on Flickr
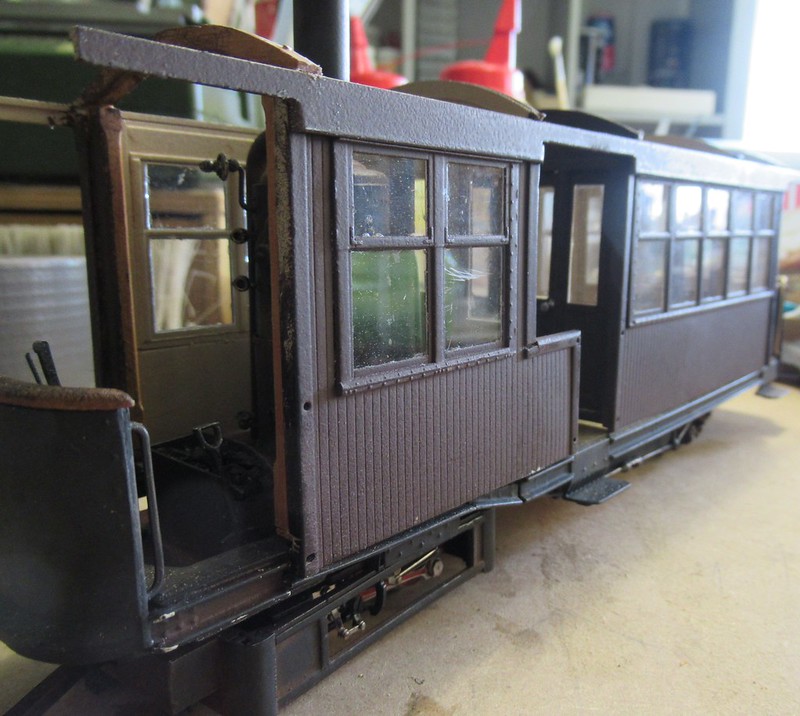 IMG_0011 (2) by Daniel Osvaldo Caso, on Flickr
The roof is also being a tricky thing, as you will notice soon.
 IMG_0017 (2) by Daniel Osvaldo Caso, on Flickr
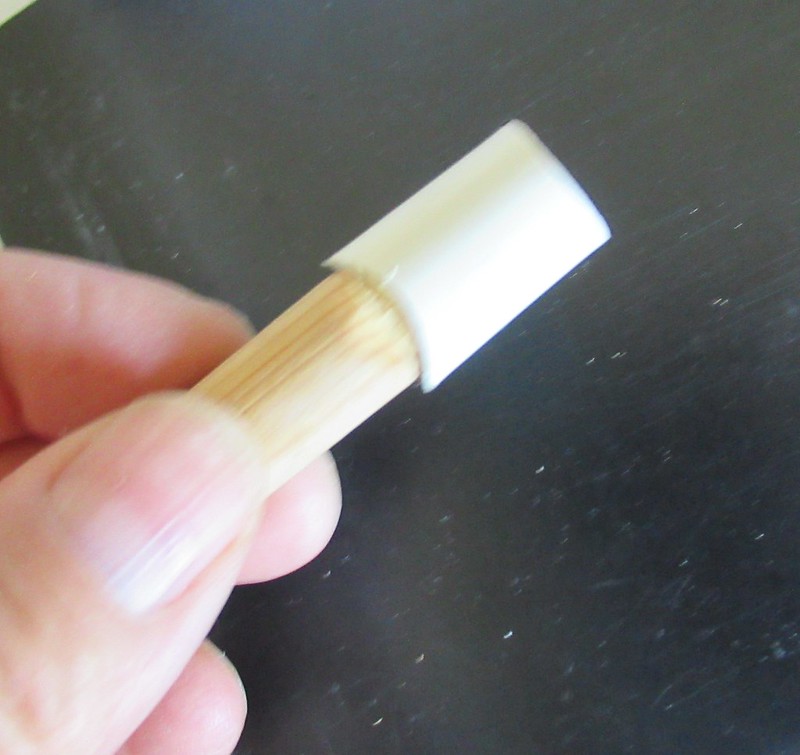
In next photo it is just rolled arround a 45mm piece of wood rod but not glued yet...
 IMG_0018 (2) by Daniel Osvaldo Caso, on Flickr
(Neither the body is fastenned to the fram yet)
 IMG_0019 (2) by Daniel Osvaldo Caso, on Flickr
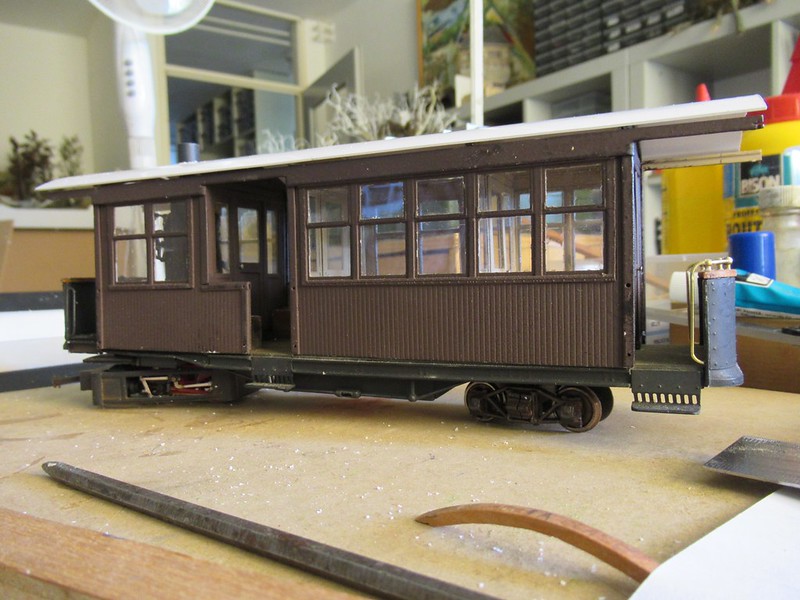 IMG_0020 (2) by Daniel Osvaldo Caso, on Flickr
 IMG_0023 (2) by Daniel Osvaldo Caso, on Flickr
 IMG_0003 (2) by Daniel Osvaldo Caso, on Flickr
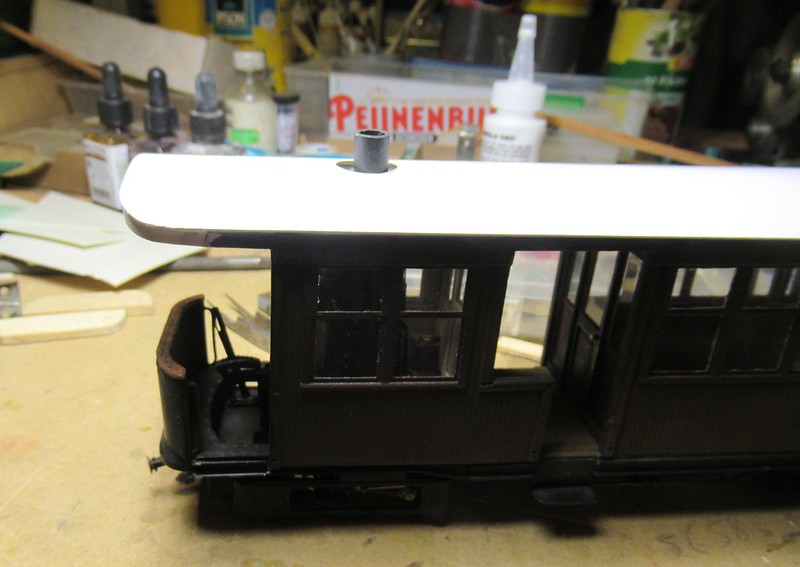 IMG_0007 (2) by Daniel Osvaldo Caso, on Flickr
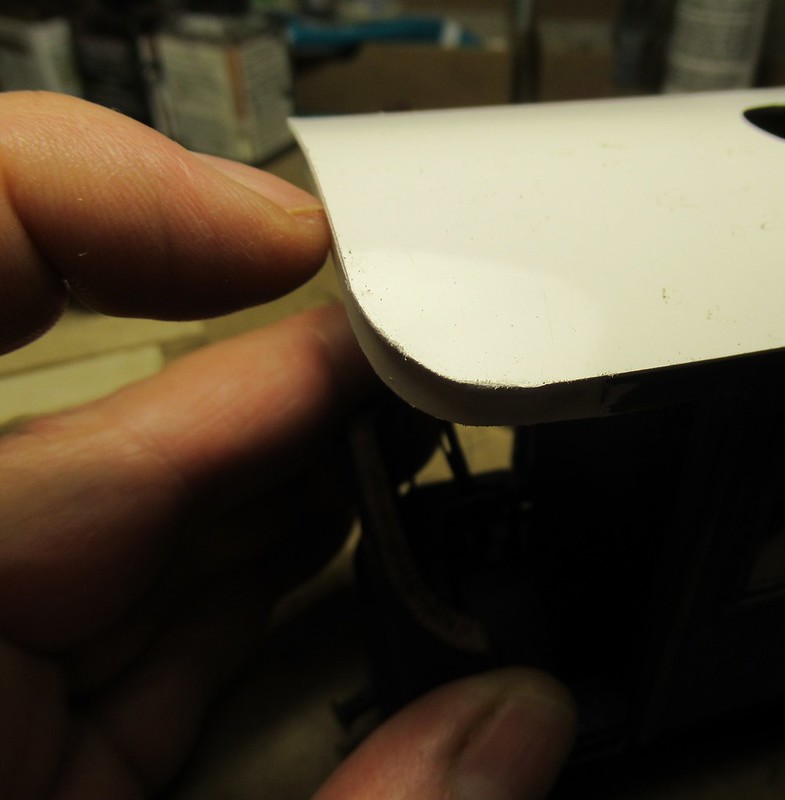 IMG_0009 (2) by Daniel Osvaldo Caso, on Flickr
How?
So:
 IMG_0001 (2) by Daniel Osvaldo Caso, on Flickr
 IMG_0002 (2) by Daniel Osvaldo Caso, on Flickr
 IMG_0003 (2) by Daniel Osvaldo Caso, on Flickr
 IMG_0005 (2) by Daniel Osvaldo Caso, on Flickr
 IMG_0006 (2) by Daniel Osvaldo Caso, on Flickr
 IMG_0007 (2) by Daniel Osvaldo Caso, on Flickr
 IMG_0008 (2) by Daniel Osvaldo Caso, on Flickr
 IMG_0009 (2) by Daniel Osvaldo Caso, on Flickr
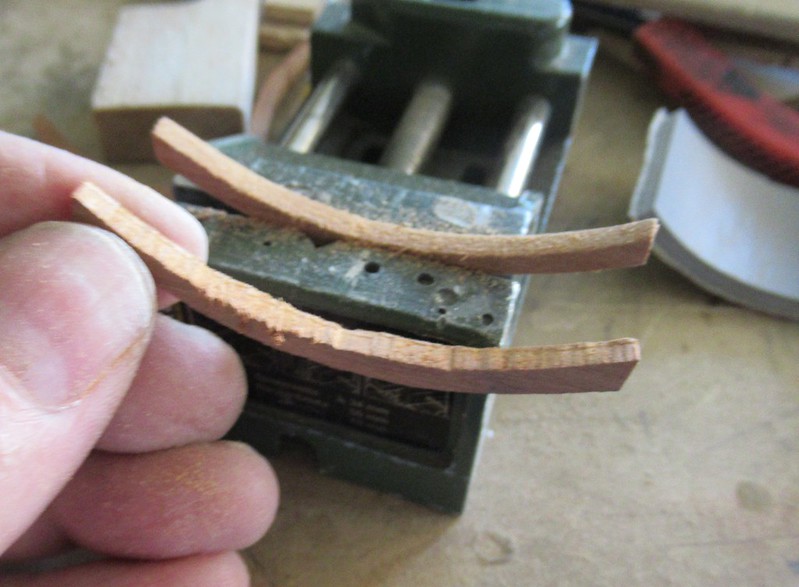 IMG_0010 (2) by Daniel Osvaldo Caso, on Flickr
The sander tool
 IMG_0011 (2) by Daniel Osvaldo Caso, on Flickr
 IMG_0012 (2) by Daniel Osvaldo Caso, on Flickr
 IMG_0013 (2) by Daniel Osvaldo Caso, on Flickr
 IMG_0014 (2) by Daniel Osvaldo Caso, on Flickr
 IMG_0015 (2) by Daniel Osvaldo Caso, on Flickr
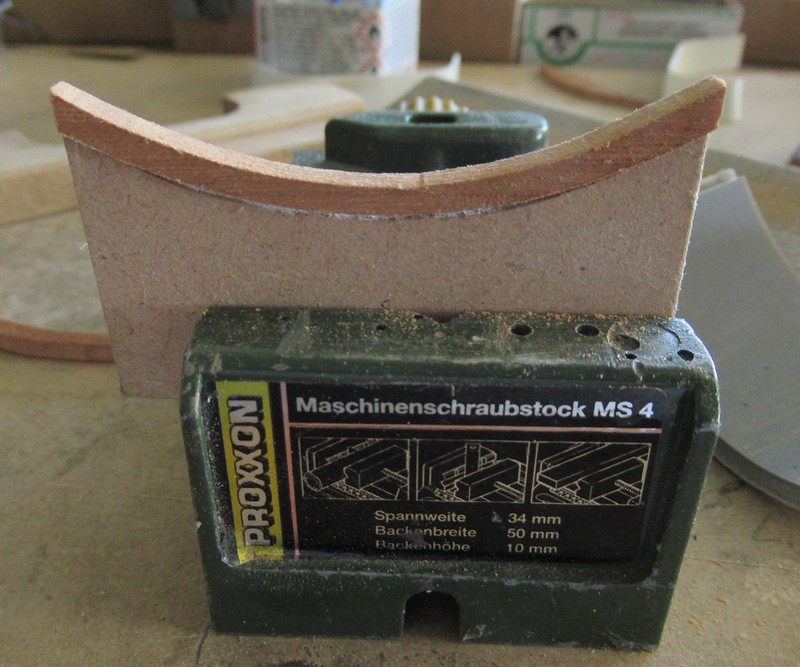 IMG_0016 (2) by Daniel Osvaldo Caso, on Flickr
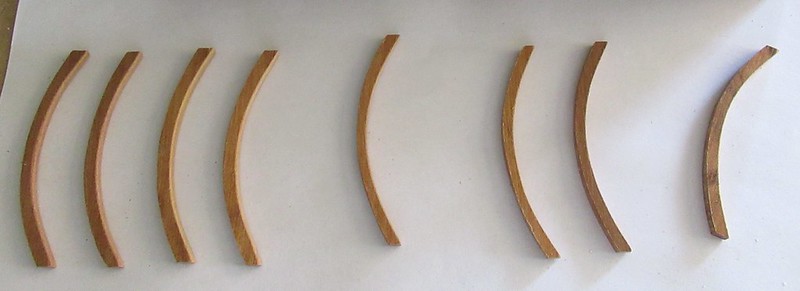 IMG_0018 (2) by Daniel Osvaldo Caso, on Flickr
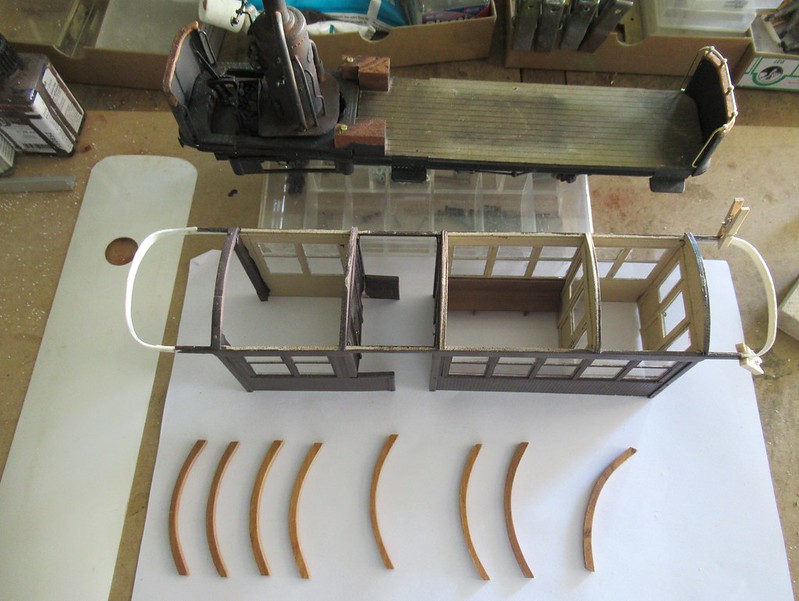 IMG_0017 (2) by Daniel Osvaldo Caso, on Flickr
 IMG_0019 (3) by Daniel Osvaldo Caso, on Flickr
 IMG_0020 (2) by Daniel Osvaldo Caso, on Flickr
Frame, body & roof are still not fastenned to each other...
 IMG_0007 (2) by Daniel Osvaldo Caso, on Flickr
... but I really needed to play a bit with it on the layout and see ...
 IMG_0009 (2) by Daniel Osvaldo Caso, on Flickr
...
Daniel
My new Flickr:
https://www.flickr.com/photos/158027525@N08/
My old Flickr:
https://www.flickr.com/photos/daniel_1_32_scale/page223
Being right is one thing, but being true is quite another.
https://www.flickr.com/photos/158027525@N08/
My old Flickr:
https://www.flickr.com/photos/daniel_1_32_scale/page223
Being right is one thing, but being true is quite another.