
Catzilla's are a pain!
Here is another pic for inspiration viewtopic.php?f=22&t=52149&p=637319&hil ... rd#p637319
I quite fancy a bash at a scrapyard too! (with some loco's in it!)
St Ann's Bridge
-
TimberSurf

- Posts: 2536
- Joined: Wed Jan 08, 2014 5:47 pm
- Location: N.Wales
- Contact:

-
Harringay Dave
- Posts: 61
- Joined: Fri Dec 06, 2013 10:20 am
- Location: Harringay Green Lanes via Stourbridge Jn
Re: St Ann's Bridge
Some serious inspiration in there. I love how less is more!
Inevitably the scrap merchant will be quite difficult to see so I don’t want to go too over the top with modelling it - a couple of old wooden doors will work a treat, especially if they can be opened outwards. Within might be a tiny shack (I got a small asbestos platelayers hut from the Metcalfe signal box which could do the job), piles of rubbish and indeed a few bits for an ‘oss! (a trough and hay basket, perhaps!)
Frustratingly for me, the N gauge Metcalfe school comes with a playground and walls, but the OO gauge doesn’t, so I’ve been scratch building tonight - nothing complex, I just couldn’t find any walls that matched what I wanted.
These aren’t of the highest quality - the pillars are individual 28x7mm pieces of Metcalfe stone card which are glued around 4 6mm pieces cut to length from spare platform strengtheners, which themselves encapsulate a longer pair of platform strengtheners forming the main base of the wall.
The outside of the pillars are easy enough but I had to cut slots into those facing to the walls, and neither my hand, eye nor equipment is overly good at that! Still, this is a gentle reminder to myself that I’m coming into this from a position of zero. I’m creatively minded but I have no manual skills, so to do something like this is quite the achievement no matter how simple!
I’m quite happy with the outcome considering they’re built with no instruction or pointers - stone toppers for the pillars will help to mask some of the imperfections, as will some light brushes of grey paint on the edges. My ultimate goal is to commission a friend of mine with a 3D printer to produce some wrought iron railings for the top of the wall and for the school gates.
See a couple of pics attached.
Cheers,
HD
- Attachments
-
- From inside the school looking towards the station - who uses 9mm MDF for their playground surface!?
-
- The view walking towards the station with school wall in place
-
- You can see a couple of gaps in the pillars - tricky business
-
End2end

- Posts: 6010
- Joined: Sun Jan 12, 2014 9:58 pm
- Location: At the end....... and sometimes at the other end
Re: St Ann's Bridge
Heres another idea for the scrap yard. Old window and doors.
https://www.ebay.co.uk/itm/Harburn-Haml ... SwySVaKXZB
Thanks
End2end
https://www.ebay.co.uk/itm/Harburn-Haml ... SwySVaKXZB
Thanks
End2end
"St Blazey's" - The progress and predicaments.
Welcome
Planning
Building
St. Blazey's Works & Depot thread
Welcome
Planning
Building
St. Blazey's Works & Depot thread
-
Harringay Dave
- Posts: 61
- Joined: Fri Dec 06, 2013 10:20 am
- Location: Harringay Green Lanes via Stourbridge Jn
Re: St Ann's Bridge
Thanks for everyone's contributions!
I've finally finished the school walls. It's taken me so long, especially considering the fact I could have just bought some walls, and it has tested my patience to a serious limit.
All so I could make it look a bit more homely with a combination of brick and wrought iron!
I still need to add capping stones, but now the structure is done I'm starting to look for iron fencing. But more importantly - I can now start to work on the playground and grass inside the walls.
I'll also be providing a space for Mr Harris the headmaster's Rover P4!
- Attachments
-
-
Harringay Dave
- Posts: 61
- Joined: Fri Dec 06, 2013 10:20 am
- Location: Harringay Green Lanes via Stourbridge Jn
Re: St Ann's Bridge
Progress! Still trying to work out how to do railings... But til then...
- Attachments
-
Re: St Ann's Bridge
I love the deserted nature of this layout, it's like a scene from a John Wyndham novel 
Metcalf buildings always look good.
Pete
Metcalf buildings always look good.
Pete
It's the nature of evolution
The dinosaurs went to Hell
The dinosaurs went to Hell
-
Harringay Dave
- Posts: 61
- Joined: Fri Dec 06, 2013 10:20 am
- Location: Harringay Green Lanes via Stourbridge Jn
Re: St Ann's Bridge
Ha! Quite right! People are way beyond me right now... although I’ll be at Ally Pally this coming weekend looking into the serious detail, I think.
There’s not much more to do fundamentally on this board. So far I’ve got:
Arch businesses (add 2 more]
Fencing for school and stationmaster’s house
Ballasting station area and bridge
Signage for the station
And then various accoutrement - iron works, road markings, advertising, street furniture, vehicles and - naturally - people!
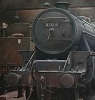
Until then... see moody shot below of brewery shunter “Sally” being exploited to the full extent of the local special instructions by the BR shunters, being used to prepare the outgoing beer train’s brakevan (strictly within station limits, of course). The Pannier will be down shortly to take the wagons to St Ann’s Junction to be added to a local freight.
There’s not much more to do fundamentally on this board. So far I’ve got:
Arch businesses (add 2 more]
Fencing for school and stationmaster’s house
Ballasting station area and bridge
Signage for the station
And then various accoutrement - iron works, road markings, advertising, street furniture, vehicles and - naturally - people!
Until then... see moody shot below of brewery shunter “Sally” being exploited to the full extent of the local special instructions by the BR shunters, being used to prepare the outgoing beer train’s brakevan (strictly within station limits, of course). The Pannier will be down shortly to take the wagons to St Ann’s Junction to be added to a local freight.
Last edited by Harringay Dave on Sun Mar 25, 2018 10:15 pm, edited 1 time in total.

Re: St Ann's Bridge
That looks good. It is lovely when one reaches the stage in ones layout where things start to look real!
Modelling On A Budget ---》 https://www.newrailwaymodellers.co.uk/F ... 22&t=52212
-
Harringay Dave
- Posts: 61
- Joined: Fri Dec 06, 2013 10:20 am
- Location: Harringay Green Lanes via Stourbridge Jn
Re: St Ann's Bridge
Thanks! You're very kind.
I went to Ally Pally today - thought it was an improvement on last year, with some really great layouts.
I finally found a solution to my iron fencing issues, via a German HO fence set (which also contained a picket fence for the station master's garden)! I also bought some motors to make the place seem lived in.
Sorry for the corny filter, I needed something for a new Facebook cover...
But I'm quite pleased with how that looks!
- Attachments
-
Re: St Ann's Bridge
Hi
Maybe a bit late in the day, but have you seen the scalelink railings etc
http://www.scalelink.co.uk/acatalog/Sca ... _____.html
Might be something to consider in the future.
Pete.
Maybe a bit late in the day, but have you seen the scalelink railings etc
http://www.scalelink.co.uk/acatalog/Sca ... _____.html
Might be something to consider in the future.
Pete.
It's the nature of evolution
The dinosaurs went to Hell
The dinosaurs went to Hell
-
Harringay Dave
- Posts: 61
- Joined: Fri Dec 06, 2013 10:20 am
- Location: Harringay Green Lanes via Stourbridge Jn
Re: St Ann's Bridge
Thanks Pete,
You’re absolutely right and I did indeed browse that website, but I’m terribly lax at carrying through my plans unless circumstance is in my favour such as it actually being in front of me! As it was today!
You’re absolutely right and I did indeed browse that website, but I’m terribly lax at carrying through my plans unless circumstance is in my favour such as it actually being in front of me! As it was today!
-
Harringay Dave
- Posts: 61
- Joined: Fri Dec 06, 2013 10:20 am
- Location: Harringay Green Lanes via Stourbridge Jn
Re: St Ann's Bridge
A very productive weekend - the school wall/fence combo had been causing me loads of grief and in hindsight I think it was too much of a tedious task to really commit oneself too for relatively little gain (although I'm pleased with how they turned out). So finishing that off allows me to move on to other things...
I've scratched a very simple arch business frontage, using a Metcalfe brick sheet. I added a spare gate from one of their sets as a side door, and a simple piece of card with horizontal pencil lines and coloured with watered down grey matt paint. I think it gives a pretty good impression of a roller shutter. I also did a bit of signwriting, with a very moderate amount of success!
I'm very keen on detail, so I've tried to make it a bit more aesthetically pleasing. I've uploaded the shot of the brewery shunter, and an "after" comparison with everything I've added this weekend in shot...
I'm pretty pleased, overall.
- Attachments
-
- Before...
-
- ... After
-
- Viaduct Timber Ltd - with great sign writing...
Re: St Ann's Bridge
Yes. That looks the part. Reminds me of school..
Modelling On A Budget ---》 https://www.newrailwaymodellers.co.uk/F ... 22&t=52212
-
railwayjim
- Posts: 731
- Joined: Tue Sep 02, 2014 7:46 am
- Location: Sunny Fleetwood by the sea
Re: St Ann's Bridge
I really like the greyscale images, very atmospheric.
Neat job on the walls/railings, I definitely think that would of tried my patience
Jim.
Neat job on the walls/railings, I definitely think that would of tried my patience
Jim.
-
Harringay Dave
- Posts: 61
- Joined: Fri Dec 06, 2013 10:20 am
- Location: Harringay Green Lanes via Stourbridge Jn
Re: St Ann's Bridge
Summer has been magic so far - I've hardly gone in the spare room... But inspired by micro layouts I've seen recently, I decided to measure up for a very small part of the back corner of my modular layout... The board I've featured so far isn't quite finished, but I'm loathe to lay down the track at the moment and fancied doing. something different.
What I most like is unintentionally ending up with a perfect 2:1 rectangle... And then gratuitously slicing a triangle across it...
Because I'm a setrack fiend I had to come up with a novel way of working the siding in on 2nd radius curves - offsetting them slightly does the trick. Not that I'll be using the track examples in the shot - some of which date way back to my first Hornby sets 20 years ago.
A train on the two track mainline will run behind the loading bay of the glassworks warehouse, then to the viewer will appear between the two as it crosses the road bridge, disappearing behind the main works and thence off scene.
Meanwhile the siding will sit at the front of the loading bay. I'm yet to decide whether to bake a second siding in, but there certainly wouldn't be space for two platforms.
This leads me to a question - was there any prototypical situation where a siding ran specifically *on top* of a building? Before deciding to run a siding straight on whilst the main line turns away, I was going to put a three storey factory here to achieve the same effect as I outlined above with the loading bay (if not, I could still restrict the warehouse with loading bay to being a long, narrow building - with embankments running either side of it). The warehouse would be connected to the main works using an over road wooden bridge, something that I've seen in industrial pictures down the years...
The bits I'm modelling would be entirely at height, so the road and glassworks (and indeed the wrap around retaining wall and warehouse "frontage") would follow later. I'm intending to scratch build most of it... Which is very daunting. But I like a challenge.
... And breathe.
- Attachments
-
-