
As true as I'm sat here typing this message. I couldn't believe it either.After the guy left the operator just looked at me and shrugged his shoulders.Ex-Pat wrote:Are you sure it wasn't April 1st?!RailwayRobbo wrote:
On the subject of realism, I was once admiring a layout at an exhibition when the guy stood next to me started to comment to one of the operators about the choice of cows they had on the layout. He told them they were incorrect as the breed of cows they had on the layout had not been introduced into the UK until well after the era the railway was set in. He was deadly serious about it as well. A cow is a cow to me. I'll not be researching what breeds of cow were in fields in the 50s/60s.
The story of PETERSDALE my OO gauge Branch Line layout
-
RailwayRobbo
- Posts: 608
- Joined: Tue Nov 10, 2015 1:32 pm
- Location: Deepest, Darkest Northants.
Re: The story of PETERSDALE my OO gauge Branch Line layout

Re: The story of PETERSDALE my OO gauge Branch Line layout
You'd be surprised. Everyone has their specialist subjects, and are not afraid to point out when something's wrong. It's usually bus routes and numbers, in my experience (and God help you if you have a tram of any type), but even down to Land Rover number plates... *heavy sigh*Ex-Pat wrote:Are you sure it wasn't April 1st?!RailwayRobbo wrote:
On the subject of realism, I was once admiring a layout at an exhibition when the guy stood next to me started to comment to one of the operators about the choice of cows they had on the layout. He told them they were incorrect as the breed of cows they had on the layout had not been introduced into the UK until well after the era the railway was set in. He was deadly serious about it as well. A cow is a cow to me. I'll not be researching what breeds of cow were in fields in the 50s/60s.
-
RailwayRobbo
- Posts: 608
- Joined: Tue Nov 10, 2015 1:32 pm
- Location: Deepest, Darkest Northants.
Re: The story of PETERSDALE my OO gauge Branch Line layout
BASEBOARDS.
So the track plan for PETERSDALE was finalised and 6 boards were needed.
The 2 Fiddle Yard boards measured 900mm x 400mm.
The 2 Scenic boards across the back measured 1200mm x 600mm.
The 2 Village/Station boards measured 1300mm x 700mm.
At the time of constructing the baseboards I was still Teaching and had the school workshops and machinery available for my use.
With this in mind I decided to construct what probably turned out to be 'heavy duty' boards. The layout was going to be a permanent fixture in the shed.
All boards were the same construction, no glued and screwed joints for me. All corner joints were interlocking comb joints and inside joints were halving joints.
12mm ply was chosen for the framework of the boards with (generous) holes drilled for running wires etc through.
Legs for the baseboards were constructed of 64mm x 38mm softwood cross braced with 40mm x 15mm softwood. The cross bracing was mortised into the legs. The legs have adjustable feet which enabled good levelling of the board.
Backscene boards were attached as construction progressed. This proved to be a mistake. Leaning over, especially the wider Station/Village boards to attach the backscene proved to be a real pain in the back. If you do have to construct the backscene in this way at least sweet talk your better half (if you have one) into helping. 2 pairs of hands are definitely better than 1. Legs were screwed and glued in place and screws were added to the halving joints for extra strength.
Baseboard tops were also 12mm plywood for the simple reason that I had a fair amount left after constructing the frames. In normal circumstances I would have maybe used 6 or 9mm ply. Better still if I was rich enough I would use Sundeala board.
NEXT ............................................... TRACK LAYING.
So the track plan for PETERSDALE was finalised and 6 boards were needed.
The 2 Fiddle Yard boards measured 900mm x 400mm.
The 2 Scenic boards across the back measured 1200mm x 600mm.
The 2 Village/Station boards measured 1300mm x 700mm.
At the time of constructing the baseboards I was still Teaching and had the school workshops and machinery available for my use.
With this in mind I decided to construct what probably turned out to be 'heavy duty' boards. The layout was going to be a permanent fixture in the shed.
All boards were the same construction, no glued and screwed joints for me. All corner joints were interlocking comb joints and inside joints were halving joints.
- One of the Scenic boards under construction in the school workshop.
- 013.JPG (173.14 KiB) Viewed 3690 times
- Baseboard Legs.
- 013A.JPG (185.52 KiB) Viewed 3690 times
- Completed Scenic board with legs. The legs were further cross braced across the back of the board for extra stability. This was done when all the boards were completed and joined together.
- 014.JPG (189.13 KiB) Viewed 3690 times
- Fiddle yard to Scenic board corner with backscene board attached.
- 015.JPG (152.66 KiB) Viewed 3690 times
- Baseboards complete. Fiddle yard is the first to have been 'topped off' so to speak.
- 016.JPG (216.39 KiB) Viewed 3690 times
Re: The story of PETERSDALE my OO gauge Branch Line layout
Some very nice carpentry there! Puts my Grade 2 O level woodwork to shame. And a "good story"! I shall be watching...
Thanks for the effort.
Thanks for the effort.
-
luckymucklebackit
- Posts: 3712
- Joined: Mon Jul 18, 2011 7:05 am
- Location: Eaglesham (Again)
- Contact:
Re: The story of PETERSDALE my OO gauge Branch Line layout
Looks really impressive - hope that heater is only stored under there, could cause a lot of trouble if it is fired up in that position!! 
jim
jim
This Signature Left Intentionally Blank, but since I have written this and I intended to do it, this Signature is intentionally not blank. Paradox or What?
My layout - Gateside and Northbridge

My layout - Gateside and Northbridge
-
RailwayRobbo
- Posts: 608
- Joined: Tue Nov 10, 2015 1:32 pm
- Location: Deepest, Darkest Northants.
Re: The story of PETERSDALE my OO gauge Branch Line layout
Cheers whynot. I'll let you into a little secret. I only got grade 3 GCE O level Woodwork. I got a better grade (1) for Metalwork which I actually hated. LOLwhynot wrote:Some very nice carpentry there! Puts my Grade 2 O level woodwork to shame. And a "good story"! I shall be watching...
Thanks for the effort.
-
RailwayRobbo
- Posts: 608
- Joined: Tue Nov 10, 2015 1:32 pm
- Location: Deepest, Darkest Northants.
Re: The story of PETERSDALE my OO gauge Branch Line layout
No problem there Jim. I put it next to the door and let it warm the Layout Shed up then switch it off. The shed's well insulated and double glazed so it holds the heat for a good while. Just started using it the last few weeks this winter. Well it is the middle of November.luckymucklebackit wrote:Looks really impressive - hope that heater is only stored under there, could cause a lot of trouble if it is fired up in that position!!
jim
Pete.
-
RailwayRobbo
- Posts: 608
- Joined: Tue Nov 10, 2015 1:32 pm
- Location: Deepest, Darkest Northants.
Re: The story of PETERSDALE my OO gauge Branch Line layout
TRACK LAYING and ELECTRICS
No surprises here I stuck to my 'everything off the shelf, out of a box etc.' for my materials.
PECO Code 100 track with wooden sleepers laid on cork underlay.
PECO 'Electrofrog' turnouts with PECO motors mounted under the baseboards. Small radius turnouts were used in the fiddle yard and medium radius on the main operating boards.
I was also able to make a clear perspex cover (in 4 pieces) for the Fiddle Yard again thanks to the school facilities.
The Canal Bridge is the WILLS River/Canal Bridge kit SS82
Electrics were kept simple and to a minimum. This is NOT my favourite part of railway modelling.
Main power feeds are indicated by the toggle switches 1 to 4.
Feed 1 = Fiddle Yard.
Feed 2 = Station and Goods Yard area.
Feed 3 = Bay Platform and future Engine Shed Yard.
Feed 4 = To facilitate run round at the end of the platform.
Isolated sections are placed in the Bay Platform and Goods Siding.
NOTE = More isolated sections were added with the development of the Engine Shed Yard.
The AGW Controller was made locally in Derbyshire. At Peterborough show this year I noticed one of the British Railway Modelling magazine layouts had a similar single controller so they must still be being made.
NEXT ............................................ BACKSCENES (aaaaaaaaaaaaaaaaaaaaaaaaaaaaaaaaaaargh) and EXTENDING THE SHED YARD.
No surprises here I stuck to my 'everything off the shelf, out of a box etc.' for my materials.
PECO Code 100 track with wooden sleepers laid on cork underlay.
PECO 'Electrofrog' turnouts with PECO motors mounted under the baseboards. Small radius turnouts were used in the fiddle yard and medium radius on the main operating boards.
- Fiddle yard. The clear perspex sides were added for protection. The 2 outer roads have isolated sections so I'm able to store 2 shorter trains as well as a longer one.
- 017.JPG (190.03 KiB) Viewed 3644 times
- The main Station/Goods Yard area. The Maroon Parcels van (bottom left) is stood on the short headshunt that will eventually become the entrance to the Loco Shed Yard.
- 018.JPG (401.52 KiB) Viewed 3644 times
- The first structure on the layout was the Canal Bridge. Here it's all nice and clean and straight out of the packet, but that will change.
- 019.JPG (445.93 KiB) Viewed 3644 times
- Control Panel. Operated on the Probe and Stud method. Complete with Capacitor Discharge unit for operating turnouts.
- 020.JPG (507.15 KiB) Viewed 3644 times
Main power feeds are indicated by the toggle switches 1 to 4.
Feed 1 = Fiddle Yard.
Feed 2 = Station and Goods Yard area.
Feed 3 = Bay Platform and future Engine Shed Yard.
Feed 4 = To facilitate run round at the end of the platform.
Isolated sections are placed in the Bay Platform and Goods Siding.
NOTE = More isolated sections were added with the development of the Engine Shed Yard.
- My trusty AGW Twin Controller (bought for the first version of PETERSDALE when 2 train running was needed) and a Gaugemaster track cleaner. Both these are now over 25 years old.
- 021.JPG (526.53 KiB) Viewed 3644 times
NEXT ............................................ BACKSCENES (aaaaaaaaaaaaaaaaaaaaaaaaaaaaaaaaaaargh) and EXTENDING THE SHED YARD.
Re: The story of PETERSDALE my OO gauge Branch Line layout
Hi Pete
Thanks for the comment on my layout. I've just had a good read through. I love your railway shed. Great job!
Your woodwork skills are excellent. It's nice to have the equipment and the ability but doing a nice tidy job is important too. Your wiring looks neat and well thought out. I like the control panel as well.
You've made a cracking start and I can't wait to see how you develop the scenery along with the track plan.
Thanks
Dan
My Layout Thread: http://www.newrailwaymodellers.co.uk/Fo ... 22&t=30117
-
RailwayRobbo
- Posts: 608
- Joined: Tue Nov 10, 2015 1:32 pm
- Location: Deepest, Darkest Northants.
Re: The story of PETERSDALE my OO gauge Branch Line layout
BACKSCENES
Must admit this was the part of the layout construction I enjoyed the least. It was so frustrating and a couple of disasters occurred. The mistake was to fix the backscene boards to the baseboards before joining them together.
After a bit of research on what backscenes were available I chose id backscenes. I think photographic backscenes are head and shoulders above the rest. They are more expensive but worth spending the extra on if you can afford it. The 'Hills and Dales' scene was spot on for my Peak District inspired layout. Unfortunately my backscene boards fell between the 9" wide and 15" wide scenes available so a 15" set was bought and some of the excess sky was trimmed off to fit.
I'd had quite a lot of wallpapering experience which I thought would come in handy. The instructions recommended pasting the board and attaching the backscene with that method. Although the backscenes are on good quality paper you have to work quickly or you end up with a soggy piece of paper. This is where a second pair of helping hands comes in handy.
An after thought I had was to use Spraymount instead of wallpaper paste. An expensive alternative but it would give you that extra time to position the backscene. Maybe I'll give it a try if I do another layout.
Imperfections in the backscene would have to be masked using trees and bushes etc. as best as they could be.
Also I had weathered the sides of the rails with a 'light rust' paint. A very tedious job but one I thought was well worth the effort. The shiny finish of the newly painted rails has dulled over time.
I also did some ballasting for the first time. Amazingly I got to enjoy this tedious operation after time. It just seemed to grow on me for some reason. Although the container said 'OO Guage Grey Ballast' at first it did look a bit on the large side but when I'd fully ballasted the layout it didn't look all that bad size wise. Having said that I've read a few articles about ballasting which do recommend using 'N gauge' ballast on OO gauge layouts.
I also wondered which do you do first. Lay the track and ballast or lay the track, do the scenery then ballast. I got the opinion of a few modelling friends and the result was about 50/50. Bit of a Chicken and Egg situation I suppose. I ended up ballasting between the rails first then doing the scenery and finishing off the ballasting once the initial shape of the scenery was completed.
NEXT ........................................... BUILDING THE STATION PLATFORM.
Must admit this was the part of the layout construction I enjoyed the least. It was so frustrating and a couple of disasters occurred. The mistake was to fix the backscene boards to the baseboards before joining them together.
After a bit of research on what backscenes were available I chose id backscenes. I think photographic backscenes are head and shoulders above the rest. They are more expensive but worth spending the extra on if you can afford it. The 'Hills and Dales' scene was spot on for my Peak District inspired layout. Unfortunately my backscene boards fell between the 9" wide and 15" wide scenes available so a 15" set was bought and some of the excess sky was trimmed off to fit.
I'd had quite a lot of wallpapering experience which I thought would come in handy. The instructions recommended pasting the board and attaching the backscene with that method. Although the backscenes are on good quality paper you have to work quickly or you end up with a soggy piece of paper. This is where a second pair of helping hands comes in handy.
An after thought I had was to use Spraymount instead of wallpaper paste. An expensive alternative but it would give you that extra time to position the backscene. Maybe I'll give it a try if I do another layout.
- Picture shows backscene in the Loco Shed Yard area. Also the short headshunt originally laid has been lifted. An extra turnout has been added and a siding parallel to the main running line and a second longer section of track added.
- 022.JPG (187.04 KiB) Viewed 3599 times
Also I had weathered the sides of the rails with a 'light rust' paint. A very tedious job but one I thought was well worth the effort. The shiny finish of the newly painted rails has dulled over time.
I also did some ballasting for the first time. Amazingly I got to enjoy this tedious operation after time. It just seemed to grow on me for some reason. Although the container said 'OO Guage Grey Ballast' at first it did look a bit on the large side but when I'd fully ballasted the layout it didn't look all that bad size wise. Having said that I've read a few articles about ballasting which do recommend using 'N gauge' ballast on OO gauge layouts.
- The main Station/Goods Yard area with rails weathered and ballasted.
- 023.JPG (200.97 KiB) Viewed 3599 times
NEXT ........................................... BUILDING THE STATION PLATFORM.
Re: The story of PETERSDALE my OO gauge Branch Line layout
Hi Pete
Back scenes look great. Just my thoughts on ballast: I would lay track first. For the simple reason you can wire it all up and test it before it starts to become too permanent. Also, I like to do a lot of running before scenery. I run trains as soon as possible to get used to the layout and identify problem areas or areas that aren't interesting to operate. Easy(ish) then to move things around. If I had to move ballast during this process I'd be frustrated.
I'm sure there are arguements both ways though.
Keep up the good work. And the updates
Thanks
Dan
My Layout Thread: http://www.newrailwaymodellers.co.uk/Fo ... 22&t=30117
-
railwayjim
- Posts: 731
- Joined: Tue Sep 02, 2014 7:46 am
- Location: Sunny Fleetwood by the sea
Re: The story of PETERSDALE my OO gauge Branch Line layout
I'm watching this layout with interest as it evolves.
The shed looks a great railway room for your layout.
You mentioned in an earlier post, the layout will be 50's 60's midland themed, right up my street, can't wait to see the scenic work start.
Keep up the good work!!
Jim.
The shed looks a great railway room for your layout.
You mentioned in an earlier post, the layout will be 50's 60's midland themed, right up my street, can't wait to see the scenic work start.
Keep up the good work!!
Jim.
-
RailwayRobbo
- Posts: 608
- Joined: Tue Nov 10, 2015 1:32 pm
- Location: Deepest, Darkest Northants.
Re: The story of PETERSDALE my OO gauge Branch Line layout
THE STATION PLATFORM
I suppose the basics here are how long are your trains going to be and what size of building(s) are going to be used.
The answer to the first question for me was long enough to accommodate a 3 coach passenger train and allow the engine to run round.
On PETERSDALE'S travels I had took with me some Prototype card kits which included a nice version of UPPINGHAM STATION in Rutland. It was a larger type branch line station and was in real life of timber construction rather than brick or stone. It must be well over 20 years old maybe nearer 25 now. I also had 2 other card kits from the Prototype range. The Goods Shed at Uppingham and the Signal Box at Draughton Crossing in Northamptonshire which I think was actually on the LNWR Northampton to Market Harborough line. Strangely all where within 25 miles of where I now live in Northamptonshire. For reasons I'll give later I ended up using none of them.
The basic construction is softwood strip. The platform face was covered in Superquick Engineering blue brick paper which was what I had to hand at the time. A strip of 2mm mounting card was placed on top. The card was edged with Superquick Engineering blue brick paper and placed in position to achieve a brick course with a slight over hang at the platform edge. Mounting board was added to the other softwood strip as shown in the picture to keep everything level and then the overall platform surface was added. Again the platform surface was made of the 2mm mounting card painted grey with the white edging stones added then glued to the base frame construction again with a slight over hang at the platform edge. On the backscene side of the bay platform I constructed a platform face to add some realism to the overall platform construction.
My favourite Midland 4F 0-6-0 Loco (Bachmann) BR No. 43875 stands at the end of the platform while the maroon parcel van stands in the goods siding.
The picture shows the first piece of scenic work I did on the layout. This is a retaining wall which runs the width of the layout at the platform end. It's a simple construction of ply faced with Metcalfe's Sandstone sheets. Buttress's were added later and the wall weathered from the bottom upwards as will be seen in later pictures. The autumnal coloured lichen was placed temporarily along the top of the retaining to see how it looked and was replaced later with a more summery green lichen.
The platform edging was actually the idea of my better half. Having pondered for about a week how to get the edging to look correct (painting perhaps!) she suggested I use the computer program 'Excel'. Those of you familiar with excel know it consists of filling in cells with data. My wife suggested experimenting with cell width and length and highlighting the cells with borders and finally colouring in the appropriate cells with a shade of grey and leaving the ones that would form the actual platform edge blank so it would be white when printed out. After much experimentation and guess work it produced a decent representation of edging stones which was easy to apply to the platform. A very acceptable result but maybe needed to be a little bit smaller.
MINOR MISTAKE No.1 - ALWAYS CHECK YOUR CLEARANCES.
Straight platforms are relatively easy to construct but the clearance at the platform edge is very important. I'd checked the clearance using a variety of rolling stock including Diesel locos, tender engines, tank engines and different freight and passenger stock. The loco I DIDN'T test for clearance was a Bachmann 08 Deisel Shunter I have. On approaching the platform on it's first run it rode up the platform edge and lifted he loco off the track. I'd forgotten to take into account the the loco had outside connecting rods and required slightly more clearance than other locos.. The loco now works exclusively in the goods yard. Oooooops lesson learned. Check ALL stock when doing clearances.
NEXT ................SERIOUS SCENIC WORK.
I suppose the basics here are how long are your trains going to be and what size of building(s) are going to be used.
The answer to the first question for me was long enough to accommodate a 3 coach passenger train and allow the engine to run round.
On PETERSDALE'S travels I had took with me some Prototype card kits which included a nice version of UPPINGHAM STATION in Rutland. It was a larger type branch line station and was in real life of timber construction rather than brick or stone. It must be well over 20 years old maybe nearer 25 now. I also had 2 other card kits from the Prototype range. The Goods Shed at Uppingham and the Signal Box at Draughton Crossing in Northamptonshire which I think was actually on the LNWR Northampton to Market Harborough line. Strangely all where within 25 miles of where I now live in Northamptonshire. For reasons I'll give later I ended up using none of them.
- Picture shows platform base construction before adding the platform surface.
- 024.JPG (201.48 KiB) Viewed 3474 times
My favourite Midland 4F 0-6-0 Loco (Bachmann) BR No. 43875 stands at the end of the platform while the maroon parcel van stands in the goods siding.
- Picture shows platform complete and the first piece of scenic work on the layout.
- 025.JPG (167.65 KiB) Viewed 3474 times
The platform edging was actually the idea of my better half. Having pondered for about a week how to get the edging to look correct (painting perhaps!) she suggested I use the computer program 'Excel'. Those of you familiar with excel know it consists of filling in cells with data. My wife suggested experimenting with cell width and length and highlighting the cells with borders and finally colouring in the appropriate cells with a shade of grey and leaving the ones that would form the actual platform edge blank so it would be white when printed out. After much experimentation and guess work it produced a decent representation of edging stones which was easy to apply to the platform. A very acceptable result but maybe needed to be a little bit smaller.
MINOR MISTAKE No.1 - ALWAYS CHECK YOUR CLEARANCES.
Straight platforms are relatively easy to construct but the clearance at the platform edge is very important. I'd checked the clearance using a variety of rolling stock including Diesel locos, tender engines, tank engines and different freight and passenger stock. The loco I DIDN'T test for clearance was a Bachmann 08 Deisel Shunter I have. On approaching the platform on it's first run it rode up the platform edge and lifted he loco off the track. I'd forgotten to take into account the the loco had outside connecting rods and required slightly more clearance than other locos.. The loco now works exclusively in the goods yard. Oooooops lesson learned. Check ALL stock when doing clearances.
NEXT ................SERIOUS SCENIC WORK.
-
RailwayRobbo
- Posts: 608
- Joined: Tue Nov 10, 2015 1:32 pm
- Location: Deepest, Darkest Northants.
Re: The story of PETERSDALE my OO gauge Branch Line layout
A LITTLE OFF TOPIC DIVERSION.
As I said I was born in 52 and spent my childhood years watching the trains on the Worksop to Mansfield line. Actual rides on the line were usually restricted to visiting relatives in Mansfield who lived a short distance from the station. Of course these ceased in November 64 when the passenger service was withdrawn by the good Doctor.
At school I was just an average student ending my school years at a Secondary Modern (remember them?) with 5 modest 'O' levels and an 'A' level. We were still in an era when traditional industries still existed. So in 1971 I followed my Father, Uncles and Grandfather into the coal industry. I got an apprenticeship to be a Colliery Surveyor. The 4 year apprenticeship was served at different collieries including 2 stints at the local colliery at Whitwell This was good as it meant that I could walk to work. Usually a 10 minute walk got me from home to the colliery. My route took me past the front of the now long closed Whitwell Station. Since 1964 it had been used to store different things which included waste cardboard and freezers but it was now empty and unused. One morning during my second stint at Whitwell (around 75/76) I was approaching the station to be met by quite a bit of activity. Men up ladders. Others were chalking numbers on each stone of the building. Another taking photographs. Having to get to work I just looked as I walk past. However on the way home I stopped and asked the guys what they were doing. This guy told me in quite some detail that the station building and the small stone shelter on the opposite platform had been given to them by BR for nothing. All they had to do was dismantle it and take it away and leave the site safe and tidy. He told me it was going to be re-erected at the Midland Railway Centre at Butterley. Unfortunately I was transferred to another colliery a few weeks after and was unable to watch the progress of the demolition. I try to make the trip up to Butterley every year to see the old station.
The year of this photo is unknown but it was after closure in 1964. Some of the platform furniture is still evident with a couple of sets and lamps in place. Most of the stations on the Worksop to Mansfield line were built to this design. Whitwell however had one unique feature that the others lacked. That feature is the ornate ironwork that can be seen at the platform entrance in the centre of the picture. This was put in place because the Duke of Portland whose Welbeck estate is nearby used the station regularly in it's early days.
The Midland Railway Centre did a great job rebuilding the old Whitwell Station. A small modification was they only reinstated one of the pieces of ornamental ironwork at the platform entrance as can be seen in the photograph. The first time I went to the MRC to see the finished rebuild I asked one of the guys what had happened to the small stone shelter that used to be on the opposite platform at Whitwell. He told me they had planned to rebuild at at Hammersmith where the line finishes due to it being blocked by the A38. Sadly the stone had been stolen shortly after it had been delivered so no chance of it being rebuilt.
HOW TIMES CHANGE.
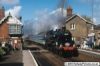
Yet another load of Derbyshire/Nottinghamshire coal heads towards Worksop and the Trent Power Stations.
I was working at Markham Colliery when we had a similar loco named after the colliery. I nipped down to the coal loading point to watch the 'ceremony' take place. The colliery was presented with an OO gauge model of the loco and a replica nameplate which was put in the reception area of the offices. After the colliery closed the nameplate was given to the local Miner's Welfare where it is to this day. I don't know what happened to the OO gauge model.
In the distance it can been seen that the Station no longer exists but the Goods Shed and the Signal Box are still there. The Signal box looks in good condition and there looks to be still some activity around the Goods Shed. The Goods Yard has been cleared but the tracks into the Goods Shed are still in existence although the connection to the main line has long since gone. The Stationmaster's House is the grey stone building in the top centre of the picture. Behind on the skyline you can see a row of terraced houses. These were originally called 'Colliery Row' but a few years after the colliery shut they were renamed 'Parkway' to give the village a better image. LOL.
The Colliery had closed in 1986.
The line passing the Signal Box on the right hand edge of the picture served 2 purposes. Firstly the colliery shunter would push the loaded coal wagons out of the colliery yard via the connection in front of the small brick hut in the upper right of the picture. This hut was located at the end of the Mansfield platform. The mainline loco could the attach and set off to the Power Station. I never saw a mainline loco enter the colliery yard perhaps due to weight restrictions and the appalling state of the colliery trackwork. The line also served as a short branch to a stone crushing plant connected to a quarry which was located at the other side of the colliery.
The train (heading for Mansfield. Next stop Cresswell) is positioned between the new station and where the Goods Shed and Signal Box were sited. Both the colliery sidings to the right and the Goods Yard to the left have been reclaimed by nature. The Goods Yard has been fenced off with that beautiful grey palisade fencing (I am being sarcastic) which is springing up all over the rail network these days. But the big change from the 1987 picture is the simplification of the track work. Not a single point to be seen. The new station looks all nice and clean with it's bus shelters. I think passenger numbers on the trains are steadily rising. The Stationmaster's House still stands although it has been surrounded at the back with a new housing estate and Parkway is still Parkway. What a difference 60 years makes.
As I said I was born in 52 and spent my childhood years watching the trains on the Worksop to Mansfield line. Actual rides on the line were usually restricted to visiting relatives in Mansfield who lived a short distance from the station. Of course these ceased in November 64 when the passenger service was withdrawn by the good Doctor.
At school I was just an average student ending my school years at a Secondary Modern (remember them?) with 5 modest 'O' levels and an 'A' level. We were still in an era when traditional industries still existed. So in 1971 I followed my Father, Uncles and Grandfather into the coal industry. I got an apprenticeship to be a Colliery Surveyor. The 4 year apprenticeship was served at different collieries including 2 stints at the local colliery at Whitwell This was good as it meant that I could walk to work. Usually a 10 minute walk got me from home to the colliery. My route took me past the front of the now long closed Whitwell Station. Since 1964 it had been used to store different things which included waste cardboard and freezers but it was now empty and unused. One morning during my second stint at Whitwell (around 75/76) I was approaching the station to be met by quite a bit of activity. Men up ladders. Others were chalking numbers on each stone of the building. Another taking photographs. Having to get to work I just looked as I walk past. However on the way home I stopped and asked the guys what they were doing. This guy told me in quite some detail that the station building and the small stone shelter on the opposite platform had been given to them by BR for nothing. All they had to do was dismantle it and take it away and leave the site safe and tidy. He told me it was going to be re-erected at the Midland Railway Centre at Butterley. Unfortunately I was transferred to another colliery a few weeks after and was unable to watch the progress of the demolition. I try to make the trip up to Butterley every year to see the old station.
- Whitwell Station (Closed).jpg (135.78 KiB) Viewed 3438 times
- Whitwell Station at Butterley. Front Entrance.
- Butterley Station Entrance.JPG (130.97 KiB) Viewed 3438 times
- Rebuilt Whitwell Station at Butterley. Platform side.
- Butterley Station Platform side.JPG (139.97 KiB) Viewed 3438 times
HOW TIMES CHANGE.
- A view towards the station in 1987
- Whitwell 1987.jpg (206.33 KiB) Viewed 3438 times
I was working at Markham Colliery when we had a similar loco named after the colliery. I nipped down to the coal loading point to watch the 'ceremony' take place. The colliery was presented with an OO gauge model of the loco and a replica nameplate which was put in the reception area of the offices. After the colliery closed the nameplate was given to the local Miner's Welfare where it is to this day. I don't know what happened to the OO gauge model.
In the distance it can been seen that the Station no longer exists but the Goods Shed and the Signal Box are still there. The Signal box looks in good condition and there looks to be still some activity around the Goods Shed. The Goods Yard has been cleared but the tracks into the Goods Shed are still in existence although the connection to the main line has long since gone. The Stationmaster's House is the grey stone building in the top centre of the picture. Behind on the skyline you can see a row of terraced houses. These were originally called 'Colliery Row' but a few years after the colliery shut they were renamed 'Parkway' to give the village a better image. LOL.
The Colliery had closed in 1986.
The line passing the Signal Box on the right hand edge of the picture served 2 purposes. Firstly the colliery shunter would push the loaded coal wagons out of the colliery yard via the connection in front of the small brick hut in the upper right of the picture. This hut was located at the end of the Mansfield platform. The mainline loco could the attach and set off to the Power Station. I never saw a mainline loco enter the colliery yard perhaps due to weight restrictions and the appalling state of the colliery trackwork. The line also served as a short branch to a stone crushing plant connected to a quarry which was located at the other side of the colliery.
- Whitwell Station today 2015.
- Whitwell 2015.jpg (92.06 KiB) Viewed 3438 times
-
luckymucklebackit
- Posts: 3712
- Joined: Mon Jul 18, 2011 7:05 am
- Location: Eaglesham (Again)
- Contact:
Re: The story of PETERSDALE my OO gauge Branch Line layout
Great pictures, I love seeing "then and now" comparisons as it really gives context to the historical photo. Think the loop line on the right is still in place under the scenic scatter.
Jim
Jim
This Signature Left Intentionally Blank, but since I have written this and I intended to do it, this Signature is intentionally not blank. Paradox or What?
My layout - Gateside and Northbridge
My layout - Gateside and Northbridge