
A lot will depend on how well designed a kit is. Complicated doesn’t equate to difficult if the design is good.Dad-1 wrote:Jim,
That wagon brake system is superb !!
And to think I struggled with a simplified version in 7 mm.
I think I must be getting 'past it' !!
Geoff T.
Birmingham New Street and Brettell Road in P4
Re: Birmingham New Street and Brettell Road in P4
Re: Birmingham New Street and Brettell Road in P4
Is that good?Harringay Dave wrote:that unit is absolute mustard!
Re: Birmingham New Street and Brettell Road in P4
Hi Jim,
While I agree the better the kit the easier it is, you are under playing
your skill. Probably quite easy to do, you're hardly aware how well honed
and practiced you really are. Even with practice not everybody can get
there ..... I'm still practicing !!
Geoff T.
While I agree the better the kit the easier it is, you are under playing
your skill. Probably quite easy to do, you're hardly aware how well honed
and practiced you really are. Even with practice not everybody can get
there ..... I'm still practicing !!
Geoff T.
Remember ... I know nothing about railways.
http://www.newrailwaymodellers.co.uk/Fo ... 22&t=32187 and Another on http://www.newrailwaymodellers.co.uk/Fo ... &sk=t&sd=a
http://www.newrailwaymodellers.co.uk/Fo ... 22&t=32187 and Another on http://www.newrailwaymodellers.co.uk/Fo ... &sk=t&sd=a
-
Harringay Dave
- Posts: 61
- Joined: Fri Dec 06, 2013 10:20 am
- Location: Harringay Green Lanes via Stourbridge Jn
Re: Birmingham New Street and Brettell Road in P4
It certainly is!Jim S-W wrote:Is that good?Harringay Dave wrote:that unit is absolute mustard!
Not so much cutting the mustard as taking a whacking great chainsaw to it! Marvellous
Re: Birmingham New Street and Brettell Road in P4
I found a relatively cheap Bachmann Compound recently and thoughts have turned to what to do with it.
Lets start with a little disclaimer. Alan Gibson supplies a set of wheels to convert this loco to P4 and I would have every confidence that just swapping the wheels would get a p4 steam loco up and running pretty quickly. After all a 4-4-0 has got to be about the best case scenario you could really ask for. I didn't try it myself but we've had a wheel swapped GWR Grange (I think) running on Moor Street for years now.
Being relative new to RTR steam locos, this is actually my first RTR tender loco I've had since i was a kid, there's always 2 areas that stand out to me as looking a little weak on pretty much all RTR steam locos. No, not the wheels although big, in your face, wheels do perhaps yield the greatest benefit of swapping to p4 visually. The areas I am talking about are bogies and tenders. More specifically in the case of the latter, tender underframes. They just always seem so, for want of a better description, flat!
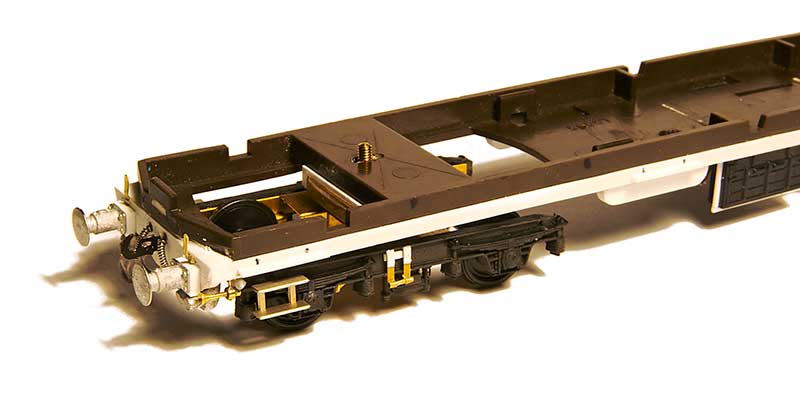
The bogie
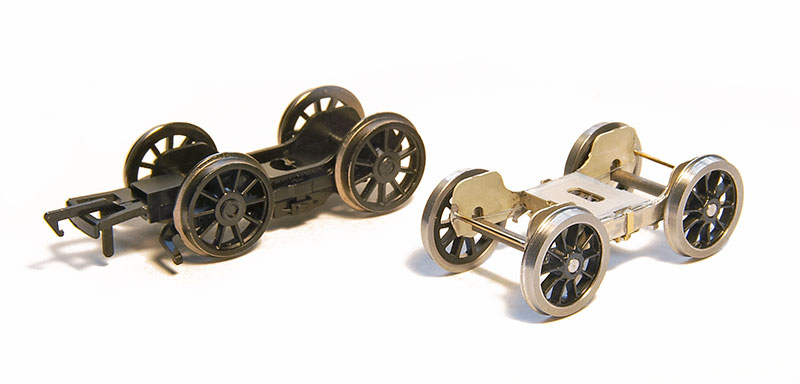
So to the bogie. There was nothing about the supplied RTR one that i wanted to keep so its a straight swap with a Comet example. As supplied they can be built with central springing for side control but no springing on the axles. Setting some simple springs up however couldn't be easier.
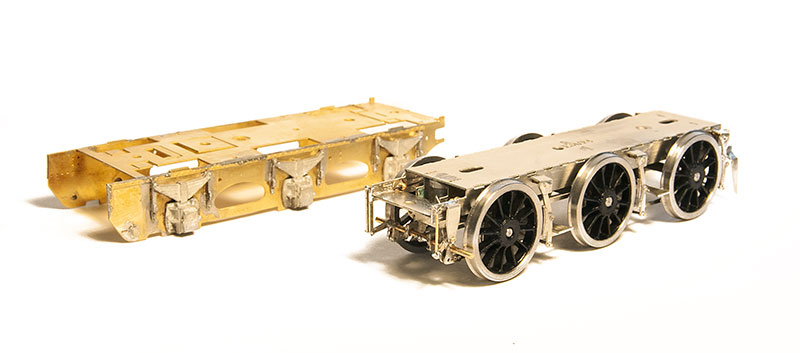
The loco chassis</strong
To the loco. I decided I wanted to use some of the Comet chassis bits but not exactly as intended. So the first process was deciding what of the RTR offering I wanted to keep and what I wanted to replace.
I wanted to use the sideframes in a sort of Brassmasters easychas inspired way and keep the original Bachmann drive. Initially I thought the crosshead was just an RTR bodge but they do actually look like that. So that and the cylinders were keepers. I also liked the brake gear so that stayed.
The Comet chassis is not designed for this model and is too long. The wheelbase between the driving wheels and hence the coupling rods are also too long. Comet do specify this is the case on their website. The Bachmann frames are actually the right width at the front of the loco but narrow from the cylinders back to accommodate the 00 wheels. The cylinders look, from underneath that they might fit on little pegs coming down from the footplate. They don't, they slot sideways into the chassis. Its best to pop them off and keep them safe.
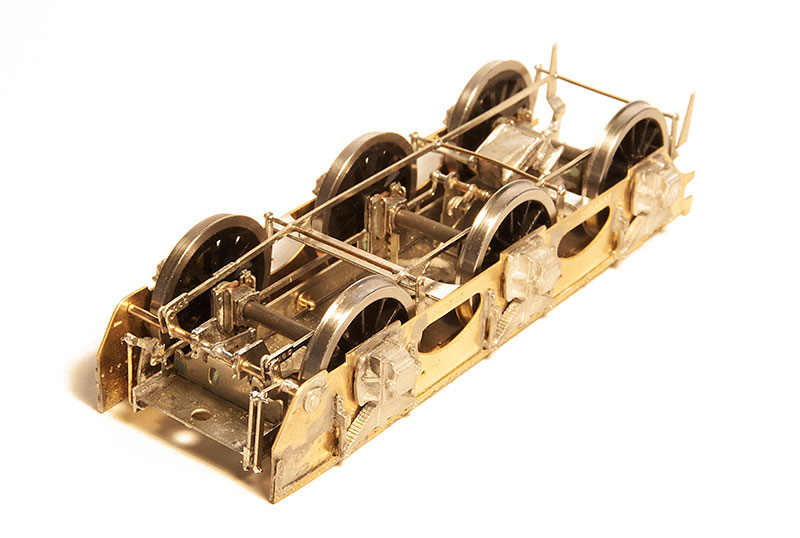
I decided to split the chassis behind the forward step to loose some of its extra length. The front part being a relatively easy fit. The rear part needed some trial and error to cut away little sections to get it to fit. The Bachmann model is driven on the front driver ( it looks like the chassis was designed for gears but to both axles but it doesn't have them), so the Comet chassis was carefully titivated so that the rear axles position matched. I wasn't too worried about the front driver as I has decided to keep it rigid.
By leaving the RTR style bearings off the rear driving axle you get a little room for vertical movement. A Brassmasters sprung bearing was modified with a bit of tube (the Bachmann and hence Alan Gibson axles are an odd size). The frames were glued in place using 60 thou plasticard to space them out to something more prototypical. The springs are part of the RTR keeper plate so they are too to far back but I decided to leave them as is.
The brake gear needs a bit of modification to fit over the new frames and it was here that I hit a little unexpected snag. Bachmann use bigger wheels than scale. I wonder if this is because its a development of the national railway museum model which being an earlier example had bigger wheels? Anyway the effect of this is the brake gear sits too low and would likely hit the rails when crossing pointwork. The solution is to take a mm out of the top of the keeper plate so that everything moves up a little.
Valve gear
Lets be honest RTR valve gear is generally a bit weird. Its often both too big and too thin at the same time. The Bachmann coupling rods are about scale height (ignoring the bosses which are huge!!) but being only 1 piece of metal aren't thick enough. So these were discarded and the Comet ones used in their place. Suitability shortened by 2mm.
The connecting rods as supplied are quite good though. Much more meaty and they feature the big square bosses that the Comet ones don't, so hybrid valve gear it is then! The Bachmann crank pins are 2mm wide (really!) so a bit of tube was soldered in to make them fit the Gibson crank pins. While I was at it I made another 2 collars for the trailing driver a the coupling rods on a compound are outside of the connecting rods.
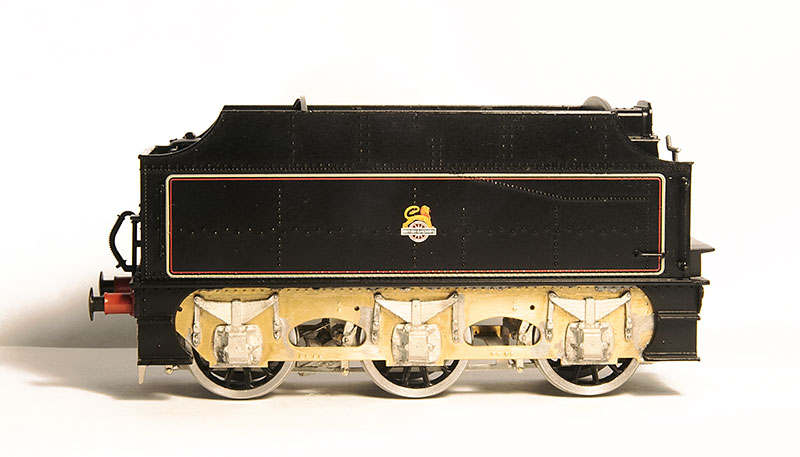
On to the tender
Body great but underframe - ugh!
Luckily Lanarkshire models do a replacement chassis kit for a Fowler tender. This was assembled as per the instructions. For the outer frames I was kindly supplied a spare etch by Brassmasters and mated this with some Comet springs and axleboxes. I decided to keep the Bachmann steps as they are moulded as part of the tender body.
As is often the case with this sort of stuff, the most pleasing view is the one you wont ever see!
Lets start with a little disclaimer. Alan Gibson supplies a set of wheels to convert this loco to P4 and I would have every confidence that just swapping the wheels would get a p4 steam loco up and running pretty quickly. After all a 4-4-0 has got to be about the best case scenario you could really ask for. I didn't try it myself but we've had a wheel swapped GWR Grange (I think) running on Moor Street for years now.
Being relative new to RTR steam locos, this is actually my first RTR tender loco I've had since i was a kid, there's always 2 areas that stand out to me as looking a little weak on pretty much all RTR steam locos. No, not the wheels although big, in your face, wheels do perhaps yield the greatest benefit of swapping to p4 visually. The areas I am talking about are bogies and tenders. More specifically in the case of the latter, tender underframes. They just always seem so, for want of a better description, flat!
The bogie
So to the bogie. There was nothing about the supplied RTR one that i wanted to keep so its a straight swap with a Comet example. As supplied they can be built with central springing for side control but no springing on the axles. Setting some simple springs up however couldn't be easier.
The loco chassis</strong
To the loco. I decided I wanted to use some of the Comet chassis bits but not exactly as intended. So the first process was deciding what of the RTR offering I wanted to keep and what I wanted to replace.
I wanted to use the sideframes in a sort of Brassmasters easychas inspired way and keep the original Bachmann drive. Initially I thought the crosshead was just an RTR bodge but they do actually look like that. So that and the cylinders were keepers. I also liked the brake gear so that stayed.
The Comet chassis is not designed for this model and is too long. The wheelbase between the driving wheels and hence the coupling rods are also too long. Comet do specify this is the case on their website. The Bachmann frames are actually the right width at the front of the loco but narrow from the cylinders back to accommodate the 00 wheels. The cylinders look, from underneath that they might fit on little pegs coming down from the footplate. They don't, they slot sideways into the chassis. Its best to pop them off and keep them safe.
I decided to split the chassis behind the forward step to loose some of its extra length. The front part being a relatively easy fit. The rear part needed some trial and error to cut away little sections to get it to fit. The Bachmann model is driven on the front driver ( it looks like the chassis was designed for gears but to both axles but it doesn't have them), so the Comet chassis was carefully titivated so that the rear axles position matched. I wasn't too worried about the front driver as I has decided to keep it rigid.
By leaving the RTR style bearings off the rear driving axle you get a little room for vertical movement. A Brassmasters sprung bearing was modified with a bit of tube (the Bachmann and hence Alan Gibson axles are an odd size). The frames were glued in place using 60 thou plasticard to space them out to something more prototypical. The springs are part of the RTR keeper plate so they are too to far back but I decided to leave them as is.
The brake gear needs a bit of modification to fit over the new frames and it was here that I hit a little unexpected snag. Bachmann use bigger wheels than scale. I wonder if this is because its a development of the national railway museum model which being an earlier example had bigger wheels? Anyway the effect of this is the brake gear sits too low and would likely hit the rails when crossing pointwork. The solution is to take a mm out of the top of the keeper plate so that everything moves up a little.
Valve gear
Lets be honest RTR valve gear is generally a bit weird. Its often both too big and too thin at the same time. The Bachmann coupling rods are about scale height (ignoring the bosses which are huge!!) but being only 1 piece of metal aren't thick enough. So these were discarded and the Comet ones used in their place. Suitability shortened by 2mm.
The connecting rods as supplied are quite good though. Much more meaty and they feature the big square bosses that the Comet ones don't, so hybrid valve gear it is then! The Bachmann crank pins are 2mm wide (really!) so a bit of tube was soldered in to make them fit the Gibson crank pins. While I was at it I made another 2 collars for the trailing driver a the coupling rods on a compound are outside of the connecting rods.
On to the tender
Body great but underframe - ugh!
Luckily Lanarkshire models do a replacement chassis kit for a Fowler tender. This was assembled as per the instructions. For the outer frames I was kindly supplied a spare etch by Brassmasters and mated this with some Comet springs and axleboxes. I decided to keep the Bachmann steps as they are moulded as part of the tender body.
As is often the case with this sort of stuff, the most pleasing view is the one you wont ever see!
Re: Birmingham New Street and Brettell Road in P4
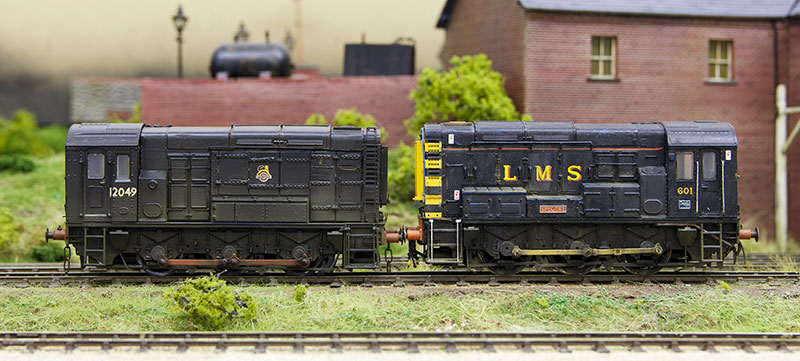
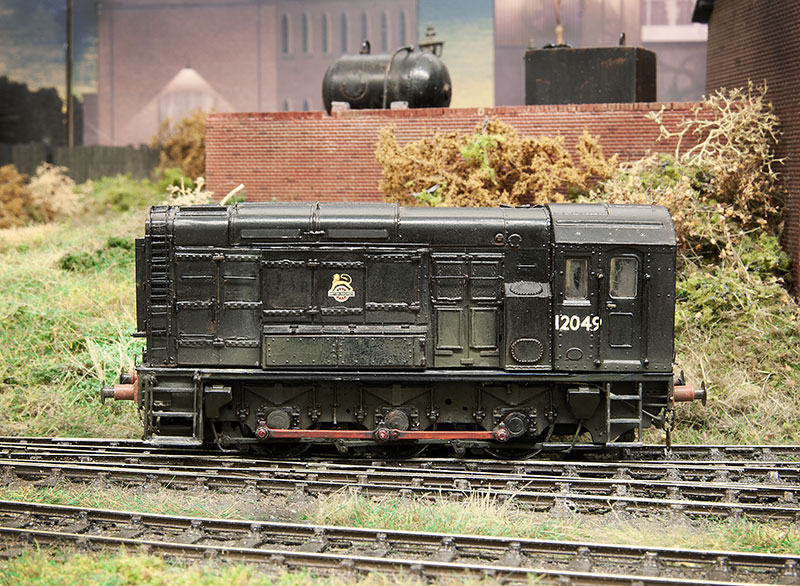
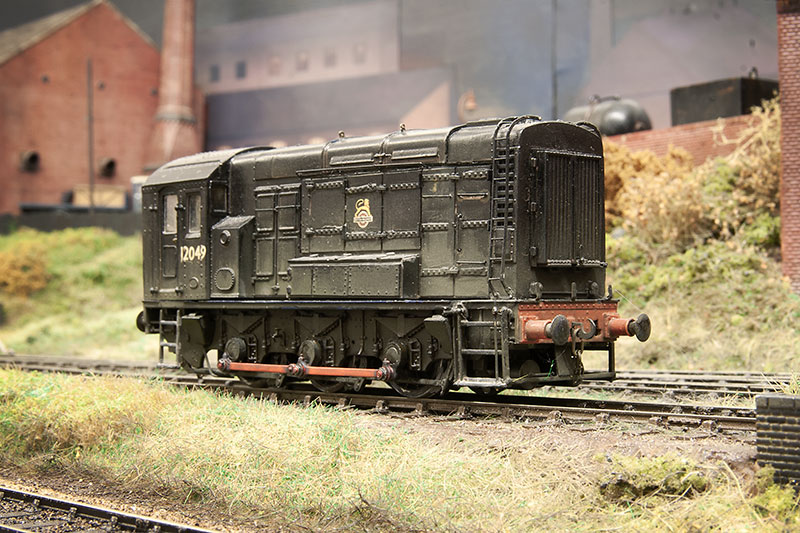
One thing that's always bugged me a little about the above image is the coupling rods on the class 11 (left). I cant remember why but I used the Brassmasters standard rods rather than their finescale ones. Well I finally got around to swapping them over.
Another little distraction is this Bachmann anchor tank wagon.
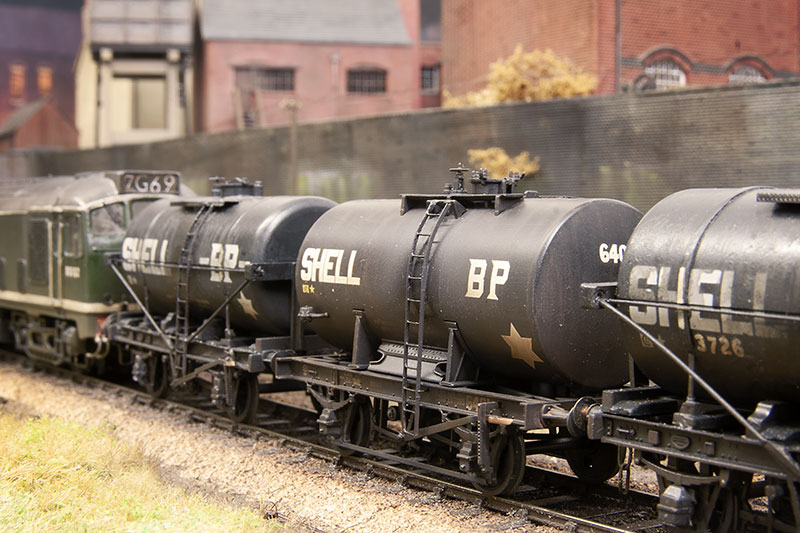
A simple wheel swap with a new etched discharge wheel and new ladders from Stenson models.
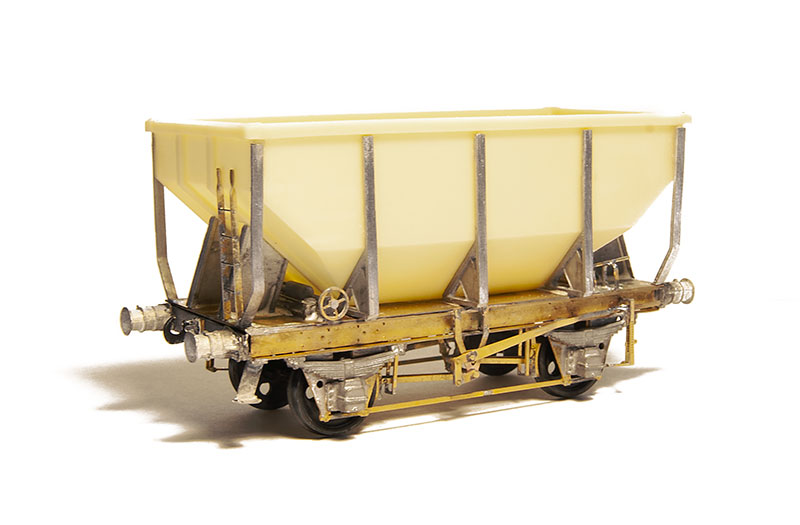
A bit more of a 'proper' project was this diagram 1/163 iron ore hopper from Wizard models. Quite a neat little project this one.
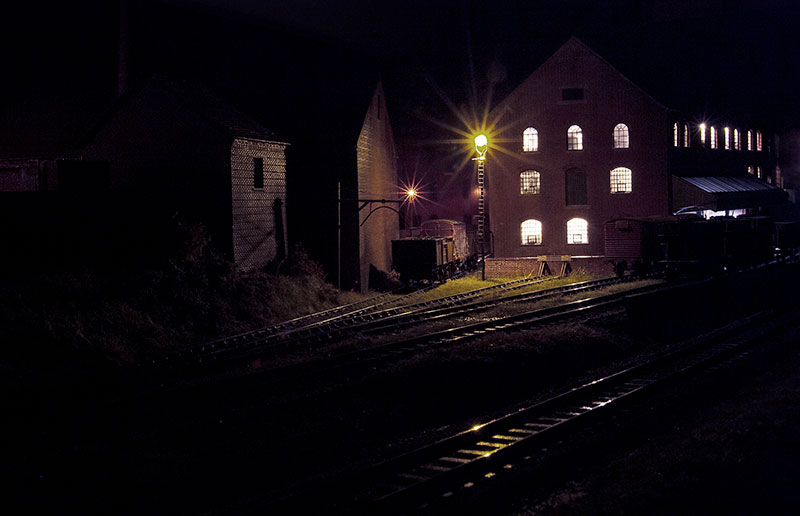
Finally, i don't want to remind anyone but the nights are drawing in again!
Re: Birmingham New Street and Brettell Road in P4
So back to the Bachmann compound then.
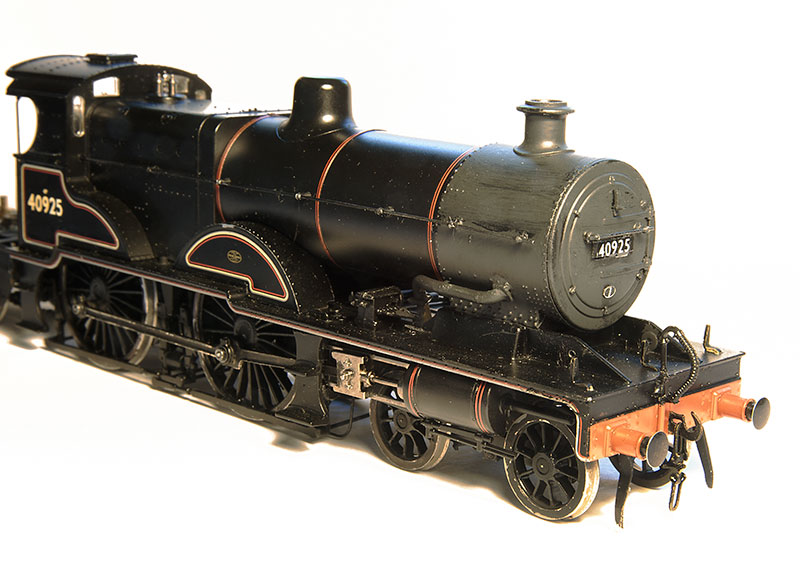
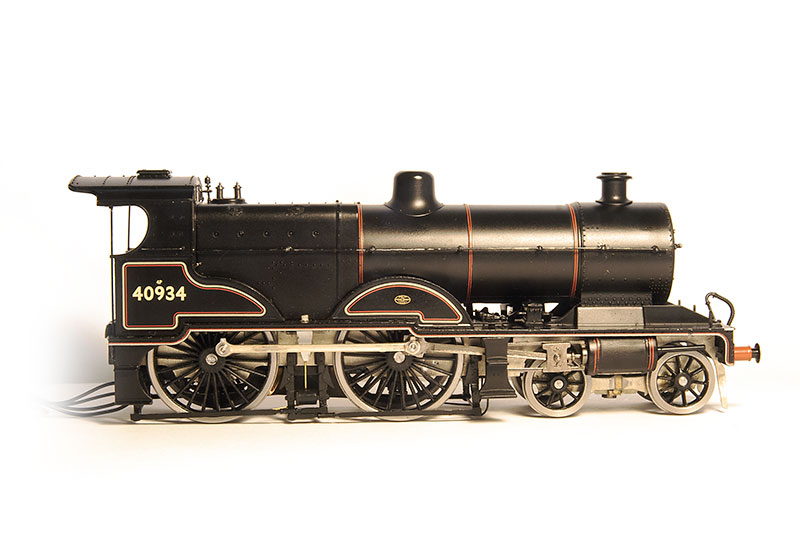
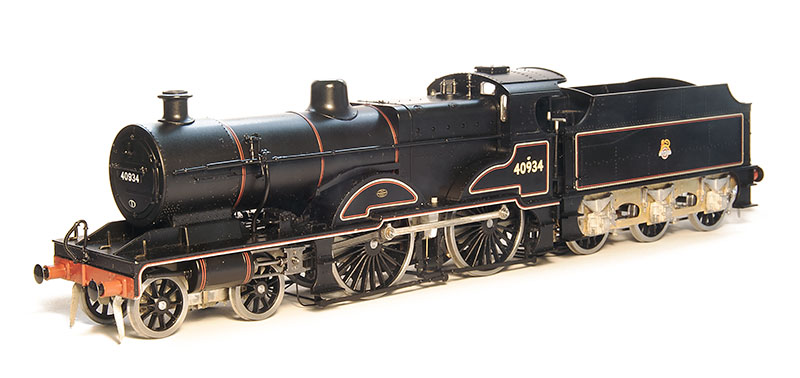
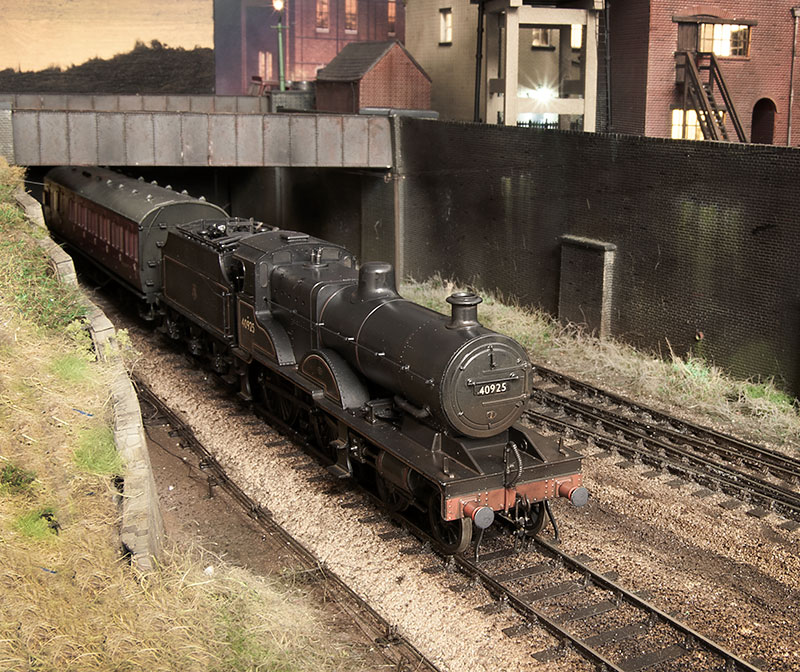
The body looks pretty much spot on to me and the firebox Bachmann had modeled suits the loco I have chosen to do. 40925 was a late survivor and based at Bournville so that's local enough for me. I added the lifting points to the front frames and the large pipe coming from the smokebox. This is an exhaust steam injector and not all compounds had them. As far as I can tell they were only fitted on one side, that being the side opposite the driver (compounds came in both left and right hand drive versions). The smoke box has been painted in Revell no9 and he difference looks a little stark at this stage.
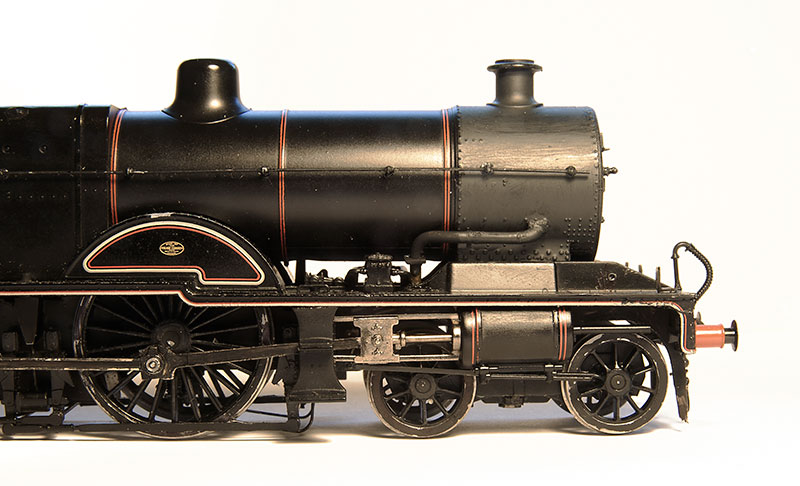
The ejectors are the Bachmann ones cu down, again refer to a pictures of your specific loco as these varied a lot. There's a connecting rod that appears to bo from the back of the ejectors to somewhere near the slide bar support bracket. In the pictures that show this well it always looks extremely close to the face of the rear bogie wheel. I decided the best way to replicate this was to mount it on the actual bogie instead.
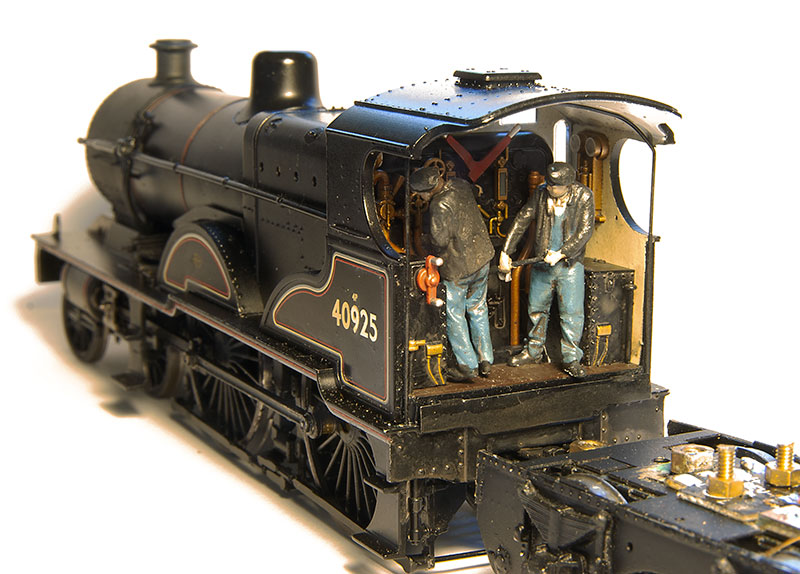
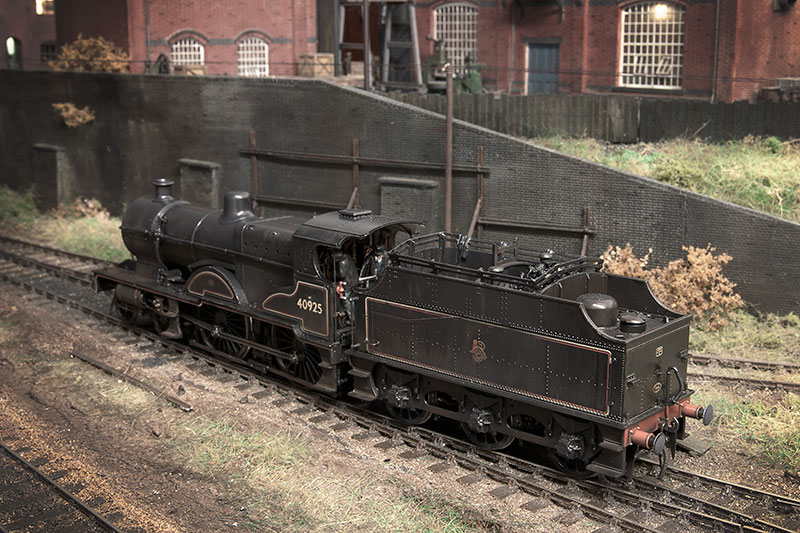
Crew from Modelu - the driver looks distinctly uncomfortable straining to see. A the compounds had very large cab roofs I haven gone for a rain sheet on this model.
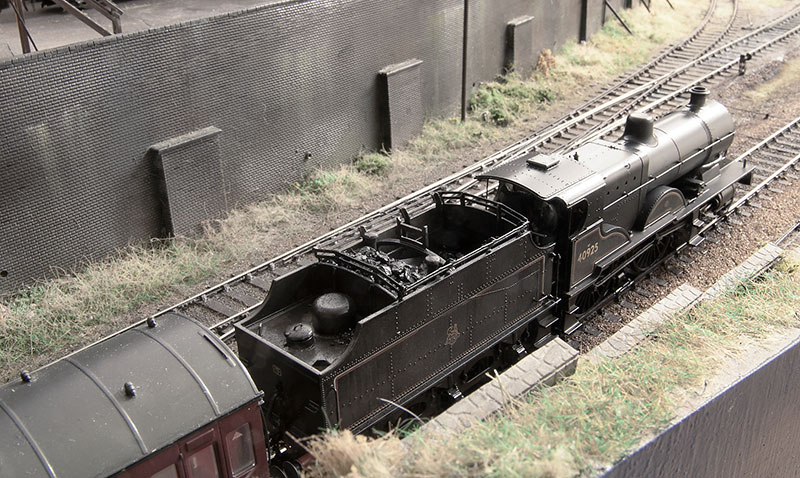
On to the tender
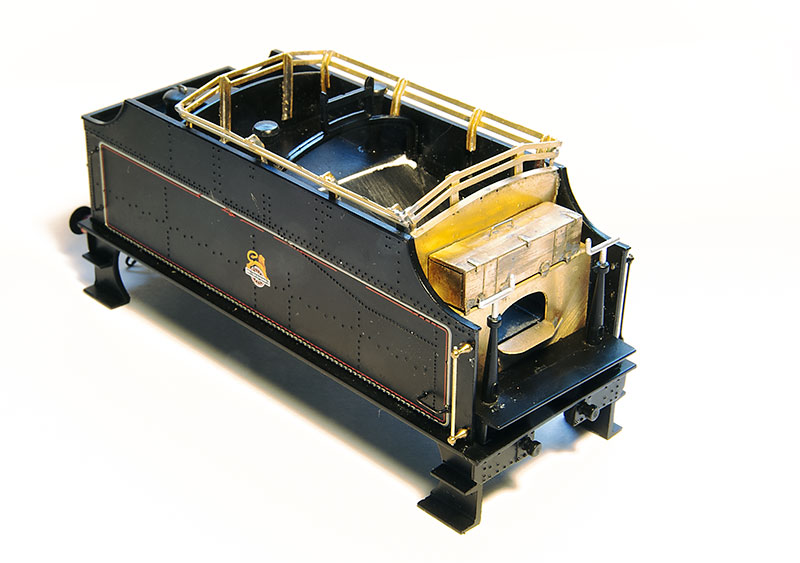
The body Bachmann supplied was a later Fowler type with coal tunnel and doors. Of course the loco I had picked had the earlier type without them. Luckily Brassmasters do a conversion kit and coal rails so that was what I used. The floor in the Bachmann model is flat fo i knocked up the coal chute from plasticard. Incidentally the supplied handrails are absolutely fine and don't need replacing. They had to be on the one side for no other reason than i mangled it!
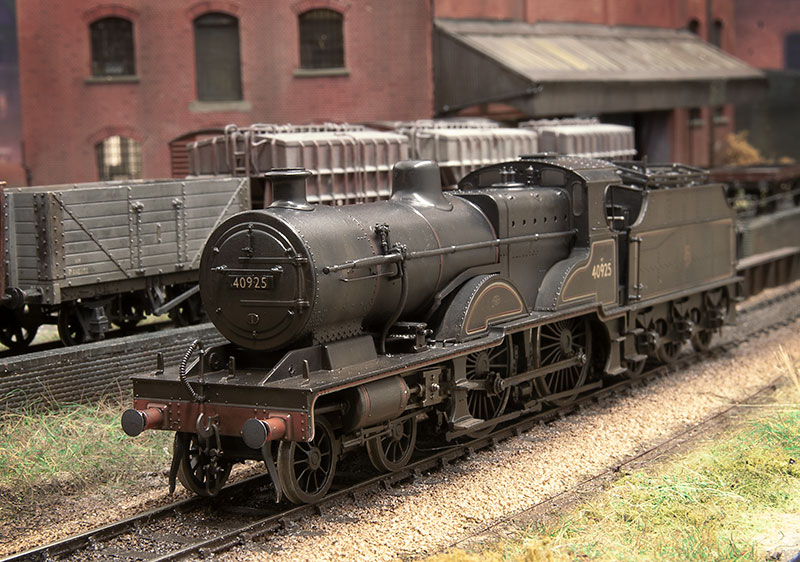
So the model has been weathered (to look tired but not scrap line) and aside from the wheel balance weights I can call this one done.
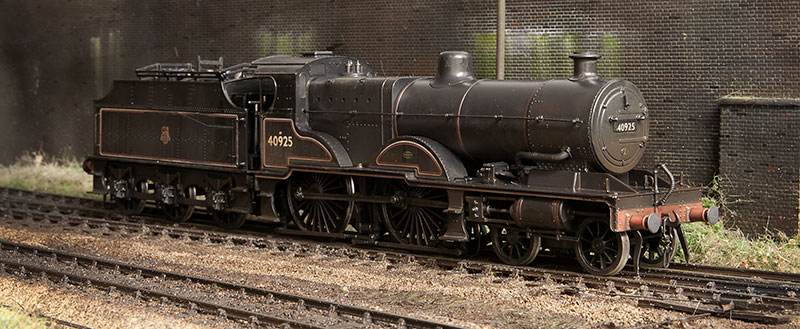
The body looks pretty much spot on to me and the firebox Bachmann had modeled suits the loco I have chosen to do. 40925 was a late survivor and based at Bournville so that's local enough for me. I added the lifting points to the front frames and the large pipe coming from the smokebox. This is an exhaust steam injector and not all compounds had them. As far as I can tell they were only fitted on one side, that being the side opposite the driver (compounds came in both left and right hand drive versions). The smoke box has been painted in Revell no9 and he difference looks a little stark at this stage.
The ejectors are the Bachmann ones cu down, again refer to a pictures of your specific loco as these varied a lot. There's a connecting rod that appears to bo from the back of the ejectors to somewhere near the slide bar support bracket. In the pictures that show this well it always looks extremely close to the face of the rear bogie wheel. I decided the best way to replicate this was to mount it on the actual bogie instead.
Crew from Modelu - the driver looks distinctly uncomfortable straining to see. A the compounds had very large cab roofs I haven gone for a rain sheet on this model.
On to the tender
The body Bachmann supplied was a later Fowler type with coal tunnel and doors. Of course the loco I had picked had the earlier type without them. Luckily Brassmasters do a conversion kit and coal rails so that was what I used. The floor in the Bachmann model is flat fo i knocked up the coal chute from plasticard. Incidentally the supplied handrails are absolutely fine and don't need replacing. They had to be on the one side for no other reason than i mangled it!
So the model has been weathered (to look tired but not scrap line) and aside from the wheel balance weights I can call this one done.
Re: Birmingham New Street and Brettell Road in P4
True artistry at so many levels.
Always blows me away, but gives something to aim at, but I don't have either the skill,
or patience. I know by using the latter I could improve, although this is most certainly
beyond my reach.
Geoff T.
Always blows me away, but gives something to aim at, but I don't have either the skill,
or patience. I know by using the latter I could improve, although this is most certainly
beyond my reach.
Geoff T.
Remember ... I know nothing about railways.
http://www.newrailwaymodellers.co.uk/Fo ... 22&t=32187 and Another on http://www.newrailwaymodellers.co.uk/Fo ... &sk=t&sd=a
http://www.newrailwaymodellers.co.uk/Fo ... 22&t=32187 and Another on http://www.newrailwaymodellers.co.uk/Fo ... &sk=t&sd=a
Re: Birmingham New Street and Brettell Road in P4
A while ago I shared my initial thoughts on extending Brettell Road. For those that missed it heres a link http://www.p4newstreet.com/brettell-road-2.html
The initial plan required some modification to the left hand end of the existing layout but otherwise it was pretty much an add on. Then the coronavirus happened and while plans were firmed up no wood was cut (lazered) and its not progressed to any kind of physical reality. In that time my thoughts have turned to correcting the first regret, that being that Brettell Road 1 wasn't double track to begin with. This would also have the benefit of replacing the mainline track bed with ply as initially I used MDF. The layout was only supposed to be a play thing if you remember.
This would require some additional tweaks to Brettell Road 1 but actually not as drastic as one might think.
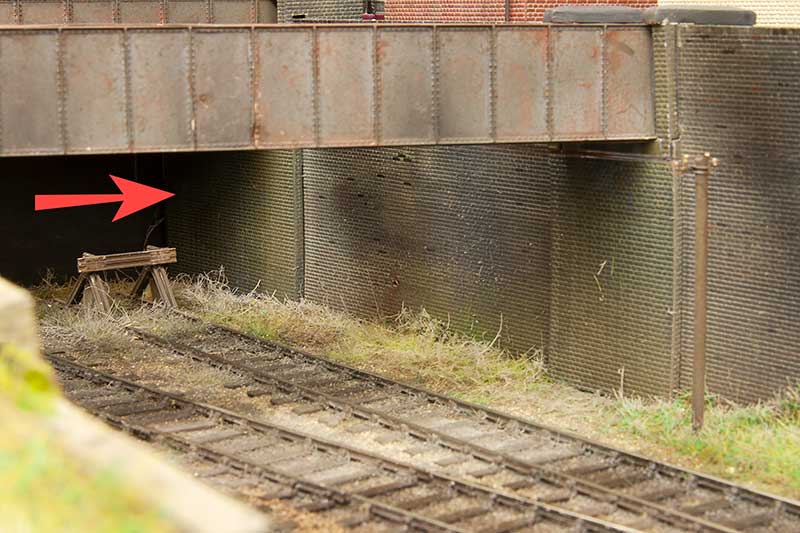
Starting with the left hand end, where the new boards would attach to the existing layout in addition to the track. I was actually quite generous with the track spacing and the double track would fit with only a slight tweak to the wall shown by the arrow. There's another advantage here as my first plan would involve splitting the single slip across the baseboard joint but the double track pulls everything further in to the layout meaning the entire slip falls on this board. No changes would be required to the bridges.
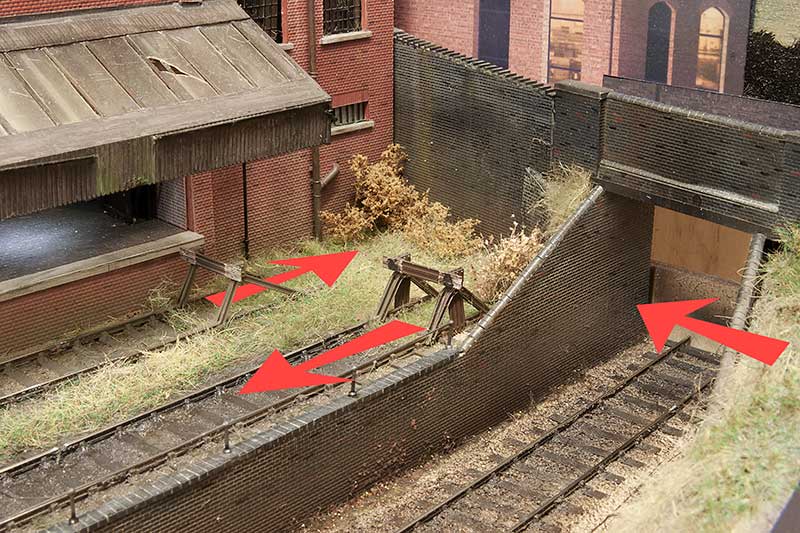
At the right hand end there's a benefit to slewing the track away from the front of the layout with space then for the second track in front of it. The plan is to extend the furthest siding a little while shortening the front one a smidge. This would allow me to start curving the front wall just after the canal bridge to generate the extra space. I will need to build a new bridge. None of these tweaks are particularly drastic.
Below is a mock up of how it would look.

The initial plan required some modification to the left hand end of the existing layout but otherwise it was pretty much an add on. Then the coronavirus happened and while plans were firmed up no wood was cut (lazered) and its not progressed to any kind of physical reality. In that time my thoughts have turned to correcting the first regret, that being that Brettell Road 1 wasn't double track to begin with. This would also have the benefit of replacing the mainline track bed with ply as initially I used MDF. The layout was only supposed to be a play thing if you remember.
This would require some additional tweaks to Brettell Road 1 but actually not as drastic as one might think.
Starting with the left hand end, where the new boards would attach to the existing layout in addition to the track. I was actually quite generous with the track spacing and the double track would fit with only a slight tweak to the wall shown by the arrow. There's another advantage here as my first plan would involve splitting the single slip across the baseboard joint but the double track pulls everything further in to the layout meaning the entire slip falls on this board. No changes would be required to the bridges.
At the right hand end there's a benefit to slewing the track away from the front of the layout with space then for the second track in front of it. The plan is to extend the furthest siding a little while shortening the front one a smidge. This would allow me to start curving the front wall just after the canal bridge to generate the extra space. I will need to build a new bridge. None of these tweaks are particularly drastic.
Below is a mock up of how it would look.

Re: Birmingham New Street and Brettell Road in P4
Interesting. It is always difficult to know what alterations will improve things and which don't. I think your plans will work nicely but won't it interfere with the goods shed? Or would that be assumed to be out of use with the new improvements? I will look at the link above to see more. One could signal the outer line for both directions when something is being loaded?
Uhmm. A single track line would look more appropiate at this position but it is interesting whichever you decide to do. Decisions....
Uhmm. A single track line would look more appropiate at this position but it is interesting whichever you decide to do. Decisions....
Modelling On A Budget ---》 https://www.newrailwaymodellers.co.uk/F ... 22&t=52212
Re: Birmingham New Street and Brettell Road in P4
Nope other than the slight tweak to the buffer stops the goods yard is unaffected.
Re: Birmingham New Street and Brettell Road in P4
Long time followers may recall this old picture of a Hornby Class 110 DMU that I intended to chop up into something a little more 'local'. With the acquisition of a Bachmann Derby lightweight as a gap filler it kind of fell off the radar a little. I did debate doing another class 100 but in the end I have decided that a Park Royal class 103 would be the target of my attentions.
A little about the prototypes
These units were introduced in 1957 to the Birmingham LMR region. 20 sets were produced and the last vehicle in passenger use lasted until 1983. A few vehicles survived a little longer in departmental use (Derby RTC Lab5 lasting until 1991) or as a Sandite unit (1985). There was another oddity in that one set was converted to a Viaduct Inspection Saloon. This was withdrawn in 1978 but was saved for preservation.
The 20 sets were all allocated to the Birmingham area for their first decade operating mainly Walsall services before moving on initially to Chester then spreading further afield. Although none standard they did use the blue square coupling code so could work with the majority of other DMU types. Pretty early on they started to suffer from cracking in the bogie frames and their poor reliability saw steam hauled services return to many of their diagrams while the problems were sorted out. Aside from the oddballs mentioned earlier they only carried 2 liveries. Green (with or without whiskers and later with a small yellow warning panel) or BR Blue (small panel or full yellow end). None received blue and grey livery.
The Model
The similarity between a class 103 and the class 110 is reasonably obvious and (as with my class 100 and 114 conversions) the desired result can be achieved by cutting parts out and shuffling them around, Plus a few spare panels from previous projects.
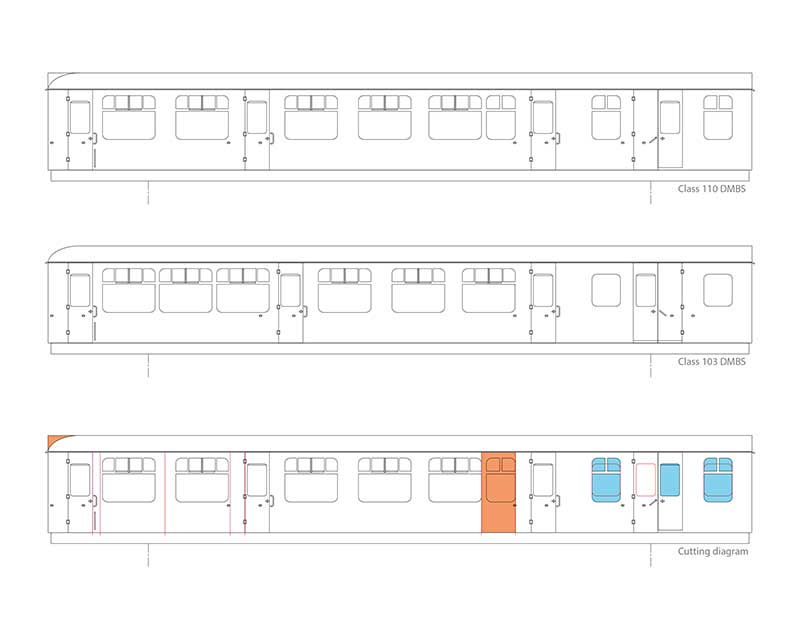
The above diagram may be of assistance. The red lines are cuts or areas than need to be removed. The orange areas are surplus and the blue areas need filling in. On the driving trailer everything aft of the last door stays the same as the class 110. I didn't cut into the roof.
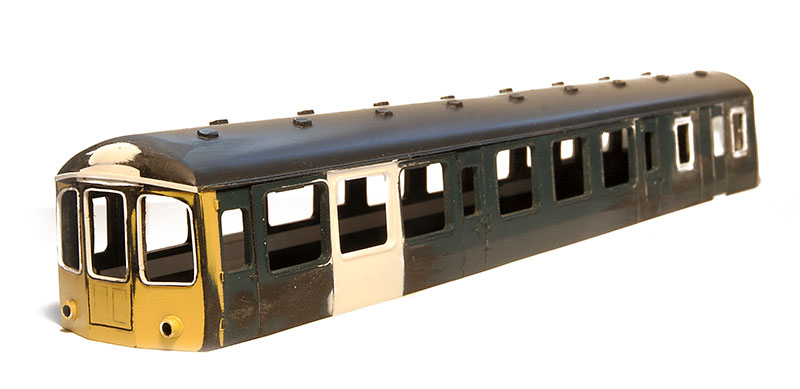
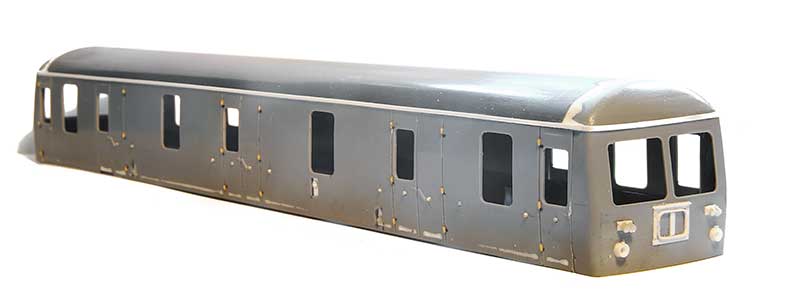
Initial stages of assembly. You can see the additional panel from another body shell in white.
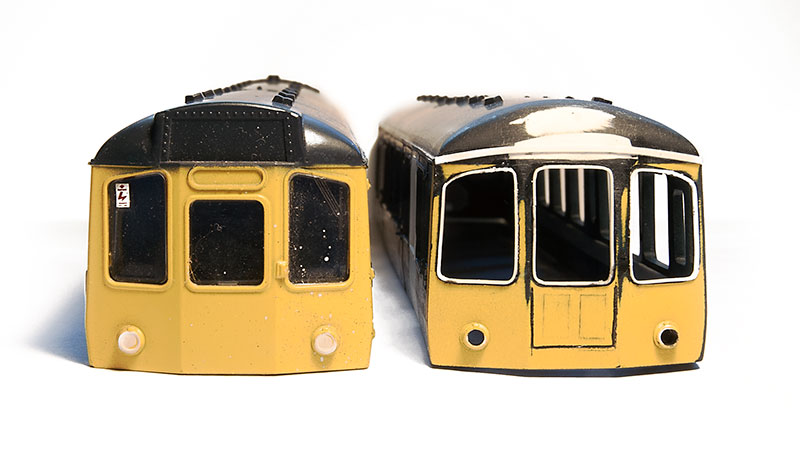
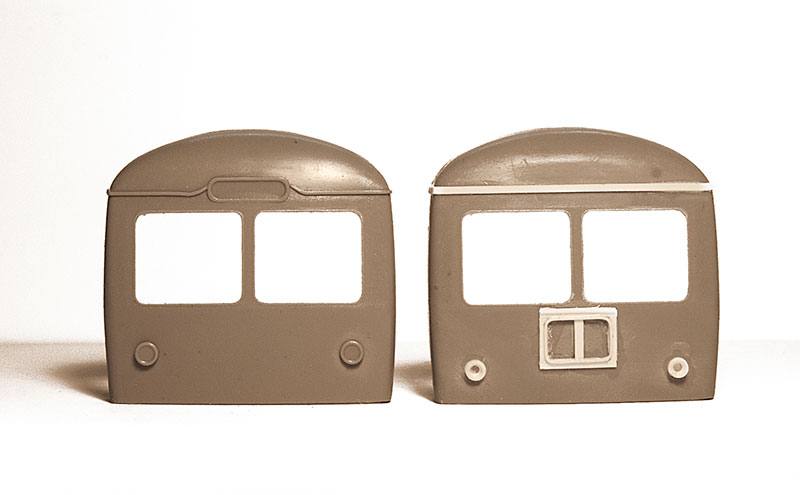
Face on you can see where the windows are opened up to match the class 103. The new frames are 10 x 30 thou microstrip secured to the inner edges. Incidentally in working on this conversion I have come to the conclusion that the class 110 windows aren't right as supplied. They need to be wider and the angles tops need a slight curve.
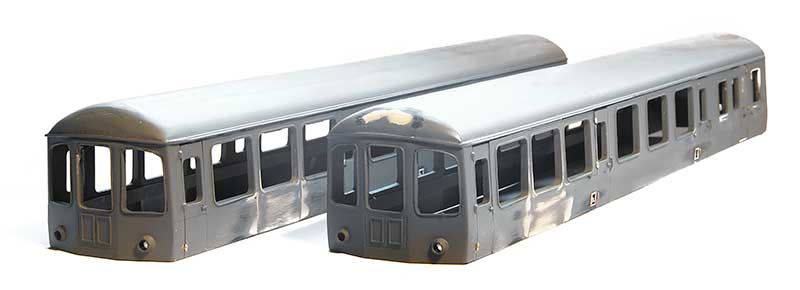
The 2 body shells after a coat of primer and more work with filler. The angled tumblehome Hornby used has been rounded off and any missing hinges replaces with etched ones from Southern Pride. I need to add another cental filler to the DMBS yet.
Why do one when you can do 2?
While in a DMU kinda mood I have started work on a class 129 DPU using a DC kits body kit.
A bit on this prototype as well
3 of these single car units were ordered from Cravens by the LMR. These had a none standard coupling code (yellow diamond) meaning that the could work with the original Derby Lightweights. Introduced in 1958 they lased until 1973 with one going to the RTC initially for brake testing but later for hydraulic transmission tests and gaining the name 'Hydra'. None of the 3 survived into preservation. Although 55997 was initially allocated to Walsall it was 55998 that was most often to be found working int he Birmingham area during the late 1950s mainly on New Street to Walsall, Wolverhampton or Coventry services. Later it would regularity continue on to Rugby and one slightly unusual service was Alrewas to New Street with produce from market gardens. As with the other DPU class, class 128 they would regularly pull a tail load.
The Model
Charlie supplied his class 129 kit with a standard class 105 cravens DMU cab moulding (no doubt tooling up another cab just for this class of 3 units wouldn't make a huge amount on commercial sense). So there is a little work to do to make it closer to the prototype, mainly removing the destination box and moving the marker lights down. I elected not to use the supplied flat bass etch for the route indicator box and made my own from microstrip.
The main bodyshell assembled with extra little details. On something so plain sided it pays to add these little things to break up the sea of grey plastic.
Re: Birmingham New Street and Brettell Road in P4
Long time followers may recall this old picture of a Hornby Class 110 DMU that I intended to chop up into something a little more 'local'. With the acquisition of a Bachmann Derby lightweight as a gap filler it kind of fell off the radar a little. I did debate doing another class 100 but in the end I have decided that a Park Royal class 103 would be the target of my attentions.
A little about the prototypes
These units were introduced in 1957 to the Birmingham LMR region. 20 sets were produced and the last vehicle in passenger use lasted until 1983. A few vehicles survived a little longer in departmental use (Derby RTC Lab5 lasting until 1991) or as a Sandite unit (1985). There was another oddity in that one set was converted to a Viaduct Inspection Saloon. This was withdrawn in 1978 but was saved for preservation.
The 20 sets were all allocated to the Birmingham area for their first decade operating mainly Walsall services before moving on initially to Chester then spreading further afield. Although none standard they did use the blue square coupling code so could work with the majority of other DMU types. Pretty early on they started to suffer from cracking in the bogie frames and their poor reliability saw steam hauled services return to many of their diagrams while the problems were sorted out. Aside from the oddballs mentioned earlier they only carried 2 liveries. Green (with or without whiskers and later with a small yellow warning panel) or BR Blue (small panel or full yellow end). None received blue and grey livery.
The Model
The similarity between a class 103 and the class 110 is reasonably obvious and (as with my class 100 and 114 conversions) the desired result can be achieved by cutting parts out and shuffling them around, Plus a few spare panels from previous projects.
The above diagram may be of assistance. The red lines are cuts or areas than need to be removed. The orange areas are surplus and the blue areas need filling in. On the driving trailer everything aft of the last door stays the same as the class 110. I didn't cut into the roof.
Initial stages of assembly. You can see the additional panel from another body shell in white.
Face on you can see where the windows are opened up to match the class 103. The new frames are 10 x 30 thou microstrip secured to the inner edges. Incidentally in working on this conversion I have come to the conclusion that the class 110 windows aren't right as supplied. They need to be wider and the angles tops need a slight curve.
The 2 body shells after a coat of primer and more work with filler. The angled tumblehome Hornby used has been rounded off and any missing hinges replaces with etched ones from Southern Pride. I need to add another cental filler to the DMBS yet.
Why do one when you can do 2?
While in a DMU kinda mood I have started work on a class 129 DPU using a DC kits body kit.
A bit on this prototype as well
3 of these single car units were ordered from Cravens by the LMR. These had a none standard coupling code (yellow diamond) meaning that the could work with the original Derby Lightweights. Introduced in 1958 they lased until 1973 with one going to the RTC initially for brake testing but later for hydraulic transmission tests and gaining the name 'Hydra'. None of the 3 survived into preservation. Although 55997 was initially allocated to Walsall it was 55998 that was most often to be found working int he Birmingham area during the late 1950s mainly on New Street to Walsall, Wolverhampton or Coventry services. Later it would regularity continue on to Rugby and one slightly unusual service was Alrewas to New Street with produce from market gardens. As with the other DPU class, class 128 they would regularly pull a tail load.
The Model
Charlie supplied his class 129 kit with a standard class 105 cravens DMU cab moulding (no doubt tooling up another cab just for this class of 3 units wouldn't make a huge amount on commercial sense). So there is a little work to do to make it closer to the prototype, mainly removing the destination box and moving the marker lights down. I elected not to use the supplied flat bass etch for the route indicator box and made my own from microstrip.
The main bodyshell assembled with extra little details. On something so plain sided it pays to add these little things to break up the sea of grey plastic.
Re: Birmingham New Street and Brettell Road in P4
Attention has moved the the under frames of my DMU project. As I mentioned when building my class 114 the easy option for the 103 would be to stick with the 110 under frames and I would expect most people wouldn't notice. However as per my 114 project that wont really do.
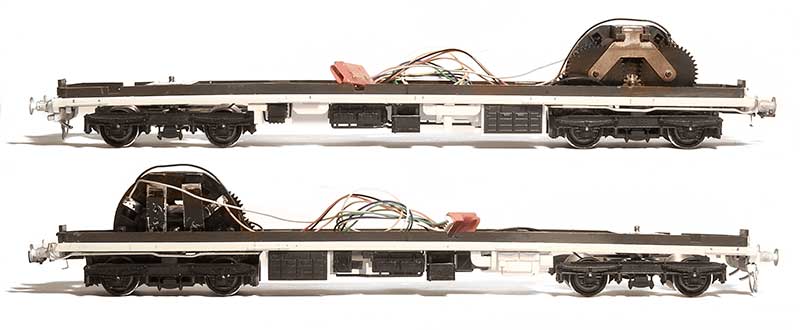
The DMBS. Its easier to start with a center car chassis than a power car as when you cut off the Hornby details it gives you a flat floor to work on rather than just a hole. The battery boxes are from Replica and most of the other (black) bits are spares from a Heljan class 128. The white bits are scratchbuilt and the buffers are from Lanarkshire model. The heating ducts on a class 103 are quite distinctive as is the way the exhausts are routed past the inner bogie.
The DTCL
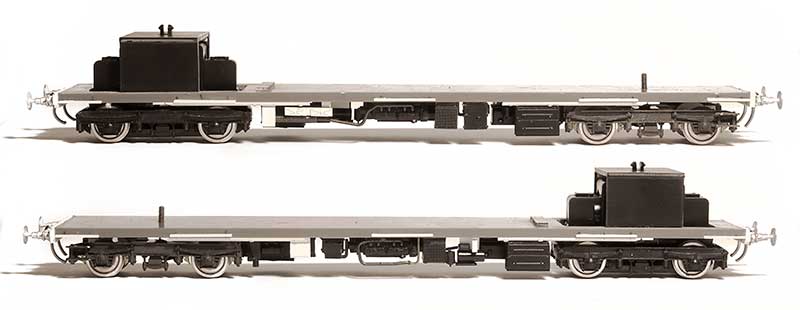
For the class 129 the obvious thing to do would be to mount the body on a Bachmann class 105 chassis. However the class 129 chassis is a bit different to a normal cravens unit and shares some parts with a class 108, especially the distinctive battery boxes. So most of these one came from a Bachmann 108 with again some scratchbuilt parts Buffers and their stools again come from Lanarckshire models.
With all these there is still a little more to do before paint, namely bogie steps, air horns and lamp irons.
The DMBS. Its easier to start with a center car chassis than a power car as when you cut off the Hornby details it gives you a flat floor to work on rather than just a hole. The battery boxes are from Replica and most of the other (black) bits are spares from a Heljan class 128. The white bits are scratchbuilt and the buffers are from Lanarkshire model. The heating ducts on a class 103 are quite distinctive as is the way the exhausts are routed past the inner bogie.
The DTCL
For the class 129 the obvious thing to do would be to mount the body on a Bachmann class 105 chassis. However the class 129 chassis is a bit different to a normal cravens unit and shares some parts with a class 108, especially the distinctive battery boxes. So most of these one came from a Bachmann 108 with again some scratchbuilt parts Buffers and their stools again come from Lanarckshire models.
With all these there is still a little more to do before paint, namely bogie steps, air horns and lamp irons.
Re: Birmingham New Street and Brettell Road in P4
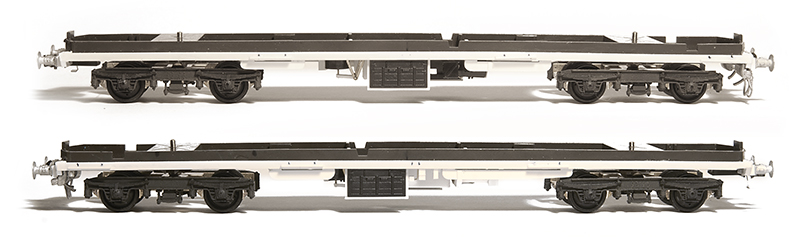
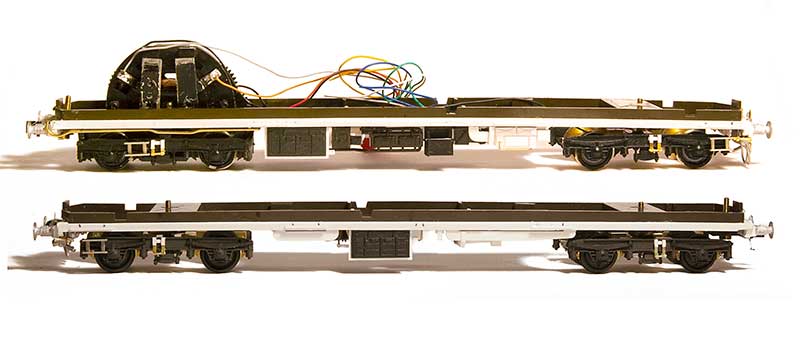
One of the things that struck me as a bit weird with the pics of the class 103 underframes I showed last time was that the bogies seemed to be too far inboard from the ends. The class 103 (and class 110 for that matter) have bogies centres of 40 feet but Hornby have them set closer to 38 feet. This is not something I've ever seen mentioned before with regards to the Hornby 110.
On the trailer and the none powered end of the DMBS, because i had used Brassmasters bogies it was simply a case of moving the bogies out. Originally the mounting plate sat neatly inside the moulding (although raised by some 100thou evergreen strip. Now they sit outside of the moulding by 20thou as can just be seen in the picture. At the powered ens U opened out the floor at the inner end and simply bent the forward clip of the bogie to push everything back (the sideframes aren't the best fit to the power bogie and were way to stiff before anyway!).
The bogies have been backdated with bits of wire and microstrip.
Happier now. With that, some paint, the seating modified and some LEDs, aside from some windscreen wipers I can call these done.
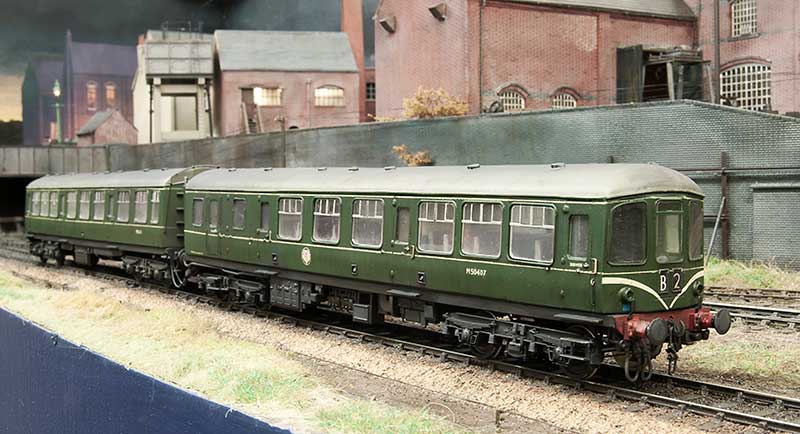
Class 103
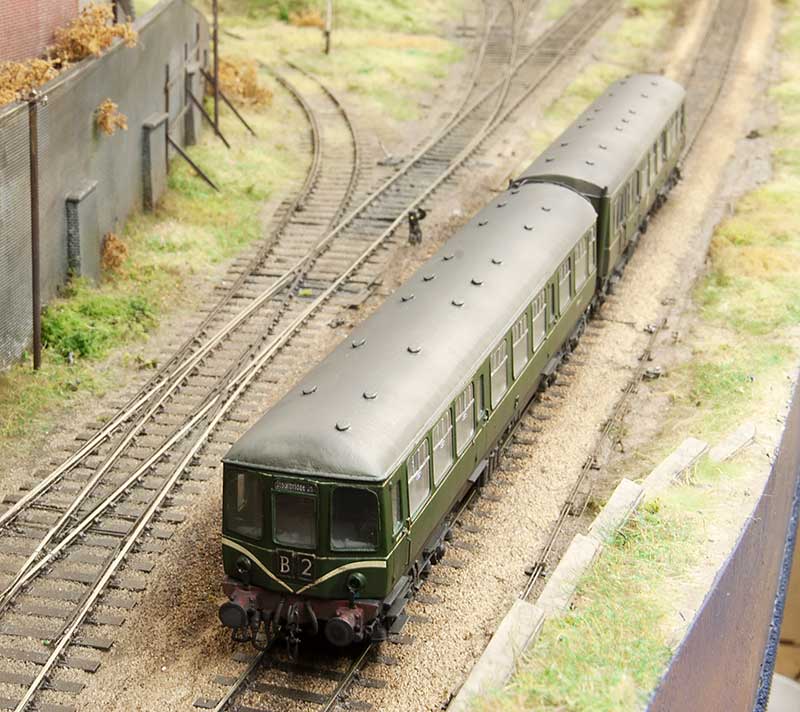
The roof vents were kindly printed for my by my friend John Chivers and I extend my thanks.
Class 129
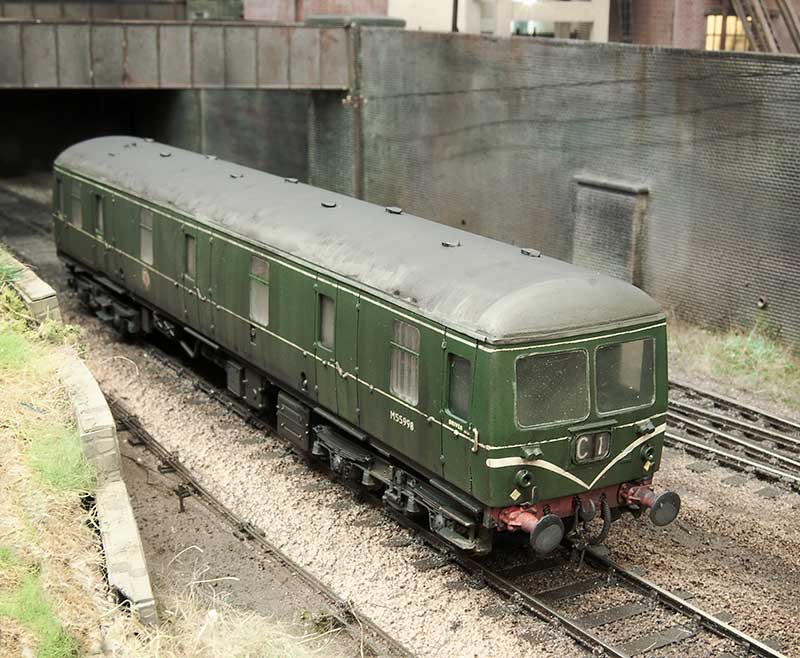
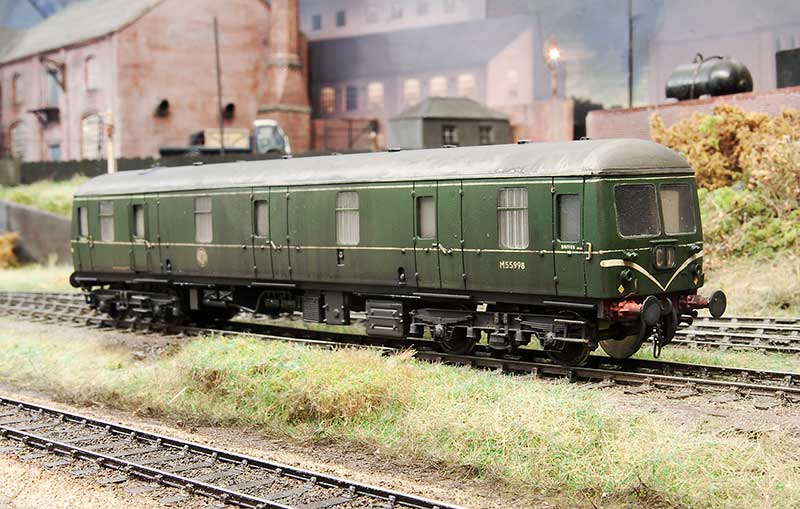
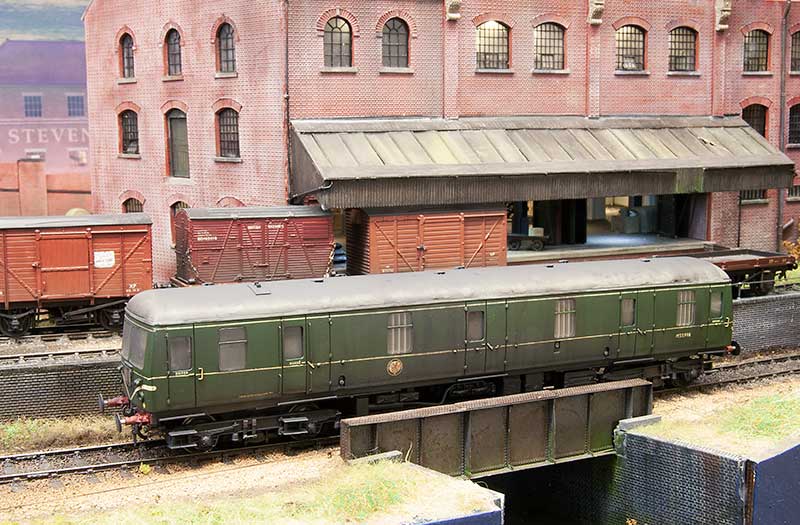
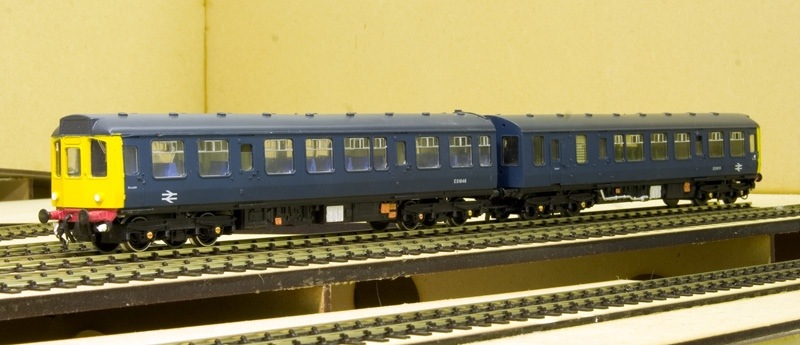
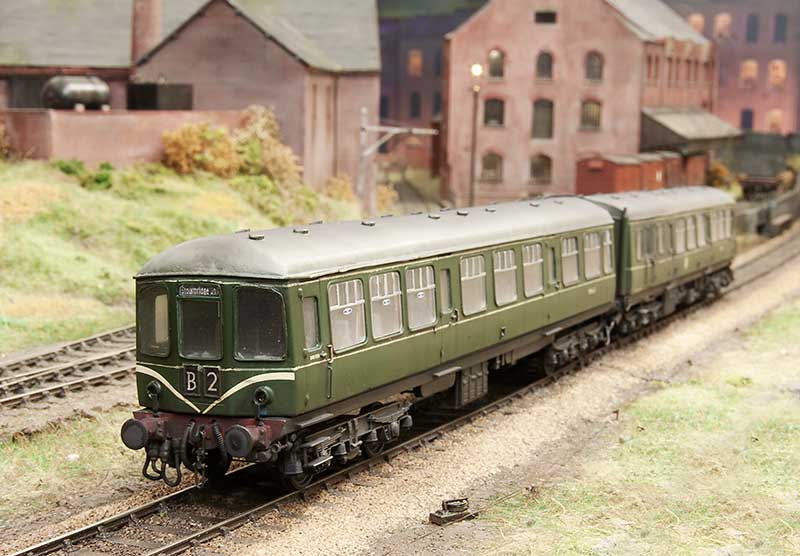
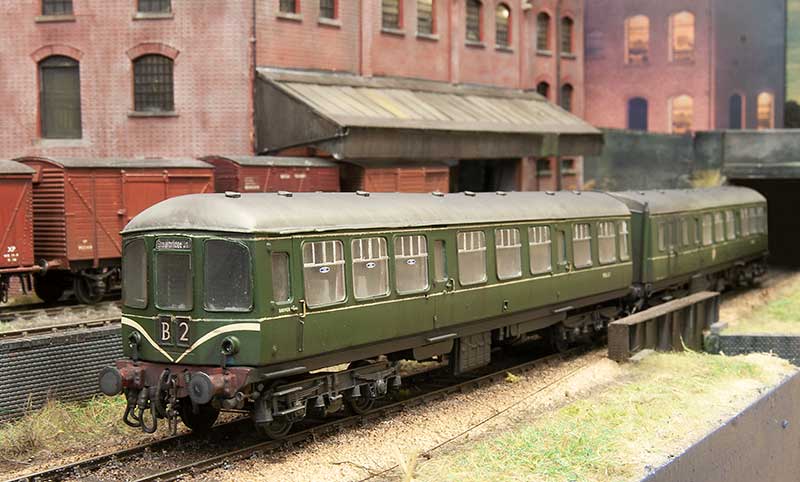
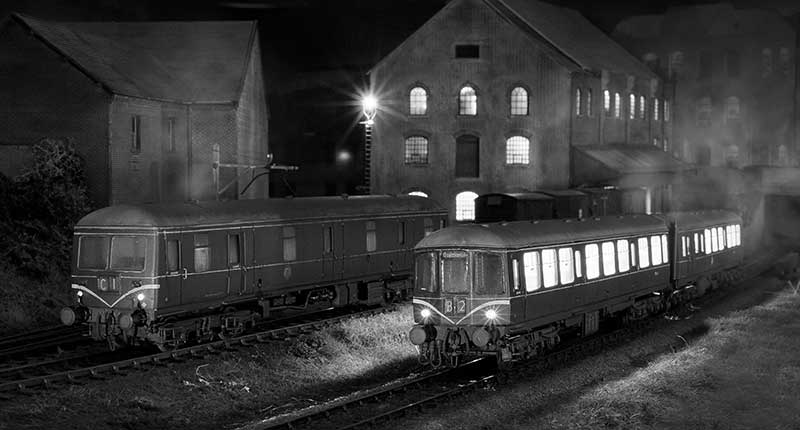
And finally both units together.
On the trailer and the none powered end of the DMBS, because i had used Brassmasters bogies it was simply a case of moving the bogies out. Originally the mounting plate sat neatly inside the moulding (although raised by some 100thou evergreen strip. Now they sit outside of the moulding by 20thou as can just be seen in the picture. At the powered ens U opened out the floor at the inner end and simply bent the forward clip of the bogie to push everything back (the sideframes aren't the best fit to the power bogie and were way to stiff before anyway!).
The bogies have been backdated with bits of wire and microstrip.
Happier now. With that, some paint, the seating modified and some LEDs, aside from some windscreen wipers I can call these done.
Class 103
The roof vents were kindly printed for my by my friend John Chivers and I extend my thanks.
Class 129
And finally both units together.