Barchester

Post pictures and information about your own personal model railway layout that is under construction. Keep members up-to-date with what you are doing and discuss problems that you are having.
Post Reply
ceedee
Posts: 257
Joined: Mon Jan 10, 2005 8:53 pm
Location: Benidorm, Alicante, Spain
Contact:

Barchester

Post by ceedee »

I started modelling again in January 2005, after an unwanted absence of some 15 years, and Barchester, as far as it has progressed in the last 14 months, is the result. I am not only building a model railway but also making a web site, see link below, where I hope I can be of some help to the new starters in this great hobby of ours. I suppose a lot of my ideas and methods are out of date now but they may be able to help someone and that's all I care about. Barchester doesn't follow any period or prototype it is just a model railway made for the sheer joy of modelling and I run the models I like regardless.
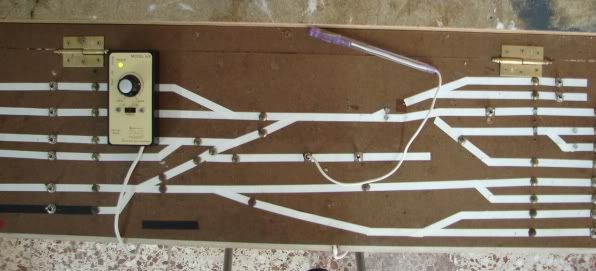
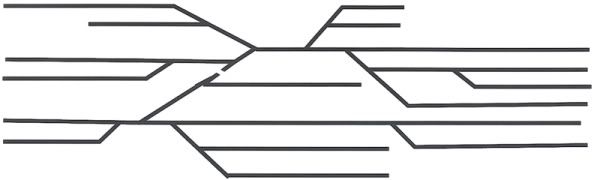
This trackplan is taken from the control panel with Barchester's platforms to the left and the 6 road fiddle yard to the right. Platforms are numbered from the top. 1 and 3 are main line arrivals, 2 is a bay for auto-trailer and 2 car DMU, 4 the main line departure platform, 5 is the branch line arrival and departures while 6 is a holding road. There is a 2 road loco shed at the top and 2 goods roads at the bottom, one of which is for coal drops.
The entrance to the fiddle yard is about 18 inches to the right of the engine shed.
Image

The layout is run to a strict sequence which consists of 130 different moves, 64 main line and 66 branch line. The layout is effectively divided into two halves electrically, and main and branch lines can be operated independently of each other but must still follow the sequence laid down. At the end of the day all trains finish up back in their starting positions. All these movements are gathered together in a timetable which operates between all the model railways I have admired over the years.
Mr P
Posts: 81
Joined: Sat Feb 04, 2006 10:09 pm
Location: High Wycombe

Post by Mr P »

excellent web site, well done on compiling all that info. It makes a change for people to be able to get the advice and help without being blinded with science. Keep up the good work !

Nice layout as well (just a thought, where have all the people gone? :cry: )
ceedee
Posts: 257
Joined: Mon Jan 10, 2005 8:53 pm
Location: Benidorm, Alicante, Spain
Contact:

Post by ceedee »

Thanks for the compliment Steve&Matthew. As for people I have been in a hurry with this layout for various reasons and what I have done so far is just the broad picture. All the small detail, people, cars, trucks, junk etc, which brings the layout to life, has yet to be added and I'm really looking forward to that.
ceedee
Posts: 257
Joined: Mon Jan 10, 2005 8:53 pm
Location: Benidorm, Alicante, Spain
Contact:

Post by ceedee »

Forgot to mention the size of Barchester, it's 20 feet long by 32 inches wide. Too wide for comfortable working as it turned out but I got carried away by the space I had. Here's a picture of the baseboard framework made up of 4 foot lengths.
Another thing I forgot to mention, Barchester is 4mm scale 00 gauge.

Image
Kentman98
Posts: 265
Joined: Fri Jan 06, 2006 9:01 pm
Location: Maidstone

Post by Kentman98 »

It looks superb. Congrats on a fine website and layout. :)

Any plans for expansion, i.e using the other walls? Also is this the one and only model railway in Alicante? :lol: Guess everyone else is too busy golfing and sunbathing.

Trev
Trev

Never take life seriously. Nobody gets out alive anyway.......

My layout thread
ceedee
Posts: 257
Joined: Mon Jan 10, 2005 8:53 pm
Location: Benidorm, Alicante, Spain
Contact:

Post by ceedee »

This shows the chipboard top surface and my corn flake packet trackwork. Just to see if things will fit, crude but all the lengths are cut to exact width and points and crossovers take up the same amount of room as when the real track is used. Works for me.

Image
ceedee
Posts: 257
Joined: Mon Jan 10, 2005 8:53 pm
Location: Benidorm, Alicante, Spain
Contact:

Post by ceedee »

Hi Trev. Yes plans are afoot for expansion but I only have the room courtesy of the management of the complex where we live so I have to move slowly. I think it's the only British outline model in Alicante that's for sure but I could be wrong.
It's a good job golfing isn't my thing otherwise it would be bye, bye model railway. They are just fanatics out here, the golfing fraternity I mean, not us model railway people of course. :lol: :lol:
ledgero2
Posts: 104
Joined: Fri Dec 23, 2005 1:48 pm
Location: used to be Rotherham,but its now Birmingham Uni
Contact:

Post by ledgero2 »

looking good. neat little layout there. what system are you powering it with
ceedee
Posts: 257
Joined: Mon Jan 10, 2005 8:53 pm
Location: Benidorm, Alicante, Spain
Contact:

Post by ceedee »

Straight forward DC using peco point motors with CDU and a Gaugemaster hand held controller. I like to keep things simple if I can.
ledgero2
Posts: 104
Joined: Fri Dec 23, 2005 1:48 pm
Location: used to be Rotherham,but its now Birmingham Uni
Contact:

Post by ledgero2 »

dc? where will you wire it up. its going to be complicated isnt it?
ceedee
Posts: 257
Joined: Mon Jan 10, 2005 8:53 pm
Location: Benidorm, Alicante, Spain
Contact:

Post by ceedee »

If it was complicated then I wouldn't be able to do it, being a duffer at electrics. DC wiring is just a matter of multiplying up. You have two wires for feed, multiplied by the number of feeds. 1 wire to each section that you want to switch on and off, via an ON/OFF switch, multiplied by the number of sections, and then the usual point wiring which is unavoidable.
Barchester's points are operated by the stud and pencil method which is simplicity itself. In fact I made the electric pencil out of an old biro and the studs are furniture tacks. When I look at Barchester's wiring it does look complicated I have to admit but that's only because there are a lot of wires. Some will say I have over simplified but I don't think so as I take care to keep away from complicated trackwork as you can see from the track layout.
ceedee
Posts: 257
Joined: Mon Jan 10, 2005 8:53 pm
Location: Benidorm, Alicante, Spain
Contact:

Post by ceedee »

Further to my last post here is a picture of the control panel showing just how many isolating breaks and feeds that there are plus the number of points. There are 2 feeds, 18 isolating sections, 15 points and 30 studs. You can also see the home made biro electric pencil.

Image
Dave777
Posts: 193
Joined: Wed Nov 02, 2005 12:58 pm
Location: UK

Post by Dave777 »

Looks good. Don't often see coal drops on layouts, I was pondering on having them on mine but don't think I can squeeze them in.

Nice use of Metcalfe buildings too.
Specialist in short and to-the-point replies
ceedee
Posts: 257
Joined: Mon Jan 10, 2005 8:53 pm
Location: Benidorm, Alicante, Spain
Contact:

Post by ceedee »

I've always found that when you are in a hurry, as I am, then the Metcalfe range of building kits are ideal as space fillers till you can get round to doing what you really want. They are also excellent models in their own right of course and a very good introduction to the modelling game for the beginner.
User avatar
Phat Controller
Posts: 246
Joined: Wed Feb 15, 2006 2:57 pm
Location: Sydney (Australia)

Post by Phat Controller »

I agree ceedee Metclalfe & Superquick are great products I don't see why some people tend to 'dislike' them.

They can be 'scenic'd' (did I invent a new word?) or 'weathered' with a bit of imagination.

but that is the key - using your imagination.
research = asking a bloke who knows a bloke who said something vaguely similar to what I wanted to hear! - Tony (aka the Phat Controller)
Post Reply