Tarting up the Hornby Caley Pug

Discuss Hornby Model Railway products and related topics here. This includes (Lima, Rivarossi, Jouef, Electrotren and Oxford Rail).
Post Reply
User avatar
stuartp
Posts: 1244
Joined: Sat Feb 28, 2009 7:40 pm

Tarting up the Hornby Caley Pug

Post by stuartp »

The Hornby Caledonian Pug seems to be quite popular on here recently so prompted (sort of) by 6C, here's how I modified mine to hopefully make something that looks a bit more like it emerged from Springburn rather than Margate.

The Caley Pug has been around a while now, I had two in the 1980s both in CR blue. It's also appeared in various industrial guises, in fictitious Furness Railway livery, and a very fictitious HR livery featuring the little know Stroudley's Further Improved Engine Green, which comes out as blue apparently. It's currently in the Railroad range for less that thirty quid in CR blue or BR black as 'Smokey Joe'.

The model is based on the CR 264 Class of shunters, built by Neilson & Co and St Rollox from 1885 to 1908. The LNER Y9 class was very similar. The last one was withdrawn in 1962, and my model is of 56031 of Motherwell shed, in similar condition to this: http://www.flickr.com/photos/64215236@N ... 7241871910

That photo dates from 1958, I've modelled mine in slightly later condition with a stovepipe chimney and electrification flashes. Further details of the real thing here:
http://en.wikipedia.org/wiki/Caledonian ... _264_Class.

There was a fair amount of variation between batches and as a result of modifications over the years. The two major ones are wheels (Drummond 8 spoke or McIntosh 12 spoke) and springs (visible above the footplate or hidden behind the wheels). Rear sandboxes also appear to have been a moving feast - none, right side only or both sides all featured over the years and the relevant thread on the CR Association forum is getting quite long. Most appear to have had them on both sides by BR days but for wheels and springs you really need to find a good photo.

The Hornby model is stretched slightly to fit the GWR Holden tank chassis, but the extra length is all in the saddle tank and therefore relatively straightforward to fix. It would have been far harder (pointless in fact) to correct if they'd stretched all the components out of proportion. The other major fudge on the body is that the firebox is way to big, necessary to clear the motor, and this is harder to fix. The chassis is crude - no slide bars or pistons and the con rods see-saw about in a couple of slots, and it has an outrageous turn of speed. The die-cast running plate adds plenty of weight and has a representation of the springs cast into it but also has a big wire spring sticking out each side holding the motor.

Fortunately salvation is at hand in the form of Branchlines who, in 2008, released a chassis kit in etched nickel silver. It really is rather nice and gives you the option of a dead scale chassis or one to fit the 'as-is' Hornby body and running plate. Branchlines were still trading the last time I checked but you need to email or ring them for a catalogue.

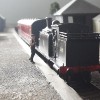
I opted to go for scale length, and as well as chopping 8mm out of the saddle tank I replaced the cast footplate with a scale length styrene one.

This shot shows the major modifications to the body:
IMG_0230.jpg
IMG_0230.jpg (172.17 KiB) Viewed 5497 times
The saddle tank has had a 4mm slice taken out either side of the dome, and then glued back together. I got one joint slightly out of alignment hence the filler. The new tank filler is simply because I lost the one I carefully cut off and put in a safe place. Footplate is 40 thou styrene overlaid with 10 thou to get the 'lip', buffer beams and dumb buffers are 60 thou built up, front sandboxes are simply laminations of 40thou rectangles filed smooth, cab beading restored with microstrip, chimney cap filed back and replaced with a microstrip lip for the stovepipe, and the firebox carved and filed out and replaced with a curved piece of 20 thou. it's still too big but less noticeably so I hope.
IMG_0231.jpg
IMG_0231.jpg (165.25 KiB) Viewed 5497 times
The cab rear sheet is 10 thou brass with beading and lamp irons soldered on. The fire iron brackets are also on there, and the top beading needs to be positioned to pick up the vertical handrails running from footplate to cab roof rear edge. I left the cab end of the firebox alone even though it is way overscale, if I was doing this again I would probably replace it.
IMG_0277.jpg
IMG_0277.jpg (148.75 KiB) Viewed 5497 times
Further cab details include a reversing lever and some damper handles, as well as the inside coal boxes. Photos of the cab were almost impossible to find so a lot of this is conjecture. It still needs a regulator handle.
Portwilliam - Southwest Scotland in the 1960s, in OO - http://stuart1968.wordpress.com/
User avatar
stuartp
Posts: 1244
Joined: Sat Feb 28, 2009 7:40 pm

Re: Tarting up the Hornby Caley Pug

Post by stuartp »

Hmm. "Board Attachment Limit Reached" - lets see if I can remember how to do Photobucket:

Image
Portwilliam - Southwest Scotland in the 1960s, in OO - http://stuart1968.wordpress.com/
User avatar
stuartp
Posts: 1244
Joined: Sat Feb 28, 2009 7:40 pm

Re: Tarting up the Hornby Caley Pug

Post by stuartp »

Seems I can, but I can't edit the post. Sorry about the clumsiness.

That last pic shows the handbrake standard added (thin brass tube, a handrail knob and a bit of wire) and the new rear steps from the Branchlines etch.

Image
This is the chassis, built more or less according to the instructions and fitted with a High Level Loadhauler Compact 108:1 gearbox. I'm not going to describe how I did it, chassis are not my strong point and this went a bit awry later, but there are plenty of people on here and other forums who are much better at it than me.

Image
The boiler bottom was soldered up from more 10 thou brass and is fixed in place by the front body fixing screw which goes up through the front smokebox. Motor is a Mashima 1224.

Image
Last few detail fittings before it all got covered in paint. Leaf springs were filed from blanks of 80 thou styrene, the rest is mostly bits and bobs of wire and some ancient Maygib turned buffers.

Image
And this was as far as it got before the driving axle gave up the ghost and locked everything up solid, followed by one of the wheels slipping and going out of quarter. I don't really get on with glued chassis bits, a rebuild is underway with Romford wheels (wrong number of spokes but no quartering issues) and a nice grub-screw-fitted Loadhauler gearbox (which is what I should have fitted in the first place).

The Branchlines kit includes etched cylinder fronts not fitted here, but they're a bit shallow. The real engines had a big chunky crucifix casting here which I will probably try to replicate in more styrene.
Portwilliam - Southwest Scotland in the 1960s, in OO - http://stuart1968.wordpress.com/
fazy
Posts: 6
Joined: Sun Oct 20, 2013 9:50 pm

Re: Tarting up the Hornby Caley Pug

Post by fazy »

That looks much better than the standard hornby model
HybridSynergy
Posts: 5
Joined: Wed Jul 16, 2014 11:32 am

Re: Tarting up the Hornby Caley Pug

Post by HybridSynergy »

Agreed.

Am wanting to try this in P4, but modified to LNE "Y9" form.
User avatar
luckymucklebackit
Posts: 3712
Joined: Mon Jul 18, 2011 7:05 am
Location: Eaglesham (Again)
Contact:

Re: Tarting up the Hornby Caley Pug

Post by luckymucklebackit »

I would love to do a Y9 as well, I have a Smokey Joe lying in a storage box somewhere minus a chimney, maybe someday......

Jim
This Signature Left Intentionally Blank, but since I have written this and I intended to do it, this Signature is intentionally not blank. Paradox or What?
My layout - Gateside and Northbridge
Image
HybridSynergy
Posts: 5
Joined: Wed Jul 16, 2014 11:32 am

Re: Tarting up the Hornby Caley Pug

Post by HybridSynergy »

Was quite amazed that you have to lose 8mm from the saddle tank - that's two scale feet!! :shock:
Post Reply